
阿里云ECS配置支持IPv6,解决苹果app审核失败问题
前几天iOS的App提交给苹果审核没通过,给出的原因是:该应用在 IPv6 的环境下无法使用。
检查发现:阿里云优化过的系统没有启用IPv6协议,需要配置启用一下,
但是只单独启用IPv6也是无法直接提供访问的,可以使用 Hurricane Electric提供的IPv6 Tunnel Broker 来让 ECS 支持 IPv6 。
1.检查确认阿里云ECS服务器状态
1.1.检查确认服务器状态
以下命令返回值为0表示IPv6启用,1表示禁用,
cat /proc/sys/net/ipv6/conf/all/disable_ipv6
cat /proc/sys/net/ipv6/conf/default/disable_ipv6

文件不存在表示被禁用了
1.2.查看IP进一步确认
ifconfig
ip address list
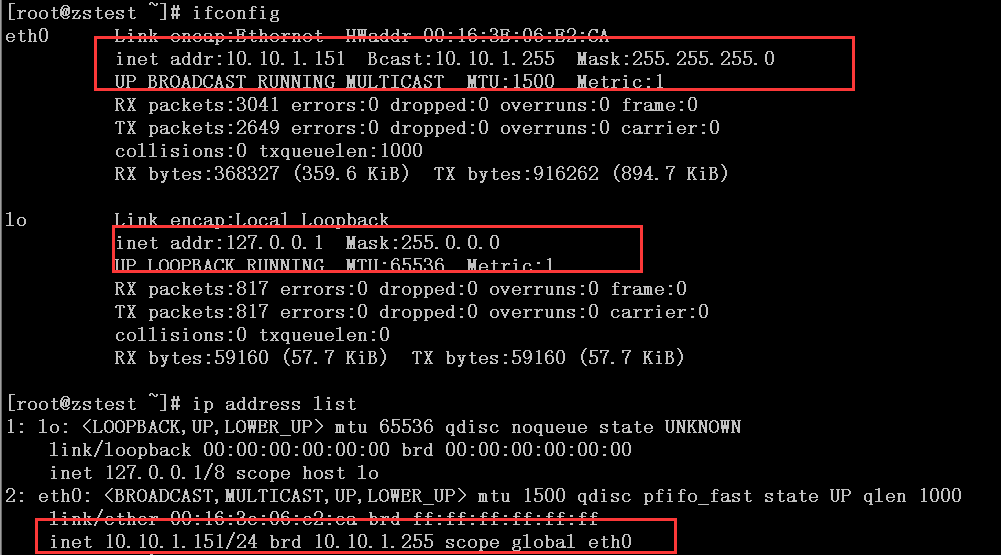
只有IPv4的IP地址,可以确认IPv6功能并没有启用
1.3.配置服务器启用IPv6功能
# 修改网络配置信息
vim /etc/sysconfig/network
-------------------------
# made for IPv6
NETWORKING_IPV6=yes
-------------------------
# 增加dns解析地址
vim /etc/resolv.conf
-------------------------
......
# IPv6 DNS by google
nameserver 2001:4860:4860::8888
nameserver 2001:4860:4860::8844
-------------------------
# 修改内核参数,启用IPv6配置
vim /etc/sysctl.conf
-------------------------
# for enable ipv6
net.ipv6.conf.all.disable_ipv6 = 0
net.ipv6.conf.default.disable_ipv6 = 0
net.ipv6.conf.lo.disable_ipv6 = 0
-------------------------
sysctl -p
发现报错了:错误如下:
error: "net.ipv6.conf.all.disable_ipv6" is an unknown key
error: "net.ipv6.conf.default.disable_ipv6" is an unknown key
error: "net.ipv6.conf.lo.disable_ipv6" is an unknown key
报错原因:IPv6模块没有启用
使用以下命令查看IPv6模块的启用状态
lsmod | grep ipv6
-----------------------
[root@zstest ~]# lsmod | grep ipv6
ipv6                  336944  2 ib_ipoib,ib_addr
-----------------------
类似上面的返回信息,ipv6有用到但不是我们需要的,执行以下命令手动调用IPv6模块
modprobe ipv6
----------------------
[root@zstest ~]# modprobe ipv6
FATAL: Module off not found.
----------------------
依然报错:原因是IPv6模块的配置文件为禁用状态,需要编辑下
找到该文件,修改为如下内容
vim /etc/modprobe.d/disable_ipv6.conf
----------------------
#alias net-pf-10 off
#alias ipv6 off
options ipv6 disable=0
----------------------
再次执行modprobe ipv6,无返回执行成功
再次执行lsmod | grep ipv6
[root@zstest ~]# lsmod | grep ipv6
ipv6                  335781  8
再次执行以下命令,可以正常运行,如果不成功可以重启系统
sysctl -p
执行以下命令,可以看到IPv6地址已经存才
ifconfig
ip address list
-------------------------
[root@zstest ~]# ifconfig
eth0      Link encap:Ethernet  HWaddr 00:16:3E:06:E2:CA
          inet addr:10.10.1.151  Bcast:10.10.1.255  Mask:255.255.255.0
          inet6 addr: fe80::216:3eff:fe06:e2ca/64 Scope:Link
          UP BROADCAST RUNNING MULTICAST  MTU:1500  Metric:1
          RX packets:3727 errors:0 dropped:0 overruns:0 frame:0
          TX packets:3228 errors:0 dropped:0 overruns:0 carrier:0
          collisions:0 txqueuelen:1000
          RX bytes:424568 (414.6 KiB)  TX bytes:1681556 (1.6 MiB)

lo        Link encap:Local Loopback
          inet addr:127.0.0.1  Mask:255.0.0.0
          inet6 addr: ::1/128 Scope:Host
          UP LOOPBACK RUNNING  MTU:65536  Metric:1
          RX packets:934 errors:0 dropped:0 overruns:0 frame:0
          TX packets:934 errors:0 dropped:0 overruns:0 carrier:0
          collisions:0 txqueuelen:0
          RX bytes:66414 (64.8 KiB)  TX bytes:66414 (64.8 KiB)

[root@zstest ~]# ip address list
1: lo: <LOOPBACK,UP,LOWER_UP> mtu 65536 qdisc noqueue state UNKNOWN
    link/loopback 00:00:00:00:00:00 brd 00:00:00:00:00:00
    inet 127.0.0.1/8 scope host lo
    inet6 ::1/128 scope host
       valid_lft forever preferred_lft forever
2: eth0: <BROADCAST,MULTICAST,UP,LOWER_UP> mtu 1500 qdisc pfifo_fast state UP qlen 1000
    link/ether 00:16:3e:06:e2:ca brd ff:ff:ff:ff:ff:ff
    inet 10.10.1.151/24 brd 10.10.1.255 scope global eth0
    inet6 fe80::216:3eff:fe06:e2ca/64 scope link
       valid_lft forever preferred_lft forever
------------------------
至此阿里云服务器的IPv6功能启用完成,接下来需要配置IPv6的隧道提供对外的IPv6访问
2.创建IPv6隧道
2.1.首先在官方网站注册一个账户:
2.2.配置IPv6隧道
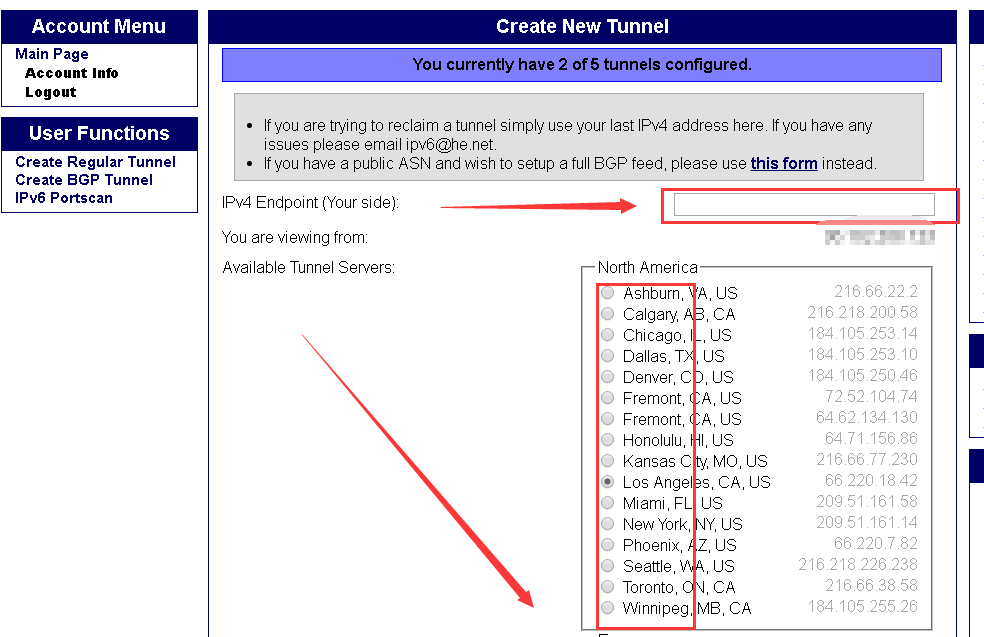
登陆账号后,创建隧道Create Regular Tunnel

在接下来的页面需要选择以下两个选项
IPv4 Endpoint (Your side)--->填ECS的公网 IP 地址,
Available Tunnel Servers--->选择隧道服务器位置,一般来说 亚洲的HK离大陆近延迟低,
选择完毕“Create Tunnel”创建隧道
2.3.查看隧道信息
单击左上角“Main Page”打开首页,找到刚创建的隧道

单击进入,查看详情

补充填入描述信息---> Description:
跟着是一些隧道的IP地址信息,需要记录下来
2.4.生成创建隧道网卡的命令
在隧道详情页,单击“Example Configurations”标签,选择对应的系统类型
我的系统是64位的CentOS-6.9,可以选择两种模式进行配置
(1)模式1:linux-net-tools模式
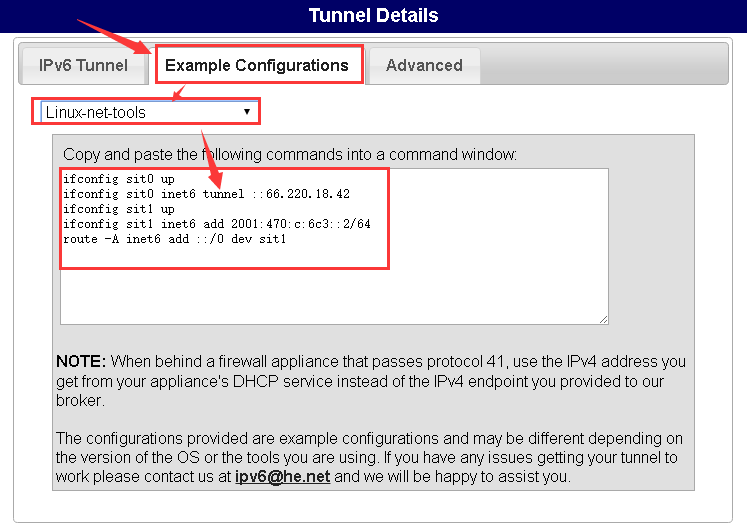
在阿里云服务器上执行生成的命令:
# linux-net-tools模式
-----------------------
ifconfig sit0 up
ifconfig sit0 inet6 tunnel ::66.220.18.42
ifconfig sit1 up
ifconfig sit1 inet6 add 2001:470:c:6c3::2/64
route -A inet6 add ::/0 dev sit1
-----------------------
查看ip信息,发现多了两个网卡sit0和sit1
ifconfig
ip address list
-----------------------
[root@zstest ~]# ifconfig
eth0      Link encap:Ethernet  HWaddr 00:16:3E:06:E2:CA
          inet addr:10.10.1.151  Bcast:10.10.1.255  Mask:255.255.255.0
          inet6 addr: fe80::216:3eff:fe06:e2ca/64 Scope:Link
          UP BROADCAST RUNNING MULTICAST  MTU:1500  Metric:1
          RX packets:14663 errors:0 dropped:0 overruns:0 frame:0
          TX packets:11931 errors:0 dropped:0 overruns:0 carrier:0
          collisions:0 txqueuelen:1000
          RX bytes:1464275 (1.3 MiB)  TX bytes:9011308 (8.5 MiB)

lo        Link encap:Local Loopback
          inet addr:127.0.0.1  Mask:255.0.0.0
          inet6 addr: ::1/128 Scope:Host
          UP LOOPBACK RUNNING  MTU:65536  Metric:1
          RX packets:6176 errors:0 dropped:0 overruns:0 frame:0
          TX packets:6176 errors:0 dropped:0 overruns:0 carrier:0
          collisions:0 txqueuelen:0
          RX bytes:397496 (388.1 KiB)  TX bytes:397496 (388.1 KiB)

sit0      Link encap:IPv6-in-IPv4
          inet6 addr: ::127.0.0.1/96 Scope:Unknown
          inet6 addr: ::10.10.1.151/96 Scope:Compat          # 这个是阿里云服务器内网的IP
          UP RUNNING NOARP  MTU:1480  Metric:1
          RX packets:0 errors:0 dropped:0 overruns:0 frame:0
          TX packets:0 errors:0 dropped:0 overruns:0 carrier:0
          collisions:0 txqueuelen:0
          RX bytes:0 (0.0 b)  TX bytes:0 (0.0 b)

sit1      Link encap:IPv6-in-IPv4
          inet6 addr: 2001:470:c:6c3::2/64 Scope:Global
          inet6 addr: fe80::a0a:197/64 Scope:Link
          UP POINTOPOINT RUNNING NOARP  MTU:1480  Metric:1
          RX packets:0 errors:0 dropped:0 overruns:0 frame:0
          TX packets:0 errors:0 dropped:0 overruns:0 carrier:0
          collisions:0 txqueuelen:0
          RX bytes:0 (0.0 b)  TX bytes:0 (0.0 b)

[root@zstest ~]# ip address list
1: lo: <LOOPBACK,UP,LOWER_UP> mtu 65536 qdisc noqueue state UNKNOWN
    link/loopback 00:00:00:00:00:00 brd 00:00:00:00:00:00
    inet 127.0.0.1/8 scope host lo
    inet6 ::1/128 scope host
       valid_lft forever preferred_lft forever
2: eth0: <BROADCAST,MULTICAST,UP,LOWER_UP> mtu 1500 qdisc pfifo_fast state UP qlen 1000
    link/ether 00:16:3e:06:e2:ca brd ff:ff:ff:ff:ff:ff
    inet 10.10.1.151/24 brd 10.10.1.255 scope global eth0
    inet6 fe80::216:3eff:fe06:e2ca/64 scope link
       valid_lft forever preferred_lft forever
3: sit0: <NOARP,UP,LOWER_UP> mtu 1480 qdisc noqueue state UNKNOWN
    link/sit 0.0.0.0 brd 0.0.0.0
    inet6 ::10.10.1.151/96 scope global
       valid_lft forever preferred_lft forever
    inet6 ::127.0.0.1/96 scope host
       valid_lft forever preferred_lft forever
7: sit1: <POINTOPOINT,NOARP,UP,LOWER_UP> mtu 1480 qdisc noqueue state UNKNOWN
    link/sit 0.0.0.0 peer 66.220.18.42
    inet6 2001:470:c:6c3::2/64 scope global
       valid_lft forever preferred_lft forever
    inet6 fe80::a0a:197/64 scope link
       valid_lft forever preferred_lft forever
-------------------------
使用以下命令可以查看IPv6的路由信息
route -A inet6
-------------------------
[root@zstest ~]# route -A inet6
Kernel IPv6 routing table
Destination                                 Next Hop                                Flags Metric Ref    Use Iface
*/96                                        *                                       U     256    0        0 sit0
2001:470:c:6c3::/64                         *                                       U     256    0        0 sit1
fe80::/64                                   *                                       U     256    0        0 eth0
fe80::/64                                   *                                       U     256    0        0 sit1
*/0                                         *                                       U     1      0        0 sit1
localhost/128                               *                                       U     0      0        1 lo
::10.10.1.151/128                           *                                       U     0      0        1 lo
localhost/128                               *                                       U     0      0        1 lo
ipv6.zuiyoujie.com/128                      *                                       U     0      0        1 lo
fe80::a0a:197/128                           *                                       U     0      0        1 lo
fe80::216:3eff:fe06:e2ca/128                *                                       U     0      0        1 lo
ff00::/8                                    *                                       U     256    0        0 eth0
ff00::/8                                    *                                       U     256    0        0 sit1
-------------------------
接下来使用ping6命令测试隧道的联通性
[root@zstest ~]# ping6 ipv6.google.com
PING ipv6.google.com(hkg12s02-in-x0e.1e100.net) 56 data bytes
64 bytes from hkg12s02-in-x0e.1e100.net: icmp_seq=3 ttl=56 time=326 ms
64 bytes from hkg12s02-in-x0e.1e100.net: icmp_seq=4 ttl=56 time=326 ms
64 bytes from hkg12s02-in-x0e.1e100.net: icmp_seq=5 ttl=56 time=330 ms
64 bytes from hkg12s02-in-x0e.1e100.net: icmp_seq=6 ttl=56 time=326 ms
^C
--- ipv6.google.com ping statistics ---
6 packets transmitted, 4 received, 33% packet loss, time 5974ms
rtt min/avg/max/mdev = 326.864/327.732/330.198/1.480 ms
通过tcpdump抓包如下:
[root@zstest ~]# tcpdump -nn  -i sit1
tcpdump: WARNING: sit1: no IPv4 address assigned
tcpdump: verbose output suppressed, use -v or -vv for full protocol decode
listening on sit1, link-type RAW (Raw IP), capture size 65535 bytes
20:10:59.532401 IP6 2001:470:c:6c3::2 > 2404:6800:4005:802::200e: ICMP6, echo request, seq 1, length 64
20:11:00.531604 IP6 2001:470:c:6c3::2 > 2404:6800:4005:802::200e: ICMP6, echo request, seq 2, length 64
20:11:01.531606 IP6 2001:470:c:6c3::2 > 2404:6800:4005:802::200e: ICMP6, echo request, seq 3, length 64
20:11:01.858483 IP6 2404:6800:4005:802::200e > 2001:470:c:6c3::2: ICMP6, echo reply, seq 3, length 64
20:11:02.532339 IP6 2001:470:c:6c3::2 > 2404:6800:4005:802::200e: ICMP6, echo request, seq 4, length 64
20:11:02.859174 IP6 2404:6800:4005:802::200e > 2001:470:c:6c3::2: ICMP6, echo reply, seq 4, length 64
20:11:03.534006 IP6 2001:470:c:6c3::2 > 2404:6800:4005:802::200e: ICMP6, echo request, seq 5, length 64
20:11:03.864169 IP6 2404:6800:4005:802::200e > 2001:470:c:6c3::2: ICMP6, echo reply, seq 5, length 64
20:11:04.534990 IP6 2001:470:c:6c3::2 > 2404:6800:4005:802::200e: ICMP6, echo request, seq 6, length 64
20:11:04.861923 IP6 2404:6800:4005:802::200e > 2001:470:c:6c3::2: ICMP6, echo reply, seq 6, length 64
^C
10 packets captured
10 packets received by filter
0 packets dropped by kernel
[root@zstest ~]#
至此,linux-net-tools模式就配置成功了
(2)模式2:linux-router2模式
在阿里云服务器执行以下命令:
modprobe ipv6
ip tunnel add he-ipv6 mode sit remote 66.220.18.42 local 10.10.1.151 ttl 255
ip link set he-ipv6 up
ip addr add 2001:470:c:6c3::2/64 dev he-ipv6
ip route add ::/0 dev he-ipv6
ip -f inet6 addr
# 注意:local后面网站默认生成的是阿里云公网的地址,是无法使用的,需要修改成对应的内网地址,这里是10.10.1.151
# 查看ip信息,发现多了1个网卡:he-ipv6
# he-ipv6是隧道的客户端IP,也就是上面的“Client IPv6 Address:”
ifconfig
ip address list
-------------------------
[root@zstest ~]# ifconfig
eth0      Link encap:Ethernet  HWaddr 00:16:3E:06:E2:CA
          inet addr:10.10.1.151  Bcast:10.10.1.255  Mask:255.255.255.0
          inet6 addr: fe80::216:3eff:fe06:e2ca/64 Scope:Link
          UP BROADCAST RUNNING MULTICAST  MTU:1500  Metric:1
          RX packets:16047 errors:0 dropped:0 overruns:0 frame:0
          TX packets:13006 errors:0 dropped:0 overruns:0 carrier:0
          collisions:0 txqueuelen:1000
          RX bytes:1592602 (1.5 MiB)  TX bytes:9693068 (9.2 MiB)

he-ipv6   Link encap:IPv6-in-IPv4
          inet6 addr: 2001:470:c:6c3::2/64 Scope:Global
          inet6 addr: fe80::a0a:197/128 Scope:Link
          UP POINTOPOINT RUNNING NOARP  MTU:1480  Metric:1
          RX packets:0 errors:0 dropped:0 overruns:0 frame:0
          TX packets:0 errors:0 dropped:0 overruns:0 carrier:0
          collisions:0 txqueuelen:0
          RX bytes:0 (0.0 b)  TX bytes:0 (0.0 b)

lo        Link encap:Local Loopback
          inet addr:127.0.0.1  Mask:255.0.0.0
          inet6 addr: ::1/128 Scope:Host
          UP LOOPBACK RUNNING  MTU:65536  Metric:1
          RX packets:6893 errors:0 dropped:0 overruns:0 frame:0
          TX packets:6893 errors:0 dropped:0 overruns:0 carrier:0
          collisions:0 txqueuelen:0
          RX bytes:441950 (431.5 KiB)  TX bytes:441950 (431.5 KiB)

[root@zstest ~]# ip address list
1: lo: <LOOPBACK,UP,LOWER_UP> mtu 65536 qdisc noqueue state UNKNOWN
    link/loopback 00:00:00:00:00:00 brd 00:00:00:00:00:00
    inet 127.0.0.1/8 scope host lo
    inet6 ::1/128 scope host
       valid_lft forever preferred_lft forever
2: eth0: <BROADCAST,MULTICAST,UP,LOWER_UP> mtu 1500 qdisc pfifo_fast state UP qlen 1000
    link/ether 00:16:3e:06:e2:ca brd ff:ff:ff:ff:ff:ff
    inet 10.10.1.151/24 brd 10.10.1.255 scope global eth0
    inet6 fe80::216:3eff:fe06:e2ca/64 scope link
       valid_lft forever preferred_lft forever
3: sit0: <NOARP> mtu 1480 qdisc noqueue state DOWN
    link/sit 0.0.0.0 brd 0.0.0.0
8: he-ipv6: <POINTOPOINT,NOARP,UP,LOWER_UP> mtu 1480 qdisc noqueue state UNKNOWN
    link/sit 10.10.1.151 peer 66.220.18.42
    inet6 2001:470:c:6c3::2/64 scope global
       valid_lft forever preferred_lft forever
    inet6 fe80::a0a:197/128 scope link
       valid_lft forever preferred_lft forever
------------------------
# 使用以下命令可以查看IPv6的路由信息
route -A inet6
------------------------
[root@zstest ~]# route -A inet6
Kernel IPv6 routing table
Destination                                 Next Hop                                Flags Metric Ref    Use Iface
2001:470:c:6c3::/64                         *                                       U     256    0        0 he-ipv6
fe80::/64                                   *                                       U     256    0        0 eth0
fe80::/64                                   *                                       U     256    0        0 he-ipv6
*/0                                         *                                       U     1024   0        0 he-ipv6
localhost/128                               *                                       U     0      0        1 lo
ipv6.zuiyoujie.com/128                      *                                       U     0      0        1 lo
fe80::a0a:197/128                           *                                       U     0      0        1 lo
fe80::216:3eff:fe06:e2ca/128                *                                       U     0      0        1 lo
ff00::/8                                    *                                       U     256    0        0 eth0
ff00::/8                                    *                                       U     256    0        0 he-ipv6
-----------------------
接下来使用ping6命令测试隧道的联通性
[root@zstest ~]# ping6 ipv6.google.com
PING ipv6.google.com(hkg07s21-in-x0e.1e100.net) 56 data bytes
64 bytes from hkg07s21-in-x0e.1e100.net: icmp_seq=1 ttl=56 time=352 ms
64 bytes from hkg07s21-in-x0e.1e100.net: icmp_seq=2 ttl=56 time=352 ms
64 bytes from hkg07s21-in-x0e.1e100.net: icmp_seq=3 ttl=56 time=356 ms
64 bytes from hkg07s21-in-x0e.1e100.net: icmp_seq=4 ttl=56 time=352 ms
^C
--- ipv6.google.com ping statistics ---
5 packets transmitted, 4 received, 20% packet loss, time 4052ms
rtt min/avg/max/mdev = 352.681/353.712/356.706/1.875 ms
[root@zstest ~]#
使用tcpdump抓包如下:
[root@zstest ~]# tcpdump -nn  -i he-ipv6
tcpdump: WARNING: he-ipv6: no IPv4 address assigned
tcpdump: verbose output suppressed, use -v or -vv for full protocol decode
listening on he-ipv6, link-type RAW (Raw IP), capture size 65535 bytes
20:20:52.308875 IP6 2001:470:c:6c3::2 > 2404:6800:4005:800::200e: ICMP6, echo request, seq 1, length 64
20:20:52.661535 IP6 2404:6800:4005:800::200e > 2001:470:c:6c3::2: ICMP6, echo reply, seq 1, length 64
20:20:53.310354 IP6 2001:470:c:6c3::2 > 2404:6800:4005:800::200e: ICMP6, echo request, seq 2, length 64
20:20:53.663056 IP6 2404:6800:4005:800::200e > 2001:470:c:6c3::2: ICMP6, echo reply, seq 2, length 64
20:20:54.311855 IP6 2001:470:c:6c3::2 > 2404:6800:4005:800::200e: ICMP6, echo request, seq 3, length 64
20:20:54.668535 IP6 2404:6800:4005:800::200e > 2001:470:c:6c3::2: ICMP6, echo reply, seq 3, length 64
20:20:55.313331 IP6 2001:470:c:6c3::2 > 2404:6800:4005:800::200e: ICMP6, echo request, seq 4, length 64
20:20:55.666041 IP6 2404:6800:4005:800::200e > 2001:470:c:6c3::2: ICMP6, echo reply, seq 4, length 64
20:20:56.314835 IP6 2001:470:c:6c3::2 > 2404:6800:4005:800::200e: ICMP6, echo request, seq 5, length 64
20:20:56.667574 IP6 2404:6800:4005:800::200e > 2001:470:c:6c3::2: ICMP6, echo reply, seq 5, length 64
^C
10 packets captured
10 packets received by filter
0 packets dropped by kernel
这种模式下,依然可以ping6通,注意修改生成的IP即可
两种模式的对比:
1)操作方面:模式1的方法比模式2的简单,模式2的需要修改IP地址,推荐使用
2)网卡条目:模式1创建的网卡项目比模式2创建的多
3)路由条目:模式1创建的路由条目比模式2创建的多
3.配置IPv6的网站进行调试
可以使用nginx提供IPv6的网站访问,
3.1.配置IPv6域名解析记录
由于要进行页面的访问,需要在阿里云对域名进行相应的解析,添加IPv6的AAAA记录

3.2.保证nginx安装完成,配置好
nginx的安装优化就不演示了,下载地址如下:
http://nginx.org/download/nginx-1.8.0.tar.gz
我的是源码编译安装的,编译参数如下:注意需要添加IPv6的支持
./configure --prefix=/usr/local/nginx --user=nginx --group=nginx --with-http_stub_status_module --with-http_ssl_module --with-ipv6
3.3.编辑好页面文件
cd /usr/local/nginx/html/
cp index.html index.html.ori
vim index.html
-------------------------
ipv6.zuiyoujie.com
-------------------------
3.4.编辑nginx相关配置文件,提供ipv6访问
vim ipv6.zuiyoujie.com.conf
-------------------------
# ipv6web
server {
   listen   [2001:470:c:6c3::2]:80;
   server_name ipv6.zuiyoujie.com;
   charset utf-8;
   location / {
      root   html;
      index  index.html index.htm;
   }
}
-------------------------
3.5.重启nginx进行页面访问测试
service nginx reload
3.6.IPv6网站的测试方法
1)linux命令-curl
[root@zstest extra]# curl -6 ipv6.zuiyoujie.com
ipv6.zuiyoujie.com
2)linux命令-wget
[root@zstest extra]# wget -6 ipv6.zuiyoujie.com
--2018-06-27 21:25:48--  http://ipv6.zuiyoujie.com/
Resolving ipv6.zuiyoujie.com... 2001:470:c:6c3::2
Connecting to ipv6.zuiyoujie.com|2001:470:c:6c3::2|:80... connected.
HTTP request sent, awaiting response... 200 OK
Length: 19 [text/html]
Saving to: “index.html”

100%[======================================>] 19          --.-K/s   in 0s

2018-06-27 21:25:48 (5.32 MB/s) - “index.html” saved [19/19]

[root@zstest extra]# cat index.html
ipv6.zuiyoujie.com
3)使用网页版的IPv6测试工具
http://ipv6-test.com/validate.php
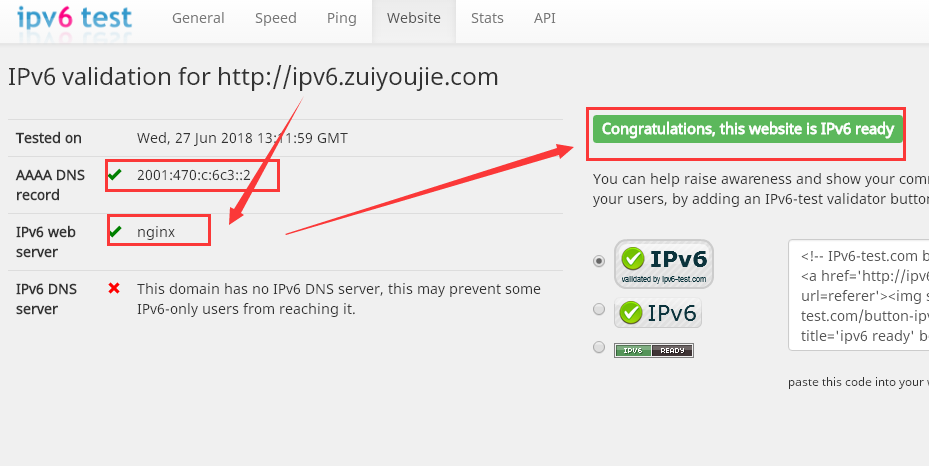
由绿色的框里的信息可知,IPv6的访问可以成功
至此,阿里云服务器对于IPv6的网站支持就配置好了,可以完美支持苹果爸爸对app的IPv6检测
拓展: 对于早期的阿里云服务器,以上方法无法成功配置IPv6的隧道
原因:早期的阿里云服务器内外网IP地址都配置在服务器内部,如下
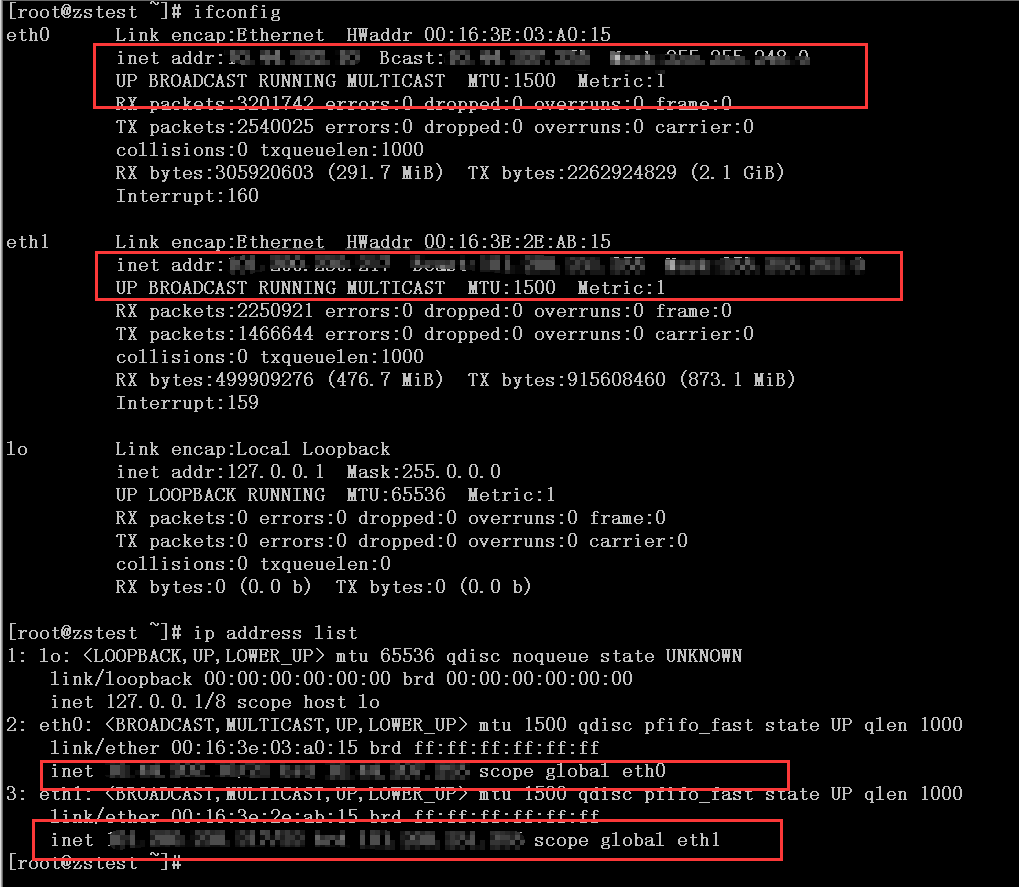
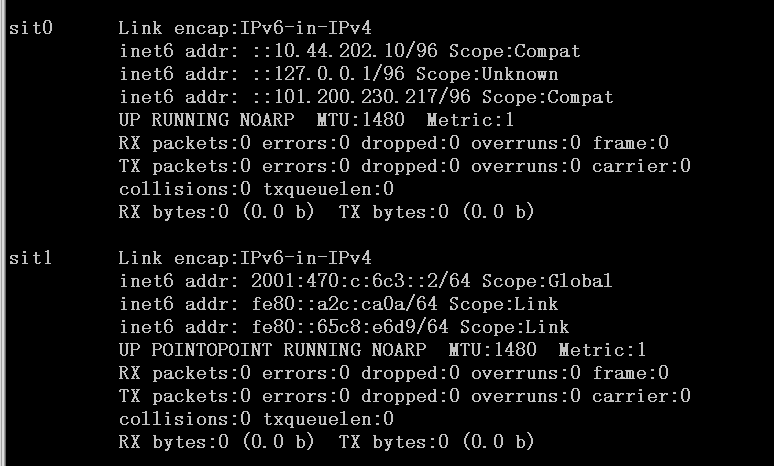
如果是这种类型的服务器,在使用模式1的方法配置后,sit0和sit1的IPv6地址会多增加一个,如下图
配置完成进行测试,使用以下命令测试与Google的联通性:
ping6 ipv6.google.com
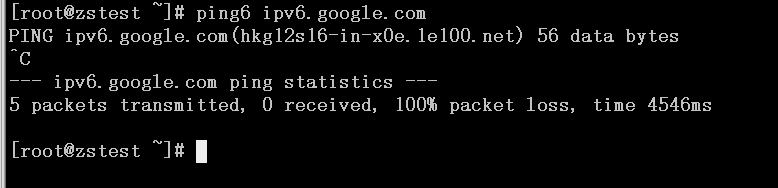
可以看到能成功解析到,但没有完全ping通,使用tcpdump抓包:
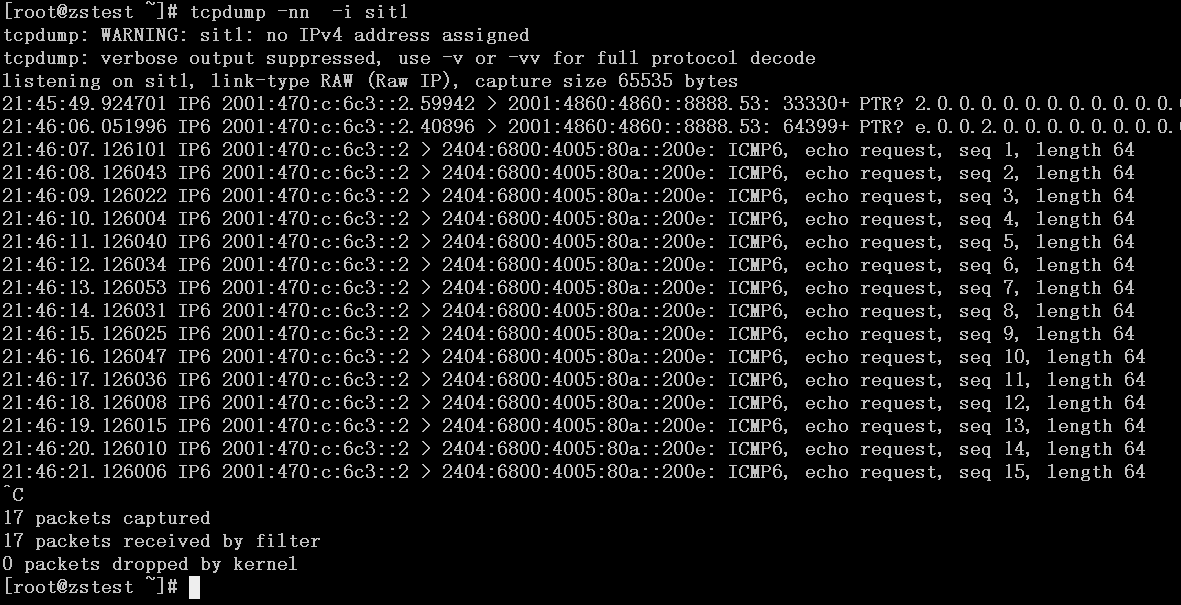
只有去的包,没有回的包,查看路由表
[root@zstest ~]# route -A inet6
Kernel IPv6 routing table
Destination                                 Next Hop                                Flags Metric Ref    Use Iface
*/96                                        *                                       U     256    0        0 sit0
2001:470:c:6c3::/64                         *                                       U     256    0        0 sit1
google-public-dns-a.google.com/128          google-public-dns-a.google.com          UC    0      1        0 sit1
hkg07s01-in-x0e.1e100.net/128               hkg07s01-in-x0e.1e100.net               UC    0      90       0 sit1
fe80::/64                                   *                                       U     256    0        0 eth0
fe80::/64                                   *                                       U     256    0        0 eth1
fe80::/64                                   *                                       U     256    0        0 sit1
*/0                                         *                                       U     1      0        0 sit1
localhost/128                               *                                       U     0      0        1 lo
::10.44.202.10/128                          *                                       U     0      0        1 lo
::101.200.230.217/128                       *                                       U     0      0        1 lo
localhost/128                               *                                       U     0      0        1 lo
tunnel483503-pt.tunnel.tserv15.lax1.ipv6.he.net/128 *                                       U     0      11       1 lo
fe80::a2c:ca0a/128                          *                                       U     0      0        1 lo
fe80::65c8:e6d9/128                         *                                       U     0      0        1 lo
fe80::216:3eff:fe03:a015/128                *                                       U     0      0        1 lo
fe80::216:3eff:fe2e:ab15/128                *                                       U     0      0        1 lo
ff00::/8                                    *                                       U     256    0        0 eth0
ff00::/8                                    *                                       U     256    0        0 eth1
ff00::/8                                    *                                       U     256    0        0 sit1
[root@zstest ~]#
尝试禁用掉某个网卡进行配置,也无法解决这个
ifdown eth1
ifconfig sit0 up
ifconfig sit0 inet6 tunnel ::66.220.18.42
ifconfig sit1 up
ifconfig sit1 inet6 add 2001:470:c:6c3::2/64
route -A inet6 add ::/0 dev sit1
ifup eth1
eth0和eth1都不成功,且会临时断掉服务器连接,测试前需要确认可以直接连接到控制台命令行
以上问题比较难解决,不太擅长,有兴趣的可以研究下
完毕,呵呵呵呵
本文版权归作者和博客园共有,如果感觉有用可以随意打赏,感谢支持,欢迎转载


 浙公网安备 33010602011771号