基于mykernel 2.0编写一个操作系统内核
1. 内核编译
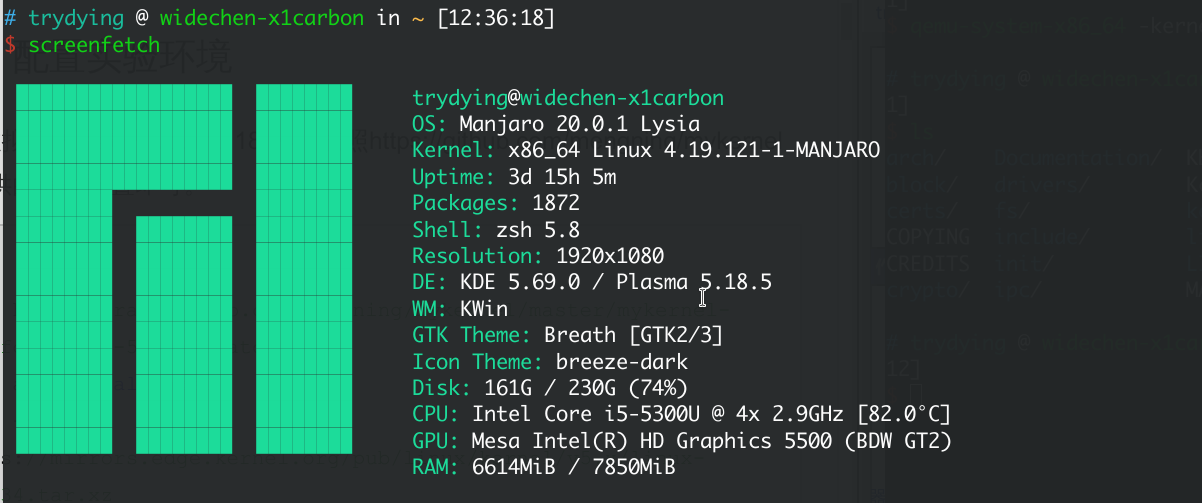
1.本机环境
2.编译过程
按照https://github.com/mengning/mykernel 的说明进行编译即可。
3.运行结果
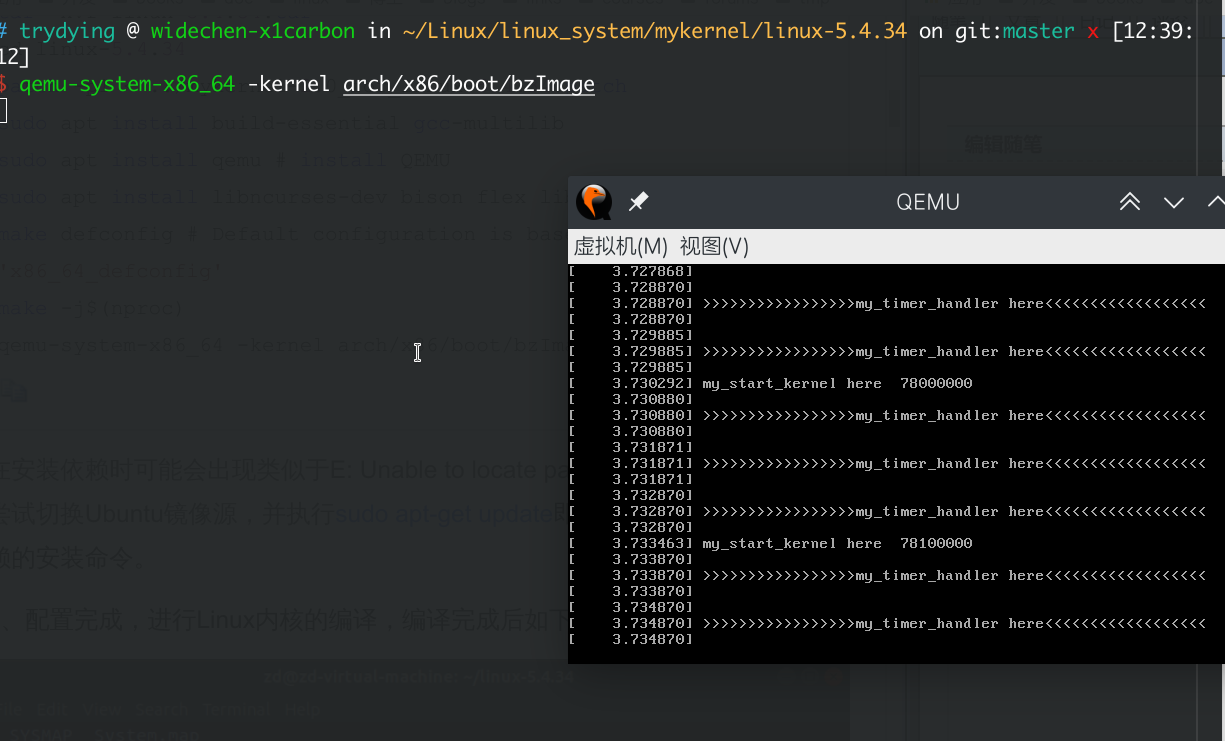
可以看到my_start_kernel正常执行,my_timer_handler时钟中断处理程序周期性执行。
2. 基于mykernel2.0编写内核
- 在mykernel目录下增加mypcb.h
/*
 *  linux/mykernel/mypcb.h
 *
 *  Kernel internal PCB types
 *
 *  Copyright (C) 2013  Mengning
 *
 */

#define MAX_TASK_NUM        4
#define KERNEL_STACK_SIZE   1024*2
/* CPU-specific state of this task
   存储ip,sp*/
struct Thread {
    unsigned long		ip;
    unsigned long		sp;
};

typedef struct PCB{
    int pid;                    //进程id
    volatile long state;	/*进程状态 -1 unrunnable, 0 runnable, >0 stopped */
    unsigned long stack[KERNEL_STACK_SIZE]; //进程堆栈
    /* CPU-specific state of this task */
    struct Thread thread;
    unsigned long	task_entry;   //进程入口
    struct PCB *next;  //指向下一个PCB
}tPCB;

void my_schedule(void);
2.增加mymain.c
首先调用my_start_kernel函数,启动0号进程并创建了其它进程PCB,在my_process函数中,根据my_need_sched变量,判断当前进程是否进行调度。
/*
 *  linux/mykernel/mymain.c
 *
 *  Kernel internal my_start_kernel
 *  Change IA32 to x86-64 arch, 2020/4/26
 *
 *  Copyright (C) 2013, 2020  Mengning
 *
 */
#include <linux/types.h>
#include <linux/string.h>
#include <linux/ctype.h>
#include <linux/tty.h>
#include <linux/vmalloc.h>


#include "mypcb.h"

tPCB task[MAX_TASK_NUM];     //声明tPCB类型的数组
tPCB * my_current_task = NULL;    //声明当前task的指针
volatile int my_need_sched = 0;     //判断是否需要调度

void my_process(void);


void __init my_start_kernel(void)
{
    int pid = 0;
    int i;
    /* Initialize process 0*/
    task[pid].pid = pid;      //初始化0号进程
    task[pid].state = 0;/* -1 unrunnable, 0 runnable, >0 stopped */
    task[pid].task_entry = task[pid].thread.ip = (unsigned long)my_process;   //入口
    task[pid].thread.sp = (unsigned long)&task[pid].stack[KERNEL_STACK_SIZE-1];
    task[pid].next = &task[pid];
    /*fork more process */
    for(i=1;i<MAX_TASK_NUM;i++)   //复制创建其他进程
    {
        memcpy(&task[i],&task[0],sizeof(tPCB));
        task[i].pid = i;
        task[i].thread.sp = (unsigned long)(&task[i].stack[KERNEL_STACK_SIZE-1]);
        task[i].next = task[i-1].next;
        task[i-1].next = &task[i];
    }
    /* start process 0 by task[0] */
    pid = 0;
    my_current_task = &task[pid];
    asm volatile(
        "movq %1,%%rsp\n\t"     /* set task[pid].thread.sp to rsp */
        "pushq %1\n\t"             /* push rbp */
        "pushq %0\n\t"             /* push task[pid].thread.ip */
        "ret\n\t"                 /* pop task[pid].thread.ip to rip */
        :
        : "c" (task[pid].thread.ip),"d" (task[pid].thread.sp)    /* input c or d mean %ecx/%edx*/
    );
}

int i = 0;

void my_process(void)
{
    while(1)
    {
        i++;
        if(i%10000000 == 0)
        {
            printk(KERN_NOTICE "this is process %d -\n",my_current_task->pid);
            if(my_need_sched == 1)    //判断是否需要调度
            {
                my_need_sched = 0;
                my_schedule();
            }
            printk(KERN_NOTICE "this is process %d +\n",my_current_task->pid);
        }
    }
}
3. myinterrupt.c
my_timer_handler函数记录时间,每经过固定的时间片就执行调度,通过调用my_schedule函数,如果下一个进程状态时runnable,就进行进程的切换。
/*
 *  linux/mykernel/myinterrupt.c
 *
 *  Kernel internal my_timer_handler
 *  Change IA32 to x86-64 arch, 2020/4/26
 *
 *  Copyright (C) 2013, 2020  Mengning
 *
 */
#include <linux/types.h>
#include <linux/string.h>
#include <linux/ctype.h>
#include <linux/tty.h>
#include <linux/vmalloc.h>

#include "mypcb.h"

extern tPCB task[MAX_TASK_NUM];
extern tPCB * my_current_task;
extern volatile int my_need_sched;
volatile int time_count = 0;

/*
 * Called by timer interrupt.
 * it runs in the name of current running process,
 * so it use kernel stack of current running process
 */
void my_timer_handler(void)
{
    if(time_count%1000 == 0 && my_need_sched != 1)   //控制时间片的大小,设置调度的标志
    {
        printk(KERN_NOTICE ">>>my_timer_handler here<<<\n");
        my_need_sched = 1;
    }
    time_count ++ ;
    return;
}

void my_schedule(void)   //进程切换
{
    tPCB * next;
    tPCB * prev;

    if(my_current_task == NULL
        || my_current_task->next == NULL)
    {
        return;
    }
    printk(KERN_NOTICE ">>>my_schedule<<<\n");
    /* schedule */
    next = my_current_task->next;
    prev = my_current_task;
    if(next->state == 0)/* -1 unrunnable, 0 runnable, >0 stopped 根据下一个进程的状态来判断是否切换*/
    {
        my_current_task = next;
        printk(KERN_NOTICE ">>>switch %d to %d<<<\n",prev->pid,next->pid);
        /* switch to next process */
        asm volatile(
            "pushq %%rbp\n\t"         /* save rbp of prev */
            "movq %%rsp,%0\n\t"     /* save rsp of prev */
            "movq %2,%%rsp\n\t"     /* restore  rsp of next */
            "movq $1f,%1\n\t"       /* save rip of prev ,%1f指接下来的标号为1的位置*/
            "pushq %3\n\t"
            "ret\n\t"                 /* restore  rip of next */
            "1:\t"                  /* next process start here */
            "popq %%rbp\n\t"
            : "=m" (prev->thread.sp),"=m" (prev->thread.ip)
            : "m" (next->thread.sp),"m" (next->thread.ip)
        );
    }
    return;
}
4. 重新编译并启动内核
进程process[0-3]在轮流进行

3.分析内核核心功能
0号进程启动
0号进程由mymain.c的这一段汇编代码执行
asm volatile(
        "movq %1,%%rsp\n\t"     /* set task[pid].thread.sp to rsp */
        "pushq %1\n\t"             /* push rbp */
        "pushq %0\n\t"             /* push task[pid].thread.ip */
        "ret\n\t"                 /* pop task[pid].thread.ip to rip */
        :
        : "c" (task[pid].thread.ip),"d" (task[pid].thread.sp)    /* input c or d mean %ecx/%edx*/
    );
该段代码完成:
- 使用task[0].thread.sp修改rsp的值,内核堆栈的栈顶指针rsp此时 指向task[0]的栈顶。
- 将task[0]的sp位置处压入rbp的值,保护原来的内核堆栈
- 设置task[0].thread.ip的值给rip,保证cpu下一步能够执行0号进程
进程切换
myinterrupt.c中这一段汇编代码用于进程切换
asm volatile(
        "pushq %%rbp\n\t"       /* save rbp of prev */
        "movq %%rsp,%0\n\t"     /* save rsp of prev */
        "movq %2,%%rsp\n\t"     /* restore  rsp of next */
        "movq $1f,%1\n\t"       /* save rip of prev ,%1f指接下来的标号为1的位置*/
        "pushq %3\n\t"
        "ret\n\t"               /* restore  rip of next */
        "1:\t"                  /* next process start here */
        "popq %%rbp\n\t"
        : "=m" (prev->thread.sp),"=m" (prev->thread.ip)
        : "m" (next->thread.sp),"m" (next->thread.ip)
)
- 保存prev进程的rbp
- 修改prev->thread.sp的值为rsp寄存器的值,保存prev进程的栈顶指针
- 将next->thread.sp的值赋给rsp寄存器,完成进车给你切换
- 保存prev进程rip寄存器值到prev->thread.ip
- 把即将执行的next进程的指令地址next->thread.ip入栈。
- ret 就是将压入栈中的next->thread.ip放入rip寄存器,rip寄存器现在存储next进程的指令。
- next进程栈底从堆栈中恢复到rbp寄存器中,开始next进程的执行。
运行机制
- 从my_start_kernel函数开始,启动并初始化0号进程,并复制创建其他进程
- 进入my_process函数,通过while(1)死循环不断重复i++,每10000000次检查my_need_sched变量,同时内核周期性调用my_timer_handler函数,通过time_count变量的自增来控制时间片
- 时间片结束时,修改my_need_sched的值为1,调用my_schedule函数进行进程调度

 浙公网安备 33010602011771号