
Android性能优化之布局优化
最新最准确内容建议直接访问原文:Android性能优化之布局优化
本文为Android性能优化的第二篇——布局优化,主要介绍使用抽象布局标签(include, viewstub, merge)、去除不必要的嵌套和View节点、减少不必要的infalte及其他Layout方面可调优点,顺带提及布局调优相关工具(hierarchy viewer和lint)。
性能优化专题已完成五部分:
性能优化总纲——性能问题及性能调优方式
性能优化第三篇——Java(Android)代码优化
性能优化第二篇——布局优化
性能优化第一篇——数据库性能优化
1、抽象布局标签
(1) <include>标签
include标签常用于将布局中的公共部分提取出来供其他layout共用,以实现布局模块化,这在布局编写方便提供了大大的便利。
下面以在一个布局main.xml中用include引入另一个布局foot.xml为例。main.mxl代码如下:
<?xml version="1.0" encoding="utf-8"?>
<RelativeLayout xmlns:android="http://schemas.android.com/apk/res/android"
    android:layout_width="match_parent"
    android:layout_height="match_parent" >

    <ListView
        android:id="@+id/simple_list_view"
        android:layout_width="match_parent"
        android:layout_height="match_parent"
        android:layout_marginBottom="@dimen/dp_80" />

    <include layout="@layout/foot.xml" />

</RelativeLayout>
其中include引入的foot.xml为公用的页面底部,代码如下:
<?xml version="1.0" encoding="utf-8"?>
<RelativeLayout xmlns:android="http://schemas.android.com/apk/res/android"
    android:layout_width="match_parent"
    android:layout_height="match_parent" >

    <Button
        android:id="@+id/button"
        android:layout_width="match_parent"
        android:layout_height="@dimen/dp_40"
        android:layout_above="@+id/text"/>

    <TextView
        android:id="@+id/text"
        android:layout_width="match_parent"
        android:layout_height="@dimen/dp_40"
        android:layout_alignParentBottom="true"
        android:text="@string/app_name" />

</RelativeLayout>
<include>标签唯一需要的属性是layout属性,指定需要包含的布局文件。可以定义android:id和android:layout_*属性来覆盖被引入布局根节点的对应属性值。注意重新定义android:id后,子布局的顶结点i就变化了。
(2) <viewstub>标签
viewstub标签同include标签一样可以用来引入一个外部布局,不同的是,viewstub引入的布局默认不会扩张,即既不会占用显示也不会占用位置,从而在解析layout时节省cpu和内存。
viewstub常用来引入那些默认不会显示,只在特殊情况下显示的布局,如进度布局、网络失败显示的刷新布局、信息出错出现的提示布局等。
下面以在一个布局main.xml中加入网络错误时的提示页面network_error.xml为例。main.mxl代码如下:
<?xml version="1.0" encoding="utf-8"?>
<RelativeLayout xmlns:android="http://schemas.android.com/apk/res/android"
    android:layout_width="match_parent"
    android:layout_height="match_parent" >

    ……
    <ViewStub
        android:id="@+id/network_error_layout"
        android:layout_width="match_parent"
        android:layout_height="match_parent"
        android:layout="@layout/network_error" />

</RelativeLayout>
其中network_error.xml为只有在网络错误时才需要显示的布局,默认不会被解析,示例代码如下:
<?xml version="1.0" encoding="utf-8"?>
<RelativeLayout xmlns:android="http://schemas.android.com/apk/res/android"
    android:layout_width="match_parent"
    android:layout_height="match_parent" >

    <Button
        android:id="@+id/network_setting"
        android:layout_width="@dimen/dp_160"
        android:layout_height="wrap_content"
        android:layout_centerHorizontal="true"
        android:text="@string/network_setting" />

    <Button
        android:id="@+id/network_refresh"
        android:layout_width="@dimen/dp_160"
        android:layout_height="wrap_content"
        android:layout_below="@+id/network_setting"
        android:layout_centerHorizontal="true"
        android:layout_marginTop="@dimen/dp_10"
        android:text="@string/network_refresh" />

</RelativeLayout>
在java中通过(ViewStub)findViewById(id)找到ViewStub,通过stub.inflate()展开ViewStub,然后得到子View,如下:
private View networkErrorView;

private void showNetError() {
    // not repeated infalte
    if (networkErrorView != null) {
        networkErrorView.setVisibility(View.VISIBLE);
        return;
    }

    ViewStub stub = (ViewStub)findViewById(R.id.network_error_layout);
    networkErrorView = stub.inflate();
    Button networkSetting = (Button)networkErrorView.findViewById(R.id.network_setting);
    Button refresh = (Button)findViewById(R.id.network_refresh);
}

private void showNormal() {
    if (networkErrorView != null) {
        networkErrorView.setVisibility(View.GONE);
    }
}
在上面showNetError()中展开了ViewStub,同时我们对networkErrorView进行了保存,这样下次不用继续inflate。这就是后面第三部分提到的减少不必要的infalte。
viewstub标签大部分属性同include标签类似。
上面展开ViewStub部分代码
ViewStub stub = (ViewStub)findViewById(R.id.network_error_layout);
networkErrorView = stub.inflate();
也可以写成下面的形式
View viewStub = findViewById(R.id.network_error_layout);
viewStub.setVisibility(View.VISIBLE);   // ViewStub被展开后的布局所替换
networkErrorView =  findViewById(R.id.network_error_layout); // 获取展开后的布局
效果一致,只是不用显示的转换为ViewStub。通过viewstub的原理我们可以知道将一个view设置为GONE不会被解析,从而提高layout解析速度,而VISIBLE和INVISIBLE这两个可见性属性会被正常解析。
(3) <merge>标签
在使用了include后可能导致布局嵌套过多,多余不必要的layout节点,从而导致解析变慢,不必要的节点和嵌套可通过hierarchy viewer(下面布局调优工具中有具体介绍)或设置->开发者选项->显示布局边界查看。
merge标签可用于两种典型情况:
a. 布局顶结点是FrameLayout且不需要设置background或padding等属性,可以用merge代替,因为Activity内容试图的parent view就是个FrameLayout,所以可以用merge消除只剩一个。
b. 某布局作为子布局被其他布局include时,使用merge当作该布局的顶节点,这样在被引入时顶结点会自动被忽略,而将其子节点全部合并到主布局中。
以(1) <include>标签的示例为例,用hierarchy viewer查看main.xml布局如下图:
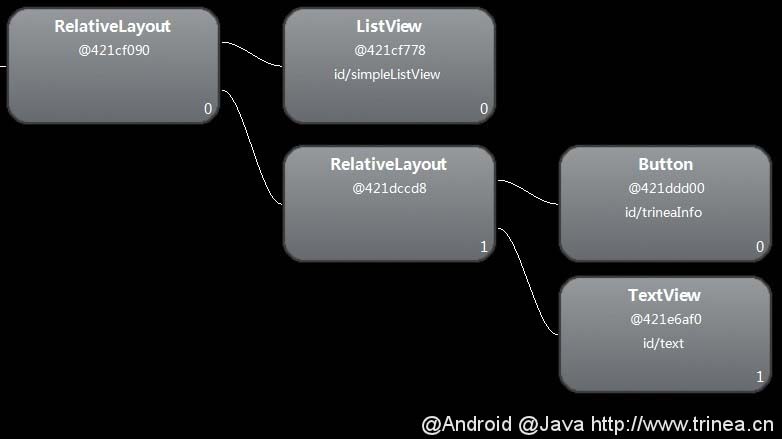
可以发现多了一层没必要的RelativeLayout,将foot.xml中RelativeLayout改为merge,如下:
<?xml version="1.0" encoding="utf-8"?>
<merge xmlns:android="http://schemas.android.com/apk/res/android"
    android:layout_width="match_parent"
    android:layout_height="match_parent" >

    <Button
        android:id="@+id/button"
        android:layout_width="match_parent"
        android:layout_height="@dimen/dp_40"
        android:layout_above="@+id/text"/>

    <TextView
        android:id="@+id/text"
        android:layout_width="match_parent"
        android:layout_height="@dimen/dp_40"
        android:layout_alignParentBottom="true"
        android:text="@string/app_name" />

</merge>
运行后再次用hierarchy viewer查看main.xml布局如下图:
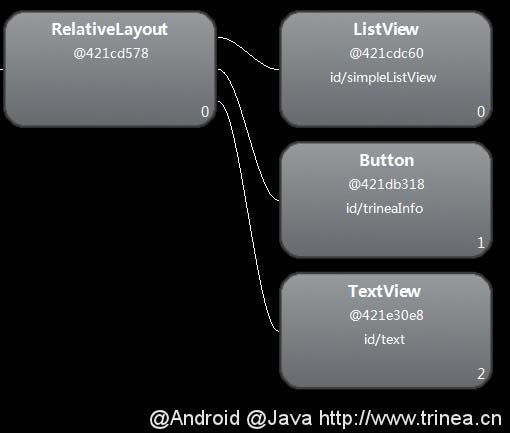
这样就不会有多余的RelativeLayout节点了。
2、去除不必要的嵌套和View节点
更多调优方式及调优工具介绍见原文:Android性能优化之布局优化
你可能还感兴趣:


 浙公网安备 33010602011771号