
Java基本语法笔记
1.基本格式
public class HelloWprdApp {

    public static void main(String[] args) {
        // TODO Auto-generated method stub
        int num = 10;
        num = 30;
        System.out.println("num="+num);
        System.out.println("num*num="+num*num);
    }

}
String args[]:传统的写法,c、c++都用该种写法;
String[] args :Java的写法,但Java也能用上面的方法定义。
实际上String[] args 是定义一字符串数组变量。
在java中,String[] args和String args[] 都可以定义数组。二者没有什么区别。为规范编码,推荐使用String[] args。另外args可以随意改,和其它变量一样,它只不过是一变量名,只要符合变量名规则即可。
打印语句:
System.Out.println("");  带有换行
System.Out.print("");  不带有换行
java申明一个类的方法有两种:
<i>public class 类名称要和文件的名称一样,否则不能编译
<ii>class 类名称可以和文件的名称不一样,编译时候生成的是 类名称.class
2.java基本数据类型
| 数据类型 | 大小/位 | 可表示的数据范围 | 默认值 |
| long(长整数) | 64 | -2^63~2^63-1 | 0L |
| int(整数) | 32 |
-2^31~2^31-1 -0x80000000~0x7FFFFFFF -2147483648~2147483647 |
0 |
| short(短整数) | 16 | -32768~32767 | 0 |
| byte(位) | 8 | -128~127 | 0 |
| char(字符) | 2 | 0~255 | \u0000 |
| float(单精度) | 32 | -3.4E38~3.4E38 | 0.0f 定义为float型的时候,数值的后面要加上f |
| double(双精度) | 64 | -1.7E308~1.7E308 | 0.0d 注意使用浮点型数值的时候,默认使用的是double型,后面加上f的时候才使用float型 |
| boolean | 1 | flase true | flase |
当数值发生溢出的时候,会形成循环,即最大值加上1后会变成最小值
强制转换类型的两种方法:
Integer.MAX_VALUE+2L 在加的数字后面加上L表示强制转换成长整形
((long)Integer.MAX_VALUE+2) 在加的数字前面加上long实现强制转换
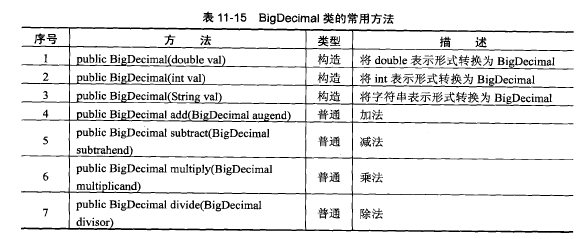
如果需要精确的计算结果,则必须使用BigDecimal类,而且使用BigDecimal类也可以进行大数的操作。
import java.math.BigDecimal;

class MyMath{
	public static double add(double d1, double d2){		//进行加法运算
		BigDecimal b1 = new BigDecimal(d1);
		BigDecimal b2 = new BigDecimal(d2);
		return b1.add(b2).doubleValue();
	}

	public static double sub(double d1, double d2){		//进行减法运算
		BigDecimal b1 = new BigDecimal(d1);
		BigDecimal b2 = new BigDecimal(d2);
		return b1.subtract(b2).doubleValue();
	}

	public static double mul(double d1, double d2){		//进行乘法运算
		BigDecimal b1 = new BigDecimal(d1);
		BigDecimal b2 = new BigDecimal(d2);
		return b1.multiply(b2).doubleValue();
	}

	public static double div(double d1, double d2,int len){		//进行除法运算
		BigDecimal b1 = new BigDecimal(d1);
		BigDecimal b2 = new BigDecimal(d2);
		return b1.divide(b2,len,BigDecimal.ROUND_HALF_UP).doubleValue();	//表示四舍五入
	}

	public static double round(double d,int len){		//进行四舍五入
		BigDecimal b1 = new BigDecimal(d);
		BigDecimal b2 = new BigDecimal(1);						//任何一个数字除以1都是原数字
		return b1.divide(b2,len,BigDecimal.ROUND_HALF_UP).doubleValue();	//表示四舍五入
	}
}

public class BigDecimal_demo {

	public static void main(String[] args) {
		// TODO 自动生成的方法存根
		System.out.println("加法运算:"+MyMath.round(MyMath.add(10.345, 3.333), 1));
		System.out.println("加法运算:"+MyMath.round(MyMath.sub(10.345, 3.333), 1));
		System.out.println("加法运算:"+MyMath.div(10.345, 3.333, 1));
		System.out.println("加法运算:"+MyMath.round(MyMath.mul(10.345, 3.333), 1));
	}

}
3.常用的转义字符
| 转义字符 | 描述 |
| \f | 换页 |
| \\ | 反斜线 |
| \b | 倒退一格 |
| \' | 单引号 |
| \r | 归位 |
| \" | 双引号 |
| \t | 制表符tab |
| \n | 换行 |
4.类型的转换
当表示范围小的数值类型加上大的数值类型的时候,会自动转换成大的数值类型,比如short+int,会自动把结果转换成int型
当数值类型加上字符串的时候,都转换成字符串类型
5.数值格式化
1.NumberFormat表示数字的格式化类,即可以按照本地的风格习惯进行数字的显示。
NumberFormat是一个抽象类,和MessageFormat类一样,都是Format类的子类,本类在使用时可以直接使用NumberFormat类中提供的静态方法为其实例化。

import java.text.NumberFormat;

public class NumberFormat_demo {

	public static void main(String[] args) {
		// TODO 自动生成的方法存根
		NumberFormat nf = null;
		nf = NumberFormat.getInstance();			//返回当前默认语言环境的数字格式
		System.out.println("格式化之后的数字:"+nf.format(1000000));
		System.out.println("格式化之后的数字:"+nf.format(1000.345));
	}

}
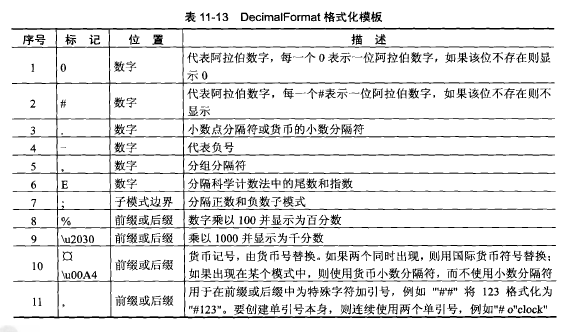
2.DecimalFormat类也是Format的一个子类,主要作用是格式化数字。
在格式化数字的时候比直接使用NumberFormat更加方便,因为可以直接指定按用户自定义的方式进行格式化操作,与SimpleDateFormat类似,如果要进行自定义格式化操作,则必须指定格式化操作的模板。
import java.text.DecimalFormat;

class FormatDemo{
	public void format1(String pattern,double value){
		DecimalFormat df = null;					//声明一个DecimalFormat对象
		df = new DecimalFormat(pattern);	//实例化对象
		String str = df.format(value);				//格式化数字
		System.out.println("使用"+pattern+"格式化数字"+value+":"+str);
	}
}

public class DecimalFormat_demo {

	public static void main(String[] args) {
		// TODO 自动生成的方法存根
		FormatDemo demo = new FormatDemo();
		demo.format1("###,###.###", 111222.34567);
		demo.format1("000,000.000", 11222.34567);
		demo.format1("###,###.###¥", 111222.34567);
		demo.format1("##.###%", 0.34567);			//使用百分数形式
		demo.format1("00.###%", 0.034567);			//使用百分数形式
		demo.format1("###.###\u2030", 0.34567);	//使用千分数形式
	}

}
6.java枚举类型Enum
在JDK5中引入了一个新的关键字——enum,可以直接定义枚举类型
在申明枚举类的时候,也可以申明属性、方法和构造函数,但枚举类的构造函数必须为私有的,不然就能new出枚举类
取出一个枚举内容
enum Color{
	RED,GREEN,BLUE;
}

public class Enum_demo {

	public static void main(String[] args) {
		// TODO 自动生成的方法存根
		Color c = Color.BLUE;
		System.out.println(c);
	}

}
枚举类型的数据也可以使用“枚举.values()”的形式,将全部的枚举类型变为对喜爱数组的形式,之后再直接使用foreach进行输出
enum Color{
	RED,GREEN,BLUE;
}

public class Enum_demo {

	public static void main(String[] args) {
		// TODO 自动生成的方法存根
		for(Color c:Color.values()){
			System.out.println(c);
		}
	}

}
使用switch进行判断
enum Color{
	RED,GREEN,BLUE;
}

public class Enum_demo {

	public static void main(String[] args) {
		// TODO 自动生成的方法存根
		for(Color c:Color.values()){
			print(c);
		}
	}

	public static void print(Color color){
		switch(color){
			case RED:{
				System.out.println("红色");
				break;
			}
			case GREEN:{
				System.out.println("绿色");
				break;
			}
			case BLUE:{
				System.out.println("蓝色");
				break;
			}
			default:{
				System.out.println("其他颜色");
				break;
			}
		}
	}

}

使用name()和ordinal()方法取得名称和编号
enum Color{
	RED,GREEN,BLUE;
}

public class Enum_demo {

	public static void main(String[] args) {
		// TODO 自动生成的方法存根
		for(Color c:Color.values()){
			System.out.println(c.ordinal()+"-->"+c.name());
		}
	}

}
通过构造方法为属性赋值
通过把构造方法私有,使得不能new 一个新的Color对象,只能使用RED("红色"),GREEN("绿色"),BLUE("蓝色")三个类型
enum Color{
	RED("红色"),GREEN("绿色"),BLUE("蓝色");		//定义枚举的3个类型,“红色”对应String name

	private Color(String name){			//定义私有构造方法
		this.setName(name);
	}

	private String name;

	public String getName() {
		return name;
	}

	public void setName(String name) {
		this.name = name;
	}

}

public class Enum_demo {

	public static void main(String[] args) {
		// TODO 自动生成的方法存根
		for(Color c:Color.values()){
			System.out.println(c.ordinal()+"-->"+c.name()+c.getName());
		}
	}

}
通过setter()方法为属性赋值


枚举比较器
import java.util.Iterator;
import java.util.Set;
import java.util.TreeSet;

enum Color{
	RED("红色"),GREEN("绿色"),BLUE("蓝色");		//定义枚举的3个类型

	private Color(String name){			//定义构造方法
		this.setName(name);
	}

	private String name;

	public String getName() {
		return name;
	}

	public void setName(String name) {
		this.name = name;
	}

}

public class Enum_demo {

	public static void main(String[] args) {
		// TODO 自动生成的方法存根

		Set<Color> t = new TreeSet<Color>();
		t.add(Color.BLUE);
		t.add(Color.GREEN);
		t.add(Color.RED);
		Iterator<Color> iter = t.iterator();
		while(iter.hasNext()){
			System.out.println(iter.next()+"、");
		}
	}


}
EnumMap
EnumMap是Map接口的子类,所以本身还是以Map的形式进行操作,即Key--Value,
如果要使用EnumMap,则首先要创建EnumMap的对象,在创建对象的时候必须指定要操作的枚举类型
import java.util.EnumMap;
import java.util.Map;

enum color{
	RED,GREEN,BLUE;		//定义枚举的3个类型
}

public class EnumMap_demo {

	public static void main(String[] args) {
		// TODO 自动生成的方法存根
		Map<Color,String> desc = null;									//定义一个Map对象
		desc = new EnumMap<Color,String>(Color.class);	//实例化EnumMap
		desc.put(Color.BLUE, "蓝色");
		desc.put(Color.RED, "红色");
		desc.put(Color.GREEN,"绿色");

		for(Color c:Color.values()){				//取得全部的枚举
			System.out.println(c.name()+"-->"+c.getName());
		}

		for(Color c:desc.keySet()){				//取得全部的Key
			System.out.println(c.name()+"、");
		}

		for(String c:desc.values()){				//取得全部的值
			System.out.println(c+"、");
		}
	}

}
EnumSet
EnumSet是Set接口的子类,所以里面的内容是无法重复的。
使用EnumSet时不能直接使用关键字new为其进行实例化,所以在此类中提供了很多的静态方法

EnumSet---将全部的集合设置到EnumSet集合中
import java.util.EnumSet;

enum color_{
	RED,GREEN,BLUE;		//定义枚举的3个类型
}

public class EnumSet_demo {

	public static void main(String[] args) {
		// TODO 自动生成的方法存根
		EnumSet<Color> es = null;				//声明一个EnumSet对象
		es = EnumSet.allOf(Color.class);		//将枚举的全部类型设置到EnumSet对象中

		print(es);
	}

	public static void print(EnumSet<Color> temp){		//专门的输出操作
		for(Color c:temp){															//循环输出EnumSet中的内容
			System.out.println(c+"、");
		}
	}

}
只设置一个枚举的类型到集合中
使用EnumSet提供的static方法of(),将一个枚举中的一个内容设置到EnumSet集合中
import java.util.EnumSet;

enum color_{
	RED,GREEN,BLUE;		//定义枚举的3个类型
}

public class EnumSet_demo {

	public static void main(String[] args) {
		// TODO 自动生成的方法存根
		EnumSet<Color> es = null;				//声明一个EnumSet对象
		es = EnumSet.of(Color.BLUE);			//设置一个枚举的内容

		print(es);
	}

	public static void print(EnumSet<Color> temp){		//专门的输出操作
		for(Color c:temp){															//循环输出EnumSet中的内容
			System.out.println(c+"、");
		}
	}

}
创建只能放入指定枚举类型的集合
使用EnumSet提供的static方法noneOf(),将集合设置成只能增加Color类型的集合,但是并不设置任何的内容到集合中
import java.util.EnumSet;

enum color_{
	RED,GREEN,BLUE;		//定义枚举的3个类型
}

public class EnumSet_demo {

	public static void main(String[] args) {
		// TODO 自动生成的方法存根
		EnumSet<Color> es = null;				//声明一个EnumSet对象

		es = EnumSet.noneOf(Color.class);			//创建一个可以加入Color类型的对象
		es.add(Color.BLUE);
		es.add(Color.RED);

		print(es);
	}

	public static void print(EnumSet<Color> temp){		//专门的输出操作
		for(Color c:temp){															//循环输出EnumSet中的内容
			System.out.println(c+"、");
		}
	}

}
创建不包含指定元素的集合
import java.util.EnumSet;

enum color_{
	RED,GREEN,BLUE;		//定义枚举的3个类型
}

public class EnumSet_demo {

	public static void main(String[] args) {
		// TODO 自动生成的方法存根

		EnumSet<Color> esOld = null;				//声明一个EnumSet对象
		EnumSet<Color> esNew = null;				//声明一个EnumSet对象
		esOld = EnumSet.noneOf(Color.class);			//创建一个可以加入Color类型的对象
		esOld.add(Color.BLUE);
		esOld.add(Color.RED);
		esNew = EnumSet.complementOf(esOld);		//创建一个不包含指定元素的集合
		print(esNew);
	}

	public static void print(EnumSet<Color> temp){		//专门的输出操作
		for(Color c:temp){															//循环输出EnumSet中的内容
			System.out.println(c+"、");
		}
	}

}
复制已有的内容
import java.util.EnumSet;

enum color_{
	RED,GREEN,BLUE;		//定义枚举的3个类型
}

public class EnumSet_demo {

	public static void main(String[] args) {
		// TODO 自动生成的方法存根

		EnumSet<Color> esOld = null;				//声明一个EnumSet对象
		EnumSet<Color> esNew = null;				//声明一个EnumSet对象
		esOld = EnumSet.noneOf(Color.class);			//创建一个可以加入Color类型的对象
		esOld.add(Color.BLUE);
		esOld.add(Color.RED);

		esNew = EnumSet.copyOf(esOld);					//从已有的集合中复制出内容
		print(esNew);
	}

	public static void print(EnumSet<Color> temp){		//专门的输出操作
		for(Color c:temp){															//循环输出EnumSet中的内容
			System.out.println(c+"、");
		}
	}

}
让枚举类实现一个接口
在接口中定义了一个getColor()方法,枚举类在实现此接口之后,就必须对枚举类中的每个对象分别实现接口中的getColor()方法
interface Print_{	//定义Print方法
	public String getColor();	//定义抽象方法
}

enum color_1 implements Print_{	//枚举类实现接口
	RED{	//枚举对象实现抽象方法
		@Override
		public String getColor() {
			// TODO 自动生成的方法存根
			return "红色";
		}
	},
	BLUE{
		@Override
		public String getColor() {
			// TODO 自动生成的方法存根
			return "蓝色";
		}
	},
	GREEN{
		@Override
		public String getColor() {
			// TODO 自动生成的方法存根
			return "绿色";
		}
	};
}

public class InterfaceEnum_demo {

	public static void main(String[] args) {
		// TODO 自动生成的方法存根
		for(color_1 c:color_1.values()){	//循环输出EnumSet中的内容
			System.out.println(c.getColor()+"、");
		}
	}

}
在枚举类中定义抽象方法
interface Print_{	//定义Print方法
	public String getColor();	//定义抽象方法
}

//enum color_1 implements Print_{	//枚举类实现接口
//	RED{	//枚举对象实现抽象方法
//		@Override
//		public String getColor() {
//			// TODO 自动生成的方法存根
//			return "红色";
//		}
//	},
//	BLUE{
//		@Override
//		public String getColor() {
//			// TODO 自动生成的方法存根
//			return "蓝色";
//		}
//	},
//	GREEN{
//		@Override
//		public String getColor() {
//			// TODO 自动生成的方法存根
//			return "绿色";
//		}
//	};
//}

enum color_1{	//枚举类实现接口
	RED{	//枚举对象实现抽象方法
		@Override
		public String getColor() {
			// TODO 自动生成的方法存根
			return "红色";
		}
	},
	BLUE{
		@Override
		public String getColor() {
			// TODO 自动生成的方法存根
			return "蓝色";
		}
	},
	GREEN{
		@Override
		public String getColor() {
			// TODO 自动生成的方法存根
			return "绿色";
		}
	};
	public abstract String getColor();	//定义抽象方法
}


//主类
//Function        : 	InterfaceEnum_demo;
public class InterfaceEnum_demo {

	public static void main(String[] args) {
		// TODO 自动生成的方法存根
		for(color_1 c:color_1.values()){	//循环输出EnumSet中的内容
			System.out.println(c.getColor()+"、");
		}
	}

}
7.位运算符
| 位运算符 | 描述 |
| & | 按位与 |
| | | 按位或 |
| ^ | 异或(相同为0,不同为1) |
| ~ | 取反 |
| << | 左移位 |
| >> | 右移位 正数右移的时候左边补零,负数左边补一 |
| >>> | 无符号移位 正数负数右移的时候左边都补零 |
数组中,数组的名字,即地址存在栈内存中,地址指向的内容存在堆内存中,开辟新的堆内存必须要用关键字new,栈内存中存储的是堆内存的访问地址
当堆空间没有任何栈空间引用的时候,就成为了垃圾空间,等待这垃圾回收机制进行回收
数组的复制:System.arraycopy(i1,3,i2,1,3)源数组名称 源数组开始点 目标数组名称 目标数组开始点 复制长度
8.逻辑运算符优先级

9.方法的定义方式
public static void 方法名字(类型 参数,类型 参数。。。){
  程序语句
}
10.可变参数
  fun();
  fun(1);
  fun(1,2,3,4,5);

  public static void fun(int... arg){
    for(int i=0;i<arg.lenght;i++){
      system.out.print(arg[i]+"、");
  }
11.类的定义
class Person{
    private string name;//把属性封装,讲不能通过XX.name访问,必须通过setter和getter方法设置和取得
    private int age;//private也可以用-表示

    public Person(String name,int age){ //构造函数,和类名同名
      this.setName(name);
      this.setAge(age);
    }

    public void tell(){
      system.out.println();
    }
}
对象的创建和使用
类名 对象名称 = null;
对象名称 = new 类名();
或者
类名 对象名称 = new 类名();
匿名对象
new Person("张三",30).tell();//匿名对象,匿名对象一般是作为其他类实例化对象的参数传递,匿名对象是一个堆内存空间,没有栈空间
类设计分析
<1>根据要求写出类所包含的属性
<2>所有的属性都必须进行封装(private)
<3>封装之后的属性通过setter和getter设置和取得
<4>如果需要可以加入若干构造方法
<5>再根据其他要求添加相应的方法
<6>类中的所有方法都不要直接输出,而是交给被调用处输出
<7> 永远不要继承一个已经实现好的类,只能继承抽象类或者实现接口,因为一旦发生对象的向上转型关系后,所调用的方法一定是被子类所覆写的方法
12.Java内部类和包装类
在类Outer的内部再定义一个类Inner,此时类inner就称为内部类,而类outer则称为外部类。
内部类的唯一好处就是可以方便的访问外部类中的私有属性
class outer{
	private String info = "Hello World!";
	class inner{
		public void print(){
			System.out.println(info);
		}
	};

	public void fun(){
		new inner().print();
	}
};

public class inner_test {

	public static void main(String[] args) {
		// TODO 自动生成的方法存根
		new outer().fun();
	}

}
使用static定义内部类
使用static声明的内部类变成了外部类,但是用static声明的内部类不能方位非static申明的外部类属性。
其中inner()要有static
class outer{
	private static String info = "Hello World!";
	static class inner{
		public void print(){
			System.out.println(info);
		}
	};


public class inner_test {

	public static void main(String[] args) {
		// TODO 自动生成的方法存根
		new outer.inner().print();
	}

}
在外部访问内部类
一个内部类除了可以通过外部类访问,也可以直接在其他类中进行调用,调用的基本格式:
外部类.内部类 内部类对象 = 外部类实例.new 内部类();
Java 内部类
分四种:成员内部类、局部内部类、静态内部类和匿名内部类。
1、成员内部类: 即作为外部类的一个成员存在,与外部类的属性、方法并列。
注意:成员内部类中不能定义静态变量,但可以访问外部类的所有成员。
public class Outer{
private static int i = 1;
private int j=10;
private int k=20;
public static void outer_f1(){
    //do more something
}
public void out_f2(){
    //do more something
}

//成员内部类
class Inner{
//static int inner_i =100; //内部类中不允许定义静态变量
int j=100;//内部类中外部类的实例变量可以共存
int inner_i=1;
void inner_f1(){
    System.out.println(i);//外部类的变量如果和内部类的变量没有同名的,则可以直接用变量名访问外部类的变量
    System.out.println(j);//在内部类中访问内部类自己的变量直接用变量名
    System.out.println(this.j);//也可以在内部类中用"this.变量名"来访问内部类变量
    //访问外部类中与内部类同名的实例变量可用"外部类名.this.变量名"。
    System.out.println(k);//外部类的变量如果和内部类的变量没有同名的,则可以直接用变量名访问外部类的变量
    outer_f1();
    outer_f2();
}
}
//外部类的非静态方法访问成员内部类
public void outer_f3(){
    Inner inner = new Inner();
    inner.inner_f1();
}

//外部类的静态方法访问成员内部类,与在外部类外部访问成员内部类一样
public static void outer_f4(){
    //step1 建立外部类对象
    Outer out = new Outer();
    //***step2 根据外部类对象建立内部类对象***
    Inner inner=out.new Inner();
    //step3 访问内部类的方法
    inner.inner_f1();
}

public static void main(String[] args){
    outer_f4();
}
}
成员内部类的优点:
⑴ 内部类作为外部类的成员,可以访问外部类的私有成员或属性。(即使将外部类声明为PRIVATE,但是对于处于其内部的内部类还是可见的。)
⑵ 用内部类定义在外部类中不可访问的属性。这样就在外部类中实现了比外部类的private还要小的访问权限。
注意:内部类是一个编译时的概念,一旦编译成功,就会成为完全不同的两类。对于一个名为outer的外部类和其内部定义的名为inner的内部类。编译完成后出现outer.class和outer$inner.class两类。
2、局部内部类: 即在方法中定义的内部类,与局部变量类似,在局部内部类前不加修饰符public或private,其范围为定义它的代码块。
注意:局部内部类中不可定义静态变量,可以访问外部类的局部变量(即方法内的变量),但是变量必须是final的。
public class Outer {
 private int s = 100;
 private int out_i = 1;
 public void f(final int k){
  final int s = 200;
  int i = 1;
  final int j = 10;
  class Inner{ //定义在方法内部
   int s = 300;//可以定义与外部类同名的变量
   //static int m = 20;//不可以定义静态变量
   Inner(int k){
    inner_f(k);
   }
   int inner_i = 100;
   void inner_f(int k){
    System.out.println(out_i);//如果内部类没有与外部类同名的变量,在内部类中可以直接访问外部类的实例变量
    System.out.println(k);//*****可以访问外部类的局部变量(即方法内的变量),但是变量必须是final的*****
//    System.out.println(i);
    System.out.println(s);//如果内部类中有与外部类同名的变量,直接用变量名访问的是内部类的变量
    System.out.println(this.s);//用"this.变量名" 访问的也是内部类变量
    System.out.println(Outer.this.s);//用外部"外部类类名.this.变量名" 访问的是外部类变量
   }
  }
  new Inner(k);
 }

 public static void main(String[] args) {
 //访问局部内部类必须先有外部类对象
  Outer out = new Outer();
  out.f(3);
 }

}
注意:
在类外不可直接生成局部内部类(保证局部内部类对外是不可见的)。要想使用局部内部类时需要生成对象,对象调用方法,在方法中才能调用其局部内部类。通过内部类和接口达到一个强制的弱耦合,用局部内部类来实现接口,并在方法中返回接口类型,使局部内部类不可见,屏蔽实现类的可见性。

3、静态内部类: 静态内部类定义在类中,任何方法外,用static定义。
注意:静态内部类中可以定义静态或者非静态的成员
public class Outer {
 private static int i = 1;
 private int j = 10;
 public static void outer_f1(){

 }
 public void outer_f2(){

 }
// 静态内部类可以用public,protected,private修饰
// 静态内部类中可以定义静态或者非静态的成员
 static class Inner{
  static int inner_i = 100;
  int inner_j = 200;
  static void inner_f1(){
   System.out.println("Outer.i"+i);//静态内部类只能访问外部类的静态成员
   outer_f1();//包括静态变量和静态方法
  }
  void inner_f2(){
//   System.out.println("Outer.i"+j);//静态内部类不能访问外部类的非静态成员
//   outer_f2();//包括非静态变量和非静态方法
  }

 }

 public void outer_f3(){
//  外部类访问内部类的静态成员:内部类.静态成员
  System.out.println(Inner.inner_i);
  Inner.inner_f1();
//  外部类访问内部类的非静态成员:实例化内部类即可
  Inner inner = new Inner();
  inner.inner_f2();

 }
 public static void main(String[] args) {
  new Outer().outer_f3();
 }

}
注意:*******生成(new)一个静态内部类不需要外部类成员:这是静态内部类和成员内部类的区别。静态内部类的对象可以直接生成:
Outer.Inner in=new Outer.Inner();
而不需要通过生成外部类对象来生成。这样实际上使静态内部类成为了一个顶级类。静态内部类不可用private来进行定义。*******

例子:
对于两个类,拥有相同的方法:
class People
{
  run();
}
class Machine{
   run();
}
此时有一个robot类:
class Robot extends People implement Machine.
此时run()不可直接实现。
注意:当类与接口(或者是接口与接口)发生方法命名冲突的时候,此时必须使用内部类来实现。用接口不能完全地实现多继承,用接口配合内部类才能实现真正的多继承。

4、匿名内部类
匿名内部类是一种特殊的局部内部类,它是通过匿名类实现接口。
IA被定义为接口。
IA I=new IA(){};

匿名内部类的特点:

1,一个类用于继承其他类或是实现接口,并不需要增加额外的方法,只是对继承方法的事先或是覆盖。
2,只是为了获得一个对象实例,不需要知道其实际类型。
3,类名没有意义,也就是不需要使用到。
public class Outer {
 private static int i = 1;
 private int j = 10;
 public static void outer_f1(){

 }
 public void outer_f2(){

 }
// 静态内部类可以用public,protected,private修饰
// 静态内部类中可以定义静态或者非静态的成员
 static class Inner{
  static int inner_i = 100;
  int inner_j = 200;
  static void inner_f1(){
   System.out.println("Outer.i"+i);//静态内部类只能访问外部类的静态成员
   outer_f1();//包括静态变量和静态方法
  }
  void inner_f2(){
//   System.out.println("Outer.i"+j);//静态内部类不能访问外部类的非静态成员
//   outer_f2();//包括非静态变量和非静态方法
  }
 }

 public void outer_f3(){
//  外部类访问内部类的静态成员:内部类.静态成员
  System.out.println(Inner.inner_i);
  Inner.inner_f1();
//  外部类访问内部类的非静态成员:实例化内部类即可
  Inner inner = new Inner();
  inner.inner_f2();

 }
 public static void main(String[] args) {
  new Outer().outer_f3();
 }

}
注:一个匿名内部类一定是在new的后面,用其隐含实现一个接口或实现一个类,没有类名,根据多态,我们使用其父类名。因他是局部内部类,那么局部内部类的所有限制都对其生效。匿名内部类是唯一一种无构造方法类。大部分匿名内部类是用于接口回调用的。匿名内部类在编译的时候由系统自动起名Out$1.class。如果一个对象编译时的类型是接口,那么其运行的类型为实现这个接口的类。因匿名内部类无构造方法,所以其使用范围非常的有限。当需要多个对象时使用局部内部类,因此局部内部类的应用相对比较多。匿名内部类中不能定义构造方法。如果一个对象编译时的类型是接口,那么其运行的类型为实现这个接口的类。
内部类总结:
1.首先,把内部类作为外部类的一个特殊的成员来看待,因此它有类成员的封闭等级:private ,protected,默认(friendly),public;
它有类成员的修饰符: static,final,abstract
2.非静态内部类nested inner class,内部类隐含有一个外部类的指针this,因此,它可以访问外部类的一切资源(当然包括private)
外部类访问内部类的成员,先要取得内部类的对象,并且取决于内部类成员的封装等级。
非静态内部类不能包含任何static成员
3.静态内部类:static inner class,不再包含外部类的this指针,并且在外部类装载时初始化.
静态内部类能包含static或非static成员.
静态内部类只能访问外部类static成员.
外部类访问静态内部类的成员,循一般类法规。对于static成员,用类名.成员即可访问,对于非static成员,只能用对象.成员进行访问
4.对于方法中的内部类或块中内部类只能访问块中或方法中的final变量。
类成员有两种static , non-static,同样内部类也有这两种
non-static 内部类的实例,必须在外部类的方法中创建或通过外部类的实例来创建(OuterClassInstanceName.new innerClassName(ConstructorParameter)),并且可直接访问外部类的信息,外部类对象可通过OuterClassName.this来引用
static 内部类的实例, 直接创建即可,没有对外部类实例的引用。
内部类不管static还是non-static都有对外部类的引用
non-static 内部类不允许有static成员
方法中的内部类只允许访问方法中的final局部变量和方法的final参数列表,所以说方法中的内部类和内部类没什麽区别。但方法中的内部类不能在方法以外访问,方法中不可以有static内部类
匿名内部类如果继承自接口,必须实现指定接口的方法,且无参数
匿名内部类如果继承自类,参数必须按父类的构造函数的参数传递
自动装箱:指开发人员可以把一个基本数据类型直接赋给对应的包装类
自动拆箱:指开发人员可以把一个包装类对象直接赋给对应的基本数据类型
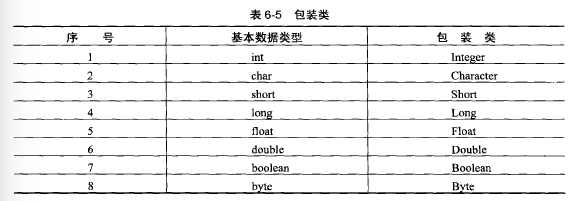
要把基本数据类型称为对象的时候,需要把基本数据类型进行包装,
运用:把一个对象赋值给一个基本数据类型(一个由数字组成的字符串赋值给一个int或者float类型的基本数据类型)
比如:
List list = new ArrayList();		 	//集合List只能添加对象
list.add(1);						//1是基本数据类型,自动装箱之后才能添加到集合中

Iterator i = list.iterator();
while(i.hasNext()){
    int m = (Integer)i.next();		//next()方法返回的是Object,需要强转Integer之后,自动拆箱
}
包装类的应用,将一个全由数字组成的字符串变成一个int或者float类型的基本数据
public class Wrapper_demo {

	public static void main(String[] args) {
		// TODO 自动生成的方法存根
		String str1 = "30";
		String str2 = "30.3";
		int x = Integer.parseInt(str1);
		float f = Float.parseFloat(str2);
		System.out.println(x);
		System.out.println(f);
	}

}
13.string对象
使用==比较string对象的时候比较的是string的地址
使用.equals方法比较的是string对象的内容
<1>使用string str = new string("hello");创建一个新的string对象,"hello"创建一个对象,new关键字又创建一个对象,所以建议使用第二种方法创建对象
<2>string str = "hello";
注意:字符串的内容不可以修改,所以要避免对字符串的内容进行连续的修改,因为修改一次就要开辟两个新的内存空间,通过断开和连接进行字符串的修改。
要通过StringBuffer类进行修改。
14.引用
所谓引用传递就是指将堆内存空间的使用权交给多个栈内存空间。
例子<1>
public class Aliasing {
	int temp = 30;
	public static void main(String[] args) {
		// TODO 自动生成的方法存根
		Aliasing d1 = new Aliasing();
		d1.temp = 50;
		System.out.println(d1.temp);
		fun(d1);
		System.out.println(d1.temp);
	}

	public static void fun (Aliasing d2){
		d2.temp = 1000;
	}
}

例子<2> 其中传递的是string对象,由于string的内容是不可以修改,所以str1的值还是hello,如果传递的是对象的string属性,那是可以修改的
public class Aliasing {
	int temp = 30;
	public static void main(String[] args) {
		// TODO 自动生成的方法存根
		String str1 = "hello";
		System.out.println(str1);
		fun(str1);
		System.out.println(str1);
	}

	public static void fun (String str2){
		str2 = "hello2";
	}
}

例子<3>传递的是对象的string属性
public class Aliasing {
	String temp = "hello";
	public static void main(String[] args) {
		// TODO 自动生成的方法存根
		Aliasing d1 = new Aliasing();
		d1.temp = "world";
		System.out.println(d1.temp);
		fun(d1);
		System.out.println(d1.temp);
	}

	public static void fun (Aliasing d2){
		d2.temp="HELLO";
	}
}

一对一关系 例子
一个人对应一本书,一本书对应一个人
class Person{
		private String name;
		private int age;
		private Book book;

		public Person(String name,int age){
			this.setName(name);
			this.setAge(age);
		}

		public  String getName(){
			return name;
		}

		public void setName(String n){
			name = n;
		}

		public int getAge(){
			return age;
		}

		public void setAge(int a){
			age = a;
		}

		public Book getBook(){
			return book;
		}

		public void setBook(Book b){
			book = b;
		}
}

class Book{
	private String title;
	private float price;
	private Person person;

	public Book(String title,float price){
		this.setTitle(title);
		this.setPrice(price);
	}

	public  String getTitle(){
		return title;
	}

	public void setTitle(String t){
		title = t;
	}

	public float getPrice(){
		return price;
	}

	public void setPrice(float p){
		price = p;
	}

	public Person getPerson(){
		return person;
	}

	public void setPerson(Person person){
		this.person = person;
	}

}


public class reference {

	public static void main(String[] args) {
		// TODO 自动生成的方法存根
		Person per = new Person("zhangsan",30);
		Book bk = new Book("JAVA SE kaifa",90.0f);
		per.setBook(bk);
		bk.setPerson(per);
		System.out.println(" name "+per.getName()+" age "+per.getAge()+" book "+per.getBook().getTitle()+" price "+per.getBook().getPrice());
		System.out.println(" title "+bk.getTitle()+" price "+bk.getPrice()+" person "+bk.getPerson().getName()+" age "+bk.getPerson().getAge());
	}

}
一个人对应一本书,一本书对应一个人,一个孩子对应一本书,一本书对应一个孩子,一个人对应一个孩子
class Person{
		private String name;
		private int age;
		private Book book;
		private Person child;

		public Person(String name,int age){
			this.setName(name);
			this.setAge(age);
		}

		public  String getName(){
			return name;
		}

		public void setName(String n){
			name = n;
		}

		public int getAge(){
			return age;
		}

		public void setAge(int a){
			age = a;
		}

		public Book getBook(){
			return book;
		}

		public void setBook(Book b){
			book = b;
		}

		public Person getChild(){
			return child;
		}

		public void setChild(Person child){
			this.child = child;
		}
}

class Book{
	private String title;
	private float price;
	private Person person;

	public Book(String title,float price){
		this.setTitle(title);
		this.setPrice(price);
	}

	public  String getTitle(){
		return title;
	}

	public void setTitle(String t){
		title = t;
	}

	public float getPrice(){
		return price;
	}

	public void setPrice(float p){
		price = p;
	}

	public Person getPerson(){
		return person;
	}

	public void setPerson(Person person){
		this.person = person;
	}

}

public class reference {

	public static void main(String[] args) {
		// TODO 自动生成的方法存根
		Person per = new Person("zhangsan",30);
		Person cld = new Person("zhangcao",10);
		Book bk = new Book("JAVA SE kaifa",90.0f);
		Book b = new Book("11111",30.0f);
		per.setBook(bk);
		bk.setPerson(per);
		cld.setBook(b);
		b.setPerson(cld);
		per.setChild(cld);
		System.out.println(" name "+per.getName()+" age "+per.getAge()+" book "+per.getBook().getTitle()+" price "+per.getBook().getPrice());
		System.out.println(" title "+bk.getTitle()+" price "+bk.getPrice()+" person "+bk.getPerson().getName()+" age "+bk.getPerson().getAge());
		System.out.println(" cldname "+per.getChild().getName()+" age "+per.getChild().getAge()+" book "+per.getChild().getBook().getTitle()+" price "+per.getChild().getBook().getPrice());
	}

}
15.构造方法
识别合法的构造方法:
1. 构造方法可以被重载,一个构造方法可以通过this关键字调用另一个构造方法,this语句必须位于构造方法的第一行;
重载:方法的重载(overload);重载构成的条件:方法的名称相同,但参数类型或参数个数不同,才能构成方法的重载.
2. 当一个类中没有定义任何构造方法,Java将自动提供一个缺省的构造方法
3. 子类通过super关键字调用父类的一个构造方法
4. 当子类的某个构造方法没有通过super关键字调用父类的构造方法,通过这个构造方法创建子类对象时,会自动先调用父类的缺省构造方法
5. 构造方法不能被static、final、synchronized、abstract、native修饰,但可以被public、private、protected修饰;
6. 构造方法不是类的成员方法
7. 构造方法不能被继承
16.Collections接口
<1>实例操作一:返回不可变的集合
Collections类中可以返回空的List、Set、Map集合,但是通过这种方式返回的对象是无法进行增加数据的,因为在这些操作中并没有实现add()方法
import java.util.Collections;
import java.util.List;
import java.util.Set;

public class Collection_demo {

	public static void main(String[] args) {
		// TODO 自动生成的方法存根
		List<String> allList = Collections.emptyList();			//返回不可变的空List集合
		Set<String> allSet = Collections.emptySet();			//返回不可变的空List集合
	}

}
<2>实例操作二:为集合增加内容
import java.util.ArrayList;
import java.util.Collections;
import java.util.Iterator;
import java.util.List;
import java.util.Map;
import java.util.Set;

public class Collection_demo {

	public static void main(String[] args) {
		// TODO 自动生成的方法存根

		List<String> all = new ArrayList<String>();			//实例化List
		Collections.addAll(all, "zhangsan","lisi","wangwu");		//增加内容
		Iterator<String> iter = all.iterator();					//实例化iterator对象
		while(iter.hasNext()){
		System.out.println(iter.next()+"、");
		}
	}

}
<3>实例操作三:反转集合中的内容
import java.util.ArrayList;
import java.util.Collections;
import java.util.Iterator;
import java.util.List;
import java.util.Map;
import java.util.Set;

public class Collection_demo {

	public static void main(String[] args) {
		// TODO 自动生成的方法存根

		List<String> all = new ArrayList<String>();			//实例化List
		Collections.addAll(all, "zhangsan","lisi","wangwu");		//增加内容
		Collections.reverse(all);											//内容反转保存
		Iterator<String> iter = all.iterator();					//实例化iterator对象
		while(iter.hasNext()){
		System.out.println(iter.next()+"、");
		}
	}

}
<4>实例操作四:检索内容
import java.util.ArrayList;
import java.util.Collections;
import java.util.Iterator;
import java.util.List;
import java.util.Map;
import java.util.Set;

public class Collection_demo {

	public static void main(String[] args) {
		// TODO 自动生成的方法存根

		List<String> all = new ArrayList<String>();			//实例化List
		Collections.addAll(all, "zhangsan","lisi","wangwu");		//增加内容
		Collections.reverse(all);											//内容反转保存
		Iterator<String> iter = all.iterator();					//实例化iterator对象
		while(iter.hasNext()){
		System.out.println(iter.next()+"、");
		}

		int point = Collections.binarySearch(all,"zhangsan");
		System.out.println("检索结果:"+point); 			//输出位置

	}

}
<5>实例操作五:替换集合中的内容
import java.util.ArrayList;
import java.util.Collections;
import java.util.Iterator;
import java.util.List;
import java.util.Map;
import java.util.Set;

public class Collection_demo {

	public static void main(String[] args) {
		// TODO 自动生成的方法存根
//		List<String> allList = Collections.emptyList();			//返回不可变的空List集合
//		Set<String> allSet = Collections.emptySet();			//返回不可变的空List集合

		List<String> all = new ArrayList<String>();			//实例化List
		Collections.addAll(all, "zhangsan","lisi","wangwu");		//增加内容

		Collections.replaceAll(all, "wangwu", "lisi");			//替换内容

		Collections.reverse(all);											//内容反转保存
		Iterator<String> iter = all.iterator();					//实例化iterator对象
		while(iter.hasNext()){
		System.out.println(iter.next()+"、");
		}

		int point = Collections.binarySearch(all,"zhangsan");
		System.out.println("检索结果:"+point); 			//输出位置

	}

}
<6>实例操作六:集合排序
import java.util.ArrayList;
import java.util.Collections;
import java.util.Iterator;
import java.util.List;
import java.util.Map;
import java.util.Set;

public class Collection_demo {

	public static void main(String[] args) {
		// TODO 自动生成的方法存根
//		List<String> allList = Collections.emptyList();			//返回不可变的空List集合
//		Set<String> allSet = Collections.emptySet();			//返回不可变的空List集合

		List<String> all = new ArrayList<String>();			//实例化List
		Collections.addAll(all, "zhangsan","lisi","wangwu");		//增加内容

//		Collections.replaceAll(all, "wangwu", "lisi");			//替换内容

//		Collections.reverse(all);											//内容反转保存
		Iterator<String> iter = all.iterator();					//实例化iterator对象
		while(iter.hasNext()){
		System.out.println(iter.next()+"、");
		}

		Collections.sort(all);
		System.out.println("排序之后的集合");
		iter = all.iterator();
		while(iter.hasNext()){
		System.out.println(iter.next()+"、");
		}

		int point = Collections.binarySearch(all,"zhangsan");
		System.out.println("检索结果:"+point); 			//输出位置

	}

}
<7>实例操作七:交换指定位置的内容
直接使用swap()方法可以把集合中两个位置的内容进行交换
import java.util.ArrayList;
import java.util.Collections;
import java.util.Iterator;
import java.util.List;
import java.util.Map;
import java.util.Set;

public class Collection_demo {

	public static void main(String[] args) {
		// TODO 自动生成的方法存根
//		List<String> allList = Collections.emptyList();			//返回不可变的空List集合
//		Set<String> allSet = Collections.emptySet();			//返回不可变的空List集合

		List<String> all = new ArrayList<String>();			//实例化List
		Collections.addAll(all, "zhangsan","lisi","wangwu");		//增加内容

//		Collections.replaceAll(all, "wangwu", "lisi");			//替换内容

//		Collections.reverse(all);											//内容反转保存
		Iterator<String> iter = all.iterator();					//实例化iterator对象
		while(iter.hasNext()){
		System.out.println(iter.next()+"、");
		}

//		Collections.sort(all);
		Collections.swap(all,0,2);		//交换指定位置的内容
		System.out.println("排序之后的集合");
		iter = all.iterator();
		while(iter.hasNext()){
		System.out.println(iter.next()+"、");
		}

		int point = Collections.binarySearch(all,"zhangsan");
		System.out.println("检索结果:"+point); 			//输出位置

	}

}
17.List接口
List是Collection的子接口,其中可以保存各个重复的内容。

List接口的常用子类
1.ArrayList
<1>实例操作一:向集合中增加元素
<2>实例操作二:删除元素
<3>实例操作三:输出List中的内容
<4>实例操作四:将集合变为对象数组
import java.util.ArrayList;
import java.util.Collection;
import java.util.List;

public class List_demo {

	public static void main(String[] args) {
		// TODO 自动生成的方法存根

		List<String> allList = null;			//定义List对象
		Collection<String> allCollection = null;		//定义Collection对象
		allList = new ArrayList<String>();						//实例化List对象,只能是String类型
		allCollection = new ArrayList<String>();			//实例化Collection,只能是String类型

		allList.add("Hello");				//是从Collection继承的方法
		allList.add(0,"Word");			//此方法为List扩充的方法
		System.out.println(allList); 	//输出集合中的内容

		allCollection.add("zhangsan");				//增加数据
		allCollection.add("www.baidu.com");			//增加数据

		allList.addAll(allCollection);				//是从Collection继承的方法,增加一组对象
		allList.addAll(0,allCollection);				//是从Collection继承的方法,增加一组对象
		System.out.println(allList); 	//输出集合中的内容

		allList.remove(0);		//删除指定位置的元素
		allList.remove("Hello");		//删除指定内容的元素
		System.out.println(allList); 	//输出集合中的内容

		System.out.println("从前向后输出:");
		for(int i=0;i<allList.size();i++){
			System.out.println(allList.get(i)+"、");
		}

		System.out.println("从后向前输出:");
		for(int i=allList.size()-1;i>=0;i--){
			System.out.println(allList.get(i)+"、");
		}

		String str[]  =allList.toArray(new String[] {});		//指定的泛型类型
		System.out.println("转换为数组类型");
		for(int i =0;i<str.length;i++){
			System.out.println(str[i]+"、");
		}

		System.out.println("返回对象数组");
		Object obj[] = allList.toArray();
		for(int i =0;i<obj.length;i++){
			String temp = (String) obj[i];
			System.out.println(temp+"、");
		}

		System.out.println(allList.contains("zhangsan")?"字符串存在":"字符串不存在");
		List<String> allSub = allList.subList(0, 2);		//取出里面的部分集合,前两个
		System.out.println(allSub); 	//输出集合中的内容
		System.out.println("字符串的位置"+allList.indexOf("zhangsan"));	//查询字符串的位置
		System.out.println("集合操作后是否为空?"+allList.isEmpty());
	}

}
2.LinkedList子类与Queue接口
LinkedList表示的是一个链表的操作类,即Java中已经为开发者提供好了一个链表程序,开发者直接使用即可,无需再重新开发。

<1>实例操作一:在链表的开头和结尾增加数据
<2>实例操作二:找到链表头
<3>实例操作三:以先进先出的方式取出全部的数据
import java.util.LinkedList;

public class LinkedList_demo {

	public static void main(String[] args) {
			// TODO 自动生成的方法存根
			LinkedList<String> link = new LinkedList<String>();
			link.add("A");
			link.add("B");
			link.add("C");
			System.out.println("初始化链表:"+link);  //输出链表内容,调用toString

			link.addFirst("X");
			link.addLast("Y");
			System.out.println("添加头尾之后的链表:"+link);  //输出链表内容,调用toString

			System.out.println("使用element()方法找到表头:"+link.element());
			System.out.println("找到之后的link内容"+link);

			System.out.println("使用peek()方法找到表头:"+link.peek());
			System.out.println("找到之后的link内容"+link);

			System.out.println("使用poll()方法找到表头:"+link.poll());
			System.out.println("找到之后的link内容"+link);

			System.out.println("以先进先出的方式输出:");
			for(int i=0;i<link.size()+1;i++){
				System.out.println(link.poll()+"、");
			}
	}


}
在类集中提供了以下4种常见的输出方式。
Iterator:迭代输出,是使用最多的输出方式
ListIterator:是Iterator的子接口,专门用于输出List的内容
Enumeration:是一个旧的接口,功能与Iterator类似
foreach:JDK1.5之后提供的新功能,可以输出数组或者集合
Iterator:迭代输出
碰到集合输出的操作,就一定使用Iterator接口
所谓的迭代输出接口就是将元素一个个进行判断,判断其是否有内容,如果有内容则把内容取出。
<1>实例操作一:输出Collection中的全部内容
import java.util.ArrayList;
import java.util.Iterator;
import java.util.List;
import java.util.SortedSet;
import java.util.TreeSet;

public class Iterator_demo {

	public static void main(String[] args) {
		// TODO 自动生成的方法存根
		List<String> all = new ArrayList<String>();		//实例化List接口
		all.add("A");
		all.add("C");
		all.add("D");
		all.add("E");
		all.add("B");
		Iterator<String> iter = all.iterator();				//直接实例化Iterator接口
		while(iter.hasNext()){										//依次判断
			System.out.println(iter.next()+"、"); 			//输出内容
		}
	}

}
<2>实例操作二:使用Iterator删除指定内容
import java.util.ArrayList;
import java.util.Iterator;
import java.util.List;
import java.util.SortedSet;
import java.util.TreeSet;

public class Iterator_demo {

	public static void main(String[] args) {
		// TODO 自动生成的方法存根
		List<String> all = new ArrayList<String>();		//实例化List接口
		all.add("A");
		all.add("C");
		all.add("D");
		all.add("E");
		all.add("B");
		Iterator<String> iter = all.iterator();				//直接实例化Iterator接口
		while(iter.hasNext()){										//依次判断
			String str = iter.next();									//取出内容
			if("A".equals(str)){
				iter.remove();
			}else{
			System.out.println(str+"、"); 			//输出内容
			}
		}
	}

}
ListIterator:双向迭代输出
ListIterator接口的主要功能是由前向后单向输出,而此时如果想实现有后向前或是由前向后的双向输出,则必须使用Iterator接口的子接口——ListIterator。

<1>进行双向迭代
<2>增加及代替元素
import java.util.ArrayList;
import java.util.Iterator;
import java.util.List;
import java.util.ListIterator;

public class ListIterator_demo {

	public static void main(String[] args) {
		// TODO 自动生成的方法存根
		List<String> all = new ArrayList<String>();		//实例化List接口

		all.add("C");
		all.add("D");
		all.add("E");
		all.add("A");
		all.add("B");
		ListIterator<String> iter = all.listIterator();				//实例化ListIterator接口
		System.out.println("由前向后输出:"); 					//信息输出
		while(iter.hasNext()){										//依次判断
			String str = iter.next();									//取出内容
			System.out.println(str+"、"); 			//输出内容
			iter.set("LIN-"+str);									//替换元素
		}

		System.out.println("由后向前输出:"); 					//信息输出
		iter.add("TONY"); 														//增加元素
		while(iter.hasPrevious()){										//依次判断
			String str = iter.previous();									//取出内容
			System.out.println(str+"、"); 			//输出内容
		}
	}

}
18.Set接口
Set接口也是Collection接口的子接口,Set接口中不能加入重复的元素
Set接口的常用子类
1、散列的存放:HashSet
HashSet是Set接口的一个子类,主要的特点是:里面不能存放重复的元素,而且采用散列的存储方式,所以没有顺序。
2、有序的存放:TreeSet
import java.util.HashSet;
import java.util.LinkedList;
import java.util.Set;
import java.util.TreeSet;

public class Set_demo {

	public static void main(String[] args) {
		// TODO 自动生成的方法存根
//		Set<String> allSet = new HashSet<String>();		//无序
		Set<String> allSet = new TreeSet<String>();		//有序
		allSet.add("A");
		allSet.add("C");
		allSet.add("D");
		allSet.add("E");
		allSet.add("B");

		System.out.println(allSet);  //输出集合内容,调用toString
	}

}
TreeSet中实现了SortedSet接口,此接口主要用于排序操作,即实现此接口的子类都属于排序的子类。

import java.util.Set;
import java.util.SortedSet;
import java.util.TreeSet;

public class SortedSet_demo {

	public static void main(String[] args) {
		// TODO 自动生成的方法存根
		SortedSet<String> allSet = new TreeSet<String>();		//有序
		allSet.add("A");
		allSet.add("C");
		allSet.add("D");
		allSet.add("E");
		allSet.add("B");

		System.out.println("第一个元素:"+allSet.first());
		System.out.println("最后一个元素:"+allSet.last());
		System.out.println("headSet元素:"+allSet.headSet("c"));
		System.out.println("tailSet元素:"+allSet.tailSet("C"));
		System.out.println("subSet元素:"+allSet.subSet("B","D"));
	}

}
19.Map接口
Collection、Set、List接口都属于单值的操作,即每次只能操作一个对象,
而Map与他们不同的是,每次操作的是一对对象,即二元偶对象,Map中的每个元素都使用key->value的形式存储在集合中。

<1>实例操作一:向集合中增加和取出内容
在Map接口中使用put(Object key,Object value)方法可以向集合中增加内容,之后通过get(E key)方法根据key找到其对应的value
import java.util.HashMap;
import java.util.Map;

public class Map_demo {

	public static void main(String[] args) {
		// TODO 自动生成的方法存根
		Map<String,String> map = null;	     //声明Map对象
		map = new HashMap<String,String>();	//key和value是String类
		map.put("zhangsan", "www.baidu.com");	//增加内容
		map.put("lisi", "www.alibaba.com");   //增加内容
		map.put("wangwu", "www.google.com");	//增加内容
		String val = map.get("zhangsan");

		System.out.println("取出内容:"+val);
	}

}
<2>实例操作二:判断指定的key或者value是否存在
import java.util.HashMap;
import java.util.Map;

public class Map_demo {

	public static void main(String[] args) {
		// TODO 自动生成的方法存根
		Map<String,String> map = null;		//声明Map对象
		map = new HashMap<String,String>();	//key和value是String类
		map.put("zhangsan", "www.baidu.com");	//增加内容
		map.put("lisi", "www.alibaba.com");	//增加内容
		map.put("wangwu", "www.google.com");	//增加内容
		String val = map.get("zhangsan");

		System.out.println("取出内容:"+val);

		if(map.containsKey("zhangsan")){		//查找指定的key
			System.out.println("搜索的key存在");
		}else{
			System.out.println("搜索的key不存在");
		}
		if(map.containsValue("www.baidu.com")){		//查找指定的value
			System.out.println("搜索的value存在");
		}else{
			System.out.println("搜索的value不存在");
		}
	}

}
<3>实例操作三:输出全部的key
import java.util.HashMap;
import java.util.Iterator;
import java.util.Map;
import java.util.Set;

public class Map_demo {

	public static void main(String[] args) {
		// TODO 自动生成的方法存根

		Map<String,String> map = null;		//声明Map对象
		map = new HashMap<String,String>();	//key和value是String类
		map.put("zhangsan", "www.baidu.com");	//增加内容
		map.put("lisi", "www.alibaba.com");	//增加内容
		map.put("wangwu", "www.google.com");	//增加内容

		Set<String> keys = map.keySet();		//取得所有的key
		Iterator<String> iter = keys.iterator();	//实例化Iterator

		System.out.println("全部的key:");
		while(iter.hasNext()){
			String str = iter.next();		//取出集合的key
			System.out.println(str+"、");
		}
	}

}
<4>实例操作三:输出全部的value
import java.util.Collection;
import java.util.HashMap;
import java.util.Iterator;
import java.util.Map;
import java.util.Set;

public class Map_demo {

	public static void main(String[] args) {
		// TODO 自动生成的方法存根

		Map<String,String> map = null;		//声明Map对象
		map = new HashMap<String,String>();	//key和value是String类
		map.put("zhangsan", "www.baidu.com");	//增加内容
		map.put("lisi", "www.alibaba.com");	//增加内容
		map.put("wangwu", "www.google.com");	//增加内容

		Collection<String> values = map.values();		//取得所有的value
		Iterator<String> iter = values.iterator();		//实例化Iterator
		System.out.println("全部的values:");
		while(iter.hasNext()){
			String str = iter.next();			//取出集合的key
			System.out.println(str+"、");
		}
	}

}
旧的子类:Hashtable
Hashtable也是Map中的一个子类,属于旧的操作类
import java.util.Collection;
import java.util.HashMap;
import java.util.Hashtable;
import java.util.Iterator;
import java.util.Map;
import java.util.Set;

public class Map_demo {

	public static void main(String[] args) {
		// TODO 自动生成的方法存根

		Map<String,String> map = null;		//声明Map对象
		map = new Hashtable<String,String>();	//key和value是String类
		map.put("zhangsan", "www.baidu.com");	//增加内容
		map.put("lisi", "www.alibaba.com");	//增加内容
		map.put("wangwu", "www.google.com");	//增加内容

		Set<String> keys = map.keySet();		//取得所有的key
		Iterator<String> iter = keys.iterator();	//实例化Iterator
		System.out.println("全部的key:");
		while(iter.hasNext()){
			String str = iter.next();		//取出集合的key
			System.out.println(str+"、");
		}
		Collection<String> values = map.values();	//取得所有的value
		Iterator<String> iter2 = values.iterator();	//实例化Iterator
		System.out.println("全部的values:");
		while(iter2.hasNext()){
			String str = iter2.next();		//取出集合的value
			System.out.println(str+"、");
		}
	}

}

排序的子类:TreeMap
排序后输出
import java.util.Collection;
import java.util.HashMap;
import java.util.Hashtable;
import java.util.Iterator;
import java.util.Map;
import java.util.Set;
import java.util.TreeMap;

public class Map_demo {

	public static void main(String[] args) {
		// TODO 自动生成的方法存根

		Map<String,String> map = null;		//声明Map对象
		map = new TreeMap<String,String>();	//实例化Map对象
		map.put("B", "www.baidu.com");	    //增加内容
		map.put("A", "www.alibaba.com");	//增加内容
		map.put("C", "www.google.com");	    //增加内容
		Set<String> keys = map.keySet();		//取得所有的key
		Iterator<String> iter = keys.iterator();	//实例化Iterator
		System.out.println("全部的key:");
		while(iter.hasNext()){
			String str = iter.next();		//取出集合的key,排序后输出
			System.out.println(str+"、");
		}
	}

}
弱引用类:WeakHashMap
之前的Map子类中的数据都是使用强引用保存的,即里面的内容不管是否使用都始终在集合中保留,如果希望集合自动清理暂时不用的数据就使用WeakHashMap类。这样,当进行垃圾收集时会释放掉集合中的垃圾信息。
import java.util.Collection;
import java.util.HashMap;
import java.util.Hashtable;
import java.util.Iterator;
import java.util.Map;
import java.util.Set;
import java.util.TreeMap;
import java.util.WeakHashMap;

public class Map_demo {

	public static void main(String[] args) {
		// TODO 自动生成的方法存根

		Map<String,String> map = null;			//声明Map对象
		map = new WeakHashMap<String,String>();		//实例化Map对象
		map.put(new String("B"), new String("www.baidu.com"));	//增加内容
		map.put("A", "www.alibaba.com");			//增加内容
		System.gc();
		map.put("C", "www.google.com");	        //增加内容
		System.out.println("内容:"+map);
	}

}


Map输出方式一:Iterator输出Map(使用 allSet = map.entrySet();,重要:开发中经常使用)
import java.util.Collection;
import java.util.HashMap;
import java.util.Hashtable;
import java.util.Iterator;
import java.util.Map;
import java.util.Set;
import java.util.TreeMap;
import java.util.WeakHashMap;

public class Map_demo {

	public static void main(String[] args) {
		// TODO 自动生成的方法存根

		Map<String,String> map = null;			//声明Map对象
		map = new WeakHashMap<String,String>();		//实例化Map对象
		map.put("B", "www.baidu.com");			//增加内容
		map.put("A", "www.alibaba.com");		//增加内容
		map.put("C", "www.google.com");			//增加内容
		Set<Map.Entry<String, String>> allSet = null;	//声明一个Set集合,指定泛型
		allSet = map.entrySet();					//将Map接口实例变为Set接口实例
		Iterator<Map.Entry<String, String>> iter = null;		//声明Iterator对象
		iter = allSet.iterator();					//实例化Iterator对象
		while(iter.hasNext()){
		  Map.Entry<String, String> me = iter.next();			//找到Map.Entry实例
		  System.out.println(me.getKey()+"-->"+me.getValue());
	}
	}

}
Map输出方式二:foreach输出Map
import java.util.Collection;
import java.util.HashMap;
import java.util.Hashtable;
import java.util.Iterator;
import java.util.Map;
import java.util.Set;
import java.util.TreeMap;
import java.util.WeakHashMap;

public class Map_demo {

	public static void main(String[] args) {
		// TODO 自动生成的方法存根

		Map<String,String> map = null;			//声明Map对象
		map = new WeakHashMap<String,String>();		//实例化Map对象
		map.put("B", "www.baidu.com");			//增加内容
		map.put("A", "www.alibaba.com");		//增加内容
		map.put("C", "www.google.com");			//增加内容

		for(Map.Entry<String, String> me: map.entrySet()){
			System.out.println(me.getKey()+"-->"+me.getValue());
		}

	}

}
直接使用非系统类作为Key
import java.util.Collection;
import java.util.HashMap;
import java.util.Hashtable;
import java.util.Iterator;
import java.util.Map;
import java.util.Set;
import java.util.TreeMap;
import java.util.WeakHashMap;

public class Map_demo {

	public static void main(String[] args) {
		// TODO 自动生成的方法存根

		Map<String,person> map = null;				//声明Map对象,指定泛型类型
		map = new HashMap<String,person>();			//实例化Map对象
		map.put("zhangsan", new person("张三",30));
		System.out.println(map.get("zhangsan"));
	}

}

key可以重复的Map集合:IdentityHashMap
import java.util.Collection;
import java.util.HashMap;
import java.util.Hashtable;
import java.util.IdentityHashMap;
import java.util.Iterator;
import java.util.Map;
import java.util.Set;
import java.util.TreeMap;
import java.util.WeakHashMap;

public class Map_demo {

	public static void main(String[] args) {
		// TODO 自动生成的方法存根

		Map<person,String> map = null;				//声明Map对象,指定泛型类型
		map = new IdentityHashMap<person,String>();		//实例化Map对象
		map.put(new person("张三",30),"zhangsan_1");
		map.put(new person("张三",30),"zhangsan_1");

		Set<Map.Entry<person, String>> allSet = null;
		allSet = map.entrySet();
		Iterator<Map.Entry<person, String>> iter = null;
		iter = allSet.iterator();
		while(iter.hasNext()){
		  Map.Entry<person, String> me = iter.next();		//找到Map.Entry实例
		  System.out.println(me.getKey()+"-->"+me.getValue());
		}
	}

}
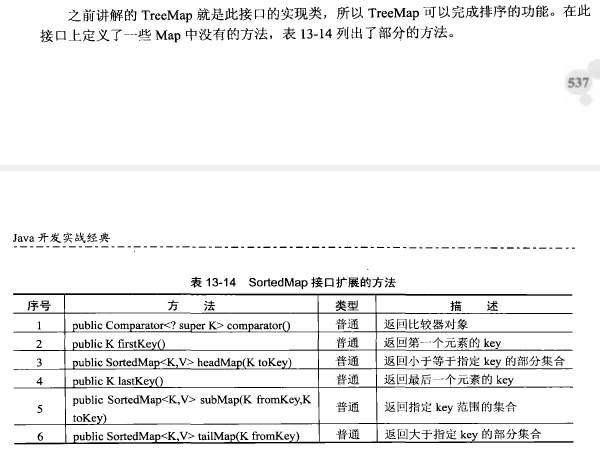
SortedMap接口是排序接口,只要是实现了此接口的子类,都属于排序的子类,TreeMap也是此接口的一个子类。
import java.util.Map;
import java.util.SortedMap;
import java.util.TreeMap;

public class SortedMap_demo {

	public static void main(String[] args) {
		// TODO 自动生成的方法存根
		SortedMap<String,String> map = null;				//声明Map对象
		map = new TreeMap<String,String>();	//key和value是String类
		map.put("zhangsan", "www.baidu.com");	//增加内容
		map.put("lisi", "www.alibaba.com");			//增加内容
		map.put("wangwu", "www.google.com");	//增加内容
		System.out.println("第一个元素的内容的key:"+map.firstKey());
		System.out.println("对应的值:"+map.get(map.firstKey()));
		System.out.println("最后一个元素的内容的key:"+map.lastKey());
		System.out.println("对应的值:"+map.get(map.lastKey()));

		System.out.println("输出小于指定范围的");
		for(Map.Entry<String, String> me: map.headMap("wangwu").entrySet()){
		System.out.println(me.getKey()+"-->"+me.getValue());
		}

		System.out.println("输出大于等于指定范围的");
		for(Map.Entry<String, String> me: map.tailMap("wangwu").entrySet()){
		System.out.println(me.getKey()+"-->"+me.getValue());
		}

		System.out.println("输出在指定范围的");
		for(Map.Entry<String, String> me: map.subMap("lisi","zhangsan").entrySet()){
		System.out.println(me.getKey()+"-->"+me.getValue());
		}
	}

}
20.输入数据类
1.Scanner类
专门的输入数据类,可以完成输入数据操作,也可以方便地对输入数据进行验证。
此类存放在java.util包中


<1>实例操作一:实现基本的数据输入
使用Scanner类的next()方法
import java.util.Scanner;

public class Scanner_demo {

	public static void main(String[] args) {
		// TODO 自动生成的方法存根
		Scanner scan = new Scanner(System.in);
		scan.useDelimiter("\n");			//修改输入数据的分隔符,不然空格以后的字符串不能显示,\n回车
		System.out.println("输入数据:");
		String str = scan.next();
		System.out.println("输入数据的数据为:"+str);
	}

}
如果输入int或者是float类型的数据,scanner类中也支持,不过最好先使用hasNextXxx()方法进行验证
import java.util.Scanner;

public class Scanner_demo {

	public static void main(String[] args) {
		// TODO 自动生成的方法存根

		Scanner scan = new Scanner(System.in); 	//从键盘接收数据
		int i =0;
		float f = 0.0f;
		System.out.println("输入整数:");
		if(scan.hasNextInt()){
			i = scan.nextInt();
			System.out.println("输入的整数"+i);
		}else{
			System.out.println("输入的不是整数");
		}

		System.out.println("输入小数:");
		if(scan.hasNextFloat()){
			f = scan.nextFloat();
			System.out.println("输入的小数"+f);
		}else{
			System.out.println("输入的不是小数");
		}
	}

}
<2>实例操作一:实现日期格式的数据输入
使用hasNext()对输入的数据进行正则验证,如果合法,则转换成Date类型
import java.text.ParseException;
import java.text.SimpleDateFormat;
import java.util.Date;
import java.util.Scanner;

public class Scanner_demo {

	public static void main(String[] args) {
		// TODO 自动生成的方法存根
//		Scanner scan = new Scanner(System.in);
//		scan.useDelimiter("\n");			//修改输入数据的分隔符,不然空格以后的字符串不能显示,\n回车
//		System.out.println("输入数据:");
//		String str = scan.next();
//		System.out.println("输入数据的数据为:"+str);

//		Scanner scan = new Scanner(System.in); 	//从键盘接收数据
//		int i =0;
//		float f = 0.0f;
//		System.out.println("输入整数:");
//		if(scan.hasNextInt()){
//			i = scan.nextInt();
//			System.out.println("输入的整数"+i);
//		}else{
//			System.out.println("输入的不是整数");
//		}
//
//		System.out.println("输入小数:");
//		if(scan.hasNextFloat()){
//			f = scan.nextFloat();
//			System.out.println("输入的小数"+f);
//		}else{
//			System.out.println("输入的不是小数");
//		}

		Scanner scan = new Scanner(System.in); 	//从键盘接收数据
		System.out.println("输入日期(yyyy-MM-dd):");
		String str = null;
		Date date = null;
		if(scan.hasNext("^\\d{4}-\\d{2}-\\d{2}$")){		//判断输入格式是否是日期
			str = scan.next("^\\d{4}-\\d{2}-\\d{2}$");		//接收日期格式的字符串
			try{
				date = new SimpleDateFormat("yyyy-MM-dd").parse(str);
			}catch(ParseException e){
				e.printStackTrace();
			}
		}else{
			System.out.println("输入的日期格式错误");
		}
		System.out.println(date);
	}

}
<3>实例操作三:从文件中得到数据
import java.io.File;
import java.io.FileNotFoundException;
import java.text.ParseException;
import java.text.SimpleDateFormat;
import java.util.Date;
import java.util.Scanner;

public class Scanner_demo {

	public static void main(String[] args) {
		// TODO 自动生成的方法存根
//		Scanner scan = new Scanner(System.in);
//		scan.useDelimiter("\n");			//修改输入数据的分隔符,不然空格以后的字符串不能显示,\n回车
//		System.out.println("输入数据:");
//		String str = scan.next();
//		System.out.println("输入数据的数据为:"+str);

//		Scanner scan = new Scanner(System.in); 	//从键盘接收数据
//		int i =0;
//		float f = 0.0f;
//		System.out.println("输入整数:");
//		if(scan.hasNextInt()){
//			i = scan.nextInt();
//			System.out.println("输入的整数"+i);
//		}else{
//			System.out.println("输入的不是整数");
//		}
//
//		System.out.println("输入小数:");
//		if(scan.hasNextFloat()){
//			f = scan.nextFloat();
//			System.out.println("输入的小数"+f);
//		}else{
//			System.out.println("输入的不是小数");
//		}

//		Scanner scan = new Scanner(System.in); 	//从键盘接收数据
//		System.out.println("输入日期(yyyy-MM-dd):");
//		String str = null;
//		Date date = null;
//		if(scan.hasNext("^\\d{4}-\\d{2}-\\d{2}$")){		//判断输入格式是否是日期
//			str = scan.next("^\\d{4}-\\d{2}-\\d{2}$");		//接收日期格式的字符串
//			try{
//				date = new SimpleDateFormat("yyyy-MM-dd").parse(str);
//			}catch(ParseException e){
//				e.printStackTrace();
//			}
//		}else{
//			System.out.println("输入的日期格式错误");
//		}
//		System.out.println(date);

		File f = new File("/home/common/software/coding/HelloWord/HelloWord/test.txt");//路径
		Scanner scan = null;
		try{
			scan = new Scanner(f);					//从文件接收数据
		}catch(FileNotFoundException e){
			e.printStackTrace();
		}
		StringBuffer str = new StringBuffer();		//用于接收数据
		while(scan.hasNext()){								//判断是否还有内容
			str.append(scan.next()).append("\n");	//分隔符分隔字符串,在每个字符串之后加上回车
		}
		System.out.println(str);
	}

}
2.BufferedReader类
BufferedReader类用于从缓冲区中读取内容,多有的输入字节数据都将放在缓冲区中。

BufferedReader中定义的构造方法只能接收字符输入流的实例,所以必须使用字符输入流和字节输入流的转换类InputStreamReader将字节输入流System.in变为字符流
以下程序没有长度的限制,也可以正确地接收中文,所以以下代码就是键盘输入数据的标准格式
import java.io.BufferedReader;
import java.io.IOException;
import java.io.InputStreamReader;

public class BufferedReader_demo {

	public static void main(String[] args) {
		// TODO 自动生成的方法存根
		BufferedReader buf = null;				//声明BufferedReader对象
		buf = new BufferedReader(new InputStreamReader(System.in));	//实例化BufferedReader对象
		String str = null;								//接收输入内容
		System.out.print("请输入内容:");
		try{
			str = buf.readLine();						//读取输入内容
		}catch(IOException e){						//要进行异常处理
			e.printStackTrace();
		}
		System.out.println("输入的内容:"+str);
	}
}
实例操作一:加法操作
输入两个数字,并让两个数字相加
可以实现整数、小数、字符串和日期类型数据的输入
import java.io.BufferedReader;
import java.io.IOException;
import java.io.InputStreamReader;
import java.text.ParseException;
import java.text.SimpleDateFormat;
import java.util.Date;

class InputData{
	private BufferedReader buf = null;			//声明BufferReader对象

	public InputData() {		//构造方法
		this.buf = new BufferedReader(new InputStreamReader(System.in));	//实例化BufferedReader对象
	}

	public String getString(String info){		//从此方法中得到字符串的信息
		String temp = null;								//接收输入内容
		System.out.println(info);
		 try{
			 temp = this.buf.readLine();                     //读取输入内容
	        }catch(IOException e){                      		//要进行异常处理
	            e.printStackTrace();
	        }
		return temp;
	}

	public int getInt(String info,String err){		//得到一个整数的输入数据
		int temp = 0;
		String str = null;
		boolean flag = true;									//定义一个循环的处理标志
		while(flag){
			str = this.getString(info);
			if(str.matches("^\\d+$")){							//符合数字的格式
				temp = Integer.parseInt(str);
				flag = false;
			}else{
				System.out.println(err);
			}
		}
		return temp;
	}

	public Float getFloat(String info,String err){		//得到一个小数的输入数据
		Float temp = 0f;
		String str = null;
		boolean flag = true;									//定义一个循环的处理标志
		while(flag){
			str = this.getString(info);
			if(str.matches("^\\d+.?\\d+$")){							//符合小数的格式
				temp = Float.parseFloat(str);
				flag = false;
			}else{
				System.out.println(err);
			}
		}
		return temp;
	}

	public Date getDate(String info,String err){		//得到一个日期的输入数据
		Date d = null;
		String str = null;
		boolean flag = true;									//定义一个循环的处理标志
		while(flag){
			str = this.getString(info);
			if(str.matches("^\\d{4}+\\d{2}$")){							//符合小数的格式
				SimpleDateFormat sdf = new SimpleDateFormat("yyyy-MM-dd");
				try{
					d = sdf.parse(str);				//将字符串变为Date型数据
				}catch(ParseException e){
					e.printStackTrace();
				}
				flag = false;							//更改标志位后,将退出循环
			}else{
				System.out.println(err);
			}
		}
		return d;
	}
}

public class BufferedReader_demo2 {

	public static void main(String[] args) {
		// TODO 自动生成的方法存根
		int i;
		int j;
		InputData input = new InputData();
		i = input.getInt("请输入第一个数字:", "输入的数据必须是数字,请重新输入!");
		j = input.getInt("请输入第二个数字:", "输入的数据必须是数字,请重新输入!");
		System.out.println(i+"+"+j+"="+(i+j));
	}
}
实例操作二:菜单显示
class Operation{
	public static void add(){
		System.out.println("你选择的是增加操作!");
	}
	public static void delete(){
		System.out.println("你选择的是删除操作!");
	}
	public static void update(){
		System.out.println("你选择的是更新操作!");
	}
	public static void find(){
		System.out.println("你选择的是查看操作!");
	}
}

//主类
//Function        : 	menu_demo;
public class menu_demo {

	public static void main(String[] args) {
		// TODO 自动生成的方法存根
		while(true){
			show();
		}
	}

	public static void show(){
		System.out.println("菜单系统");
		System.out.println("【1】增加数据");
		System.out.println("【2】删除数据");
		System.out.println("【3】修改数据");
		System.out.println("【4】查看数据");
		System.out.println("【0】系统退出");
		InputData input = new InputData();
		int i = input.getInt("请选择", "请输入正确的选项");
		switch(i){
			case 1:{
				Operation.add();
				break;
			}
			case 2:{
				Operation.delete();
				break;
			}
			case 3:{
				Operation.update();
				break;
			}
			case 4:{
				Operation.find();
				break;
			}
			case 0:{
				System.exit(1);
				break;
			}
			default:{
				System.out.println("请选择正确的操作");
			}
		}
	}
}
20.File类
使用File类可以进行创建或者删除文件等常用操作。

<1>创建一个新文件
import java.io.File;
import java.io.IOException;

public class File_demo {

	public static void main(String[] args) {
		// TODO 自动生成的方法存根
		File f = new File("/home/common/software/coding/HelloWord/HelloWord/test.txt");//路径
		System.out.println("pathSeparator:"+File.pathSeparator);		//调用静态常量
		System.out.println("separator:"+File.separator);							//调用静态常量
		try{
			f.createNewFile();
		}catch(IOException e){
			e.printStackTrace();
		}
	}

}


<2>删除一个指定的文件
使用File类中的delete()方法
import java.io.File;
import java.io.IOException;

public class delete_demo {

	public static void main(String[] args) {
		// TODO 自动生成的方法存根
		File f = new File("/home/common/software/coding/HelloWord/HelloWord/test.txt");//路径
		if(f.exists()){
			f.delete();
		}else{
			try{
				f.createNewFile();
			}catch(IOException e){
				e.printStackTrace();
			}
		}
	}

}
<3>创建一个文件夹
使用mkdir()方法完成
import java.io.File;
import java.io.IOException;

public class delete_demo {

	public static void main(String[] args) {
		// TODO 自动生成的方法存根
		File f = new File("/home/common/software/coding/HelloWord/HelloWord/test.txt");//路径
		if(f.exists()){
			f.delete();
		}else{
			try{
				f.createNewFile();
			}catch(IOException e){
				e.printStackTrace();
			}
		}
		File f1 = new File("/home/common/software/coding/HelloWord/HelloWord/test");//路径
		f1.mkdirs();
	}

}
<4>列出指定目录的全部文件

import java.io.File;
import java.io.IOException;

public class listFile_demo {

	public static void main(String[] args) {
		// TODO 自动生成的方法存根
		File f = new File("/home/common/software/coding/HelloWord/HelloWord");//路径
//		String str[] = f.list();						//列出给定目录中的内容
		File files[] = f.listFiles();						//列出给定目录中的文件,包括路径
		for(int i = 0;i<files.length;i++){
			System.out.println(files[i]);
		}
	}
}
<5>判断一个给定的路径是否是目录
使用isDirectory()方法判断给定的路径是否是目录
import java.io.File;
import java.io.IOException;

public class listFile_demo {

	public static void main(String[] args) {
		// TODO 自动生成的方法存根
		File f = new File("/home/common/software/coding/HelloWord/HelloWord");//路径

		if(f.isDirectory()){
			System.out.println("是路径");
		}
	}
}
<6>列出指定目录的全部内容
import java.io.File;
import java.io.IOException;

public class File_demo {

	public static void main(String[] args) {
		// TODO 自动生成的方法存根

		File f = new File("/home/common/software/coding/HelloWord/HelloWord");//路径
		print(f);
	}

	public static void print(File file){
		if(file != null){
			if(file.isDirectory()){							//判断是否是目录
				File f[] = file.listFiles();					//如果是目录,则列出全部的内容
				if(f != null){
					for(int i=0;i<f.length;i++){		//列出目录下的全部内容
						print(f[i]);
					}
				}
			}else{
				System.out.println(file);				//如果不是目录,则直接打印路径信息
			}
		}
	}
}
File类只是针对文件本身进行操作,而如果要对文件内容进行操作,则可以使用RandomAccessFile类,此类属于随机读取类,可以随机地读取一个文件中指定位置的数据。

import java.io.File;
import java.io.RandomAccessFile;

public class RandomAccessFile_demo {

	public static void main(String[] args) throws Exception{
		// TODO 自动生成的方法存根
		File f = new File("/home/common/software/coding/HelloWord/HelloWord/test.txt");//路径
		RandomAccessFile rdf = null;				//声明一个RandomAccessFile类对象
		rdf = new RandomAccessFile(f,"r");	//以读写方式打开文件,会自动创建新文件

		String name = "zhangsan";
		int age = 30;

		rdf.writeBytes(name);
		rdf.writeInt(age);

		name = "lisi";
		age = 22;

		rdf.writeBytes(name);
		rdf.writeInt(age);

		name = "wangwu";
		age = 32;

		rdf.writeBytes(name);
		rdf.writeInt(age);
		rdf.close();
	}
}
22.日期操作类
主要使用java.util包中的Date、Calendar以及java.text包中的SimpleDateFormat
1.Date类
import java.util.Date;

public class Date_demo {

	public static void main(String[] args) {
		// TODO 自动生成的方法存根
		Date date = new Date();										//实例化Date类对象
		System.out.println("当前日期为:"+date);		//输出日期
	}

}
2.Calendar类

import java.util.Calendar;
import java.util.GregorianCalendar;

public class Calendar_demo {

	public static void main(String[] args) {
		// TODO 自动生成的方法存根
		Calendar calendar = null;							//声明一个Calendar对象
		calendar = new GregorianCalendar();		//通过子类为其实例化
		System.out.println("年:"+calendar.get(Calendar.YEAR));
		System.out.println("月:"+(calendar.get(Calendar.MONTH)+1));
		System.out.println("日:"+calendar.get(Calendar.DAY_OF_MONTH));
		System.out.println("时:"+calendar.get(Calendar.HOUR_OF_DAY));
		System.out.println("分:"+calendar.get(Calendar.MINUTE));
		System.out.println("秒:"+calendar.get(Calendar.SECOND));
		System.out.println("毫秒:"+calendar.get(Calendar.MILLISECOND));
	}

}
输出
年:2017
月:5
日:17
时:20
分:56
秒:8
毫秒:427
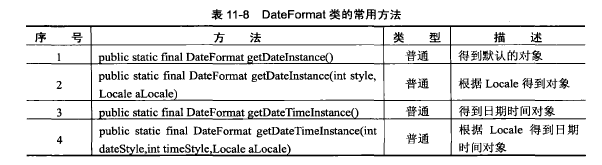
DateFormat类
对java.util.Date进行格式化操作,为了符合中国人的习惯
DateFormat类和MessageFormat类都属于Format类的子类,专门用于格式化数据使用
DateFormat类是一个抽象类,无法直接实例化,但是在此抽象类中提供了一个静态方法,可以直接取得本类的实例。
import java.util.Date;
import java.text.DateFormat;

public class DateFormat_demo {

	public static void main(String[] args) {
		// TODO 自动生成的方法存根
		DateFormat df1 = null;										//声明DateFormat类对象
		DateFormat df2 = null;										//声明DateFormat类对象
		df1 = DateFormat.getDateInstance();				//取得日期
		df2 = DateFormat.getDateTimeInstance();		//取得日期时间
		System.out.println("DATE:"+df1.format(new Date()));		//格式化日期
		System.out.println("DATETIME:"+df2.format(new Date()));
	}

}
指定显示的风格
import java.util.Date;
import java.util.Locale;
import java.text.DateFormat;

public class DateFormat_demo {

	public static void main(String[] args) {
		// TODO 自动生成的方法存根
		DateFormat df1 = null;										//声明DateFormat类对象
		DateFormat df2 = null;										//声明DateFormat类对象


		//取得日期时间,设置日期的显示格式、时间的显示格式
		df1 = DateFormat.getDateInstance(DateFormat.YEAR_FIELD,new Locale("zh","CN"));
		df2 = DateFormat.getDateTimeInstance(DateFormat.YEAR_FIELD,DateFormat.ERA_FIELD,new Locale("zh","CN"));
		System.out.println("DATE:"+df1.format(new Date()));		//格式化日期
		System.out.println("DATETIME:"+df2.format(new Date()));
	}

}
输出
DATE:2017年5月17日
DATETIME:2017年5月17日 下午09时38分22秒 CST
格式化日期操作
首先使用第1个模板将字符串中表示的日期数字取出,然后再使用第2个模板将这些日期数字重新转化为新的格式表示。
import java.util.Date;
import java.text.ParseException;
import java.text.SimpleDateFormat;

public class DateFormat_demo {

	public static void main(String[] args) {
		// TODO 自动生成的方法存根
//		DateFormat df1 = null;										//声明DateFormat类对象
//		DateFormat df2 = null;										//声明DateFormat类对象
////		df1 = DateFormat.getDateInstance();				//取得日期
////		df2 = DateFormat.getDateTimeInstance();		//取得日期时间
//
//		//取得日期时间,设置日期的显示格式、时间的显示格式
//		df1 = DateFormat.getDateInstance(DateFormat.YEAR_FIELD,new Locale("zh","CN"));
//		df2 = DateFormat.getDateTimeInstance(DateFormat.YEAR_FIELD,DateFormat.ERA_FIELD,new Locale("zh","CN"));
//		System.out.println("DATE:"+df1.format(new Date()));		//格式化日期
//		System.out.println("DATETIME:"+df2.format(new Date()));

		String strDate = "2016-3-11 10:20:30.123";		//定义日期时间的字符串
		String pat1 = "yyyy-MM-dd HH:mm:ss.SSS";		//准备第1个模板,从字符串中提取数字
		String pat2 = "yyyy年MM月dd日HH时mm分ss秒SSS毫秒";		//准备第1个模板,从字符串中提取数字
		SimpleDateFormat sdf1 = new SimpleDateFormat(pat1);			//实例化模板对象
		SimpleDateFormat sdf2 = new SimpleDateFormat(pat2);			//实例化模板对象

		Date d = null;
		try{
			d = sdf1.parse(strDate);				//将给定字符串中的日期提取出来
		}catch(ParseException e){				//如果提供的字符串格式有错误,则进行异常处理
			e.printStackTrace();
		}
		System.out.println(sdf2.format(d));				//将日期变成新的格式
	}

}
输出
2016年03月11日10时20分30秒123毫秒
SimpleDateFormat的parse方法
	public static void main(String[] args) throws ParseException {
		// TODO 自动生成的方法存根
		SimpleDateFormat sdf = new SimpleDateFormat("yyyy-MM-dd");
		String dateString = "2017-08-01";
		Date date = sdf.parse(dateString);
		System.out.println(date);
	}
输出
Tue Aug 01 00:00:00 CST 2017
实现:基于Calendar类
import java.sql.Date;
import java.util.Calendar;
import java.util.GregorianCalendar;

class DateTime {
	private Calendar calendar = null;		//定义一个Calendar对象,可以取得时间

	public DateTime() {
		super();
		this.calendar = new GregorianCalendar();		//通过Calendar类的子类实例化
	}

	public String getDate(){		//得到完整的日期,格式为:yyyy-MM-dd HH:mm:ss.SSS
		//考虑到程序要频繁修改字符串,所以使用StringBuffer提升性能
		StringBuffer buf = new StringBuffer();
		//依次取得时间
		buf.append(calendar.get(Calendar.YEAR)).append("-");
		buf.append(this.addZero(calendar.get(Calendar.MONTH)+1, 2));
		buf.append("-");
		buf.append(this.addZero(calendar.get(Calendar.DAY_OF_MONTH), 2));
		buf.append(" ");
		buf.append(this.addZero(calendar.get(Calendar.HOUR_OF_DAY), 2));
		buf.append(":");
		buf.append(this.addZero(calendar.get(Calendar.MINUTE), 2));
		buf.append(":");
		buf.append(this.addZero(calendar.get(Calendar.SECOND), 2));
		buf.append(".");
		buf.append(this.addZero(calendar.get(Calendar.MILLISECOND), 3));

		return buf.toString();

	}

	public String getDateComplete(){		//得到完整的日期,格式为:yyyy年MM月dd日HH时mm分ss秒SSS毫秒
		//考虑到程序要频繁修改字符串,所以使用StringBuffer提升性能
		StringBuffer buf = new StringBuffer();
		//依次取得时间
		buf.append(calendar.get(Calendar.YEAR)).append("年");
		buf.append(this.addZero(calendar.get(Calendar.MONTH)+1, 2));
		buf.append("月");
		buf.append(this.addZero(calendar.get(Calendar.DAY_OF_MONTH), 2));
		buf.append("日");
		buf.append(this.addZero(calendar.get(Calendar.HOUR_OF_DAY), 2));
		buf.append("时");
		buf.append(this.addZero(calendar.get(Calendar.MINUTE), 2));
		buf.append("分");
		buf.append(this.addZero(calendar.get(Calendar.SECOND), 2));
		buf.append("秒");
		buf.append(this.addZero(calendar.get(Calendar.MILLISECOND), 3));
		buf.append("毫秒");

		return buf.toString();

	}

	//考虑到日期中有前导0,所以在此处加上了补零的方法
	private String addZero(int num,int len){
		StringBuffer s = new StringBuffer();
		s.append(num);
		while(s.length()<len){		//如果长度不足,则继续补零
			s.insert(0,"0");					//在第1个位置处补零
		}
		return s.toString();
	}

	public String getTimeStamp(){		//得到时间戳:yyyyMMddHHmmssSSS
		StringBuffer buf = new StringBuffer();
		buf.append(calendar.get(Calendar.YEAR));
		buf.append(this.addZero(calendar.get(Calendar.MONTH)+1, 2));
		buf.append(this.addZero(calendar.get(Calendar.DAY_OF_MONTH), 2));
		buf.append(this.addZero(calendar.get(Calendar.HOUR_OF_DAY), 2));
		buf.append(this.addZero(calendar.get(Calendar.MINUTE), 2));
		buf.append(this.addZero(calendar.get(Calendar.SECOND), 2));
		buf.append(this.addZero(calendar.get(Calendar.MILLISECOND), 3));

		return buf.toString();

	}

}

public class CalendarClass_demo {

	public static void main(String[] args) {
		// TODO 自动生成的方法存根
		DateTime dt = new DateTime();			//实例化DateTime对象
		System.out.println("系统时间:"+dt.getDate());
		System.out.println("中文时间:"+dt.getDateComplete());
		System.out.println("系统时间:"+dt.getTimeStamp());
	}

}
输出
系统时间:2017-05-17 20:41:06.508
中文时间:2017年05月17日20时41分06秒508毫秒
系统时间:20170517204106508
实现:基于SimpleDateFormat类
import java.util.Date;
import java.text.SimpleDateFormat;

class DateTime_1 {
	private SimpleDateFormat sdf = null;		//声明日期格式化操作对象,直接对new Date()进行实例化

	//得到日期,格式为:yyyy-MM-dd HH:mm:ss.SSS
	public String getDate(){
		this.sdf = new SimpleDateFormat("yyyy-MM-dd HH:mm:ss.SSS");
		return this.sdf.format(new Date());
	}

	//得到完整的日期,格式为:yyyy年MM月dd日HH时mm分ss秒SSS毫秒
	public String getDateComplete(){
		this.sdf = new SimpleDateFormat("yyyy年MM月dd日HH时mm分ss秒SSS毫秒");
		return this.sdf.format(new Date());
	}

	//得到时间戳,格式为:yyyyMMddHHmmssSSS
	public String getDateStamp(){
		this.sdf = new SimpleDateFormat("yyyyMMddHHmmssSSS");
		return this.sdf.format(new Date());
	}
}

public class SimpleDateFormat_demo {

	public static void main(String[] args) {
		// TODO 自动生成的方法存根
		DateTime dt = new DateTime();			//实例化DateTime对象
		System.out.println("系统时间:"+dt.getDate());
		System.out.println("中文时间:"+dt.getDateComplete());
		System.out.println("系统时间:"+dt.getTimeStamp());
	}
}
输出
系统时间:2017-05-17 20:59:26.224
中文时间:2017年05月17日20时59分26秒224毫秒
系统时间:20170517205926224
23.Properties属性类
在一个属性文件中保存了多个属性,每一个属性就是直接用字符串表示出来的"key=value对",而如果想要轻松地操作这些属性文件中的属性,可以通过Properties类方便地完成。

<1>设置和取得属性
import java.util.Properties;

public class Properties_demo {

	public static void main(String[] args) {
		// TODO 自动生成的方法存根
		Properties pro = new Properties();
		pro.setProperty("BJ", "Beijing");
		pro.setProperty("NJ", "Nanjing");
		pro.setProperty("TJ", "Tianjin");
		System.out.println("获得属性"+pro.getProperty("BJ"));
		System.out.println("获得属性不存在"+pro.getProperty("HB"));
		System.out.println("获得属性不存在,同时设置默认的显示值"+pro.getProperty("HB",":::没有发现"));
	}
}
<2>将属性保存在普通文件中
import java.io.File;
import java.io.FileOutputStream;
import java.util.Properties;

public class Properties_demo {

	public static void main(String[] args) {
		// TODO 自动生成的方法存根
		Properties pro = new Properties();
		pro.setProperty("BJ", "Beijing");
		pro.setProperty("NJ", "Nanjing");
		pro.setProperty("TJ", "Tianjin");
		System.out.println("获得属性"+pro.getProperty("BJ"));
		System.out.println("获得属性不存在"+pro.getProperty("HB"));
		System.out.println("获得属性不存在,同时设置默认的显示值"+pro.getProperty("HB",":::没有发现"));

		File f = new File("/home/common/software/coding/HelloWord/HelloWord/test.properties");//路径
		try{
			pro.store(new FileOutputStream(f),"pro info");		//保存并添加注释信息
		}catch(Exception e){
			e.printStackTrace();
		}
	}
}
<3>从普通文件中读取属性内容
import java.io.File;
import java.io.FileInputStream;
import java.io.FileOutputStream;
import java.util.Properties;

public class Properties_demo {

	public static void main(String[] args) {
		// TODO 自动生成的方法存根
		Properties pro = new Properties();
		pro.setProperty("BJ", "Beijing");
		pro.setProperty("NJ", "Nanjing");
		pro.setProperty("TJ", "Tianjin");
		System.out.println("获得属性"+pro.getProperty("BJ"));
		System.out.println("获得属性不存在"+pro.getProperty("HB"));
		System.out.println("获得属性不存在,同时设置默认的显示值"+pro.getProperty("HB",":::没有发现"));

		File f = new File("/home/common/software/coding/HelloWord/HelloWord/test.properties");//路径
		try{
			pro.load(new FileInputStream(f));		//读取属性文件
		}catch(Exception e){
			e.printStackTrace();
		}
		System.out.println("BJ属性值为"+pro.getProperty("BJ"));
	}
}
<4>将属性保存在XML文件中
import java.io.File;
import java.io.FileInputStream;
import java.io.FileOutputStream;
import java.util.Properties;

public class Properties_demo {

	public static void main(String[] args) {
		// TODO 自动生成的方法存根
		Properties pro = new Properties();
		pro.setProperty("BJ", "Beijing");
		pro.setProperty("NJ", "Nanjing");
		pro.setProperty("TJ", "Tianjin");
		System.out.println("获得属性"+pro.getProperty("BJ"));
		System.out.println("获得属性不存在"+pro.getProperty("HB"));
		System.out.println("获得属性不存在,同时设置默认的显示值"+pro.getProperty("HB",":::没有发现"));

		File f = new File("/home/common/software/coding/HelloWord/HelloWord/test.xml");//路径
		try{
			pro.storeToXML(new FileOutputStream(f),"pro info");		//保存并添加注释信息
		}catch(Exception e){
			e.printStackTrace();
		}
		System.out.println("BJ属性值为"+pro.getProperty("BJ"));
	}
}
<5>从XML文件中读取属性
import java.io.File;
import java.io.FileInputStream;
import java.io.FileOutputStream;
import java.util.Properties;

public class Properties_demo {

	public static void main(String[] args) {
		// TODO 自动生成的方法存根
		Properties pro = new Properties();
		pro.setProperty("BJ", "Beijing");
		pro.setProperty("NJ", "Nanjing");
		pro.setProperty("TJ", "Tianjin");
		System.out.println("获得属性"+pro.getProperty("BJ"));
		System.out.println("获得属性不存在"+pro.getProperty("HB"));
		System.out.println("获得属性不存在,同时设置默认的显示值"+pro.getProperty("HB",":::没有发现"));

		File f = new File("/home/common/software/coding/HelloWord/HelloWord/test.xml");//路径
		try{
			pro.loadFromXML(new FileInputStream(f));		//读取属性文件
		}catch(Exception e){
			e.printStackTrace();
		}
		System.out.println("BJ属性值为"+pro.getProperty("BJ"));
	}
}
24.runtime类
Runtime类表示运行时的操作类,是一个封装了JVM进程的类,每一个JVM都对应着一个Runtime类的实例,此实例由JVM运行时为其实例化。
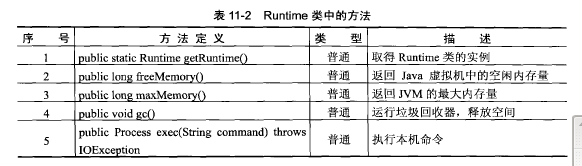
public class Runtime_demo {

	public static void main(String[] args) {
		// TODO 自动生成的方法存根

		Runtime run = Runtime.getRuntime();

		System.out.println("JVM最大内存:"+run.maxMemory());
		System.out.println("JVM空闲内存量:"+run.freeMemory());
		String str = "HELLO";
		for (int i=0;i<1000;i++){
			System.out.println(str += i);
		}
		System.out.println("JVM空闲内存量:"+run.freeMemory());
		run.gc();					//进行垃圾收集,释放空间
		System.out.println("JVM空闲内存量:"+run.freeMemory());
	}
}
Runtime类与Process类
可以直接使用Runtime类运行本机的可执行程序
public class Runtime_demo {

	public static void main(String[] args) {
		// TODO 自动生成的方法存根

		Runtime run = Runtime.getRuntime();

		try{
			run.exec("notepad.exe");
		}catch(Exception e){
			e.printStackTrace();
		}
	}
}
可以通过控制Process进行系统的进程控制,如果想要让进程消失,则可以使用destroy()方法
public class Runtime_demo {

	public static void main(String[] args) {
		// TODO 自动生成的方法存根

		Runtime run = Runtime.getRuntime();

		Process pro = null;		//声明一个Process对象,接收启动的进程

		try{
			pro = run.exec("notepad.exe");
		}catch(Exception e){
			e.printStackTrace();
		}
		try{
			Thread.sleep(5000);
		}catch(Exception e){
			e.printStackTrace();
		}
		pro.destroy();
	}
}
25.system类
System类是一些与系统相关属性和方法的集合,而且System类中所有的属性都是静态的,要想引用这些属性和方法,直接使用System类调用即可。

public class System_demo {

	public static void main(String[] args) {
		// TODO 自动生成的方法存根
		long startTime = System.currentTimeMillis();	//取得开始计算之前的时间

		int sum = 0;					//累加操作
		for(int i=0;i<300000000;i++){
			sum += i;
		}

		long endTime = System.currentTimeMillis();	//取得开始计算之后的时间
		System.out.println("计算所花费的时间:"+(endTime-startTime)+"毫秒");

		System.getProperties().list(System.out);			//列出系统的全部属性

		System.out.println("系统版本为:"+System.getProperty("os.name")+System.getProperty("os.version")+System.getProperty("os.arch"));
		System.out.println("系统用户为:"+System.getProperty("user.name"));
		System.out.println("当前用户目录:"+System.getProperty("user.home"));
		System.out.println("当前用户工作目录:"+System.getProperty("user.dir"));
	}
}
垃圾对象的回收
System类中也有一个rc()方法,此方法也可以进行垃圾的收集,而且此方法实际上是对Runtime类中的gc()方法的封装,功能与其类似。
对一个对象进行回收,一个对象如果不再被任何栈内存所引用,那么此对象就可以被成为垃圾对象,等待被回收。实际上,等待的时间是不确定的,所以可以直接调用System.gc()方法进行垃圾的回收。

System类对IO的支持

<1>System.out
System.out是PrintStream的对象,在PrintStream中定义了一系列的print()和println()方法


<2>System.err
System.err表示的是错误信息输出,如果程序出现错误,则可以直接使用System.err进行输出

<2>System.in
System.in实际上是一个键盘的输入流,其本身是InputStream类型的对象,可以利用System.in完成从键盘读取数据的功能。
指定空间的大小会出现空间限制,不指定大小则会在输入中文的时候产生乱码

package System;

import java.io.InputStream;

public class Systemin_demo {

	public static void main(String[] args) throws Exception{
		// TODO 自动生成的方法存根
		InputStream input = System.in;			//从键盘接收数据
		byte b[] = new byte[1024];					//开辟空间,接收数据
		System.out.println("请输入内容:");
		int len = input.read(b);							//接收数据
		System.out.println("输入的内容:"+new String(b,0,len));
		input.close();
	}
}
输入/输出重定向
通过System类也可以改变System.in的输入流来源和System.out和System.err两个输出流的输出位置

26.Java字节流
在程序中所有的数据都是以流的方式进行传输或保存的,程序需要数据时要使用输入流读取数据,而当程序需要将一些数据保存起来时,就要使用输出流。
在java.io包中流的操作主要有字节流、字符流两大类,两类都有输入和输出操作。
在字节流中输出数据主要使用OutStream类完成,输入使用的是InputStream类。
在字符流中输出主要使用Write类完成,输入主要是使用Reader类完成。
字节流:字节流主要操作byte类型数据,以byte数组为准
主要操作类是OutputStream类和InputStream类。
<1>字节输出流:OutputStream类
OutputStream是整个IO包中字节输出流的最大父类

向文件中写入字符串
文件不存在则会自动创建
直接将一个字符串变为byte数组,然后将byte数组直接写入到文件中
import java.io.File;
import java.io.OutputStream;
import java.io.FileOutputStream;

public class OutputStream_demo {

	public static void main(String[] args) throws Exception {		//异常抛出,不处理
		// TODO 自动生成的方法存根
		//第一步,找到一个文件
		File f = new File("/home/common/software/coding/HelloWord/HelloWord/test.txt");//路径
		//第二步,通过子类实例化父类对象
		OutputStream out = null;				//准备好一个输出的对象
		out = new FileOutputStream(f);		//通过对象多态性,进行实例化
		//第三步,进行写操作
		String str = "HelloWord";				//准备一个字符串
		byte b[] = str.getBytes();				//只能输出byte数组,所以将字符串变成byte数组

		out.write(b); 									//将内容输出,保存文件
		//第四步,关闭输出流
		out.close(); 									//关闭输出流
	}
}
追加新内容
可以通过FileOutputStream向文件中追加内容。
import java.io.File;
import java.io.OutputStream;
import java.io.FileOutputStream;

public class OutputStream_demo {

	public static void main(String[] args) throws Exception {		//异常抛出,不处理
		// TODO 自动生成的方法存根
		//第一步,找到一个文件
		File f = new File("/home/common/software/coding/HelloWord/HelloWord/test.txt");//路径
		//第二步,通过子类实例化父类对象
		OutputStream out = null;				//准备好一个输出的对象
//		out = new FileOutputStream(f);		//通过对象多态性,进行实例化
		out = new FileOutputStream(f,true);		//此处表示在文件末尾追加内容
		//第三步,进行写操作
		String str = "HelloWord";				//准备一个字符串
		byte b[] = str.getBytes();				//只能输出byte数组,所以将字符串变成byte数组

//		out.write(b); 									//将内容输出,保存文件

		for(int i=0;i<b.length;i++){
			out.write(b[i]);
		}
		//第四步,关闭输出流
		out.close(); 									//关闭输出流
	}
}
<2>字节输入流:InputStream类
和OutputStream一样,InputStream也是抽象类,必须依靠子类

import java.io.File;
import java.io.InputStream;
import java.io.FileInputStream;
import java.io.FileNotFoundException;

public class InputStream_demo {

	public static void main(String[] args) throws Exception {		//异常抛出,不处理
		// TODO 自动生成的方法存根
		//第一步,找到一个文件
		File f = new File("/home/common/software/coding/HelloWord/HelloWord/test.txt");//路径
		//第二步,通过子类实例化父类对象
		InputStream input = null;				//准备好一个输出的对象
		input = new FileInputStream(f);		//通过对象多态性,进行实例化
		//第三步,进行读操作
//		byte b[] = new byte[1024];				//所有的内容读到此数组中
		byte b[] = new byte[(int)f.length()];				//所有的内容读到此数组中,数组大小由文件决定
//		input.read(b);										//把内容取出,内容读到byte数组中
		int len = input.read(b);
		//第四步,关闭输入流
		input.close();

		System.out.println("读入数据的长度:"+len);				//没有多余的空格产生
		System.out.println("内容为:"+new String(b,0,len));//把byte数组变为字符串输出
//		System.out.println("内容为:"+new String(b));//把byte数组变为字符串输出
	}
}
在IO包中,提供了两个与平台无关的数据操作流,分别是数据输出流(DataOuputStream)和数据输入流(DataInputStream).
1.写入数据

import java.io.DataOutputStream;
import java.io.File;
import java.io.FileNotFoundException;
import java.io.FileOutputStream;

public class DataOutputStream_demo {

	public static void main(String[] args) throws Exception {
		// TODO 自动生成的方法存根

		DataOutputStream dos = null;			//声明数据输出流对象
		File f = new File("/home/common/software/coding/HelloWord/HelloWord/order.txt");//路径
		dos = new DataOutputStream(new FileOutputStream(f));	//实例化数据输出流对象

		String names[] = {"衬衣","手套","围巾"};
		float prices[] = {98.3f,30.0f,50.5f};
		int nums[] = {3,2,1};
		for(int i=0;i<names.length;i++){	//循环写入
			dos.writeChars(names[i]);			//写入字符串
			dos.writeChar('\t'); 					//加入分隔符
			dos.writeFloat(prices[i]);			//写入字符串
			dos.writeChar('\t'); 					//加入分隔符
			dos.writeInt(nums[i]);					//写入字符串
			dos.writeChar('\t'); 					//加入分隔符
		}
		dos.close();
	}
}

2.读取数据
import java.io.DataInputStream;
import java.io.DataOutputStream;
import java.io.File;
import java.io.FileInputStream;
import java.io.FileNotFoundException;
import java.io.FileOutputStream;

public class DataInputStream_demo {

	public static void main(String[] args) throws Exception {
		// TODO 自动生成的方法存根

		DataInputStream dis = null;			//声明数据输出流对象
		File f = new File("/home/common/software/coding/HelloWord/HelloWord/order.txt");//路径
		dis = new DataInputStream(new FileInputStream(f));	//实例化数据输出流对象

		String name = null;
		float price = 0.0f;
		int num = 0;
		char temp[] = null;
		char c = 0;									//存放接收的字符
		int len = 0;									//接收的字符的个数
		try{
			while(true){
				temp = new char[200];
				len = 0;
				while((c=dis.readChar()) != '\t'){	//读取字符
					temp[len] = c;								//接收内容
					len++;											//读取长度加1
				}
				name = new String(temp,0,len);	//将字符数组变成String
				price = dis.readFloat();					//读取float
				dis.readChar();								//读取\t
				num = dis.readInt();						//读取int
				dis.readChar();								//读取\n
				System.out.printf("名称:%s,名称:%5.2f,名称:%d\n",name,price,num);
			}
		}catch(Exception e){
			e.printStackTrace();
		}
		dis.close();
	}
}
27.java字符流
在程序中一个字符等于两个字节,Java提供了Reader和Writer两个专门操作字符流的类。
<1>字符输出流Writer
也是一个抽象类

和OutputStream相比,可以直接输出字符串,而不用将字符串变为byte数组之后再输出。
import java.io.File;
import java.io.FileInputStream;
import java.io.FileWriter;
import java.io.InputStream;
import java.io.Writer;

public class Write_demo {

	public static void main(String[] args) throws Exception{
		// TODO 自动生成的方法存根
		//第一步,找到一个文件
		File f = new File("/home/common/software/coding/HelloWord/HelloWord/test.txt");//路径
		//第二步,通过子类实例化父类对象
		Writer out = null;				//准备好一个输出的对象
//		out = new FileWriter(f);		//通过对象多态性,进行实例化
		out = new FileWriter(f,true);		//通过对象多态性,进行实例化
		//第三步,进行写操作
		String str = "HelloWord!!!";				//准备一个字符串
		out.write(str);										//把内容取出,内容读到byte数组中
		//第四步,关闭输入流
		out.close();
	}
}
<2>字符输入流Reader
Reader是使用字符的方式从文件中取出数据

import java.io.File;
import java.io.FileReader;
import java.io.Reader;

public class Reader_demo {

	public static void main(String[] args) throws Exception {
		// TODO 自动生成的方法存根
		//第一步,找到一个文件
		File f = new File("/home/common/software/coding/HelloWord/HelloWord/test.txt");//路径
		//第二步,通过子类实例化父类对象
		Reader reader = null;				//准备好一个输出的对象
		reader = new FileReader(f);		//通过对象多态性,进行实例化
		//第三步,进行读操作
		char c[] = new char[1024];		//所有的内容读到此数组中
		int len = reader.read(c);			//将内容输出
		//第四步,关闭输入流
		reader.close();							//关闭输入流
		System.out.println("内容为:"+new String(c,0,len));		//把char数组变为字符串输出
	}

}
字节流与字符流的区别
字节流在操作时本身不会用到缓冲区(内存),是文件本身直接操作的
字符流在操作时使用了缓冲区,通过缓冲区再操作文件
如果一个程序频繁地操作一个资源(如文件或者数据库),则性能会很低,此时为了提升性能,就可以将一部分数据暂时读入到内存的一块区域中,以后直接从此区域中读取数据即可,因为读取内存速度会比较快,这样可以提升程序的性能。

使用字节流更好
28.java转换流:字节流和字符流的转换类
InputStreamReader:是Reader的子类,将输入的字节流变成字符流
将字节输出流变成字符输出流
import java.io.File;
import java.io.FileOutputStream;
import java.io.OutputStreamWriter;
import java.io.Writer;

public class OutputStreamWriter_demo {

	public static void main(String[] args) throws Exception {
		// TODO 自动生成的方法存根
		File f = new File("/home/common/software/coding/HelloWord/HelloWord/test.txt");//路径
		Writer out = null;
		out = new OutputStreamWriter(new FileOutputStream(f));	//字节流变成字符流
		out.write("HelloWord");
		out.close();
	}
}
OutputStreamWriter:是Writer的子类,将输出的字符流变成字节流
将字节输出流变成字符输出流
import java.io.File;
import java.io.FileInputStream;
import java.io.FileOutputStream;
import java.io.InputStreamReader;
import java.io.OutputStreamWriter;
import java.io.Reader;
import java.io.Writer;

public class InputStreamReader_demo {

	public static void main(String[] args) throws Exception {
		// TODO 自动生成的方法存根
		File f = new File("/home/common/software/coding/HelloWord/HelloWord/test.txt");//路径
		Reader reader = null;
		reader = new InputStreamReader(new FileInputStream(f));	//字节流变成字符流
		char c[] = new char[1024];
		int len = reader.read(c);
		reader.close();
		System.out.println(new String(c,0,len));
	}
}

29.管道流:主要作用是可以进行两个线程间的通信
分为管道输出流(PipedOutputStream)和管道输入流(PipedInputStream)
定义两个线程对象,在发送的线程类中定义了管道输出类,在接收的线程类中定义了管道的输入类,在操作时只需要使用PipedOutputStream类中提供的connection()方法就可以将两个线程冠带连接在一起,线程启动后会自动进行管道的输入和输出操作
import java.io.IOException;
import java.io.PipedInputStream;
import java.io.PipedOutputStream;

class Send implements Runnable{		//实现Runnable接口

	private PipedOutputStream pos = null;	//管道输出流

	public Send() {	//实例化输出流
		super();
		this.pos = new PipedOutputStream();
	}

	public PipedOutputStream getPos() {		//通过线程类得到输出流
		return pos;
	}

	@Override
	public void run() {
		// TODO 自动生成的方法存根
		String str = "HelloWord!!";
		try{
			this.pos.write(str.getBytes());		//输出信息
		}catch(IOException e){
			e.printStackTrace();
		}
		try{
			this.pos.close(); 							//关闭输出流
		}catch(IOException e){
			e.printStackTrace();
		}
	}
}

class Receive implements Runnable{		//实现Runnable接口

	private PipedInputStream pis = null;	//管道输入流

	public Receive() {	//实例化输出流
		super();
		this.pis = new PipedInputStream();
	}

	public PipedInputStream getPis() {		//通过线程类得到输入流
		return pis;
	}

	@Override
	public void run() {
		// TODO 自动生成的方法存根
		byte b[] = new byte[1024];	//实例化输入流
		int len = 0;
		try{
			len = this.pis.read(b);			//接收数据
		}catch(IOException e){
			e.printStackTrace();
		}
		try{
			this.pis.close(); 							//关闭输入流
		}catch(IOException e){
			e.printStackTrace();
		}
		System.out.println("接收的内容为"+new String(b,0,len));
	}
}

public class Pipe_demo {

	public static void main(String[] args) {
		// TODO 自动生成的方法存根
		Send s = new Send();
		Receive r = new Receive();
		try{
			s.getPos().connect(r.getPis());  	//连接管道
		}catch(IOException e){
			e.printStackTrace();
		}
		new Thread(s).start();
		new Thread(r).start();
	}
}
30.内存操作流:可以将输出的位置设置在内存上
此时就要使用ByteArrayInputStream、ByteArrayOutputStream来完成输入和输出功能。
ByteArrayInputStream主要完成将内容写入到内存中
ByteArrayOutputStream的功能主要是将内存中的数据输出

import java.io.ByteArrayInputStream;
import java.io.ByteArrayOutputStream;
import java.io.IOException;

public class ByteArrayStream_demo {

	public static void main(String[] args) {
		// TODO 自动生成的方法存根
		String str = "HELLOWORD";
		ByteArrayInputStream bis = null;			//声明一个内存的输入流
		ByteArrayOutputStream bos = null;		//声明一个内存的输出流
		bis = new ByteArrayInputStream(str.getBytes());	//向内存中输入内容
		bos = new ByteArrayOutputStream();						//准备从ByteArrayInputStream中读数据

		int temp = 0;
		while((temp=bis.read()) != -1){
			char c = (char)temp;		//将读取的数字变为字符
			bos.write(Character.toLowerCase(c));		//将字符变为小写
		}
		String newStr  = bos.toString();					//取出内容
		try{
			bis.close();
			bos.close();
		}catch(IOException e){
			e.printStackTrace();
		}
		System.out.println(newStr);
	}
}

31.压缩流
ZIP是一种较为常见的压缩形式,在Java中要实现ZIP的压缩需要导入java.util.zip包,可以使用此包中的ZipFile、ZipOutputStream、ZipInputStream和ZipEntry几个类完成操作。

<1>ZipFile类
压缩一个文件
import java.io.File;
import java.io.FileInputStream;
import java.io.FileOutputStream;
import java.io.InputStream;
import java.util.zip.ZipEntry;
import java.util.zip.ZipOutputStream;

public class ZipOutputStream_demo {

	public static void main(String[] args) throws Exception{
		// TODO 自动生成的方法存根
		File file = new File("/home/common/software/coding/HelloWord/HelloWord/order.txt");//路径
		File zipfile = new File("/home/common/software/coding/HelloWord/HelloWord/order.zip");//路径

		InputStream input = new FileInputStream(file);		//定义输入文件流
		ZipOutputStream zipout = null;									//定义压缩输出流
		//实例化压缩输出流对象,并指定压缩文件的输出路径
		zipout = new ZipOutputStream(new FileOutputStream(zipfile));
		//每一个被压缩的文件都用ZipEntry表示,需要为每一个压缩后的文件设置名称
		zipout.putNextEntry(new ZipEntry(file.getName()));		//创建ZipEntry
		zipout.setComment("这是压缩后的文件");						//设置注释
		int temp = 0;																		//接收输入的数据
		while((temp = input.read()) != -1){									//读取内容,采用了边读边写的方式
			zipout.write(temp);															//压缩输出内容
		}
		input.close();
		zipout.close();
	}
}
压缩一个文件夹
import java.io.File;
import java.io.FileInputStream;
import java.io.FileOutputStream;
import java.io.InputStream;
import java.util.zip.ZipEntry;
import java.util.zip.ZipOutputStream;

public class ZipOutputStream_demo {

	public static void main(String[] args) throws Exception{
		// TODO 自动生成的方法存根
//		File file = new File("/home/common/software/coding/HelloWord/HelloWord/order.txt");//路径
//		File zipfile = new File("/home/common/software/coding/HelloWord/HelloWord/order.zip");//路径
//
//		InputStream input = new FileInputStream(file);		//定义输入文件流
//		ZipOutputStream zipout = null;									//定义压缩输出流
//		//实例化压缩输出流对象,并指定压缩文件的输出路径
//		zipout = new ZipOutputStream(new FileOutputStream(zipfile));
//		//每一个被压缩的文件都用ZipEntry表示,需要为每一个压缩后的文件设置名称
//		zipout.putNextEntry(new ZipEntry(file.getName()));		//创建ZipEntry
//		zipout.setComment("这是压缩后的文件");						//设置注释
//		int temp = 0;																		//接收输入的数据
//		while((temp = input.read()) != -1){									//读取内容,采用了边读边写的方式
//			zipout.write(temp);															//压缩输出内容
//		}
//		input.close();
//		zipout.close();

		File file = new File("/home/common/software/coding/HelloWord/HelloWord/test");//路径
		File zipfile = new File("/home/common/software/coding/HelloWord/HelloWord/order.zip");//路径

		InputStream input = null;		//定义输入文件流
		ZipOutputStream zipout = null;									//定义压缩输出流
		//实例化压缩输出流对象,并指定压缩文件的输出路径
		zipout = new ZipOutputStream(new FileOutputStream(zipfile));
		zipout.setComment("这是压缩后的文件");						//设置注释
		if(file.isDirectory()){						//判断是否是目录
			File lists[] = file.listFiles();			//列出全部文件
			for(int i=0;i<lists.length;i++){
				input = new FileInputStream(lists[i]);		//设置文件输入流
				//每一个被压缩的文件都用ZipEntry表示,需要为每一个压缩后的文件设置名称
				zipout.putNextEntry(new ZipEntry(file.getName()+File.separator+lists[i].getName()));		//创建ZipEntry
				int temp = 0;
				while((temp = input.read()) != -1){
					zipout.write(temp);
				}
				input.close();
			}
		}
		zipout.close();
	}
}
import java.io.File;
import java.io.FileOutputStream;
import java.io.InputStream;
import java.io.OutputStream;
import java.util.zip.ZipEntry;
import java.util.zip.ZipFile;

public class ZipFile_demo {

	public static void main(String[] args)  throws Exception{
		// TODO 自动生成的方法存根
		File file = new File("/home/common/software/coding/HelloWord/HelloWord/b.zip");//路径
		File outputfile = new File("/home/common/software/coding/HelloWord/HelloWord/b1.txt");//解压缩文件名称

		ZipFile zipfile = new ZipFile(file);											//实例化ZipFile对象
//		System.out.println("压缩文件的名称:"+zipfile.getName());	//得到压缩文件的名称
		ZipEntry entry = zipfile.getEntry("b2.txt");						//得到一个压缩实体
		InputStream input = zipfile.getInputStream(entry);			//取得ZipEntry输入流
		OutputStream out = new FileOutputStream(outputfile);			//取得ZipEntry输入流

		int temp = 0;				//保存接收数据
		while((temp = input.read()) != -1){
			out.write(temp);
		}
		input.close();
		out.close();
	}
}
<2>ZipInputStream类
ZipInputStream是InputStream的子类,通过此类可以方便地读取ZIP格式的压缩文件
import java.io.File;
import java.io.FileInputStream;
import java.io.FileOutputStream;
import java.io.IOException;
import java.io.InputStream;
import java.io.OutputStream;
import java.util.zip.ZipEntry;
import java.util.zip.ZipException;
import java.util.zip.ZipFile;
import java.util.zip.ZipInputStream;

public class ZipInputStream_demo {

	public static void main(String[] args) throws Exception {
		// TODO 自动生成的方法存根
		File file = new File("/home/common/software/coding/HelloWord/HelloWord/HelloWord.zip");//路径
		File outfile = null;				//定义输出的文件对象
		ZipFile zipfile = new ZipFile(file);	//实例化ZipFile对象
		ZipInputStream zipinput = new ZipInputStream(new FileInputStream(file)); 	//实例化ZIP输入流
		ZipEntry entry = null;						//定义一个ZipEntry对象,用于接收压缩文件中的每一个实体
		InputStream input = null;				//定义输入流,用于读取每一个ZipEntry
		OutputStream out = null;					//定义输出流,用于输出每一个实体内容
		while((entry = zipinput.getNextEntry()) != null){		//得到每一个ZipEntry
			System.out.println("解压缩"+entry.getName()+"文件");
			outfile = new File("/home/common/software/coding/HelloWord/HelloWord"+entry.getName());
			if(!outfile.getParentFile().exists()){		//判断文件夹是否存在
				outfile.getParentFile().mkdirs();
			}
			if(!outfile.exists()){				//判断文件是否存在
				outfile.createNewFile();
			}
			input = zipfile.getInputStream(entry);		//得到压缩实体的输入流
			out = new FileOutputStream(outfile);		//实例化输入流对象
			int temp = 0;
			while((temp = input.read()) != -1){
				out.write(temp);
			}
			input.close();
			out.close();
		}
	}
}
32.合并流:主要功能是将两个文件的内容合并成一个文件
如果要实现合并流,则必须使用SequenceInputStream类

import java.io.FileInputStream;
import java.io.FileOutputStream;
import java.io.InputStream;
import java.io.OutputStream;
import java.io.SequenceInputStream;

public class SequenceInputStream_demo {

	public static void main(String[] args) throws Exception{
		// TODO 自动生成的方法存根
		InputStream is1 = null;				//输入流1
		InputStream is2 = null;				//输入流2
		OutputStream os = null;				//输出流
		SequenceInputStream sis = null;	//合并流

		is1 = new FileInputStream("/home/common/software/coding/HelloWord/HelloWord/a.txt");
		is2 = new FileInputStream("/home/common/software/coding/HelloWord/HelloWord/b.txt");
		os = new FileOutputStream("/home/common/software/coding/HelloWord/HelloWord/ab.txt");
		sis = new SequenceInputStream(is1,is2);				//实例化合并流
		int temp = 0;
		while((temp = sis.read()) != -1){
			os.write(temp);
		}
		sis.close();
		is1.close();
		is2.close();
		os.close();
	}
}
33.对象序列化
对象序列化就是把一个对象变为二进制的数据流的一种方法。
通过对象序列化可以方便地实现对象的传输或存储。
如果一个类的对象想被序列化,则对象所在的类必须实现java.io.Serializable接口
class Person_3 implements Serializable{		//此类的对象可以被序列化
	private String name;
	private int age;

	public Person_3(String name, int age) {
		super();
		this.name = name;
		this.age = age;
	}

	@Override
	public String toString() {
		return "姓名:" + name + ", 年龄:" + age;
	}
}
此类的对象是可以经过二进制数据流进行传输的
如果要完成对象的输入或者输出,还必须依靠对象输出流(ObjectOutputStream)和对象输入流(ObjectInputStream).
使用对象输出流输出序列化对象的步骤有时也称为序列化
而使用对象输入流读入对象的过程有时也称为反序列化

<1>对象输出流ObjectOutputStream
import java.io.File;
import java.io.FileNotFoundException;
import java.io.FileOutputStream;
import java.io.ObjectOutputStream;
import java.io.OutputStream;
import java.io.Serializable;

class Person_3 implements Serializable{		//此类的对象可以被序列化
	private String name;
	private int age;

	public Person_3(String name, int age) {
		super();
		this.name = name;
		this.age = age;
	}

	@Override
	public String toString() {
		return "姓名:" + name + ", 年龄:" + age;
	}
}

public class Serializable_demo {

	public static void main(String[] args) throws Exception {
		// TODO 自动生成的方法存根
		File f = new File("/home/common/software/coding/HelloWord/HelloWord/test.txt");//路径
		ObjectOutputStream oos = null;
		OutputStream out = new FileOutputStream(f);		//文件输出流
		oos = new ObjectOutputStream(out);						//为对象输出流实例化
		oos.writeObject(new Person_3("张三", 30));
		oos.close();
	}

}
<2>对象输出流ObjectInputStream
import java.io.File;
import java.io.FileInputStream;
import java.io.FileNotFoundException;
import java.io.FileOutputStream;
import java.io.InputStream;
import java.io.ObjectInputStream;
import java.io.ObjectOutputStream;
import java.io.OutputStream;
import java.io.Serializable;

class Person_3 implements Serializable{		//此类的对象可以被序列化
	private String name;
	private int age;

	public Person_3(String name, int age) {
		super();
		this.name = name;
		this.age = age;
	}

	@Override
	public String toString() {
		return "姓名:" + name + ", 年龄:" + age;
	}
}

public class Serializable_demo {

	public static void main(String[] args) throws Exception {
		// TODO 自动生成的方法存根

		File f = new File("/home/common/software/coding/HelloWord/HelloWord/test.txt");//路径
		ObjectInputStream ois = null;
		InputStream input = new FileInputStream(f);		//文件输入流
		ois = new ObjectInputStream(input);						//为对象输入流实例化
		Object obj = ois.readObject();									//读取对象
		ois.close();
		System.out.println(obj);
	}
}
34.Java国际化程序
根据不同的国家配置不同的资源文件(资源文件有时也称为属性文件,后缀为.properties),所有的资源文件以键值对的形式出现。

Locale类

ResourceBundle类

import java.util.ResourceBundle;;

public class Locale_demo {

	public static void main(String[] args) {
		// TODO 自动生成的方法存根
		ResourceBundle rb = ResourceBundle.getBundle("Message"); //找到资源文件
		System.out.println("内容:"+rb.getString("info"));						//从资源文件中取得内容
	}

}
根据Locale所选择的国家不同,输出不同国家的“你好”。
在属性文件中不能直接写入中文,读出来也是乱码,因此要变成Unicode编码

import java.util.Locale;
import java.util.ResourceBundle;

public class Locale_demo {

	public static void main(String[] args) {
		// TODO 自动生成的方法存根

		Locale zhLoc = new Locale("zh","CN");		//表示中国地区
		Locale enLoc = new Locale("en","US");		//表示美国地区
		Locale frLoc = new Locale("fr","FR");		//表示法国地区

		ResourceBundle zhrb = ResourceBundle.getBundle("Message", zhLoc);	//找到中文的属性文件
		ResourceBundle enrb = ResourceBundle.getBundle("Message",enLoc);	//找到英文的属性文件
		ResourceBundle frrb = ResourceBundle.getBundle("Message",frLoc);	//找到法语的属性文件

		System.out.println("中文:"+zhrb.getString("info"));
		System.out.println("英文:"+enrb.getString("info"));
		System.out.println("法语:"+frrb.getString("info"));
	}

}
使用MessageFormat格式化动态文本
所有资源内容都是个固定的,但是输出的消息中如果包含一些动态文本,则必须使用占位符清楚地表示出动态文本的位置,占位符使用“{编号}”的格式出现。
import java.text.MessageFormat;
import java.util.Locale;
import java.util.ResourceBundle;

public class Locale_demo {

	public static void main(String[] args) {
		// TODO 自动生成的方法存根
//		ResourceBundle rb = ResourceBundle.getBundle("Message"); //找到资源文件
//		System.out.println("内容:"+rb.getString("info"));						//从资源文件中取得内容

		Locale zhLoc = new Locale("zh","CN");		//表示中国地区
		Locale enLoc = new Locale("en","US");		//表示美国地区
		Locale frLoc = new Locale("fr","FR");		//表示法国地区

		ResourceBundle zhrb = ResourceBundle.getBundle("Message", zhLoc);	//找到中文的属性文件
		ResourceBundle enrb = ResourceBundle.getBundle("Message",enLoc);	//找到英文的属性文件
		ResourceBundle frrb = ResourceBundle.getBundle("Message",frLoc);	//找到法语的属性文件

		System.out.println("中文:"+zhrb.getString("info"));
		System.out.println("英文:"+enrb.getString("info"));
		System.out.println("法语:"+frrb.getString("info"));

		//依次读取各个属性文件的内容,通过键值读取,此时的键值名称为“info_1”
		String str1 = zhrb.getString("info_1");
		String str2 = enrb.getString("info_1");
		String str3 = frrb.getString("info_1");
		System.out.println("中文:"+MessageFormat.format(str1,"张三"));
		System.out.println("英文:"+MessageFormat.format(str2,"zhangsan"));
		System.out.println("法语:"+MessageFormat.format(str3,"zhangsan"));
	}

}
properties文件,文件名Message_zh_CN.properties
info = \u4F60\u597D
info_1 = \u4F60\u597D\uFF0C{0}\uFF01
本文只发表于博客园和tonglin0325的博客,作者:tonglin0325,转载请注明原文链接:https://www.cnblogs.com/tonglin0325/p/5183703.html

 浙公网安备 33010602011771号