Spring Boot系列(一):Spring Boot快速开始
一、Spring Boot介绍
Spring Boot可以很容易的创建可直接运行的独立的基于Spring的应用程序。
功能特点:
- 创建独立的Spring应用程序;
- 直接嵌入Tomcat、Jetty等Web容器(不需要部署WAR文件);
- 提供一些“starter(启动器)”依赖关系来简化构建配置;
- 自动配置Spring和第三方库;
- 提供可用于生产的功能,如运行状况检查和外部化配置等;
- 无代码生成和XML配置要求;
二、Spring Boot快速开始
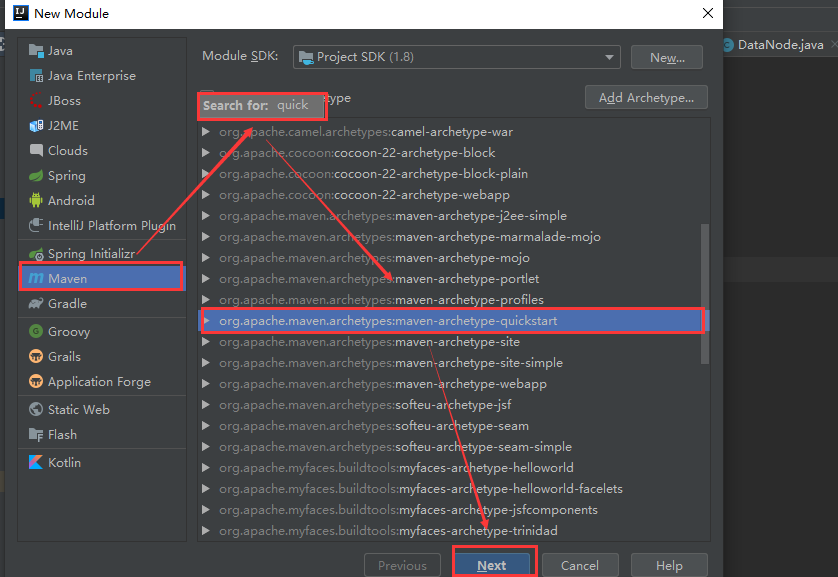
1、创建一个maven工程
2、导入Spring Boot相关的jar包
<!--父工程依赖-->
  <parent>
    <groupId>org.springframework.boot</groupId>
    <artifactId>spring-boot-starter-parent</artifactId>
    <version>2.1.6.RELEASE</version>
    <relativePath/>
  </parent>

  <dependencies>
    <!-- web -->
    <dependency>
      <groupId>org.springframework.boot</groupId>
      <artifactId>spring-boot-starter-web</artifactId>
    </dependency>
  </dependencies>

  <build>
    <finalName>spring-boot-web</finalName>
    <plugins>
      <!--打包fat jar,引入该插件,可以帮助我们将web应用程序打成可执行jar包-->
      <plugin>
        <groupId>org.springframework.boot</groupId>
        <artifactId>spring-boot-maven-plugin</artifactId>
      </plugin>
    </plugins>
  </build>
3、编写启动程序
/**
 * @desc: spring boot 启动类
 * @author: toby
 * @date: 2019/7/17 23:03
 */
@SpringBootApplication
public class WebApplication {
    public static void main(String[] args) {
        SpringApplication.run(WebApplication.class, args);
    }
}
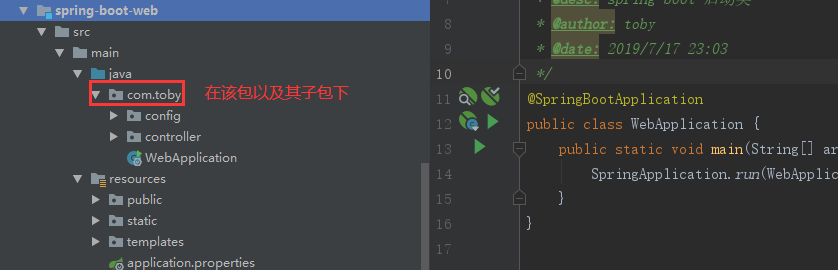
4、自己写的@Controller @Service等注解标示的组件,必须放在启动类(WebApplication)所在的包及其子包下
5、运行程序
java -jar spring-boot-web.jar
三、Spring Boot初探
为什么只引入spring-boot-starter-parent和spring-boot-starter-web就可以快速开发web mvc应用?
1、pom.xml分析
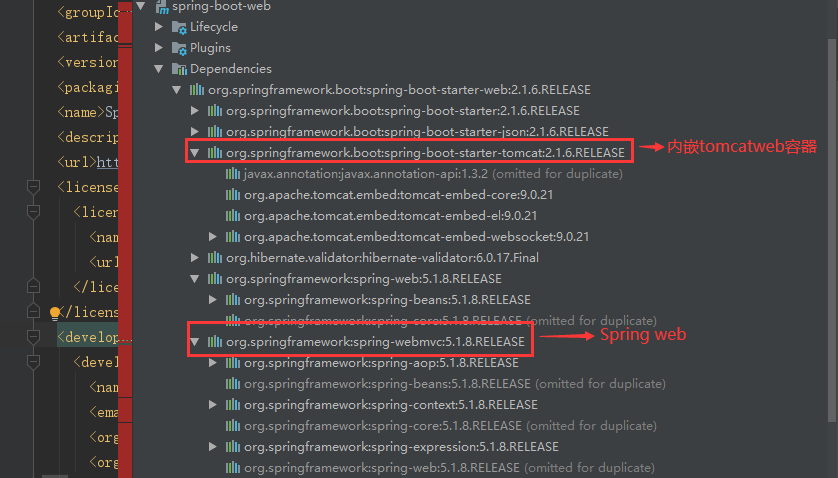
spring-boot-web的pom.xml如下:

进去如下spring-boot-starter-parent的pom.xml:
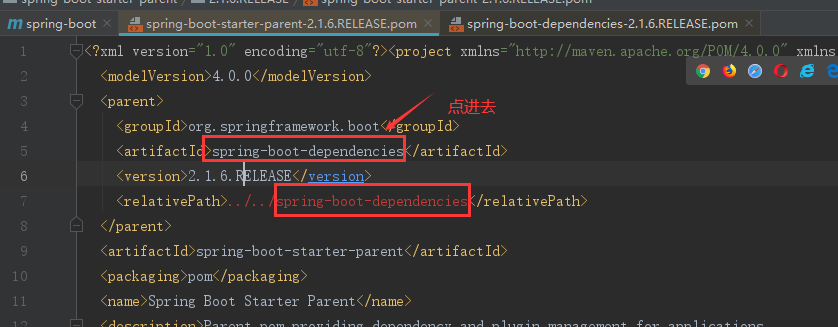
进去如下spring-boot-dependencies的pom.xml:

spring-boot-dependencies其实相当于一个对spring-boot所依赖jar包进行版本管理,所有我们导入依赖默认是不需要写版本的!
2、spring-boot-starter-web为我项目中导入web开发需要的jar包依赖
四、Spring Boot扩展Spring Mvc配置
1、添加拦截器
第一步:创建一个拦截器
/**
 * @desc: 创建一个拦截器
 * @author: toby
 */
@Slf4j
public class TobyInterceptor implements HandlerInterceptor {
    @Override
    public boolean preHandle(HttpServletRequest request, HttpServletResponse response, Object handler) throws Exception {
        log.info("TobyInterceptor的preHandle方法");
        return false;
    }

    @Override
    public void postHandle(HttpServletRequest request, HttpServletResponse response, Object handler, ModelAndView modelAndView) throws Exception {
        log.info("TobyInterceptor的postHandle方法");
    }

    @Override
    public void afterCompletion(HttpServletRequest request, HttpServletResponse response, Object handler, Exception ex) throws Exception {
        log.info("TobyInterceptor的afterCompletion方法");
    }
}
第二步:注册拦截器
/**
 * @desc: WebMvc配置
 * @author: toby
 */
@Configuration
public class TobyWebMvcConfig implements WebMvcConfigurer {

    /**
     * 注册拦截器
     * @param registry
     */
    @Override
    public void addInterceptors(InterceptorRegistry registry) {
        registry.addInterceptor(new TobyInterceptor()).addPathPatterns("/**");
    }
}
2、增加过滤器
第一步:创建一个过滤器
/**
 * @desc: 创建一个过滤器
 * @author: toby
 */
@Slf4j
@Component
public class TobyFilter implements Filter {
    @Override
    public void doFilter(ServletRequest servletRequest, ServletResponse servletResponse, FilterChain filterChain) throws IOException, ServletException {
        log.info("TobyFilter的doFilter方法");
        filterChain.doFilter(servletRequest,servletResponse);
    }
}
第二步:注册过滤器
/**
 * @desc: WebMvc配置
 * @author: toby
 */
@Configuration
public class TobyWebMvcConfig implements WebMvcConfigurer {

    @Bean
    public FilterRegistrationBean<TobyFilter> filterFilterRegistrationBean(TobyFilter tobyFilter){
        FilterRegistrationBean<TobyFilter> filterFilterRegistrationBean = new FilterRegistrationBean<>();
        List<String> uriList = new ArrayList<>(1);
        uriList.add("/**");
        filterFilterRegistrationBean.setFilter(tobyFilter);
        filterFilterRegistrationBean.setEnabled(true);
        filterFilterRegistrationBean.setUrlPatterns(uriList);
        filterFilterRegistrationBean.setName("tobyFilter");
        filterFilterRegistrationBean.setOrder(1);
        return filterFilterRegistrationBean;
    }
}
3、添加Servlet
第一步:创建一个Servlet
/**
 * @desc: 创建一个Servlet
 * @author: toby
 */
@Slf4j
@Component
public class TobyServlet extends HttpServlet {
    @Override
    protected void doGet(HttpServletRequest req, HttpServletResponse resp) throws ServletException, IOException {
        doPost(req, resp);
    }

    @Override
    protected void doPost(HttpServletRequest req, HttpServletResponse resp) throws ServletException, IOException {
        resp.getWriter().write("TobyServlet的doPost方法");
    }
}
第二步:注册Servlet
/**
 * @desc: WebMvc配置
 * @author: toby
 */
@Configuration
public class TobyWebMvcConfig implements WebMvcConfigurer {

    /**
     * 注册Servlet
     * @param tobyFilter
     * @return
     */
    @Bean
    public ServletRegistrationBean servletRegistrationBean(TobyFilter tobyFilter){
        return new ServletRegistrationBean(new TobyServlet(), "/servlet");
    }
}
运行结果如下:


4、如何接管Spring Boot的Mvc配置
使用@EnableWebMvc注解(不推荐使用)
@Retention(RetentionPolicy.RUNTIME)
@Target(ElementType.TYPE)
@Documented
//导入了DelegatingWebMvcConfiguration的组件
@Import(DelegatingWebMvcConfiguration.class)
public @interface EnableWebMvc {
}
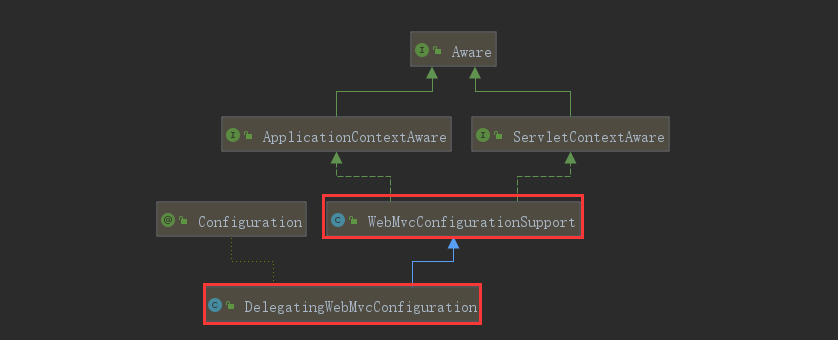
① DelegatingWebMvcConfiguration的继承图
② 再看下WebMvc的自动配置类WebMvcAutoConfiguration
@Configuration
@ConditionalOnWebApplication(type = Type.SERVLET)
@ConditionalOnClass({ Servlet.class, DispatcherServlet.class, WebMvcConfigurer.class })
//容器中没有WebMvcConfigurationSupport该配置文件才生生效,但是我们使用了@EnableWebMvc导入了WebMvcConfiurationSupport,它只保证了Spring Mvc的最基本的功能
@ConditionalOnMissingBean(WebMvcConfigurationSupport.class)
@AutoConfigureOrder(Ordered.HIGHEST_PRECEDENCE + 10)
@AutoConfigureAfter({ DispatcherServletAutoConfiguration.class, TaskExecutionAutoConfiguration.class,
        ValidationAutoConfiguration.class })
public class WebMvcAutoConfiguration {
五、总结
本文主要介绍了Spring Boot的功能特性,如何快速开始一个Spring Boot项目,以及如何扩展Spring Mvc配置,比如如何添加自己的拦截器,过滤器,和Servlet。Spring Boot是微服务的开发利器,所以要对微服务组件有深入了解,Spring Boot的自动装配组件是必备技能。

 浙公网安备 33010602011771号