springboot集成swagger2
新建springboot项目-添加web模板
导入swagger2和swagger.ui的依赖
maven网址

https://mvnrepository.com/search?q=springfox-swagger
swagger2.x版本springboot导入依赖
<!-- https://mvnrepository.com/artifact/io.springfox/springfox-swagger-ui -->
<dependency>
    <groupId>io.springfox</groupId>
    <artifactId>springfox-swagger-ui</artifactId>
    <version>2.9.2</version>
</dependency>
<!-- https://mvnrepository.com/artifact/io.springfox/springfox-swagger2 -->
<dependency>
<groupId>io.springfox</groupId>
<artifactId>springfox-swagger2</artifactId>
<version>2.9.2</version>
</dependency>
swagger3.0版本springboot导入依赖
<!-- Swagger3.0 -->
<dependency>
    <groupId>io.springfox</groupId>
    <artifactId>springfox-boot-starter</artifactId>
    <version>3.0.0</version>
</dependency>
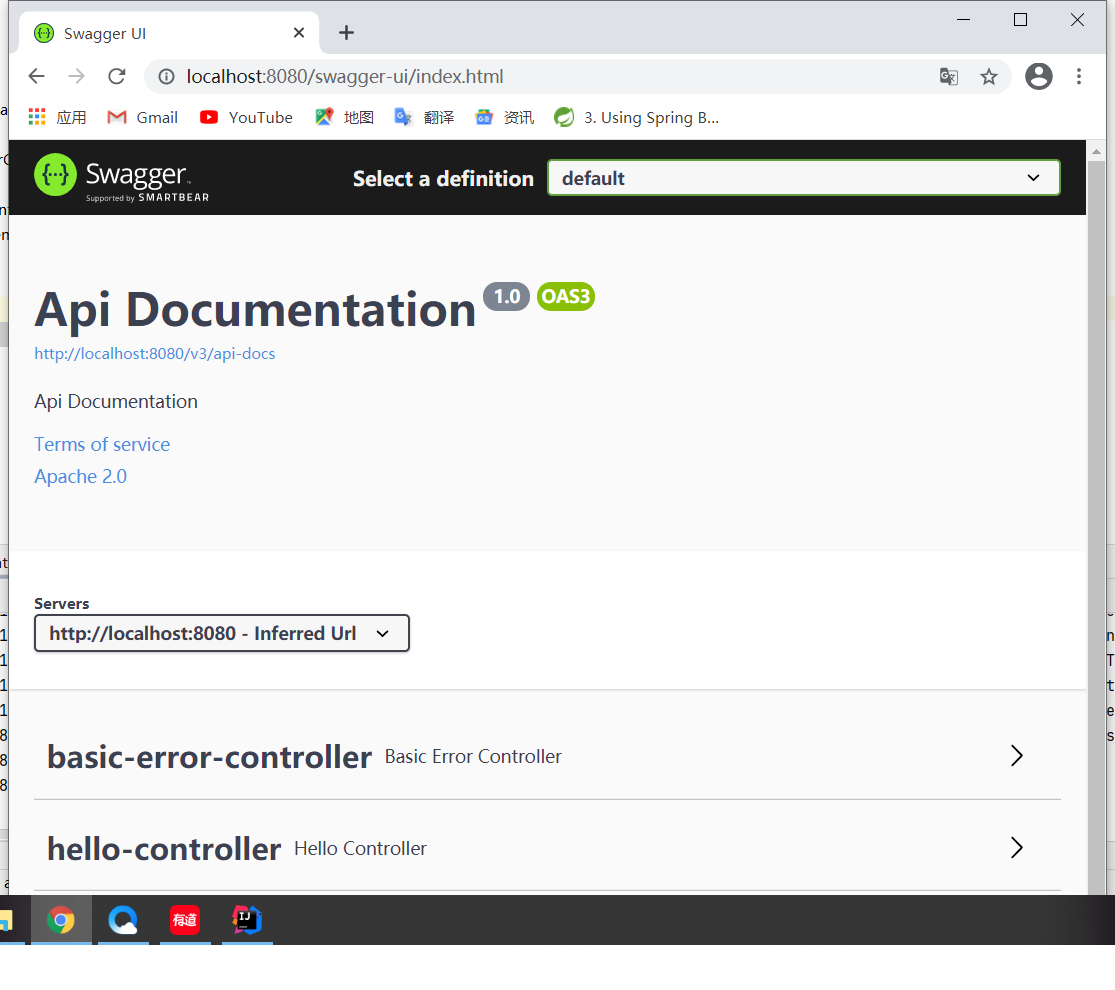
创建配置类,使用默认配置查看运行效果
运行效果
swagger3.0以下版本使用这个url
http://localhost:8080/swagger-ui.html
3.0版本
http://localhost:8080/swagger-ui/index.html
效果图
swagger的dcuket配置:
推荐进入源码查看相关字段信息
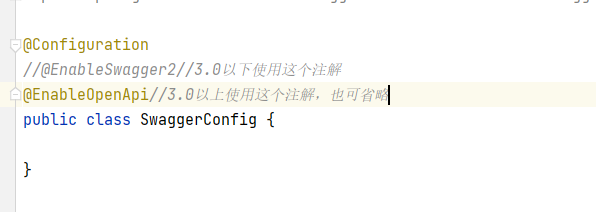
@Configuration
//@EnableSwagger2//3.0以下使用这个注解
@EnableOpenApi//3.0以上使用这个注解,也可省略
public class SwaggerConfig {

    //配置了swagger的docket的Bean实例
    @Bean
    public Docket docket() {
        return new Docket(DocumentationType.SWAGGER_2)
                .apiInfo(apiInfo());
    }

    //配置swagger信息=apiInfo
    private ApiInfo apiInfo() {
        Contact contact = new Contact("moses", "http://www.baidu.com", "6666@qq.com");
        return new ApiInfo(
                "狂人日记",//标题
                "鲁迅写的,跟我周树人有什么关系",//描述
                "1.0",
                "http://www.baidu.com",
                contact,
                "Apache 2.0",
                "http://www.apache.org/licenses/LICENSE-2.0",
                new ArrayList());
    }


}
swagger配置扫描接口
Docket.select()
    //配置了swagger的docket的Bean实例
    @Bean
    public Docket docket() {
        return new Docket(DocumentationType.SWAGGER_2)
                .apiInfo(apiInfo())
                .select()
                //RequestHandlerSelectors:配置要扫描接口的方式
                //basePackage:指定要扫描的包
                //any:扫描全部的包
                //none:不扫描
                //withClassAnnotation:扫描类上的注解
                //withMethodAnnotation:扫描方法上的注解
                .apis(RequestHandlerSelectors.basePackage("com.moses.swagger.controller"))
                //paths:过滤什么路径
                .paths(PathSelectors.ant("moses/**"))
                .build();
    }
根据生产环境选择配置是否启动swaager
在resource文件下创建几个新的配置文件,表示开发环境,测试环境,正式发布的环境。
  //设置要显示的swagger环境
        Profiles profiles = Profiles.of("dev", "test");

        //获取项目的环境,
        //通过environment.acceptsProfiles判断是否处在自己设定的环境中
        boolean flag = environment.acceptsProfiles(profiles);


        return new Docket(DocumentationType.SWAGGER_2)
                .apiInfo(apiInfo())
                .enable(flag)
                .select()
                .apis(RequestHandlerSelectors.basePackage("com.moses.swagger.controller"))
                //paths:过滤什么路径
                //.paths(PathSelectors.ant("moses/**"))
                .build();
也可以使用配置文件的方式配置是否开启swagge。
springfox.documentation.swagger-ui.enabled=true
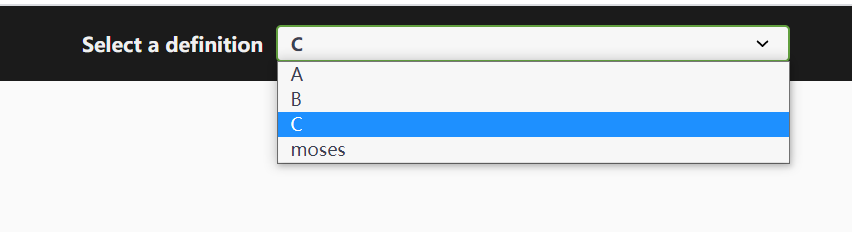
配置swagger的api文档分组
    @Bean
    public Docket docket1(){
        return new Docket(DocumentationType.SWAGGER_2).groupName("A");
    }

    @Bean
    public Docket docket2(){
        return new Docket(DocumentationType.SWAGGER_2).groupName("B");
    }

    @Bean
    public Docket docket3(){
        return new Docket(DocumentationType.SWAGGER_2).groupName("C");
    }
效果图
swagger注解功能
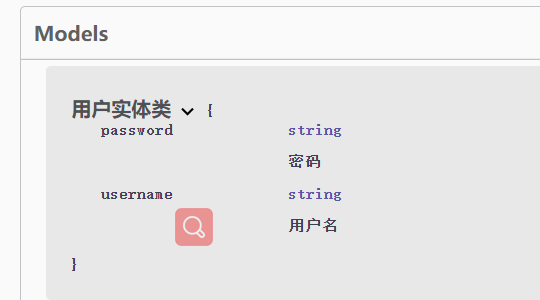
实体类注解
@ApiModel("用户实体类")
public class User {

    @ApiModelProperty("用户名")
    private String username;
    @ApiModelProperty("密码")
    private String password;
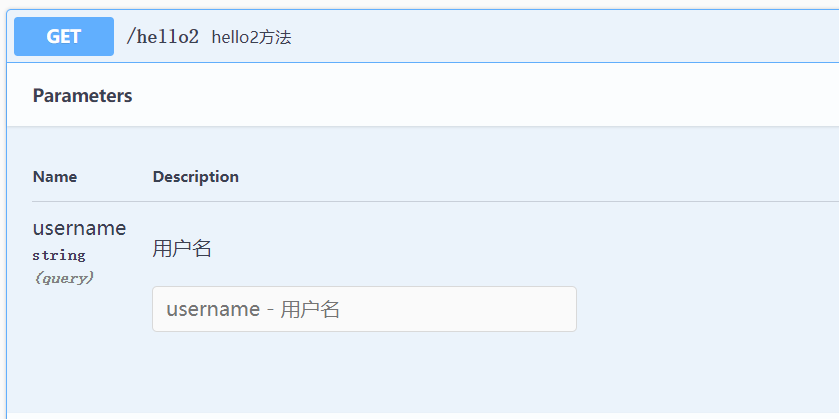
控制类注解
@ApiOperation(("hello2方法"))
    @GetMapping("/hello2")
    public String hello2(@ApiParam("用户名") String username){
        return "hello"+ user().getUsername();
    }
swagger可以点击try it out在线测试数据

总结:
1.我们可以用户swagger给一些比较难理解的属性或者接口,增加注释信息
2.接口文档可以实时更新
3.可以在线测试
注:根据B站狂神视频总结

 浙公网安备 33010602011771号