[TimLinux] PyQt5 安装部署
1. 依赖包
Click (7.0)
PyQt5 (5.11.2)
PyQt5-sip (4.19.12)
QScintilla (2.10.7)
pip (9.0.1)
pyqt5-tools (5.11.2.1.3rc8)  提供了QtDesigner.exe工具
python-dotenv (0.9.1)
setuptools (28.8.0)
sip (4.19.8)
这些依赖包都能够通过pip3 install *.whl 的包格式来安装。
1.1. 安装命令
PyQt5(不包含有 QtDesigner)
PS C:\Users\admin\Desktop> pip3 install PyQt5 -i https://pypi.douban.com/simple
Looking in indexes: https://pypi.douban.com/simple
Collecting PyQt5
  Downloading https://pypi.doubanio.com/packages/5d/85/d174a50e0d6b60aa9113f6a32afb31f2
  5345bec8584992af486235373252/PyQt5-5.11.2-5.11.1-cp35.cp36.cp37.cp38-none-win_amd64.whl (93.3MB)
    100% |████████████████████████████████| 93.4MB 1.1MB/s
Collecting PyQt5_sip<4.20,>=4.19.11 (from PyQt5)
  Downloading https://pypi.doubanio.com/packages/3f/4f/7b820770e6a8f8b83cacea561534e31c7
  8a74eeac0fb2f7618c835fa74c6/PyQt5_sip-4.19.12-cp36-none-win_amd64.whl (51kB)
    100% |████████████████████████████████| 61kB 1.6MB/s
Installing collected packages: PyQt5-sip, PyQt5
Successfully installed PyQt5-5.11.2 PyQt5-sip-4.19.12
PS C:\Users\admin\Desktop>
PyQt5-tools (包含有 QtDesigner)
PS C:\Users\admin\Desktop> pip3 install PyQt5-tools -i https://pypi.douban.com/simple
Looking in indexes: https://pypi.douban.com/simple
Collecting PyQt5-tools
  Downloading https://pypi.doubanio.com/packages/0e/a1/b2bbbb9e0c0f374fb77c85b014fc39fdb
  6e9e258c20906cc7ecb5f565e38/pyqt5_tools-5.9.0.1.2-cp36-none-win_amd64.whl (37.5MB)
    100% |████████████████████████████████| 37.5MB 6.6MB/s
Installing collected packages: PyQt5-tools
Successfully installed PyQt5-tools-5.9.0.1.2
PS C:\Users\admin\Desktop>
1.2. 文档API
https://pyqt.readthedocs.io/en/latest/sip-classes.html
https://riverbankcomputing.com/news --> https://pyqt.readthedocs.io/en/latest/
2. PyCharm配置
请参考:https://www.cnblogs.com/BlueSkyyj/p/8398277.html
简略步骤说明:
- 添加 External Tools:QtDesigner
- 添加 External Tools:PyUIC(QtDesigner生成的.ui文件自动转换为.py文件)
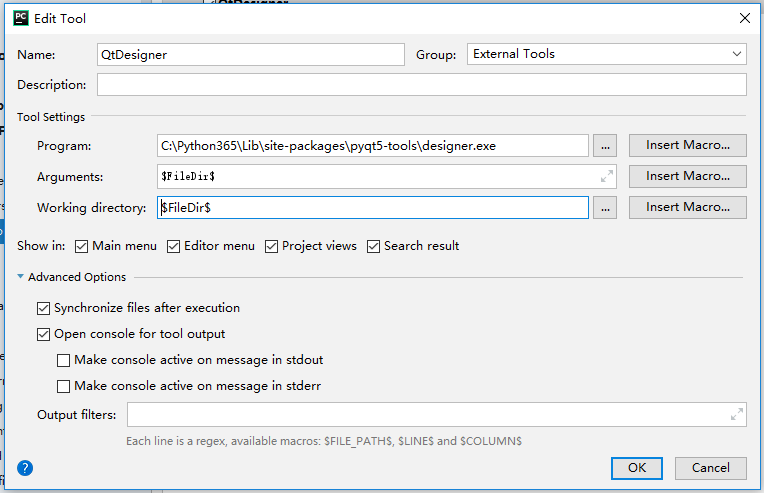
2.1. External Tools: QtDesigner
Settings -> Tools -> External Tools 选中“+”,弹出的对话框:

Name: QtDesigner
Tool Settings:
    Program: C:\Python365\Lib\site-packages\pyqt5_tools\designer.exe
    Parameters: $FileDir$  (这是一个宏,可以通过点击Insert macro来添加这个值,手动输入也是一样的意思)
    Working directory: $FileDir$
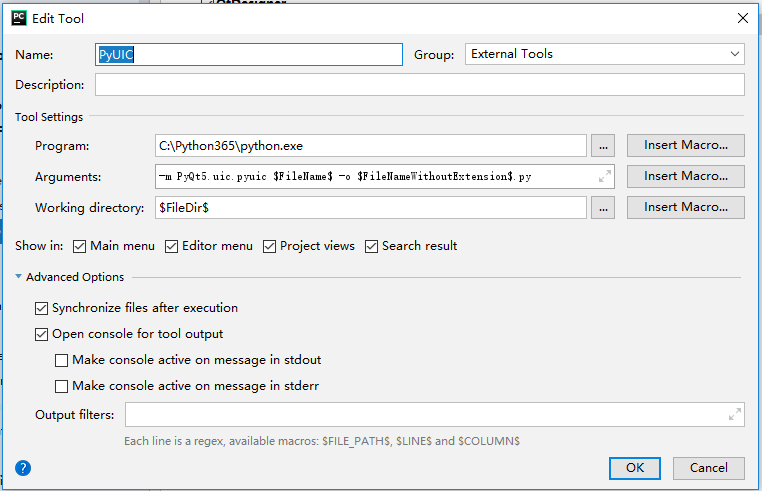
2.2. External Tools: PyUIC
settings -> Tools -> External Tools 选中“+”,弹出的对话框:

Name: PyUIC
Tool settings:
    Program: C:\Python365\python.exe
    Parameters: -m PyQt5.uic.pyuic $FileName$ -o $FileNameWithoutExtension$.py
    Working directory: $FileDir$ (可以通过 insert macro来设置,也可以手动输入)
3. 示例
创建一个纯python工程(Pure Python Project)QtTest。
3.1. 启动QtDesigner.exe
通过右键 -> External Tools -> QtDesigner,将启动QtDesigner.exe,创建一个MainWindow,然后将左侧的一个 PushButton 拖入 创建的MainWindow,保存文件到工程目录,取名 hello.ui
3.2. UI转换为PY
选中 hello.ui,然后右键 -> External Tools -> PyUIC,将自动把 hello.ui 转换为 hello.py 文件了。
3.3. 编写 main.py
在工程目录中创建 main.py 文件,写入如下内容:
import sys
import hello  #生成的 hello.py
from PyQt5.QtWidgets import QApplication, QMainWindow


if __name__ == '__main__':
    app = QApplication(sys.argv)

    w = QMainWindow()
    ui = hello.Ui_MainWindow()
    ui.setUi(w)
    w.show()

    sys.exit(app.exec_())
3.4. 运行
main.py 文件内,点击鼠标右键,选择:Run,将弹出一个 Window 窗口。
3.5. 不启动后台
使用 pythonw.exe 运行 GUI 程序,将不显示 cmd 窗口,只会显示 GUI 窗口,这点非常的有用,但是这个解析器同时关闭了原来的:stdin, stdout, stderr。解决方案参考链接:https://stackoverflow.com/questions/9705982/pythonw-exe-or-python-exe
3.6. 另外一个示例
# 来自 《PyQt5 快速开发与实践》
import sys
from PyQt5.QtWidgets import QPushButton, QApplication, QWidget


class WinForm(QWidget):
    def __init__(self, parent=None):
        super(WinForm, self).__init__(parent)
        self.setGeometry(300, 300, 350, 350)
        self.setWindowTitle('点击按钮关闭窗口')
        quit = QPushButton('Close', self)
        quit.setGeometry(10, 10, 60, 35)
        quit.setStyleSheet("background-color: red")
        quit.clicked.connect(self.close)


if __name__ == '__main__':
    app = QApplication(sys.argv)
    win = WinForm()
    win.show()
    sys.exit(app.exec_())


 浙公网安备 33010602011771号