
实验:AscendC简单算子开发
实验:AscendC简单算子开发
实验目的
- 掌握Ascend C语言基础语法,熟悉CANN算子开发流程(编写-编译-验证)。
- 实现简单AddCustom算子(两数相加),学会使用CANN API调用算子,完成基础编译与验证。
实验流程
- 环境准备:配置Linux环境、相关驱动和DDK的安装。
- 算子实现:首先创建自定义算子工程,然后修改算子工程中的部分代码文件,以实现简单的AddCustom算子,最后进行算子编译安装。
- 运行验证:准备好相关测试数据,进行算子CPU调测。
环境准备
开发运行环境需要满足以下要求:
ubuntu版本大于等于22.04,ubuntu架构为x86_64, python版本在3.7与3.10之间(包含),gcc/g++版本大于等于7.0。
一、Linux环境准备
-
如果已有Ubuntu22.04的同学,直接跳转到4.安装开发所需工具即可。
-
如果没有安装Ubuntu22.04,而安装了虚拟机的,也可以参考该博客进行安装,注意,博客内选择的版本是20.04,记得改成22.04,其余步骤不变:ubuntu 22.04下载安装_ubuntu22.04下载-CSDN博客。安装完后跳转到4.安装开发所需工具即可。
-
接下来介绍的方案是Windows下的WSL2 + Ubuntu 22.04。本教程后续将以该方案为基础,使用虚拟机方案的同学需要留意细节,自行调整。
1.启用WSL2
以管理员身份运行cmd或者powershell,输入以下命令,启用WSL和虚拟机平台:
dism.exe /online /enable-feature /featurename:Microsoft-Windows-Subsystem-Linux /all /norestart
dism.exe /online /enable-feature /featurename:VirtualMachinePlatform /all /norestart
重启电脑。
将WSL2设置为默认版本:
wsl --download-distribution --name Ubuntu-22.04
2.安装Ubuntu22.04
Ubuntu22.04镜像网站。下载官方镜像ubuntu-jammy-wsl-amd64-wsl.rootfs.tar.gz,保存到自定义的目录下。
# 创建存放虚拟硬盘的目录
mkdir D:\wsl\ubuntu2204

# 导入发行版(将 rootfs 解压到 D 盘)
wsl --import Ubuntu-22.04 D:\wsl\ubuntu2204 D:\wsl\ubuntu-jammy-wsl-amd64-wsl.rootfs.tar.gz --version 2
3.启动 Ubuntu 并配置基础环境
cmd输入以下命令,进入wsl:
wsl -d Ubuntu-22.04
进入 WSL 后(默认 root 用户),以下命令记得替换成你自己的用户名:
# 更新系统
apt update && apt upgrade -y

# 创建普通用户(可选但推荐)
adduser <你的用户名>
usermod -aG sudo <你的用户名>

# 设置默认用户(退出 WSL 后编辑 /etc/wsl.conf)
cat > /etc/wsl.conf << EOF
[user]
default=<你的用户名>
EOF

exit  # 退出 WSL
重新进入 WSL,此时应以你创建的用户登录。
4.安装开发所需工具
sudo apt update
sudo apt install -y build-essential cmake git python3 python3-pip python3-venv
# 检查 Python 版本(应为 3.10,符合要求)
python3 --version
# 检查 gcc 版本(应为 11.x,满足 ≥7.0)
gcc --version
二、驱动及DDK的安装
工具包的解压等操作需要在 Linux 环境内完成,以避免Windows解压导致链接失效。
1.下载工具包
下载tools_ascendc包:DDK-tools-6.0.1.0,以及平台插件包:kirin9020-plugin-6.0.1.0,假设文件下载到了Windows的D:\Desktop\CANN\src文件夹中,在 WSL 终端中,将它们复制到你的工作目录(例如 ~/Downloads):
#创建工作目录
mkdir ~/Downloads
# 复制 tools_ascendc 包
cp /mnt/d/Desktop/CANN/src/DDK-tools-6.0.1.0.zip ~/Downloads/
# 复制平台插件包
cp /mnt/d/Desktop/CANN/src/kirin9020-plugin-6.0.1.0.zip ~/Downloads/
2.解压并放置 DDK tools
创建DDK安装目录(最好记得这个路径,比如我这里是~/ddk),解压 DDK tools ZIP 包
#创建安装目录
cd
mkdir ddk
cd ddk

sudo apt install unzip
unzip ~/Downloads/DDK-tools-6.0.1.0.zip
3.放置平台插件
解压后进入到平台目录,解压
cd tools/platform
unzip ~/Downloads/kirin9020-plugin-6.0.1.0.zip
拷贝后的目录结构如下:
tools
├── platform
│   ├── kirin9020
├── tools_ascendc
├── ...
4.执行脚本进行安装
进入目录tools/tools_ascendc,修改安装脚本权限,执行安装脚本和环境变量设置脚本,命令如下:
cd ~/ddk/tools/tools_ascendc
chmod +x install.sh
source ./install.sh

#配置环境变量
echo "source ~/ddk/tools/tools_ascendc/set_ascendc_env.sh" >> ~/.bashrc
source ~/.bashrc
5.检查环境
ascendebug --help
msopgen --help
ccec --version
注:如果显示 ccec: error while loading shared libraries: libtinfo.so.5: cannot open shared object file: No such file or directory,就运行以下命令:
sudo apt install libncurses5
算子实现
对于使用WSL2+Ubuntu方案的同学,为了方便可视化操作,下面介绍一种方法:
在WSL终端中,使用以下命令快速跳转到Windows对应目录:
explorer.exe .
执行命令后,Windows 的文件资源管理器窗口会立刻弹出,并且自动定位到你刚才所在的 WSL 目录,之后就能使用常用的代码编辑器(如vscode)进行操作了。

一、工程创建
1.创建一个 JSON 文件
创建工作目录~/sample,并进入,然后创建一个add_custom.json文件,定义一个名为 Add 的算子。
[
    {
        "op": "AddCustom",
        "input_desc": [
            {
                "name": "x",
                "param_type": "required",
                "format": [
                    "ND",
                    "ND",
                    "ND"
                ],
                "type": [
                    "fp16",
                    "float",
                    "int32"
                ]
            },
            {
                "name": "y",
                "param_type": "required",
                "format": [
                    "ND",
                    "ND",
                    "ND"
                ],
                "type": [
                    "fp16",
                    "float",
                    "int32"
                ]
            }
        ],
        "output_desc": [
            {
                "name": "z",
                "param_type": "required",
                "format": [
                    "ND",
                    "ND",
                    "ND"
                ],
                "type": [
                    "fp16",
                    "float",
                    "int32"
                ]
            }
        ]
    }
]
2.使用 msopgen 生成工程
确保环境变量已设置(参照上一条笔记),然后运行以下命令:
# 请将 -c 参数中的芯片型号替换为你实际的目标芯片,例如 kirin9020
msopgen gen -i ~/sample/add_custom.json -c ai_core-kirin9020 -out ~/sample/AddCustom
-i:指定 JSON 文件路径。-c:关键参数,格式为ai_core-<soc_version>。<soc_version>需替换为你的芯片型号,如kirin9020、kirin9000等。如果你不确定,可先使用教程示例kirin9020。-out:指定输出工程目录。
基于同系列的AI处理器型号创建的算子工程,其基础能力通用。命令执行完后,会在$HOME/sample目录下生成算子工程目录AddCustom,工程中包含算子实现的模板文件,编译脚本等,如下所示。
AddCustom
├── build_devices.sh // 开发者无需关注,在线编译场景预留,编译device侧交付件脚本
├── build.sh         // 编译入口脚本
├── cmake
│   ├── config.cmake
│   ├── util        // 算子工程编译所需脚本及公共编译文件存放目录
├── CMakeLists.txt   // 算子工程的CMakeLists.txt
├── CMakePresets.json // ** 编译配置项 **
├── framework        // 算子插件实现文件目录,单算子模型文件的生成不依赖算子适配插件,无需关注
├── op_host                      // host侧实现文件
│   ├── add_custom_tiling.h    // ** 算子tiling定义文件 **
│   ├── add_custom.cpp         // ** 算子原型注册、shape推导、信息库、tiling实现等内容文件 **
│   ├── CMakeLists.txt
├── op_kernel                   // kernel侧实现文件
│   ├── CMakeLists.txt
│   ├── add_custom.cpp        // ** 算子核函数实现文件 **
├── scripts                     // 自定义算子工程打包相关脚本所在目录
说明
上述目录结构中标了** **的op_host/add_custom_tiling.h、op_host/add_custom.cpp、op_kernel/add_custom.cpp为后续算子开发过程中需要修改的文件,其他文件无需修改。
二、算子核函数实现
在工程存储目录的AddCustom/op_kernel/add_custom.cpp下面介绍关键实现代码。
算子核函数实现代码的内部调用关系示意图如下。
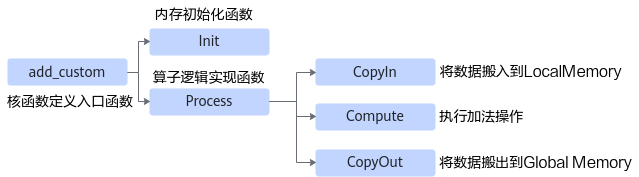
由此可见除了Init函数完成初始化外,Process中完成了对流水任务:搬入、计算、搬出的调用,开发者可以重点关注三个流水任务的实现。
1.进行核函数的定义,并在核函数中调用算子类的Init和Process函数
extern "C" __global__ __aicore__ void add_custom(GM_ADDR x, GM_ADDR y, GM_ADDR z, GM_ADDR workspace, GM_ADDR tiling)
{
    // 获取Host侧传入的Tiling参数
    GET_TILING_DATA(tiling_data, tiling);
    // 初始化算子类
    KernelAdd op;
    // 算子类的初始化函数,完成内存初始化相关工作
    op.Init(x, y, z, tiling_data.totalLength, tiling_data.tileNum);
    // 完成算子实现的核心逻辑
    op.Process();
}
2.定义KernelAdd算子类,其具体成员及成员函数实现如下
#include "kernel_operator.h"
constexpr int32_t BUFFER_NUM = 2;
class KernelAdd {
public:
    __aicore__ inline KernelAdd() {}
    // 初始化函数,完成内存初始化相关操作
    __aicore__ inline void Init(GM_ADDR x, GM_ADDR y, GM_ADDR z, uint32_t totalLength, uint32_t tileNum)
    {
        // 使用获取到的TilingData计算得到singleCoreSize(每个核上总计算数据大小)、tileNum(每个核上分块个数)、singleTileLength(每个分块大小)等变量
        this->blockLength = totalLength / AscendC::GetBlockNum();
        this->tileNum = tileNum;
        this->tileLength = this->blockLength / tileNum / BUFFER_NUM;

        // 获取当前核的起始索引
        xGm.SetGlobalBuffer((__gm__ DTYPE_X*)x + this->blockLength * AscendC::GetBlockIdx(), this->blockLength);
        yGm.SetGlobalBuffer((__gm__ DTYPE_Y*)y + this->blockLength * AscendC::GetBlockIdx(), this->blockLength);
        zGm.SetGlobalBuffer((__gm__ DTYPE_Z*)z + this->blockLength * AscendC::GetBlockIdx(), this->blockLength);
        // 通过Pipe内存管理对象为输入输出Queue分配内存
        pipe.InitBuffer(inQueueX, BUFFER_NUM, this->tileLength * sizeof(DTYPE_X));
        pipe.InitBuffer(inQueueY, BUFFER_NUM, this->tileLength * sizeof(DTYPE_Y));
        pipe.InitBuffer(outQueueZ, BUFFER_NUM, this->tileLength * sizeof(DTYPE_Z));
    }
    // 核心处理函数,实现算子逻辑,调用私有成员函数CopyIn、Compute、CopyOut完成矢量算子的三级流水操作
    __aicore__ inline void Process()
    {
        int32_t loopCount = this->tileNum * BUFFER_NUM;
        for (int32_t i = 0; i < loopCount; i++) {
            CopyIn(i);
            Compute(i);
            CopyOut(i);
        }
    }


private:
    // 搬入函数,完成CopyIn阶段的处理,被核心Process函数调用
    __aicore__ inline void CopyIn(int32_t progress)
    {
        // 从Queue中分配输入Tensor
        AscendC::LocalTensor<DTYPE_X> xLocal = inQueueX.AllocTensor<DTYPE_X>();
        AscendC::LocalTensor<DTYPE_Y> yLocal = inQueueY.AllocTensor<DTYPE_Y>();
         // 将GlobalTensor数据拷贝到LocalTensor
        AscendC::DataCopy(xLocal, xGm[progress * this->tileLength], this->tileLength);
        AscendC::DataCopy(yLocal, yGm[progress * this->tileLength], this->tileLength);
        // 将LocalTensor放入VECIN(代表矢量编程中搬入数据的逻辑存放位置)的Queue中
        inQueueX.EnQue(xLocal);
        inQueueY.EnQue(yLocal);
    }
    // 计算函数,完成Compute阶段的处理,被核心Process函数调用
    __aicore__ inline void Compute(int32_t progress)
    {
        // 将Tensor从队列中取出,用于后续计算
        AscendC::LocalTensor<DTYPE_X> xLocal = inQueueX.DeQue<DTYPE_X>();
        AscendC::LocalTensor<DTYPE_Y> yLocal = inQueueY.DeQue<DTYPE_Y>();
        // 从Queue中分配输出Tensor
        AscendC::LocalTensor<DTYPE_Z> zLocal = outQueueZ.AllocTensor<DTYPE_Z>();
        // 调用Add接口进行计算
        AscendC::Add(zLocal, xLocal, yLocal, this->tileLength);
        // 将计算结果LocalTensor放入到VecOut的Queue中
        outQueueZ.EnQue<DTYPE_Z>(zLocal);
        // 释放输入Tensor
        inQueueX.FreeTensor(xLocal);
        inQueueY.FreeTensor(yLocal);
    }
    // 搬出函数,完成CopyOut阶段的处理,被核心Process函数调用
    __aicore__ inline void CopyOut(int32_t progress)
    {
        // 从VecOut的Queue中取出输出Tensor
        AscendC::LocalTensor<DTYPE_Z> zLocal = outQueueZ.DeQue<DTYPE_Z>();
        // 将输出Tensor拷贝到GlobalTensor中
        AscendC::DataCopy(zGm[progress * this->tileLength], zLocal, this->tileLength);
        // 将不再使用的LocalTensor释放
        outQueueZ.FreeTensor(zLocal);
    }


private:
    // Pipe内存管理对象
    AscendC::TPipe pipe;
    // 输入数据Queue队列管理对象,QuePosition为VECIN
    AscendC::TQue<AscendC::QuePosition::VECIN, 1> inQueueX, inQueueY;
    // 输出数据Queue队列管理对象,QuePosition为VECOUT
    AscendC::TQue<AscendC::QuePosition::VECOUT, 1> outQueueZ;
    // 管理输入输出Global Memory内存地址的对象,其中xGm, yGm为输入,zGm为输出
    AscendC::GlobalTensor<DTYPE_X> xGm;
    AscendC::GlobalTensor<DTYPE_Y> yGm;
    AscendC::GlobalTensor<DTYPE_Z> zGm;
    // 每个核上总计算数据大小
    uint32_t blockLength;
    // 每个核上总计算数据分块个数
    uint32_t tileNum;
    // 每个分块大小
    uint32_t tileLength;
};
三、Host侧算子实现
核函数开发并验证完成后,下一步就是进行Host侧的实现,对应AddCustom/op_host目录下的add_custom_tiling.h文件与add_custom.cpp文件。下面简要介绍下两个文件的关键实现。
1.修改add_custom_tiling.h文件
参考以下代码,进行Tiling参数的定义。
#ifndef ADD_CUSTOM_TILING_H
#define ADD_CUSTOM_TILING_H
#include "register/tilingdata_base.h"
namespace optiling {
BEGIN_TILING_DATA_DEF(AddCustomTilingData)
  // AddCustom算子使用了2个tiling参数:totalLength与tileNum
  TILING_DATA_FIELD_DEF(uint32_t, totalLength);     // 总计算数据量
  TILING_DATA_FIELD_DEF(uint32_t, tileNum);         // 每个核上总计算数据分块个数
END_TILING_DATA_DEF;

// 注册tiling数据到对应的算子
REGISTER_TILING_DATA_CLASS(AddCustom, AddCustomTilingData)
}
#endif // ADD_CUSTOM_TILING_H
2.修改“add_custom.cpp”文件,进行Tiling的实现
修改“TilingFunc”函数,实现Tiling上下文的获取,并通过上下文获取输入输出shape信息,并根据shape信息设置TilingData,序列化保存TilingData,并设置TilingKey。
namespace optiling {
const uint32_t BLOCK_DIM = 1;
const uint32_t TILE_NUM = 8;
static ge::graphStatus TilingFunc(gert::TilingContext* context)
{
    AddCustomTilingData tiling;
    uint32_t totalLength = context->GetInputShape(0)->GetOriginShape().GetShapeSize();
    context->SetBlockDim(BLOCK_DIM);
    tiling.set_totalLength(totalLength);
    tiling.set_tileNum(TILE_NUM);
    tiling.SaveToBuffer(context->GetRawTilingData()->GetData(), context->GetRawTilingData()->GetCapacity());
    context->GetRawTilingData()->SetDataSize(tiling.GetDataSize());
    size_t *currentWorkspace = context->GetWorkspaceSizes(1);
    currentWorkspace[0] = 0;
    return ge::GRAPH_SUCCESS;
}
} // namespace optiling
3.在“add_custom.cpp”文件中实现AddCustom算子的shape推导
Add算子的输出shape等于输入shape,所以直接将输入shape赋给输出shape,当前msOpGen工具生成的代码“InferShape”函数无需修改。
4.修改“add_custom.cpp”文件中的算子原型注册,此函数为入口函数
namespace ops {
class AddCustom : public OpDef {
public:
    explicit AddCustom(const char* name) : OpDef(name)
    {
        // Add算子的第一个输入
        this->Input("x")
            .ParamType(REQUIRED)    // 代表输入必选
            .DataType({ ge::DT_FLOAT16, ge::DT_FLOAT, ge::DT_INT32 })   // 输入支持的数据类型
            .Format({ ge::FORMAT_ND, ge::FORMAT_ND, ge::FORMAT_ND });   // 输入支持的数据格式
        // Add算子的第二个输入
        this->Input("y")
            .ParamType(REQUIRED)
            .DataType({ ge::DT_FLOAT16, ge::DT_FLOAT, ge::DT_INT32 })
            .Format({ ge::FORMAT_ND, ge::FORMAT_ND, ge::FORMAT_ND });
        this->Output("z")
            .ParamType(REQUIRED)
            .DataType({ ge::DT_FLOAT16, ge::DT_FLOAT, ge::DT_INT32 })
            .Format({ ge::FORMAT_ND, ge::FORMAT_ND, ge::FORMAT_ND });
        // 关联InferShape函数
        this->SetInferShape(ge::InferShape);
        // 关联Tiling函数
        this->AICore()
            .SetTiling(optiling::TilingFunc);
        // 注册算子支持的AI处理器型号,请替换为实际支持的AI处理器型号,如kirin9020
        this->AICore().AddConfig("kirin9020");
    }
};
// 结束算子注册
OP_ADD(AddCustom);
} // namespace ops
四、算子工程编译部署
编译AddCustom工程,生成自定义算子安装包,并将其安装到算子库中。
1.编译自定义算子工程,构建生成自定义算子包
在算子工程AddCustom目录下执行如下命令,进行算子工程编译。
./build.sh

2.自定义算子安装包部署
在执行编译的同时,会将交付件安装到DDK安装目录下的指定目录。
~/ddk/tools/platform
查看部署后的目录结构,如下所示:
platform                            // 平台插件目录
├── kirin9020                       // Kirin AI处理器类型
│   ├── config
│   │   └── npu_custom_opinfo.json  // 算子信息库
│   ├── lib64
│   │   └── libcustom_op.so         // host侧二进制文件
│   ├── ops
│   │   └── impl
│   │       ├── custom              // kernel交付件
│   │       │   ├── add_custom.cpp
│   │       │   ├── add_custom.py
│   │       │   └── op_proto.h
│   │       └── impl
│   └── simulator
└── README.md
运行验证
一、准备输入数据与标杆数据
使用AscendC调测工具进行算子调测前,必须提供算子的输入数据和标杆数据。具体方式可以参考官方教程。本次的方法是使用外部生成的input/golden数据。
1. 生成数据
创建一个gen_input_golden.py文件,复制以下代码,可以修改数据类型和数组长度:
import numpy as np

# ========== 参数配置 ==========
N = 256                     # 数组长度
dtype = np.float32          # 数据类型,与 JSON 中的 dtype 对应
output_dir = "./"           # 输出目录(可修改为绝对路径)

# 输入文件名(需与 JSON 中的 data_file 一致)
file_a = output_dir + "input_a.bin"
file_b = output_dir + "input_b.bin"
file_golden = output_dir + "golden_out.bin"

# ========== 生成数据 ==========
# 输入 a: 0, 1, 2, ..., 255
a = np.arange(N, dtype=dtype)

# 输入 b: 0, 2, 4, ..., 510
b = np.arange(0, N * 2, 2, dtype=dtype)

# 标杆输出: a + b
golden = a + b

# ========== 保存为二进制文件 ==========
a.tofile(file_a)
b.tofile(file_b)
golden.tofile(file_golden)

# ========== 打印验证信息 ==========
print("数据生成完成!")
print(f"文件保存路径:")
print(f"  输入 a: {file_a}")
print(f"  输入 b: {file_b}")
print(f"  标杆输出: {file_golden}")
print("\n前 5 个元素预览:")
print(f"  a[:5]   = {a[:5]}")
print(f"  b[:5]   = {b[:5]}")
print(f"  golden[:5] = {golden[:5]}")
print(f"\n数据类型:{dtype}")
print(f"数据长度:{N}")
在终端运行:
python3 gen_input_golden.py
然后会生成input_a.bin、input_b.bin、golden_out.bin三个文件。
2. 算子json配置
创建一个add_custom_debug.json文件,根据实际情况进行修改,比如三个数据文件的位置、数据类型、数组长度等:
{
    "op_type": "AddCustom",
    "data_script": "",
    "gen_data": false,
    "inputs": [
        {
            "name": "x",
            "dtype": "float32",
            "format": "ND",
            "ignore": false,
            "shape": [256],
            "param_type": "required",
            "data_file": "/home/dj/sample/AddCustom/input_a.bin"
        },
        {
            "name": "y",
            "dtype": "float32",
            "format": "ND",
            "ignore": false,
            "shape": [256],
            "param_type": "required",
            "data_file": "/home/dj/sample/AddCustom/input_b.bin"
        }
    ],
    "outputs": [
        {
            "name": "z",
            "dtype": "float32",
            "format": "ND",
            "ignore": false,
            "shape": [256],
            "param_type": "required",
            "data_file": "/home/dj/sample/AddCustom/golden_out.bin"
        }
    ]
}
二、进行CPU调测
输入以下命令:
ascendebug kernel \
    --backend cpu \
    --chip-version kirin9020 \
    --repo-type customize \
    --json-file ./add_custom_debug.json \
    --core-type AiCore \
    --work-dir ./debug_workspace
注:如果遇到调测失败提示RuntimeError: run output data xxx not found,可以参考官方教程里的解决方案:调测失败解决方案
运行成功后,可以看到这样的终端输出:
2026-03-21 23:22:47,193 [CONSOLE]: ==================== cpu kernel run end, takes 238194.0(us) ====================
2026-03-21 23:22:47,193 [CONSOLE]: compare output and golden data start
2026-03-21 23:22:47,194 [CONSOLE]: Gen data compare result file: /home/dj/samp/AddCustom/debug_workspace/AddCustom/cpu/output/golden_out.txt
2026-03-21 23:22:47,194 [CONSOLE]: compare output and golden data end
其中Gen data compare result file: 那一项就是输出结果的文件目录,打开后可以看到:


 浙公网安备 33010602011771号