
3.算子实现-矢量编程
算子实现-矢量编程
建议先浏览官方文档,了解基本概念:
硬件架构-基本概念-自定义算子开发-AscendC算子开发-CANN - 华为HarmonyOS开发者
编程模型-基本概念-自定义算子开发-AscendC算子开发-CANN - 华为HarmonyOS开发者
编程API-基本概念-自定义算子开发-AscendC算子开发-CANN - 华为HarmonyOS开发者
引言、算子实现概述
AscendC的算子实现主要包含两个部分:
-
Host侧Tiling实现
由于NPU中AI Core内部存储无法完全容纳算子输入输出的所有数据,需要每次搬运一部分输入数据进行计算然后搬出,再搬运下一部分输入数据进行计算,这个过程就称之为Tiling。切分数据的算法称为Tiling算法或者Tiling策略。根据算子的shape等信息来确定数据切分算法相关参数(比如每次搬运的块大小,以及总共循环多少次)的计算程序,称之为Tiling实现,也叫Tiling函数(Tiling Function)。由于Tiling实现中完成的均为标量计算,AI Core并不擅长,所以我们将其独立出来放在Host侧CPU上执行。
-
Device侧Kernel实现
Kernel实现即算子核函数实现,在Kernel函数内部通过解析Host侧传入的Tiling结构体获取Tiling信息,根据Tiling信息控制数据搬入搬出Local Memory的流程;通过调用计算、数据搬运、内存管理、任务同步API,实现算子逻辑。其核心逻辑基本上都为计算密集型任务,需要在NPU上执行。
本章介绍了矢量编程、矩阵编程两种典型场景下的算子Tiling、Kernel实现,是对上文中两种典型编程范式的具体应用,同时也介绍了编程的更多细节、API的使用方法等。然后介绍工程化算子开发这种算子开发方式。
一、流程概述
图1 矢量算子实现流程
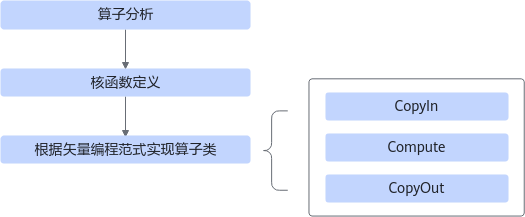
- 算子分析:分析算子的数学表达式、输入、输出以及计算逻辑的实现,明确需要调用的AscendC接口。
- 核函数定义:定义AscendC算子入口函数。
- 根据矢量编程范式实现算子类:完成核函数的内部实现。
下文以ElemWise(Add)算子为例,对上述步骤进行详细介绍。
二、算子分析
-
明确算子的数学表达式及计算逻辑。
Add算子的数学表达式为:
z = x + y图2 算子计算逻辑
![img]()
-
明确输入和输出。
- Add算子有两个输入:x与y,输出为z。
- 本样例中算子的输入支持的数据类型为half(float16),算子输出的数据类型与输入数据类型相同。
- 算子输入支持shape(8,2048),输出shape与输入shape相同。
- 算子输入支持的format为:ND。
-
确定核函数名称和参数。
- 开发者可以自定义核函数名称,本样例中核函数命名为add_custom。
- 根据对算子输入输出的分析,确定核函数有3个参数x,y,z;x,y为输入在Global Memory上的内存地址,z为输出在Global Memory上的内存地址。
-
确定算子实现所需接口。
- 实现涉及外部存储和内部存储间的数据搬运,查看AscendC API参考中的数据搬移接口,需要使用DataCopy来实现数据搬移。
- 本样例只涉及矢量计算的加法操作,通过查看AscendC API参考中的矢量计算接口定义,初步分析可使用双目指令Add接口实现x+y。
- 计算中使用到的Tensor数据结构,使用Queue队列进行管理,会使用到EnQue、DeQue等接口。
通过以上分析,得到AscendC Add算子的设计规格如下。
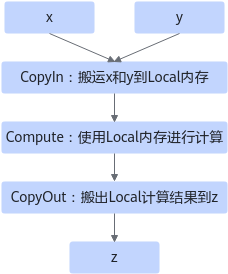
表1 AscendC Add算子设计规格
| 算子类型(OpType) | Add | |||
|---|---|---|---|---|
| 算子输入输出 | name | shape | data type | format |
| x(输入) | (8, 2048) | half | ND | |
| y(输入) | (8, 2048) | half | ND | |
| z(输出) | (8, 2048) | half | ND | |
| 核函数名称 | add_custom | |||
| 使用的主要接口 | DataCopy:数据搬移接口。 | |||
| Add:矢量双目指令接口。 | ||||
| EnQue、DeQue等接口:Queue队列管理接口。 | ||||
| 算子实现文件名称 | add_custom.cpp |
三、核函数定义
根据核函数定义中介绍的规则进行核函数的定义。
-
函数原型定义
函数原型定义如下所示:使用__global__函数类型限定符来标识它是一个核函数;使用__aicore__函数类型限定符来标识该核函数在设备端aicore上执行;为方便起见,统一使用GM_ADDR宏修饰入参,GM_ADDR宏定义请参考核函数。
extern "C" __global__ __aicore__ void add_custom(GM_ADDR x, GM_ADDR y, GM_ADDR z) { } -
调用算子类的Init和Process函数。
算子类的Init函数,完成内存初始化相关工作,Process函数完成算子实现的核心逻辑,具体介绍参见算子类实现。
extern "C" __global__ __aicore__ void add_custom(GM_ADDR x, GM_ADDR y, GM_ADDR z)
{
    KernelAdd op;
    op.Init(x, y, z);
    op.Process();
}
四、算子类实现
根据上一节介绍,核函数中会调用算子类的Init和Process函数,本节具体讲解如何基于编程范式实现算子类。
根据矢量编程范式对Add算子的实现流程进行设计的思路如下,矢量编程范式请参考Vector编程范式,设计完成后得到的Add算子实现流程图参见图3:
图3 Add算子实现流程
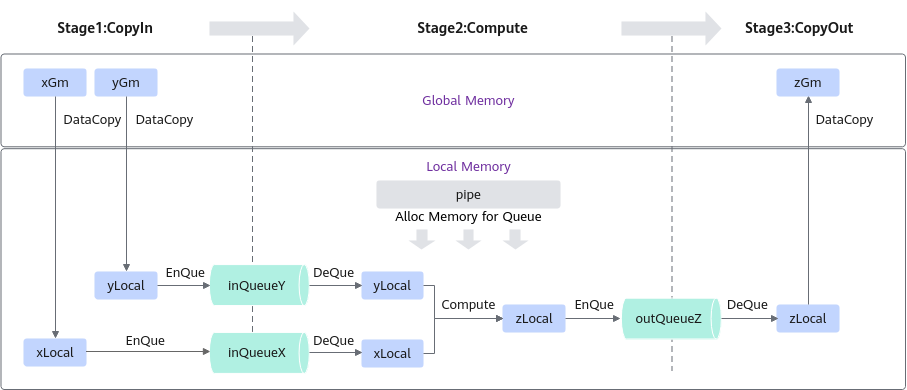
算子类中主要实现上述流程,包含对外开放的初始化Init函数和核心处理函数Process,Process函数中会对上图中的三个基本任务进行调用;同时包括一些算子实现中会用到的私有成员,比如上图中的Global Tensor和VECIN、VECOUT队列等。KernelAdd算子类具体成员如下。
class KernelAdd {
public:
    __aicore__ inline KernelAdd() {}
    // Initialization function, which initializes the memory
    __aicore__ inline void Init(GM_ADDR x, GM_ADDR y, GM_ADDR z){}
    // Core processing function, which implements the operator logic and calls the private member functions
    // CopyIn, Compute, and CopyOut to complete the three-stage pipelined execution of the vector operator
    __aicore__ inline void Process(){}

private:
    // CopyIn function, which completes the processing in the CopyIn phase and is called by the Process function
    __aicore__ inline void CopyIn(int32_t progress){}
    // Compute function, which completes the processing in the Compute phase and is called by Process function
    __aicore__ inline void Compute(int32_t progress){}
    // CopyOut function, which completes the processing in the CopyOut phase and is called by the Process function
    __aicore__ inline void CopyOut(int32_t progress){}

private:
    AscendC::TPipe pipe;  // Pipe memory management object.
    AscendC::TQue<AscendC::QuePosition::VECIN, 1> inQueueX, inQueueY;  // Input data queue management object. QuePosition is VECIN.
    AscendC::TQue<AscendC::QuePosition::VECOUT, 1> outQueueZ;  // Output data queue management object. QuePosition is VECOUT.
    AscendC::GlobalTensor<half> xGm;  // Object for managing the input and output global memory addresses. xGm and yGm are inputs, and zGm is the output.
    AscendC::GlobalTensor<half> yGm;
    AscendC::GlobalTensor<half> zGm;
};
初始化函数主要完成以下内容:
-
设置输入输出Global Tensor的Global Memory内存地址。
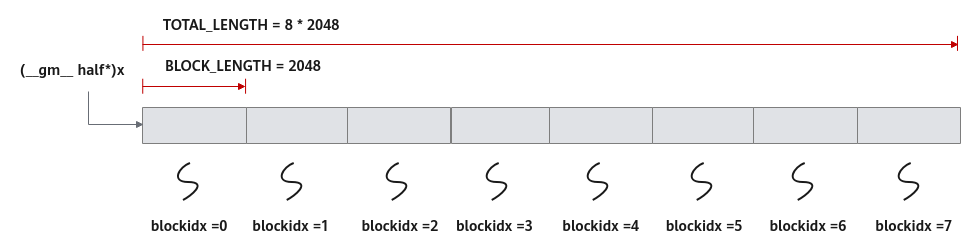
本样例中使用多核并行计算,即把数据进行分片,分配到多个核上进行处理。AscendC核函数是在一个核上的处理函数,所以只处理部分数据,需要在初始化函数中获取该核函数需要处理的输入输出在Global Memory上的内存偏移地址,并将该偏移地址设置在Global Tensor中。
以获取输入x在Global Memory上的内存偏移地址为例:
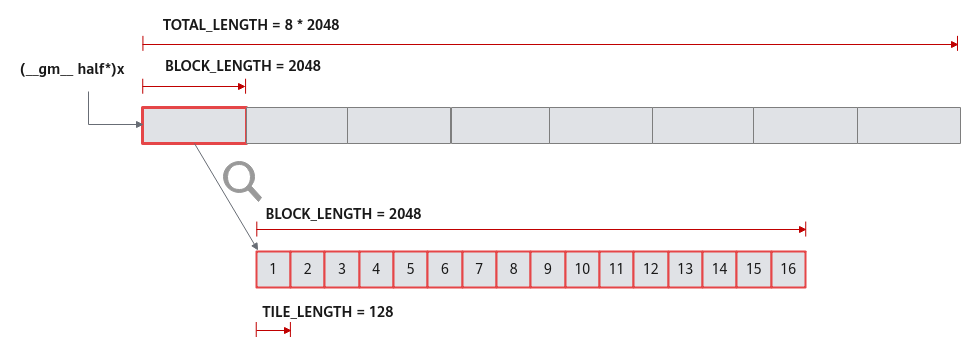
xGm.SetGlobalBuffer((__gm__ half*)x + BLOCK_LENGTH * GetBlockIdx(), BLOCK_LENGTH);本样例中的分配方案是:数据整体长度TOTAL_LENGTH为8 * 2048,平均分配到8个核上运行,每个核上处理的数据大小BLOCK_LENGTH为2048字节。x + BLOCK_LENGTH * GetBlockIdx()即为单核处理程序中x在Global Memory上的内存偏移地址,获取偏移地址后,使用GlobalTensor类的接口设定该核上Global Memory的起始地址以及长度。具体示意图请参考图4。
图4 多核并行处理示意图
![点击放大]()
-
通过Pipe内存管理对象为输入输出Queue分配内存。
比如,为输入x的Queue分配内存,可以通过如下代码段实现:
pipe.InitBuffer(inQueueX, BUFFER_NUM, TILE_LENGTH * sizeof(half))对于单核上的处理数据,可以进行数据切块(Tiling),在本示例中,将数据切分成8块(并不意味着8块就是性能最优)仅作为参考。切分后的每个数据块再次切分成2块,即可开启double buffer,实现流水线之间的并行。
这样单核上的数据(2048个数)被切分成16块,每块TILE_LENGTH(128)个数据。上文代码表示Pipe为inQueueX分配了两块大小为TILE_LENGTH * sizeof(half)个字节的内存块,每个内存块能容纳TILE_LENGTH(128)个half类型数据。数据切分示意图如图5所示。
图5 单核数据切分示意图
![点击放大]()
Kirin9020/KirinX90系列处理器支持的核数为1,具体的初始化函数代码如下。
constexpr int32_t TOTAL_LENGTH = 8 * 2048;                            // total length of data
constexpr int32_t USE_CORE_NUM = 1;                                   // num of core used
constexpr int32_t BLOCK_LENGTH = TOTAL_LENGTH / USE_CORE_NUM;         // length computed of each core
constexpr int32_t TILE_NUM = 8;                                       // split data into 8 tiles for each core
constexpr int32_t BUFFER_NUM = 2;                                     // tensor num for each queue
constexpr int32_t TILE_LENGTH = BLOCK_LENGTH / TILE_NUM / BUFFER_NUM; // separate to 2 parts, due to double buffer
__aicore__ inline void Init(GM_ADDR x, GM_ADDR y, GM_ADDR z)
{
    // get start index for current core, core parallel
    xGm.SetGlobalBuffer((__gm__ half*)x + BLOCK_LENGTH * AscendC::GetBlockIdx(), BLOCK_LENGTH);
    yGm.SetGlobalBuffer((__gm__ half*)y + BLOCK_LENGTH * AscendC::GetBlockIdx(), BLOCK_LENGTH);
    zGm.SetGlobalBuffer((__gm__ half*)z + BLOCK_LENGTH * AscendC::GetBlockIdx(), BLOCK_LENGTH);
    // pipe alloc memory to queue, the unit is Bytes
    pipe.InitBuffer(inQueueX, BUFFER_NUM, TILE_LENGTH * sizeof(half));
    pipe.InitBuffer(inQueueY, BUFFER_NUM, TILE_LENGTH * sizeof(half));
    pipe.InitBuffer(outQueueZ, BUFFER_NUM, TILE_LENGTH * sizeof(half));
}
基于矢量编程范式,将核函数的实现分为3个基本任务:CopyIn,Compute,CopyOut。Process函数中通过如下方式调用这三个函数。
    __aicore__ inline void Process()
    {
        // loop count need to be doubled, due to double buffer
        constexpr int32_t loopCount = TILE_NUM * BUFFER_NUM;
        // tiling strategy, pipeline parallel
        for (int32_t i = 0; i < loopCount; i++) {
            CopyIn(i);
            Compute(i);
            CopyOut(i);
        }
    }
根据编程范式上面的算法分析,将整个计算拆分成三个Stage,开发者单独编写每个Stage的代码,三阶段流程示意图参见图3,具体流程如下。
-
CopyIn函数实现。
__aicore__ inline void CopyIn(int32_t progress) { // alloc tensor from queue memory AscendC::LocalTensor<half> xLocal = inQueueX.AllocTensor<half>(); AscendC::LocalTensor<half> yLocal = inQueueY.AllocTensor<half>(); // copy progress_th tile from global tensor to local tensor AscendC::DataCopy(xLocal, xGm[progress * TILE_LENGTH], TILE_LENGTH); AscendC::DataCopy(yLocal, yGm[progress * TILE_LENGTH], TILE_LENGTH); // enque input tensors to VECIN queue inQueueX.EnQue(xLocal); inQueueY.EnQue(yLocal); } -
Compute函数实现。
- 使用DeQue从VecIn中取出LocalTensor。
- 使用Add接口完成矢量计算。
- 使用EnQue将计算结果LocalTensor放入到VecOut的Queue中。
- 使用FreeTensor释放不再使用的LocalTensor。
__aicore__ inline void Compute(int32_t progress) { // deque input tensors from VECIN queue AscendC::LocalTensor<half> xLocal = inQueueX.DeQue<half>(); AscendC::LocalTensor<half> yLocal = inQueueY.DeQue<half>(); AscendC::LocalTensor<half> zLocal = outQueueZ.AllocTensor<half>(); // call Add instr for computation AscendC::Add(zLocal, xLocal, yLocal, TILE_LENGTH); // enque the output tensor to VECOUT queue outQueueZ.EnQue<half>(zLocal); // free input tensors for reuse inQueueX.FreeTensor(xLocal); inQueueY.FreeTensor(yLocal); } -
CopyOut函数实现。
- 使用DeQue接口从VecOut的Queue中取出LocalTensor。
- 使用DataCopy接口将LocalTensor拷贝到GlobalTensor上。
- 使用FreeTensor将不再使用的LocalTensor进行回收。
 __aicore__ inline void CopyOut(int32_t progress)
{
    // deque output tensor from VECOUT queue
    AscendC::LocalTensor<half> zLocal = outQueueZ.DeQue<half>();
    // copy progress_th tile from local tensor to global tensor
    AscendC::DataCopy(zGm[progress * TILE_LENGTH], zLocal, TILE_LENGTH);
    // free output tensor for reuse
    outQueueZ.FreeTensor(zLocal);
}
五、运行验证
核函数即算子kernel程序开发完成后,即可编写host侧的核函数调用程序,实现从host侧的APP程序调用算子,进行运行验证。

 浙公网安备 33010602011771号