
mysql-week-1
架构作业:
1、总结mysql常见的存储引擎以及特点。
2、MySQL日志各类总结。
3、主从复制及主主复制的实现
4、xtrabackup实现全量+增量+binlog恢复库
1. mysql 常见引擎及特点
1.1 MyISAM InnoDB存储引擎对比
| 功能特点 | MyISAM | INNODB |
|---|---|---|
| 事务 | 不支持 | 支持 |
| 表级锁定 | 支持 | 支持,行级 |
| 读写相互阻塞 | 支持 | 与事务隔离级别相关 |
| 缓存 | 只缓存索引 | 数据和索引 |
| 索引 | 支持 | 支持全文索引 |
| 外键约束 | 不支持 | 支持 |
| 聚簇索引 | 不支持 | 支持 |
| MVCC高并发 | 不支持 | 支持 |
| 其他 | 读取快,资源占用少,5.5.5之前默认引擎 | 崩溃恢复性好。5.5.5后默认引擎 |
| 使用场景 | 只读、表较小 | 适合处理大量短期事务 |
| 引擎文件 | .frm/.MYD/.MYI | .frm,ibdta1.idb |
其他引擎:
Performance_schema: Performance_schema数据库专用
Memory:所有数据存储RAM,快速访问,存放临时数据,HEAP引擎
常用引擎管理命令:
#查看支持的存储引擎:
show engines;
#查看默认存储引擎
show variables like '%storage_engine%'
#设置默认存储引擎my.cnf
[mysqld]
default_storage_engine = innoDB

# 查看库中所有表使用的存储引擎
show table status from db_name;
#查看指定表的存储引擎
show table status like 'tbl_name';
show create table tbl_name;

#设置表的存储引擎:
create table tbl_name(...) ENGINE=InnoDB;
alter table tbl_name ENGINE=InnoDB;
2. mysql 系统数据库
| 数据库 | 功能 | 说明 |
|---|---|---|
| mysql | 存储用户、权限、关键字等控制和管理信息 | |
| Perforrmance_schema | 收集数据库服务器性能 | 5.5之后产生 |
| information_schema | 数据库元数据 | 5.0之后产生 |
| sys | 降低P_S复杂度 | 5.7之后增加 |
3、MySQL日志各类总结
| 序号 | 日志类型 | 表示 | 相关变量 | 功能 | 保存位置 |
|---|---|---|---|---|---|
| 1 | 事务日志 | transaction log | innodb_log | redo log undo log |
建议和数据文件分开存放 |
| 2 | 错误日志 | error log | log_error | 记录运行中的事件信息 | /var/log/mysqld/mysqld.log |
| 3 | 通用日志 | general log | general_log | 记录对数据库的通用操作,包含错误sql语句 | 默认为file 或者table(mysql.general_log) |
| 4 | 慢查询日志 | slow query log | slow_query_log | 记录执行查询时长超过指定的操作 | /var/lib/mysql/xx-slow.sql |
| 5 | 二进制日志 | binary log | sql_bin_log binlog_format max_binlog_size expire_logs_day |
备份,记录已提交导致数据改变的sql语句 | 默认/var/lib/mysql 建议和数据文件分开存放 mysqld-bin.000xx mysql_bin.index 记录当前已有的二进制日志文件列表 |
| 6 | 中继日志 | relay log | 从服务器依赖relay log同步主库数据 | - |
4、主从复制及主主复制的实现
4.1 主从复制原理
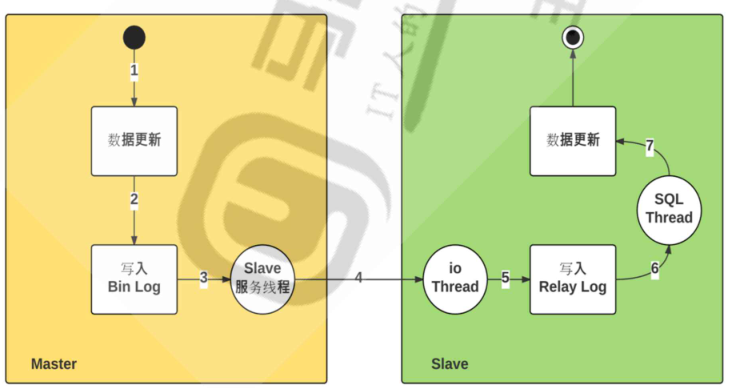
主从复制相关线程
1.主接点为每个slave的I/O thread 启动一个dump线程,用于向slave发送binary log events
2、从节点:
-
I/O Thread :向master 请求二进制日志事件,并保存在 本地relay-log中
-
SQL Thread: 从中继日志中读取日志事件,在本地完成重放
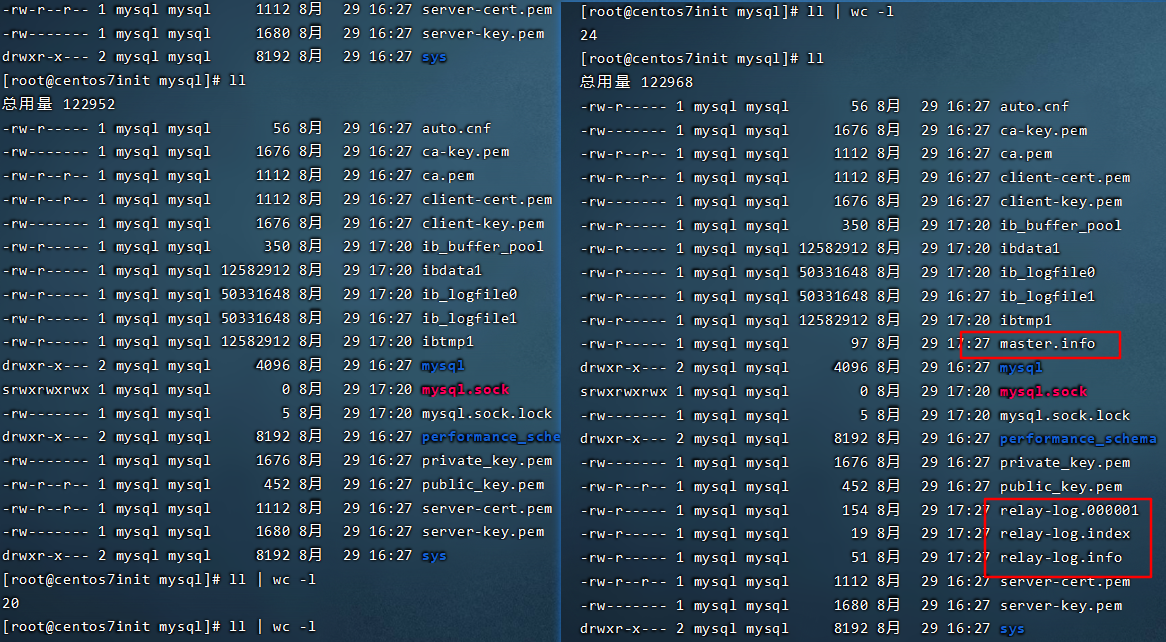
复制功能相关文件:
- mster.info :保存slave连接master的相关信息。同步账号,密码。服务器地址等
- relay-log.info:保存当前slave 节点上已经复制的当前二进制日志和本地relaylog 日志的对应关系
- mariadb-relay-bin.0000# :中继日志,保存从主节点复制来的二进制日志,本质就是二进制日志
4.2 主从复制配置
两台centos7.6 配置:2c4G20Gvm,yum安装mysql5.7.35,为最新版本
#contos7默认安装了mariadb数据库,这里把他移除:
rpm -qa | grep mariadb
sudo yum remove mariadb-libs.x86_64 -y

#安装
sudo yum -y install yum-utils
sudo yum -y install https://dev.mysql.com/get/mysql57-community-release-el7-11.noarch.rpm
#查看mysql57是否启用
sudo yum repolist all
#[可选]启动仓库
sudo yum-config-manager --disable mysql80-community
sudo yum-config-manager --enable mysql57-community
#
sudo yum install mysql-community-server.x86_64 -y-
修改配置文件/etc/my.cnf,
# 主节点配置
[mysqld]
server-id=134  # 必须开启,并设置集群中id唯一
log_bin=mysql-bin
#从节点配置
[mysqld]
server-id=135
log-bin=mysql-bin
read_only=ON
relay_log=relay-log
relay_log_index=relay-log.index
read_only=ON  #配置为从节点只允许读
#启动mysqld
systemctl start mysqld

#修改初始密码,有密码要求策略
MYSQL_INIT_PASS=`grep 'temporary password'  /var/log/mysqld.log | awk -F ':' '{print$4}'| head -n1 |awk '$1=$1'`
mysqladmin -uroot -p$MYSQL_INIT_PASS password 'Magedu123!'
#主机点查看当前master log
mysql> show master status;
+------------------+----------+--------------+------------------+-------------------+
| File             | Position | Binlog_Do_DB | Binlog_Ignore_DB | Executed_Gtid_Set |
+------------------+----------+--------------+------------------+-------------------+
| mysql-bin.000001 |      154 |              |                  |                   |
+------------------+----------+--------------+------------------+-------------------+
1 row in set (0.00 sec)


#主节点创建有复制权限的用户账号
grant replication slave on *.* to 'repluser'@'192.168.67.%' identified by 'Repl@123';


#slave节点配置
mysql> change master to master_host='192.168.67.134',master_user='repluser',master_password='Repl@123',master_log_file='mysql-bin.000001',master_log_pos=154;
Query OK, 0 rows affected, 2 warnings (0.01 sec)

#启动从服务器复制功能
mysql>start slave;

mysql> show slave status\G;
*************************** 1. row ***************************
               Slave_IO_State: Waiting for master to send event
                  Master_Host: 192.168.67.134
                  Master_User: repluser
                  Master_Port: 3306
                Connect_Retry: 60
              Master_Log_File: mysql-bin.000001
          Read_Master_Log_Pos: 452
               Relay_Log_File: relay-log.000002
                Relay_Log_Pos: 618
        Relay_Master_Log_File: mysql-bin.000001
             Slave_IO_Running: Yes            #i/o thread
            Slave_SQL_Running: Yes			  #SQL thread
              Replicate_Do_DB:
          Replicate_Ignore_DB:
           Replicate_Do_Table:
       Replicate_Ignore_Table:
      Replicate_Wild_Do_Table:
  Replicate_Wild_Ignore_Table:
                   Last_Errno: 0
                   Last_Error:
                 Skip_Counter: 0
          Exec_Master_Log_Pos: 452
              Relay_Log_Space: 819
              Until_Condition: None
               Until_Log_File:
                Until_Log_Pos: 0
           Master_SSL_Allowed: No
           Master_SSL_CA_File:
           Master_SSL_CA_Path:
              Master_SSL_Cert:
            Master_SSL_Cipher:
               Master_SSL_Key:
        Seconds_Behind_Master: 0
Master_SSL_Verify_Server_Cert: No
                Last_IO_Errno: 0
                Last_IO_Error:
               Last_SQL_Errno: 0
               Last_SQL_Error:
  Replicate_Ignore_Server_Ids:
             Master_Server_Id: 134
                  Master_UUID: f312f922-08a2-11ec-8320-00505630c7dd
             Master_Info_File: /var/lib/mysql/master.info
                    SQL_Delay: 0
          SQL_Remaining_Delay: NULL
      Slave_SQL_Running_State: Slave has read all relay log; waiting for more updates
           Master_Retry_Count: 86400
                  Master_Bind:
      Last_IO_Error_Timestamp:
     Last_SQL_Error_Timestamp:
               Master_SSL_Crl:
           Master_SSL_Crlpath:
           Retrieved_Gtid_Set:
            Executed_Gtid_Set:
                Auto_Position: 0
         Replicate_Rewrite_DB:
                 Channel_Name:
           Master_TLS_Version:
1 row in set (0.00 sec)
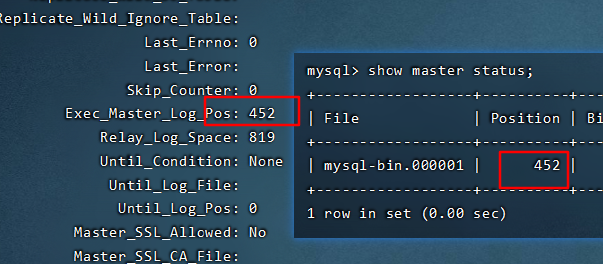
下图两个POS相同,代表同步完成
同步测试:
#主机点

mysql> create database testdb;
Query OK, 1 row affected (0.00 sec)

mysql> show databases;
+--------------------+
| Database           |
+--------------------+
| information_schema |
| mysql              |
| performance_schema |
| sys                |
| testdb             |
+--------------------+
5 rows in set (0.00 sec)

#从节点
mysql> show databases;
+--------------------+
| Database           |
+--------------------+
| information_schema |
| mysql              |
| performance_schema |
| sys                |
| testdb             |
+--------------------+
5 rows in set (0.00 sec)
限制从服务器为只读:
#添加配置
read_only=ON
#注意:此限制对拥有super权限的用户无效
在从节点清除信息:
#首先停止slave
stop slave
reset slave #从服务器清除master.inf,relay-log.info,relay_log,开始信息的relaylog
reset slave all  #清除所有从服务器上设置的主服务器同步信息,如host,port,user,password 等
复制错误解决方法:
show slave status 可以查看报错信息
- last_error :可以查看报错信息,
- last_SQL_Errno:查看错误编码
- last_SQL_error:查看出错sql语句
#方法一:跳过这个错误
stop slave;
set global sql_slave_skip_counter=1;
star slave;

#方法二:配置文件配置,忽略此错误编码
[mysqld]
slave_skip_errors=1007|ALL

systemctl restart mysqld
4.3 主主复制配置
说明:两个节点都可以更新数据,并且互为主从,容易产生数据不一致的问题,考虑要点:自动增长ID
在主从复制基础上配置:
修改M1节点配置:
#配置文件添加
#master-slave
server-id=134
log_bin=mysql-bin
read_only=ON
relay_log=relay-log
relay_log_index=relay-log.index
auto_increment_offset=1
auto_increment_increment=2

#cli修改查看
mysql> set global auto_increment_offset=2;
mysql> show variables like '%auto_increment%';
修改M2(从节点)节点配置:
#配置文件添加
#master-slave
server-id=135
log_bin=mysql-bin
read_only=ON
relay_log=relay-log
relay_log_index=relay-log.index
auto_increment_offset=2
auto_increment_increment=2
#M1
#主节点查看当前master log
mysql> show master status;
+------------------+----------+--------------+------------------+-------------------+
| File             | Position | Binlog_Do_DB | Binlog_Ignore_DB | Executed_Gtid_Set |
+------------------+----------+--------------+------------------+-------------------+
| mysql-bin.000001 |      154 |              |                  |                   |
+------------------+----------+--------------+------------------+-------------------+
1 row in set (0.00 sec)


#主节点创建有复制权限的用户账号
grant replication slave on *.* to 'repluser'@'192.168.67.%' identified by 'Repl@123';

#M2 配置
#M2节点配置
mysql> change master to master_host='192.168.67.134',master_user='repluser',master_password='Repl@123',master_log_file='mysql-bin.000001',master_log_pos=154;
Query OK, 0 rows affected, 2 warnings (0.01 sec)

#启动从服务器复制功能
mysql>start slave;
mysql> show master status;
+------------------+----------+--------------+------------------+-------------------+
| File             | Position | Binlog_Do_DB | Binlog_Ignore_DB | Executed_Gtid_Set |
+------------------+----------+--------------+------------------+-------------------+
| mysql-bin.000002 |      154 |              |                  |                   |
+------------------+----------+--------------+------------------+-------------------+
1 row in set (0.00 sec)

#M1配置
mysql> change master to master_host='192.168.67.135',master_user='repluser',master_password='Repl@123',master_log_file='mysql-bin.000002',master_log_pos=154;
mysql> start slave;
Query OK, 0 rows affected (0.00 sec)

mysql> show slave status\G;
验证:
#M1节点

mysql>create database testdb;
mysql>user testdb;
mysql>CREATE TABLE `test` (
`id`  int NOT NULL AUTO_INCREMENT ,
`name`  varchar(255) NULL ,
`age`  int NULL ,
PRIMARY KEY (`id`)
);
mysql>INSERT INTO `test` (`id`, `name`, `age`) VALUES ('1', 'mico', '18');
mysql> select * from test;
+----+------+------+
| id | name | age  |
+----+------+------+
|  1 | mico |   18 |
+----+------+------+
1 row in set (0.00 sec)
#M2
mysql>user testdb;
mysql>INSERT INTO `test` (`id`, `name`, `age`) VALUES ('2', 'cube', '20');
mysql> select * from test;
+----+------+------+
| id | name | age  |
+----+------+------+
|  1 | mico |   18 |
|  2 | cube |   20 |
+----+------+------+
2 rows in set (0.00 sec)
mysql> INSERT INTO `testdb`.`test` (`name`, `age`) VALUES ( 'name', '20');
mysql> INSERT INTO `testdb`.`test` (`name`, `age`) VALUES ( 'name2', '20');
mysql> select * from test;
+----+-------+------+
| id | name  | age  |
+----+-------+------+
|  1 | mico  |   18 |
|  2 | cube  |   20 |
|  4 | name  |   20 |
|  6 | name2 |   20 |
+----+-------+------+
4 rows in set (0.00 sec)

#M1操作
mysql> INSERT INTO `test` ( `name`, `age`) VALUES ( 'mico1', '18');
mysql> INSERT INTO `test` ( `name`, `age`) VALUES ( 'mico2', '18');

mysql> INSERT INTO `test` ( `name`, `age`) VALUES ( 'mico3', '18');
mysql> select * from test;
+----+-------+------+
| id | name  | age  |
+----+-------+------+
|  1 | mico  |   18 |
|  2 | cube  |   20 |
|  4 | name  |   20 |
|  6 | name2 |   20 |
|  7 | mico1 |   18 |
|  9 | mico2 |   18 |
| 11 | mico3 |   18 |
+----+-------+------+
7 rows in set (0.00 sec)
5、xtrabackup实现全量+增量+binlog恢复库
xtrabackup包含两个主要的工具,即xtrabackup和innobackupex,二者区别如下:
(1)xtrabackup只能备份innodb和xtradb两种引擎的表,而不能备份myisam引擎的表;
(2)innobackupex是一个封装了xtrabackup的Perl脚本,支持同时备份innodb和myisam,但在对myisam备份时需要加一个全局的读锁。还有就是myisam不支持增量备份。
5.1 Xtrabackup备份的工作原理
5.1.1.Xtrabackup恢复的工作原理
Percona Xtrabackup软件是基于InnoDB等事务引擎自带的redo日志和undo日志功能来保持备份和恢复前后数据一致性的,从而确保数据库的数据安全可靠。在InnoDB引擎中存在一个redo日志(事务日志)功能。redo日志文件会存储每一个InnoDB表中的数据修改记录。当InnoDB数据库启动时,会检查数据文件和redo日志文件,将已经提交到事务日志(redo日志文件)中的信息应用(提交)到数据文件并保存,然后根据undo日志信息将修改过但没有提交的数据记录进行回滚(不提交到数据文件)。
5.1.2.Xtrabackup执行全备份的原理
当执行Xtrabackup程序开始备份时,Xtrabackup首先会记录当前redo日志的位置(即对应的LSN号),同时还会在后台启动一个进程持续监视redo日志文件的变化,并将变化的信息都记录到Xtrabackup_logfile中,之后就会针对所有的InnoDB数据文件进行备份(复制),待InnoDB数据文件备份完成之后,再执行“flush tables with read lock”命令对整个数据库锁表,然后备份(复制)MyISAM等非事务引擎的数据文件。待数据文件全部(包括InnoDB、MyISAM数据文件和redo日志数据记录)都备份完毕之后,获取binlog二进制日志位置点信息,最后执行unlock tables解锁命令,恢复整个数据库的可读写状态。
5.1.3.Xtrabackup执行全备份恢复的过程
当执行Xtrabackup工具恢复数据时,要经过准备恢复(prepare)和实际恢复(restore)两个步骤。在准备恢复过程结束后,InnoDB表的数据(即备份的物理文件)就恢复到了复制InnoDB文件结束时的时间点,这个时间点也是全库锁表复制MyISAM引擎数据时的起点,所以最终恢复的数据和数据库的数据是一致的。全备的数据有两部分,一部分是全备的物理文件,一部分是Xtrabackup log日志文件。
5.1.4.Xtrabackup执行增量备份的过程
Innobackupex增量备份的(仅对InnoDB引擎有效)核心就是复制全备之后的InnoDB中变更的“页”数据,复制时会以全备中xtrabackup_checkpoints文件对应的LSN号为依据,将大于给定的LSN号的页数据(就是增量数据)进行备份,因为要比对全备的LSN号,所以第一次增量备份是基于全备的,以后实施的每一次增量备份都要基于上一次的增量备份,最终实现备份的数据是连续的、无缺失的,针对MyISAM引擎的备份依然是锁表备份。
增量备份的过程:
首先在全备的xtrabackup_checkpoints logfile中找到并记录最后一个checkpoint(last checkpoint LSN),然后从该LSN的位置开始复制InnoDB的redo日志到Xtrabackup_logfile,然后开始复制全部的数据文件.ibd,待全部数据复制结束后,就停止复制logfile,增量备份的过程与全备基本类似,区别就是第二步,仅复制InnoDB中变化的页数据,而非所有物理文件。
5.1.5.Xtrabackup执行增量恢复的过程
增量数据的恢复过程与全量备份的恢复过程类似,所不同的是增量恢复是以全备份数据为基础的,增量恢复的数据主要涉及全备的数据、增量的数据、Xtrabackup_log日志文件。恢复过程是先将增量备份中变化的页数据应用到全备数据中,然后,读取Xtrabackup_log应用redo数据到全备数据中,同时回滚未提交的事务。
5.2下载安装:
Percona XtraBackup 2.4 does not support making backups of databases created in MySQL 8.0, Percona Server for MySQL 8.0 or Percona XtraDB Cluster 8.0.
xtrabackup 安装
[root@centos7init opt]# rpm -i percona-xtrabackup-24-2.4.23-1.el7.x86_64.rpm
警告:percona-xtrabackup-24-2.4.23-1.el7.x86_64.rpm: 头V4 RSA/SHA256 Signature, 密钥 ID 8507efa5: NOKEY
错误:依赖检测失败:
        libev.so.4()(64bit) 被 percona-xtrabackup-24-2.4.23-1.el7.x86_64 需要
        perl(DBD::mysql) 被 percona-xtrabackup-24-2.4.23-1.el7.x86_64 需要
        perl(Digest::MD5) 被 percona-xtrabackup-24-2.4.23-1.el7.x86_64 需要
        rsync 被 percona-xtrabackup-24-2.4.23-1.el7.x86_64 需要
[root@centos7init opt]# yum install percona-xtrabackup-24-2.4.23-1.el7.x86_64.rpm -y

[root@centos7init opt]# ll /usr/bin/xtrabackup
-rwxr-xr-x 1 root root 20909928 6月  17 15:12 /usr/bin/xtrabackup
[root@centos7init opt]# file /usr/bin/xtrabackup
/usr/bin/xtrabackup: ELF 64-bit LSB executable, x86-64, version 1 (GNU/Linux), dynamically linked (uses shared libs), for GNU/Linux 2.6.32, BuildID[sha1]=70ceda16b3ec3afdcbe0d59b1115293a2f1fda29, stripped
5.3 xtrabackup使用
备份还原,需要三步实现
-
备份:对数据库做完全的备份或增量备份
![image]()
-
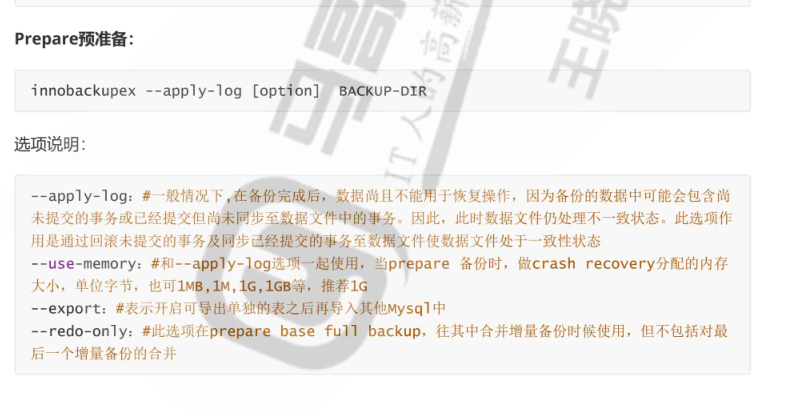
预准备:还原前,先对备份的数据库,整理至一个临时目录
![image]()
-
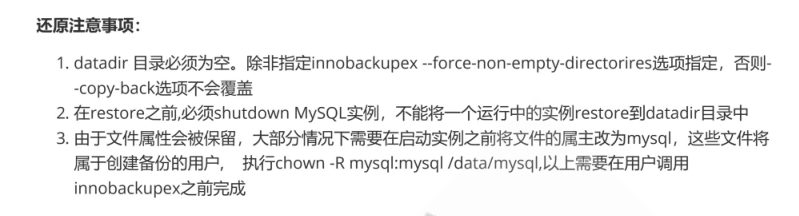
还原:将整理好的数据,复制回数据库目录中
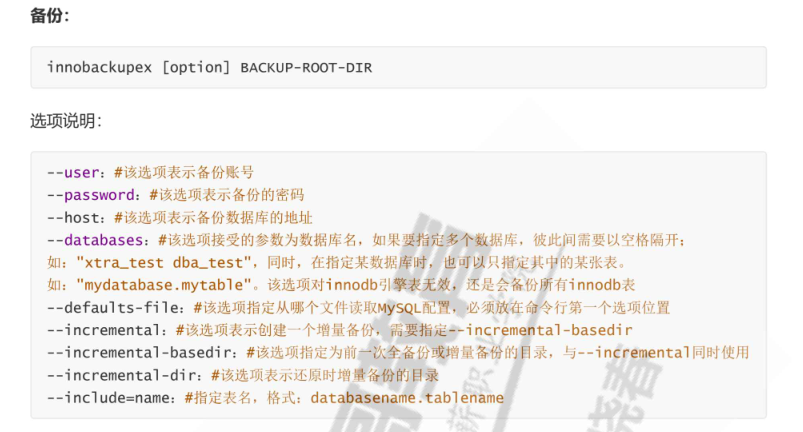

备份:
innobackupex [option] backup-root-dir

5.3.1 完全备份及还原
#备份testdb 到/backup/base目录
[root@centos7init base]# xtrabackup -uroot -pMagedu123!  --backup --target_dir=/backup/base
[root@centos7init base]# ls
backup-my.cnf  ib_buffer_pool  ibdata1  mysql  performance_schema  sys  testdb  xtrabackup_binlog_info  xtrabackup_checkpoints  xtrabackup_info  xtrabackup_logfile
#将备份复制到目的主机
[root@centos7init base]# scp -r /backup 目标主机:/

#在目标主机还原
#1)预准备:确保数据一致,提交完成的事务,回滚未完成的事务
[root@centos7init base]# xtrabackup --prepare --target-dir=/backu/base
#2)复制到数据库目录
#注意:数据库目录必须为空,mysql不能启动【新实例数据迁移】
[root@centos7init base]#  xtrabackup --copy-back --target-dir=/backup/base
#3)还原属性
[root@centos7init base]# chown -R mysql:mysql /var/lib/mysql
#4)启动服务
[root@centos7init base]#systemctl start mysqld
5.3.2 增量备份
#1)备份testdb 到/backup/base目录
[root@centos7init base]# xtrabackup -uroot -pMagedu123!  --backup --target_dir=/backup/base
#1.1)第一次修改数据
mysql> INSERT INTO `test` ( `name`, `age`) VALUES ( 'mico4', '18');
mysql> INSERT INTO `test` ( `name`, `age`) VALUES ( 'mico5', '18');
#1.2)第一次增量备份
[root@centos7init base]# xtrabackup -uroot -pMagedu123!  --backup --target_dir=/backup/inc1 --incremental-basedir=/backup/base

[root@centos7init inc1]# ls
backup-my.cnf  ib_buffer_pool  ibdata1.delta  ibdata1.meta  mysql  performance_schema  sys  testdb  xtrabackup_binlog_info  xtrabackup_checkpoints  xtrabackup_info  xtrabackup_logfile
[root@centos7init inc1]# cat xtrabackup_info
uuid = fcffce66-08c0-11ec-9246-00505630c7dd
name =
tool_name = xtrabackup
tool_command = -uroot -pMagedu123! --backup --target_dir=/backup/inc1 --incremental-basedir=/backup/base
tool_version = 2.4.23
ibbackup_version = 2.4.23
server_version = 5.7.35-log
start_time = 2021-08-29 20:02:29
end_time = 2021-08-29 20:02:31
lock_time = 1
binlog_pos = filename 'mysql-bin.000002', position '3023'
innodb_from_lsn = 2773006
innodb_to_lsn = 2778955
partial = N
incremental = Y
format = file
compact = N
compressed = N
encrypted = N
[root@centos7init inc1]# cat xtrabackup_binlog_info
mysql-bin.000002        3023
[root@centos7init inc1]# cat xtrabackup_checkpoints
backup_type = incremental
from_lsn = 2773006
to_lsn = 2778955
last_lsn = 2778964
compact = 0
recover_binlog_info = 0
flushed_lsn = 2778964
#1.3)第二次修改数据
mysql> INSERT INTO `test` ( `name`, `age`) VALUES ( 'mico6', '18');
mysql> INSERT INTO `test` ( `name`, `age`) VALUES ( 'mico7', '18');
#1.4)第二次增量备份
[root@centos7init base]# xtrabackup -uroot -pMagedu123!  --backup --target_dir=/backup/inc2 --incremental-basedir=/backup/base
[root@centos7init inc2]# cat xtrabackup_info
uuid = 809fe2ac-08c1-11ec-9246-00505630c7dd
name =
tool_name = xtrabackup
tool_command = -uroot -pMagedu123! --backup --target_dir=/backup/inc2 --incremental-basedir=/backup/base
tool_version = 2.4.23
ibbackup_version = 2.4.23
server_version = 5.7.35-log
start_time = 2021-08-29 20:06:10
end_time = 2021-08-29 20:06:12
lock_time = 1
binlog_pos = filename 'mysql-bin.000002', position '3579'
innodb_from_lsn = 2773006
innodb_to_lsn = 2779696
partial = N
incremental = Y
format = file
compact = N
compressed = N
encrypted = N
[root@centos7init inc2]# cat xtrabackup_binlog_info
mysql-bin.000002        3579
[root@centos7init inc2]# cat xtrabackup_checkpoints
backup_type = incremental
from_lsn = 2773006
to_lsn = 2779696
last_lsn = 2779705
compact = 0
recover_binlog_info = 0
flushed_lsn = 2779705
#1.5)备份生成三个目录,拷贝至目标主机
[root@centos7init inc1]# ls /backup/
base  inc1  inc2
[root@centos7init inc1]# scp -r /backup/* 目标主机:/backup/


#2数据还原过程
#2.1)预准备,选项--apply-log-only 阻止回滚未完成的事务
[root@centos7init base]# xtrabackup --prepare --apply-log-only --target-dir=/backu/base
#2.2)合并第一次增量备份到完全备份
[root@centos7init base]#xtrabackup --prepare --apply-log-only --target-dir=/backu/base  --incremental-dir=/backup/inc1
#2.3)合并第2次增量备份到完全备份,此为最终还原点,回滚未完成的事务
[root@centos7init base]#xtrabackup --prepare --target-dir=/backu/base  --incremental-dir=/backup/inc2
#2.4)复制到数据库目录
#注意:数据库目录必须为空,mysql不能启动【新实例数据迁移】
[root@centos7init base]#  xtrabackup --copy-back --target-dir=/backup/base
#2.5)还原属性
[root@centos7init base]# chown -R mysql:mysql /var/lib/mysql
#2.6)启动服务
[root@centos7init base]#systemctl start mysqld
5.3.3 单表导出和导入
#导出
#1、单表备份
innobackupex  -uroot -pMagedu123! --include='testdb.test' /backup
#2、备份表结构
mysql -uroot -pMagedu123! -e 'show create table testdb.test;' > /backup/2021-08-29_21-43-07/test.sql
#3、删除表
mysql -uroot -pMagedu123! -e 'drop table testdb.test;'
#4、导出
[root@centos7init inc1]# ls /backup/2021-08-29_21-43-07/testdb/
test.frm  test.ibd
[root@centos7init inc1]# innobackupex  --apply-log --export /backup/2021-08-29_21-43-07/
[root@centos7init inc1]# ls /backup/2021-08-29_21-43-07/testdb/
test.cfg  test.exp  test.frm  test.ibd
#5、创建表
mysql> CREATE TABLE `test` (
  `id` int(11) NOT NULL AUTO_INCREMENT,
  `name` varchar(255) DEFAULT NULL,
  `age` int(11) DEFAULT NULL,
  PRIMARY KEY (`id`)
) ENGINE=InnoDB AUTO_INCREMENT=23 DEFAULT CHARSET=latin1;
#6 删除表空间
mysql> alter table test discard tablespace;
#7 拷贝数据文件
cp /backup/2021-08-29_21-43-07/testdb/test.{cfg,exp,ibd} /var/lib/mysql/testdb/
#8 修改权限
chown -R mysql:mysql /var/lib/mysql/testdb
#9 导入表空间
mysql> alter table test import tablespace;

 浙公网安备 33010602011771号