

基于pytorch框架的yolov5训练与pycharm远程连接服务器
目录
-
yolov5 pytorch工程准备与环境部署
-
yolov5训练数据准备
-
yolov5训练
-
pycharm远程连接
-
pycharm解释器配置
-
测试
1. yolov5 pytorch工程准备与环境部署
(1)下载yolov5工程pytorch版本源码
https://github.com/ultralytics/yolov5
(2)环境部署
用anaconda创建新的虚拟环境(如tp_env_yolov5),并激活。在该环境下安装yolov5工程需要的python包。
   pip install -r requirements.txt
或 conda install -r requirements.txt
(3) 下载预训练权重
将weights文件夹下的download_weights.sh脚本文件移到上一层执行,下载不同网络规模的预训练权重。
2. yolov5训练数据准备
(1) 数据格式转换
新建voc_labels_yolov5.py文件,代码如下:
# _*_ utf-8 _*_
'''
通过该脚本将 JPEGs和xml文件转换为yolov5需要的数据格式。
'''
import xml.etree.ElementTree as ET
import pickle
import os
from os import listdir, getcwd
from os.path import join
import random
from shutil import copyfile
# 根据自己的数据标签修改
#classes=["Pedestrian", "Cyclist", "Vehicle"]
classes = ["car", "bus", "truck", "nm_vehicle", "pedestrian", "s_pedestrian", "f_cyclist", "l_cyclist","b_cyclist"]
def clear_hidden_files(path):
dir_list = os.listdir(path)
for i in dir_list:
abspath = os.path.join(os.path.abspath(path), i)
if os.path.isfile(abspath):
if i.startswith("._"):
os.remove(abspath)
else:
clear_hidden_files(abspath)
def convert(size, box):
dw = 1./size[0]
dh = 1./size[1]
x = (box[0] + box[1])/2.0
y = (box[2] + box[3])/2.0
w = box[1] - box[0]
h = box[3] - box[2]
x = x*dw
w = w*dw
y = y*dh
h = h*dh
return (x,y,w,h)
def convert_annotation(xml_path, labels_path, image_id):
in_file = open(xml_path+'%s.xml' %image_id)
out_file = open(labels_path+'%s.txt' %image_id, 'w')
tree=ET.parse(in_file)
root = tree.getroot()
size = root.find('size')
w = int(size.find('width').text)
h = int(size.find('height').text)
for obj in root.iter('object'):
# difficult = obj.find('difficult').text
cls = obj.find('name').text
if cls not in classes :
continue
cls_id = classes.index(cls)
xmlbox = obj.find('bndbox')
b = (float(xmlbox.find('xmin').text), float(xmlbox.find('xmax').text), float(xmlbox.find('ymin').text), float(xmlbox.find('ymax').text))
bb = convert((w,h), b)
out_file.write(str(cls_id) + " " + " ".join([str(a) for a in bb]) + '\n')
in_file.close()
out_file.close()
if __name__ == "__main__":
wd = os.getcwd()
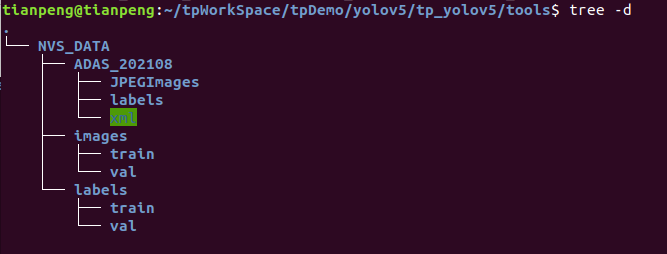
data_base_dir = os.path.join(wd, "NVS_DATA/")
if not os.path.isdir(data_base_dir):
os.mkdir(data_base_dir)
work_sapce_dir = os.path.join(data_base_dir, "ADAS_202108/")
if not os.path.isdir(work_sapce_dir):
os.mkdir(work_sapce_dir)
'''
create xml file foder,store our data
after folder created, move our xml data to this folder,then run this py again
'''
annotation_dir = os.path.join(work_sapce_dir, "xml/")
if not os.path.isdir(annotation_dir):
os.mkdir(annotation_dir)
clear_hidden_files(annotation_dir)#clear hidden files
'''
create image file foder,store our data
after folder created, move our image data to this folder,then run this py again
'''
image_dir = os.path.join(work_sapce_dir, "JPEGImages/")
if not os.path.isdir(image_dir):
os.mkdir(image_dir)
clear_hidden_files(image_dir)
'''
create label file foder, generate new data, translate from xml files
'''
yolo_labels_dir = os.path.join(work_sapce_dir, "labels/")
if not os.path.isdir(yolo_labels_dir):
os.mkdir(yolo_labels_dir)
clear_hidden_files(yolo_labels_dir)
yolov5_images_dir = os.path.join(data_base_dir, "images/")
if not os.path.isdir(yolov5_images_dir):
os.mkdir(yolov5_images_dir)
clear_hidden_files(yolov5_images_dir)
yolov5_labels_dir = os.path.join(data_base_dir, "labels/")
if not os.path.isdir(yolov5_labels_dir):
os.mkdir(yolov5_labels_dir)
clear_hidden_files(yolov5_labels_dir)
yolov5_images_train_dir = os.path.join(yolov5_images_dir, "train/")
if not os.path.isdir(yolov5_images_train_dir):
os.mkdir(yolov5_images_train_dir)
clear_hidden_files(yolov5_images_train_dir)
yolov5_images_test_dir = os.path.join(yolov5_images_dir, "val/")
if not os.path.isdir(yolov5_images_test_dir):
os.mkdir(yolov5_images_test_dir)
clear_hidden_files(yolov5_images_test_dir)
yolov5_labels_train_dir = os.path.join(yolov5_labels_dir, "train/")
if not os.path.isdir(yolov5_labels_train_dir):
os.mkdir(yolov5_labels_train_dir)
clear_hidden_files(yolov5_labels_train_dir)
yolov5_labels_test_dir = os.path.join(yolov5_labels_dir, "val/")
if not os.path.isdir(yolov5_labels_test_dir):
os.mkdir(yolov5_labels_test_dir)
clear_hidden_files(yolov5_labels_test_dir)
train_file = open(os.path.join(wd, "yolov5_train.txt"), 'w')
test_file = open(os.path.join(wd, "yolov5_val.txt"), 'w')
train_file.close()
test_file.close()
train_file = open(os.path.join(wd, "yolov5_train.txt"), 'a')
test_file = open(os.path.join(wd, "yolov5_val.txt"), 'a')
list_imgs = os.listdir(image_dir) # list image files
probo = random.randint(1, 100)
print("Probobility: %d" % probo)
for i in range(0,len(list_imgs)):
path = os.path.join(image_dir,list_imgs[i])
if os.path.isfile(path):
image_path = image_dir + list_imgs[i]
voc_path = list_imgs[i]
(nameWithoutExtention, extention) = os.path.splitext(os.path.basename(image_path))
(voc_nameWithoutExtention, voc_extention) = os.path.splitext(os.path.basename(voc_path))
annotation_name = nameWithoutExtention + '.xml'
annotation_path = os.path.join(annotation_dir, annotation_name)
label_name = nameWithoutExtention + '.txt'
label_path = os.path.join(yolo_labels_dir, label_name)
probo = random.randint(1, 100)
print("Probobility: %d" % probo)
if(probo < 80): # train dataset
if os.path.exists(annotation_path):
train_file.write(image_path + '\n')
convert_annotation(annotation_dir, yolo_labels_dir,nameWithoutExtention) # convert label
copyfile(image_path, yolov5_images_train_dir + voc_path)
copyfile(label_path, yolov5_labels_train_dir + label_name)
else: # test dataset
if os.path.exists(annotation_path):
test_file.write(image_path + '\n')
convert_annotation(annotation_dir, yolo_labels_dir,nameWithoutExtention) # convert label
copyfile(image_path, yolov5_images_test_dir + voc_path)
copyfile(label_path, yolov5_labels_test_dir + label_name)
train_file.close()
test_file.close()
注:该文件运行两次,一次生成相应的文件夹结构,将自己的jpg数据和标注xml数据拷贝到生成的文件夹里,再次执行该文件即可生成目标数据,不然为空。此处稍微繁琐,以后有时间简化。
通过该脚本将 JPEGs和xml文件转换为yolov5需要的数据格式。
(2)新建数据配置文件
在yolov5-master目录下的data文件夹下新建一个nvs.yaml文件(可以自定义命名),内容如下:

train: /home/tianpeng/tpWorkSpace/tpDemo/yolov5/tp_yolov5/tools/NVS_DATA/images/train/  #如果是远程的话,需要将本地生成的该文件夹传输至远程服务器,并配置相应路径
val: /home/tianpeng/tpWorkSpace/tpDemo/yolov5/tp_yolov5/tools/NVS_DATA/images/val/  #如果是远程的话,需要将本地生成的该文件夹传输至远程服务器,并配置相应路径
#如我的远程地址是:
#train: /home/zg-alg/Workspace/tpWork/tpTrainingData/yolov5_training_data/images/train/
#val: /home/zg-alg/Workspace/tpWork/tpTrainingData/yolov5_training_data/images/val/

# number of classes
nc: 9

# class names
names: ["car", "bus", "truck", "nm_vehicle", "pedestrian", "s_pedestrian", "f_cyclist", "l_cyclist","b_cyclist"]
(3) 修改模型配置文件
在models文件下选择训练用的网络模型,打开模型文件:

将类别(nc)修改为我们分类数,将anchors改成重新聚类的结果,也可以不改,保存退出。
3. yolov5训练
在train.py文件里进行以下几处修改:
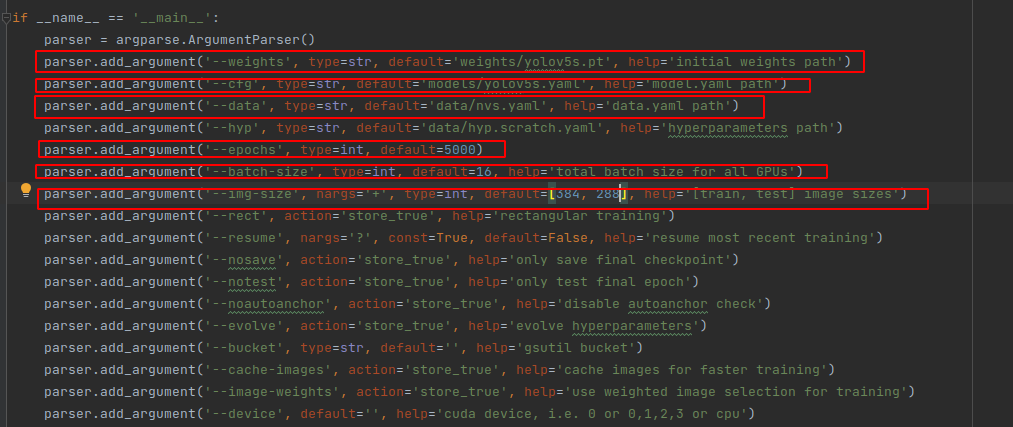
以上参数解释如下:
epochs:指的就是训练过程中整个数据集将被迭代多少次,显卡不行你就调小点。
batch-size:一次看完多少张图片才进行权重更新,梯度下降的mini-batch,显卡不行你就调小点。
cfg:存储模型结构的配置文件
data:存储训练、测试数据的文件
img-size:输入图片宽高,显卡不行你就调小点。
rect:进行矩形训练
resume:恢复最近保存的模型开始训练
nosave:仅保存最终checkpoint
notest:仅测试最后的epoch
evolve:进化超参数
bucket:gsutil bucket
cache-images:缓存图像以加快训练速度
weights:权重文件路径
name: 重命名results.txt to results_name.txt
device:cuda device, i.e. 0 or 0,1,2,3 or cpu
adam:使用adam优化
multi-scale:多尺度训练,img-size +/- 50%
single-cls:单类别的训练集
开始训练:

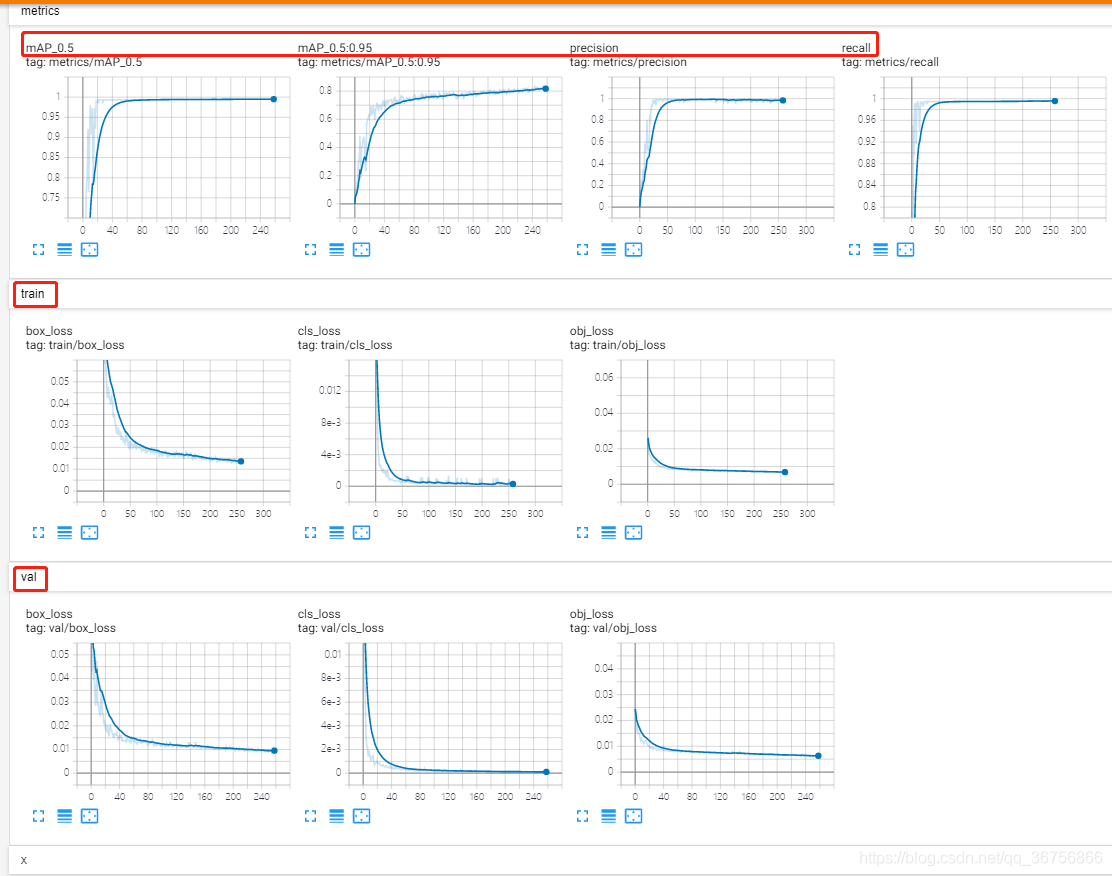
训练过程可视化
利用tensorboard可视化训练过程,训练开始会在yolov5目录生成一个runs文件夹,利用tensorboard打开即可查看训练日志,命令如下:
tensorboard --logdir=runs
在浏览器中打开生成的链接即可查看。
4. pycharm远程连接服务器
pycharm需要专业版,社区版不行。
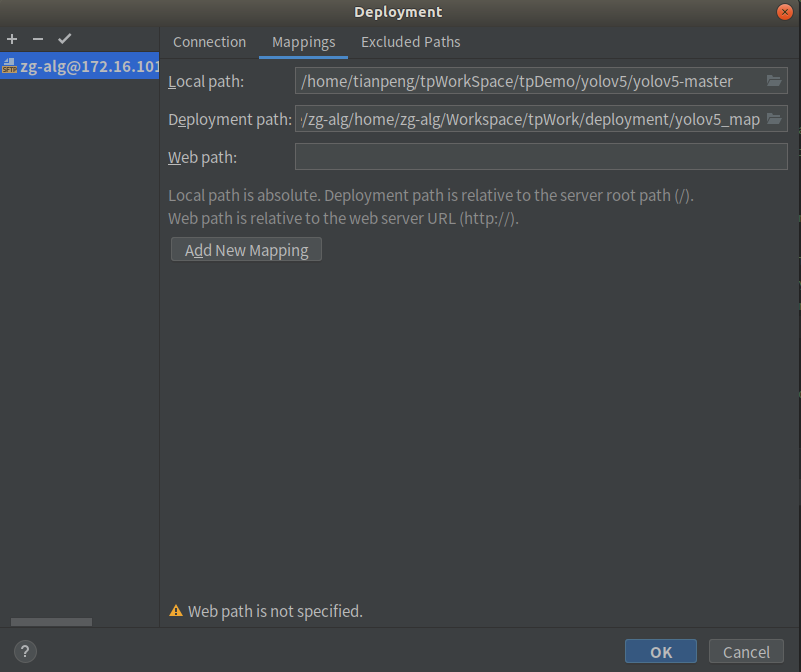
Pycharm菜单栏,如下图所示,依次点击 Tools -> Deployment -> Configration…

Connection下,协议最好选择sftp,接下来填写服务器主机IP,用户名,密码。

Mappings下可先不配,后面配置解释器再将其关联起来。
5. pycharm解释器配置
使用服务器调试Python程序的前提时在服务器上安装了Python解释器,如果没安装,请先安装。
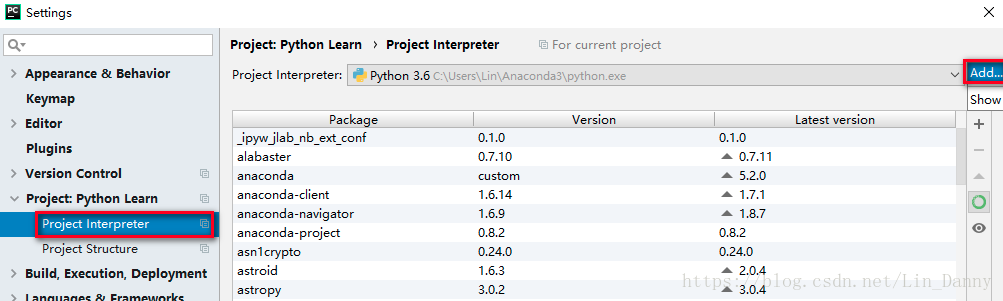
在菜单栏,File -> Settings… -> Project ×× -> Project Interpreter,点击右侧 Add按钮,添加解释器。
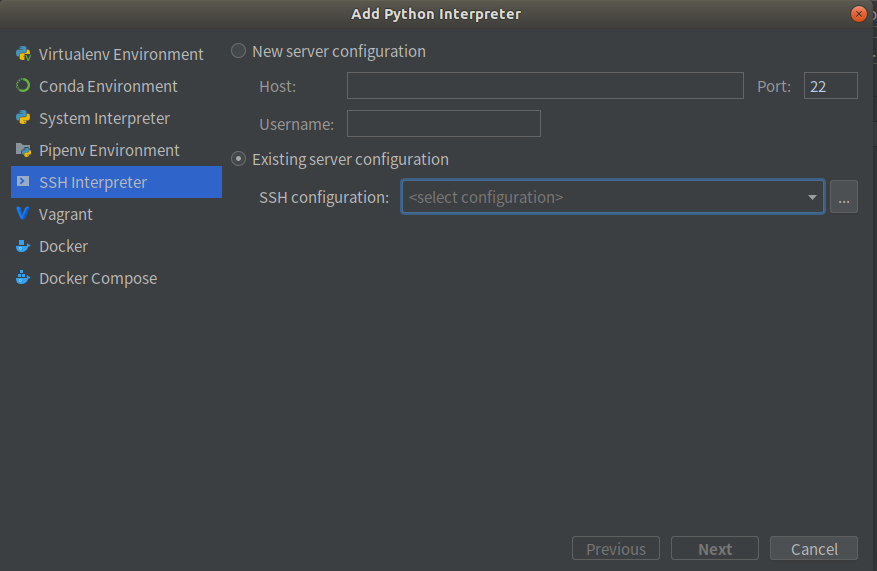
选择SSH Interpreter,Existing server configuration,选择上一步连接的服务器,如果没有则新建一个服务器连接。
选择远程服务器上Python解释器的位置,服务器上的远程同步文件夹Sync folders,可以选择多个。如果不知道Python安装在哪,可以远程连接服务器后,使用 命令 which python 找到Python安装位置。

点击Sync folder 右侧的文件夹图标,填写本地工程目录和要映射到服务器的工程路径,这一步将上一步mappings关联起来。
Finish,配置结束。该项目现在使用的就是远程服务器上的Python解释器了。以后的项目若想/不想使用该解释器,手动更改解释器即可。
使用远程解释器运行本地Python程序
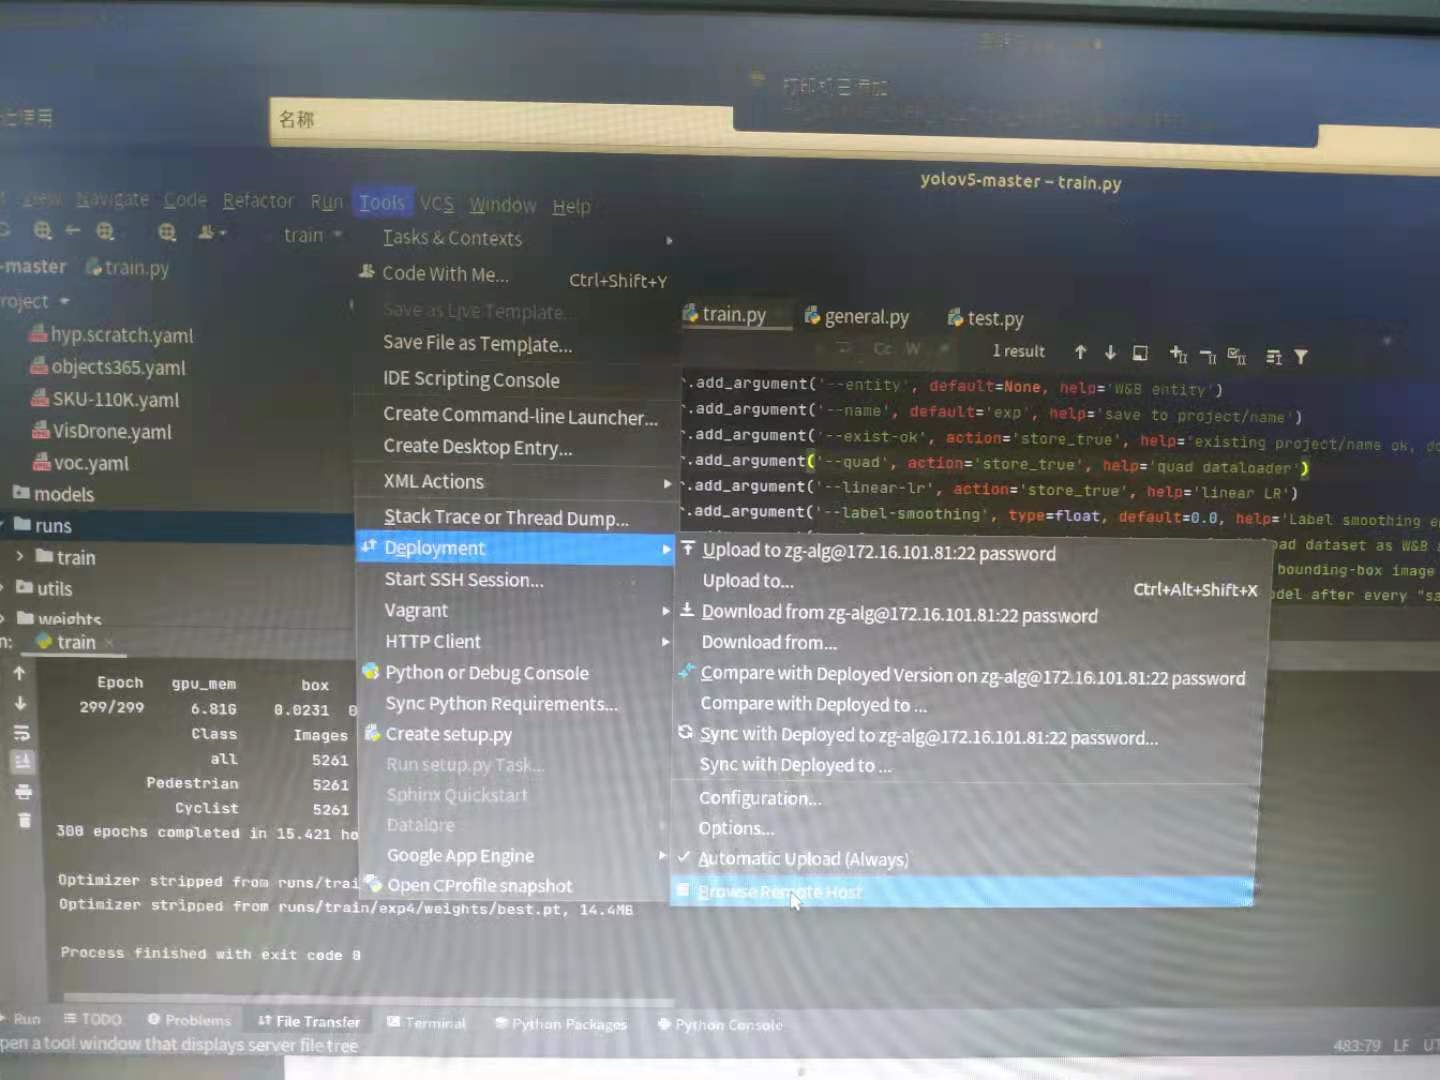
将测试代码上传至远程服务器(Tools -> Deployment -> Upload to ××)。
将服务器程序生成的模型文件或文件夹下载到本地如下操作:
Tools -> Deployment -> Browse Remote Host, 选择相应文件或文件夹,下载下来即可。
执行测试代码,可以看到现在代码是在远程服务器上运行了。
6. 测试
测试图片:
python detect.py --source ../../../tpAdasData/images_dir/test_set/guide5000/ --weights ./runs/train/exp4/weights/best.pt
测试视频:
python detect.py --source ../../test_video/car_sunny_20210508.avi --weights ./runs/train/exp4/weights/best.pt

 浙公网安备 33010602011771号