实现编辑和删除
在本章中,你将关注添加行为。它允许用户编辑或删除菜谱
学习目标
在课程结束,你将学会
1.push和modal导航的区别
2.根据它们的展示风格来dismiss视图控制器
3.理解子类强转(downcasting)
4.利用可选绑定检查复杂条件
5.使用segue标示符来确定哪个segue会发生
允许编辑已存在的Meals
当前,FoodTracker app给用户提供添加新菜谱到列表的功能,接下来,你想要给用户提供编辑功能。
你允许用户点击一个meal cell来拉起一个meal场景,我们已经预制了一些菜谱。用户可以使之改变并点击Save按钮保存,可以用更新信息并覆盖先前meal list中的记录
配置table view cell
1.返回到standard editor
2.打开storyboard
3.在画布上,选择table view cell
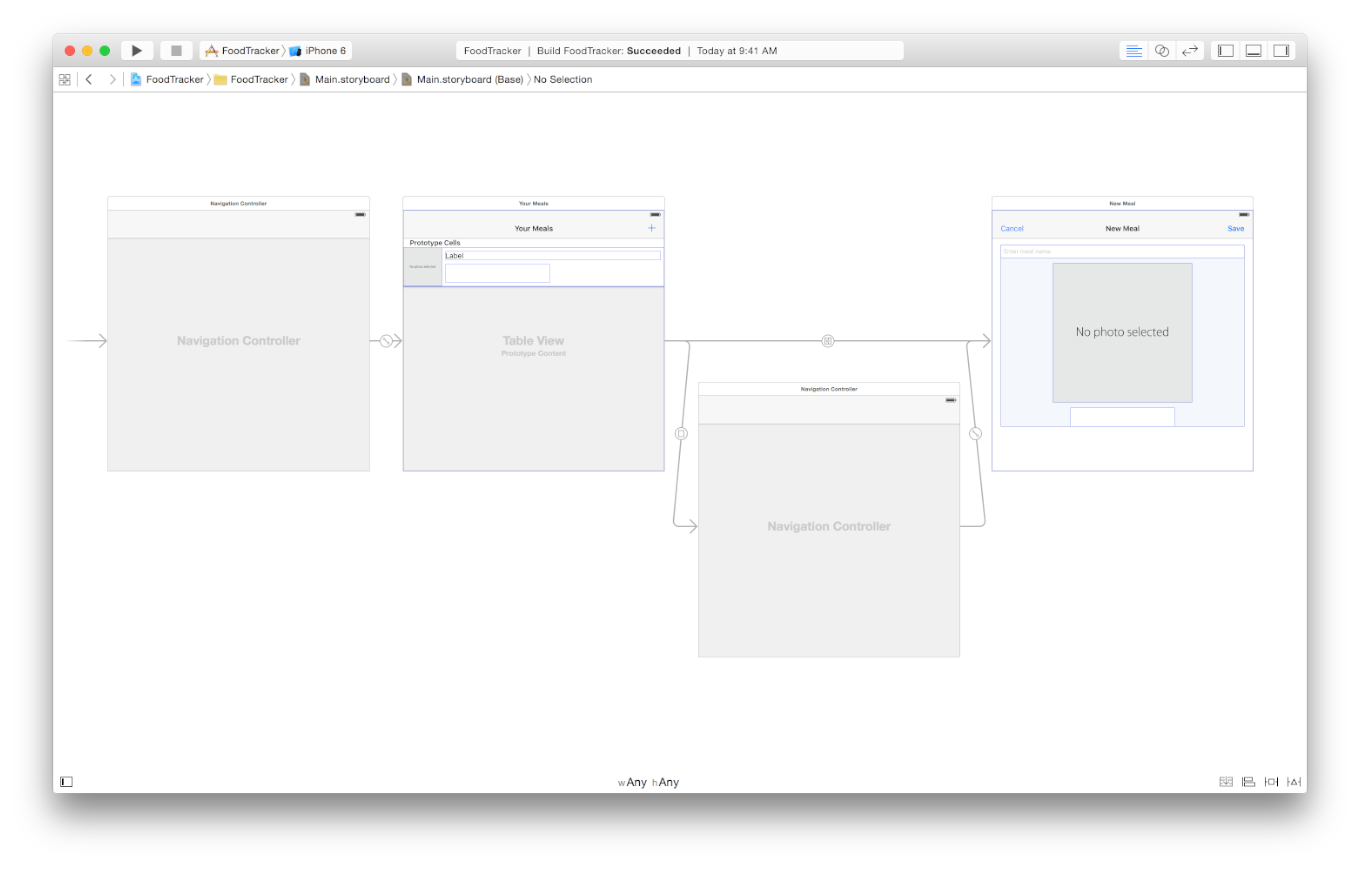
4.按住Control键,拖动table view cell到meal场景
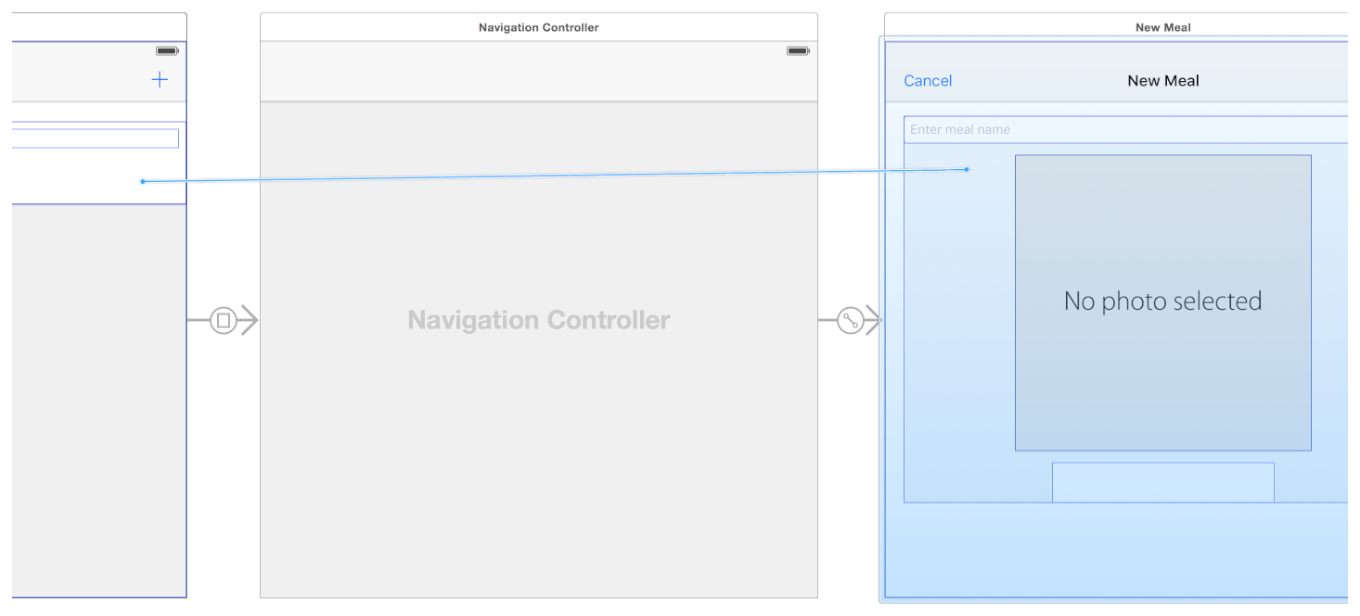
一个标题为Selection Segue的快捷菜单出现在我们松开的位置

5.选择快捷菜单中,我们选择show
6.在meal list和meal场景之间向下拖动导航控制器,直到你能看到一个新的segue
如果你想缩小它们,你可以使用Command-Minus (-)
7.在画布中,选中新添加的segue

8.在Attributes inspector中,找到Identifier标签,在旁边输入ShowDetail,然后按下Return
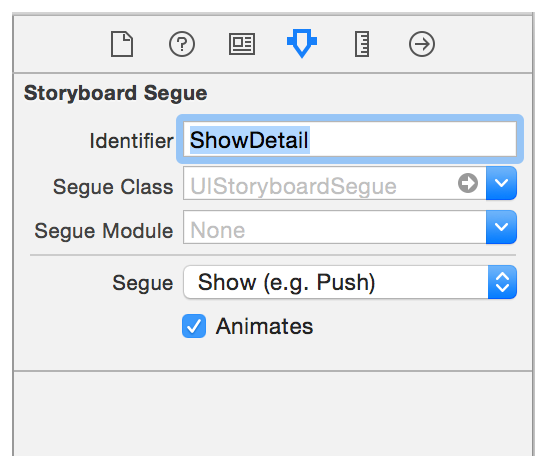
当这个sugue被触发时,它会为meal场景push视图控制器到,和meal list场景一样相同的导航栈中。
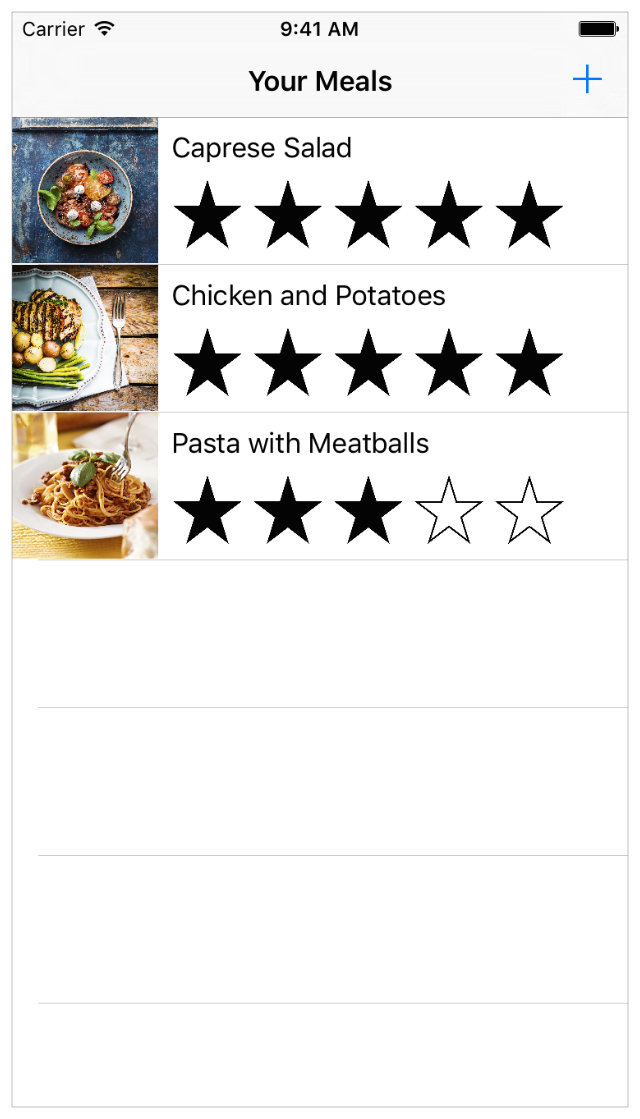
检查站:执行你的APP,在meal list场景下,你可以点击一个cell来导航到meal场景,但场景内容为空白。当你点击一个已存在的cell时,你想要编辑这个已存在的meal,而不是创建一个新的
你现在有两个segues去往相同的场景,所以你需要一个方法来识别它们,用户是想要添加还是编辑。
回忆一下prepareForSegue(_:sender:)方法,它会在任意segue执行前调用。你可以使用这个方法来识别哪个segue在发生,并在meal场景中显示适当的信息。你可以基于你早起分配给它们的标示符来区别sugues:AddItem (modal segue) 和ShowDetail (show segue)
标识哪个segue正在发生
1.打开MealTableViewController.swift
2.在MealTableViewController.swift中,找到并取消prepareForSegue(_:sender:)方法中的注释。你做完后,模版方法应该如下所示:
// MARK: - Navigation

// In a storyboard-based application, you will often want to do a little preparation before navigation
override func prepareForSegue(segue: UIStoryboardSegue, sender: AnyObject?) {

    // Get the new view controller using segue.destinationViewController.
    // Pass the selected object to the new view controller.
}
因为MealTableViewController是UITableViewControlle的子类,模版实现伴随prepareForSegue(_:sender:)结构
3.删除两行注释,并替换为if else语句
if segue.identifier == "ShowDetail" {
}
else if segue.identifier == "AddItem" {
}
上面的代码用于比较segue的标示符
4.在第一个if语句中,添加如下代码:
let mealDetailViewController = segue.destinationViewController as! MealViewController
代码试图子类强转目标segue的视图控制器问为MealViewController,使用强制类型转换操作符(as!)。你这个操作符有一个感叹号标记而不是问号,正如你所看到的,目前为止的类型转换操作。意思是这个操作执行一个强制的类型转换。如果转换成功,局部常量constantmealDetailViewController会分配一个作为MealViewController类型的。如果强转失败,APP将会在运行时崩溃。如果你绝对肯定强转会成功,你可以使用感叹号(!),如果失败的话,app会发生错误并且崩溃,如果你不肯定,你可以使用问号(as?)
5.在if语句中,添加如下代码:
// Get the cell that generated this segue.
if let selectedMealCell = sender as? MealTableViewCell {
}
上面的代码是试图子类强转sender到一个MealCell。如果转换陈功,局部常量selectedMealCell会分配一个作为MealTableViewCell类型的sender,并且if语句会执行。如果转换失败,表达式等于nil,if语句不执行
6.在if语句内部,添加如下代码:
let indexPath = tableView.indexPathForCell(selectedMealCell)!
let selectedMeal = meals[indexPath.row]
mealDetailViewController.meal = selectedMeal
上面的代码获取对应选择cell的Meal数据对象。然后分配Meal对象到目标视图控制器的meal属性中,这里的目标视图控制器是MealViewController。(当它载入时,你配置了MealViewController用来显示)meal中的信息
7.在else if语句中,添加print语句
print("Adding new meal.")
虽然不需要在这个里面做任何事,但如果万一你是添加新菜谱,而不是编辑的话,这是一个有用的提示
完整的prepareForSegue(_:sender:)方法看起来如下:
override func prepareForSegue(segue: UIStoryboardSegue, sender: AnyObject?) {
    if segue.identifier == "ShowDetail" {
        let mealDetailViewController = segue.destinationViewController as! MealViewController

        // Get the cell that generated this segue.
        if let selectedMealCell = sender as? MealTableViewCell {
            let indexPath = tableView.indexPathForCell(selectedMealCell)!
            let selectedMeal = meals[indexPath.row]
            mealDetailViewController.meal = selectedMeal
        }
    }
    else if segue.identifier == "AddItem" {
        print("Adding new meal.")
    }
}
现在你实现了逻辑,你需要在MealViewController.swift中做一些工作,确保UI正确更新。当一个MealViewController(菜谱场景)实例被创建时,它的view会从meal属性内填充数据。回忆一下这个设置工作合适的地方是在viewDidLoad()方法中
更新viewDidLoad()的方法实现
1.打开MealViewController.swift
2.在MealViewController.swift中找到viewDidLoad()方法
override func viewDidLoad() {
    super.viewDidLoad()

    // Handle the text field’s user input via delegate callbacks.
    nameTextField.delegate = self

    // Enable the Save button only if the text field has a valid Meal name.
    checkValidMealName()
}
3. 在nameTextField.delegate = self这行下方,添加如下代码:
// Set up views if editing an existing Meal.
if let meal = meal {
    navigationItem.title = meal.name
    nameTextField.text   = meal.name
    photoImageView.image = meal.photo
    ratingControl.rating = meal.rating
}
上面的代码是根据meal属性来设置MealViewController中的显示数据,前提是meal属性不为nil,这只会发生在一个已存在的meal被编辑时。
完整的 viewDidLoad()方法如下所示:
override func viewDidLoad() {
    super.viewDidLoad()

    // Handle the text field’s user input via delegate callbacks.
    nameTextField.delegate = self

    // Set up views if editing an existing Meal.
    if let meal = meal {
        navigationItem.title = meal.name
        nameTextField.text   = meal.name
        photoImageView.image = meal.photo
        ratingControl.rating = meal.rating
    }

    // Enable the Save button only if the text field has a valid Meal name.
    checkValidMealName()
}
检查站:执行你的app。你将能点击cell导航到meal场景,并看见meal预制的数据。但如果你点击Save,不是覆盖已存在的meal,它还是会添加一个新的meal。接下来我们会修改这个地方

为了覆盖已存在的meal,你需要更新unwindToMealList(_:)动作方法来处理两个不同的情况,第一种情况你需要添加一个新的mea,第二种你需求替换已存在的meal。回忆一下,这个方法只会在用户点击Save按钮时调用,所以我们不需要考虑Cancel按钮
更新unwindToMealList(_:)方法的实现,可以添加或替换meals
1.打开MealTableViewController.swift
2.在MealTableViewController.swift中,找到unwindToMealList(_:)方法
@IBAction func unwindToMealList(sender: UIStoryboardSegue) {
    if let sourceViewController = sender.sourceViewController as? MealViewController, meal = sourceViewController.meal {
        // Add a new meal.
        let newIndexPath = NSIndexPath(forRow: meals.count, inSection: 0)
        meals.append(meal)
        tableView.insertRowsAtIndexPaths([newIndexPath], withRowAnimation: .Bottom)
    }
}
3.在if语句内部的开始处,添加如下代码
if let selectedIndexPath = tableView.indexPathForSelectedRow {
}
这行代码是检查是否有一行被选中。如果是,表示用户点击了cell来编辑一个meal。换句话说,if语句会执行已经存在的meal。
4.在if语句中添加如下代码
// Update an existing meal.
meals[selectedIndexPath.row] = meal
tableView.reloadRowsAtIndexPaths([selectedIndexPath], withRowAnimation: .None)
上面的代码是更新meals中合适的条目并存储到meal数组中。第二行是重载适当的行来显示改变后的数据
5.在if语句后,添加else语句
else {
    // Add a new meal.
    let newIndexPath = NSIndexPath(forRow: meals.count, inSection: 0)
    meals.append(meal)
    tableView.insertRowsAtIndexPaths([newIndexPath], withRowAnimation: .Bottom)
}
当没有选中行时,else语句会执行,意识是用户点击的(+)按钮来跳转到meal场景。换句话说,else语句执行一个新菜谱添加的情况。
完整的unwindToMealList(_:)动作方法看起来如下:
@IBAction func unwindToMealList(sender: UIStoryboardSegue) {
    if let sourceViewController = sender.sourceViewController as? MealViewController, meal = sourceViewController.meal {
        if let selectedIndexPath = tableView.indexPathForSelectedRow {
            // Update an existing meal.
            meals[selectedIndexPath.row] = meal
            tableView.reloadRowsAtIndexPaths([selectedIndexPath], withRowAnimation: .None)
        }
        else {
            // Add a new meal.
            let newIndexPath = NSIndexPath(forRow: meals.count, inSection: 0)
            meals.append(meal)
            tableView.insertRowsAtIndexPaths([newIndexPath], withRowAnimation: .Bottom)
        }
    }
}
检查站:执行你的app,你应该能点击一个cell来导航到meal场景,如果你点击Save,会改变的覆盖的已存在的meal到meal list场景中
取消编辑已存在的Meal
有时候用户可能决定放弃编辑这个meal,然后想要返回到meal list中,并不是保存任何改变。对于这点,我们可以更新Cancel按钮的行为并适当的dismiss这个场景
被取消的类型取决于你展示的类型。你需要实现一个检查,以确定当用户点击Cancel按钮时,当前场景是如何展示的。如果是modal展示的(+ 按钮),它将通过dismissViewControllerAnimated(_:completion:)来dismiss。如果通过push导航展示的(cell),它将通过导航控制器来dismiss。
改变取消动作的实现
1.打开 MealViewController.swift
2.在MealViewController.swift,找到cancel(_:)动作方法
@IBAction func cancel(sender: UIBarButtonItem) {
    dismissViewControllerAnimated(true, completion: nil)
}
这个实现仅用于(+)按钮时的dismissViewControllerAnimated,因为那个时候我们值需要考虑Add的情况
3.在cancel(_:)动作方法中的第一行,插入如下代码
// Depending on style of presentation (modal or push presentation), this view controller needs to be dismissed in two different ways.
let isPresentingInAddMealMode = presentingViewController is UINavigationController
这里创建了一个布尔值,用来表示视图控制器是否是UINavigationController类型。因为meal场景是内嵌于自己的导航控制器中。
4.接下来把以前的callsdismissViewControllerAnimated代码,替换到if语句内
if isPresentingInAddMealMode {
    dismissViewControllerAnimated(true, completion: nil)
}
而在此之前,调用dismissviewcontrolleranimated方法发生在cancel(_:)任意调用时,而现在它只发生ispresentinginaddmode为真时。
5.在if语句之前,接着添加else语句
else {
    navigationController!.popViewControllerAnimated(true)
}
else表示push导航展示的情况,我们可以使用popViewControllerAnimated()方法以动画的方式来从当前meal场景内离开导航栈
完整的cancel(_:)动作方法如下
@IBAction func cancel(sender: UIBarButtonItem) {
    // Depending on style of presentation (modal or push presentation), this view controller needs to be dismissed in two different ways.
    let isPresentingInAddMealMode = presentingViewController is UINavigationController

    if isPresentingInAddMealMode {
        dismissViewControllerAnimated(true, completion: nil)
    }
    else {
        navigationController!.popViewControllerAnimated(true)
    }
}
检查站:执行你的app。现在当你点击(+)按钮时,然后点击Cancel你将向后导航回meal list,并不会添加任何新的菜谱
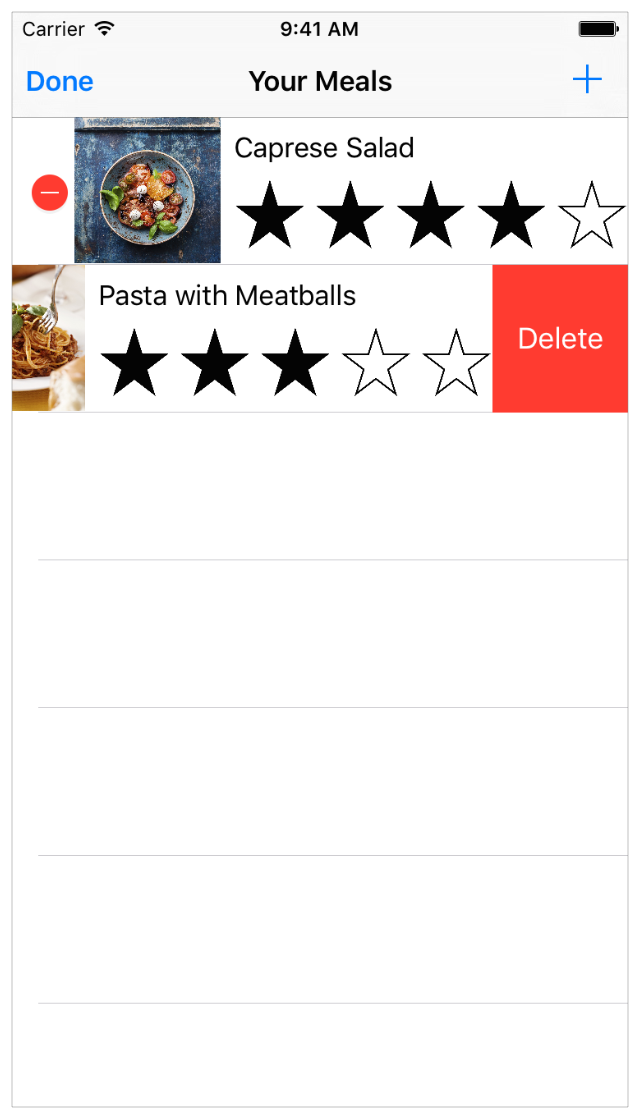
支持删除Meals
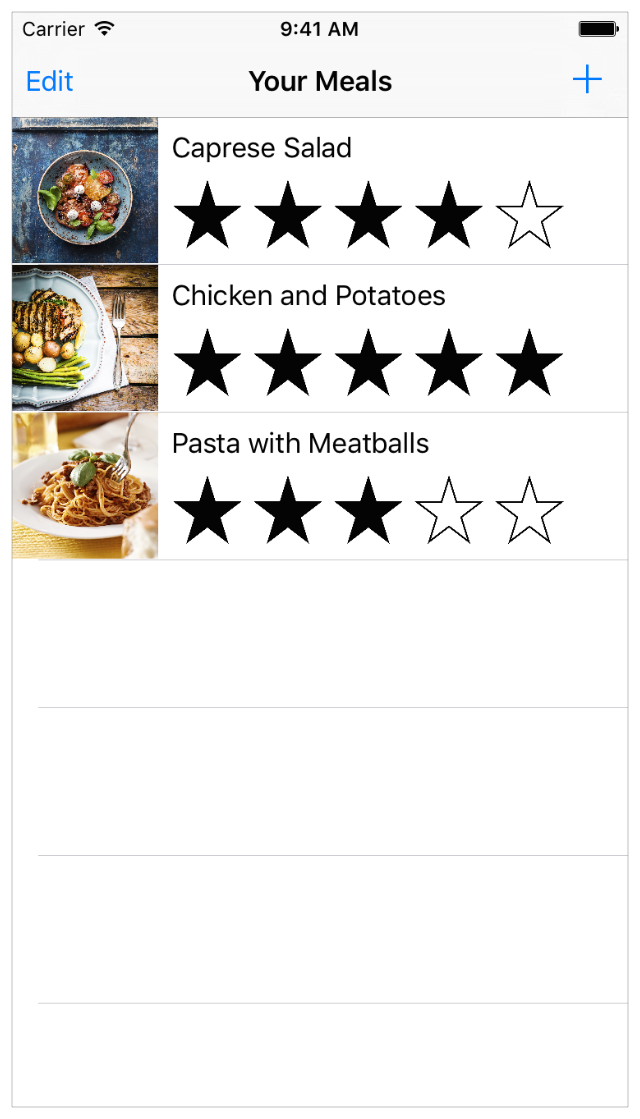
接下来,我们想要在meal list可以删除meal的功能。你需要一个方法来让用户通过在table view中以编辑模式来删除这些cells。你可以通过在table view导航栏中添加一个编辑按钮来完成这个
添加编辑按钮到table view
1.打开MealTableViewController.swift
2.在MealTableViewController.swift中,找到viewDidLoad()方法
override func viewDidLoad() {
    super.viewDidLoad()

    // Load the sample data.
    loadSampleMeals()
}
3.在super.viewDidLoad()这行代码的下方,添加如下代码
// Use the edit button item provided by the table view controller.
navigationItem.leftBarButtonItem = editButtonItem()
这会创建一个指定bar button item的类型,用于编辑行为。它会添加这个按钮在meal list场景导航栏的左边
完整的viewDidLoad()方法,看起来如下
override func viewDidLoad() {
    super.viewDidLoad()

    // Use the edit button item provided by the table view controller.
    navigationItem.leftBarButtonItem = editButtonItem()

    // Load the sample data.
    loadSampleMeals()
}
检查站:执行你的app。现在有一个Edit按钮出现在table view导航栏的左边,如果你点击这个按钮,table view会进入编辑模式,但你现在还不能删除它,因为你没有实现这个功能
为了执行任何种类的编辑,你需要实现它的委托方法tableView(_:commitEditingStyle:forRowAtIndexPath:)。当在编辑模式时,这个委托方法负责管理table的行数
删除一个meal
1.在MealTableViewController.swift,找到tableView(_:commitEditingStyle:forRowAtIndexPath:) ,并移除注释。然后模版方法如下
// Override to support editing the table view.
override func tableView(tableView: UITableView, commitEditingStyle editingStyle: UITableViewCellEditingStyle, forRowAtIndexPath indexPath: NSIndexPath) {
    if editingStyle == .Delete {
        // Delete the row from the data source
        tableView.deleteRowsAtIndexPaths([indexPath], withRowAnimation: .Fade)
    } else if editingStyle == .Insert {
        // Create a new instance of the appropriate class, insert it into the array, and add a new row to the table view
    }
}
2.在// Delete the row from the data source注释的下方,添加代码
meals.removeAtIndex(indexPath.row)
这行代码是移除一个Meal对象。这行代码之后就是从table view中删除对应的行
3.在MealTableViewController.swift中,找到tableView(_:canEditRowAtIndexPath:)方法,并取消注释。它的模版实现如下
// Override to support conditional editing of the table view.
override func tableView(tableView: UITableView, canEditRowAtIndexPath indexPath: NSIndexPath) -> Bool {
    // Return false if you do not want the specified item to be editable.
    return true
}
完整的tableView(_:commitEditingStyle:forRowAtIndexPath:)方法如下
// Override to support editing the table view.
override func tableView(tableView: UITableView, commitEditingStyle editingStyle: UITableViewCellEditingStyle, forRowAtIndexPath indexPath: NSIndexPath) {
    if editingStyle == .Delete {
        // Delete the row from the data source
        meals.removeAtIndex(indexPath.row)
        tableView.deleteRowsAtIndexPaths([indexPath], withRowAnimation: .Fade)
    } else if editingStyle == .Insert {
        // Create a new instance of the appropriate class, insert it into the array, and add a new row to the table view
    }
}
检查站:执行的APP。如果你点击Edit按钮,table view会进入编辑模式。你能通过左边的指示器选择一个cell来删除,并确认你是否想要删除它。或者在一个cell上滑动使删除按钮暴露。这个行为默认内置在table view中。当你点击Delete时,这个cell就会删除。