VuePress+GithubPages实现个人博客
VuePress:为开发者量身定制的静态站点生成器
NaN. Markdown为中心:编写文章就像写文档一样简单直接,支持Markdown扩展,让你专注于内容创作。
NaN. Vue驱动的主题系统:自定义主题或使用现成的主题,轻松打造个性化界面。
NaN. 性能卓越:预渲染静态HTML,加载速度快,SEO友好。
GitHub Pages:免费且强大的托管服务,允许用户免费托管静态网站。
NaN. 自动化部署:每次推送代码到GitHub仓库,自动更新网站内容。
NaN. 域名绑定:支持自定义域名,让你的博客更加专业。
NaN. 安全稳定:依托GitHub的基础设施,无需担心服务器维护问题。
环境准备
-
gihub账号
-
环境依赖git、noodejs
-
包管理工具:pnpm、yarn、npm任意一个。
-
能够使用国际网络的电脑:Windows、Linux、MAC
创建GithubPress
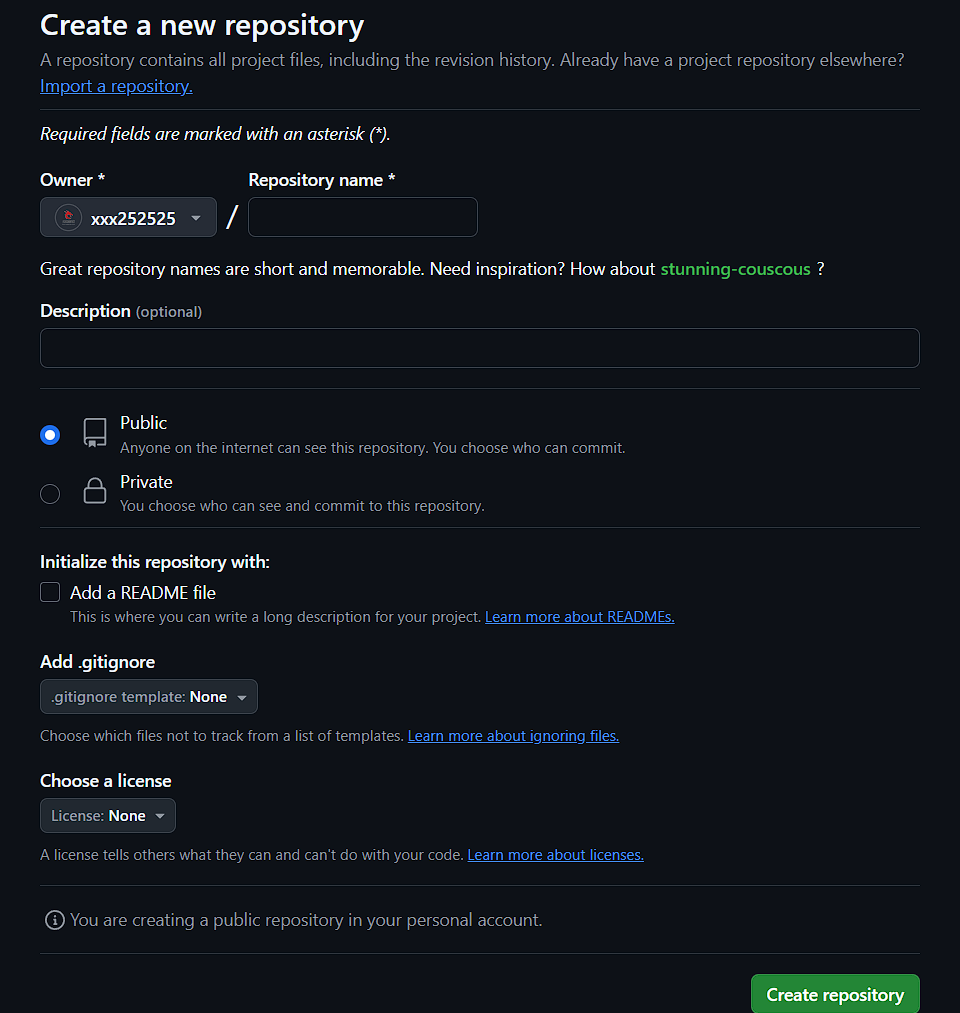
在github中创建仓库,存储库必须命名为username.github.io,创建index.html或者index.php等文件。
创建好之后,我们使用git工具将其拉取到本地,或者你可以使用带GUI的git工具,这里演示命令行操作。
git clone https://github.com/username/username.github.io
命令需要验证你的设备,验证操作如下:
ssh-keygen -t rsa -b 4096 -C "your_email@example.com"
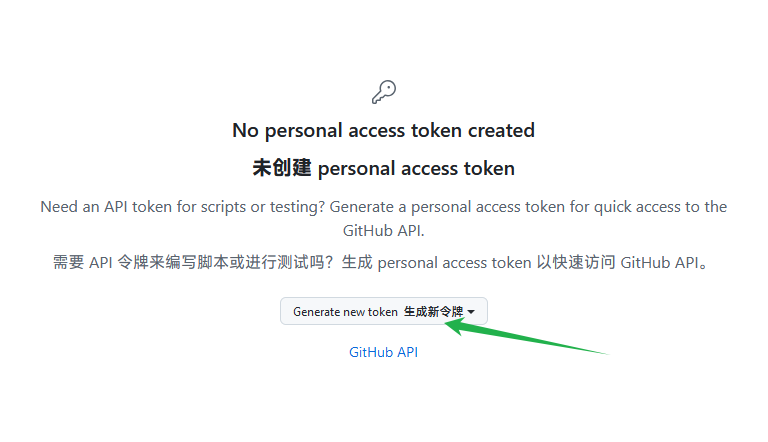
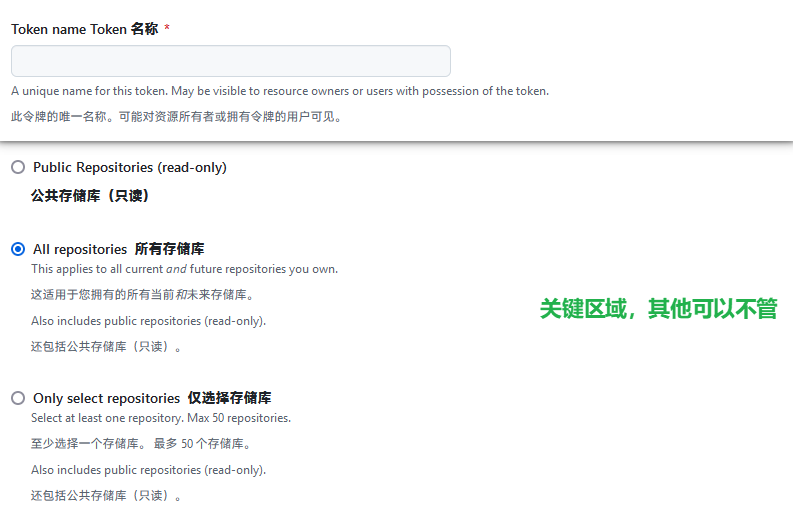
创建github个人访问令牌,访问如下地址:https://github.com/settings/tokens
配置内容自己填写即可
创建好之后使用个人令牌(也叫做token)访问克隆
git clone https://<your_token>@github.com/username/username.github.io
克隆成功之后进入目录进行操作
cd username.github.io
echo "Hello World" > index.html
添加、提交并推送你的更改:
git add --all
git commit -m "Initial commit"
git push -u origin main
然后访问你的githubpress网页,地址https://*username*.github.io
创建VuePress
搭建Vue环境
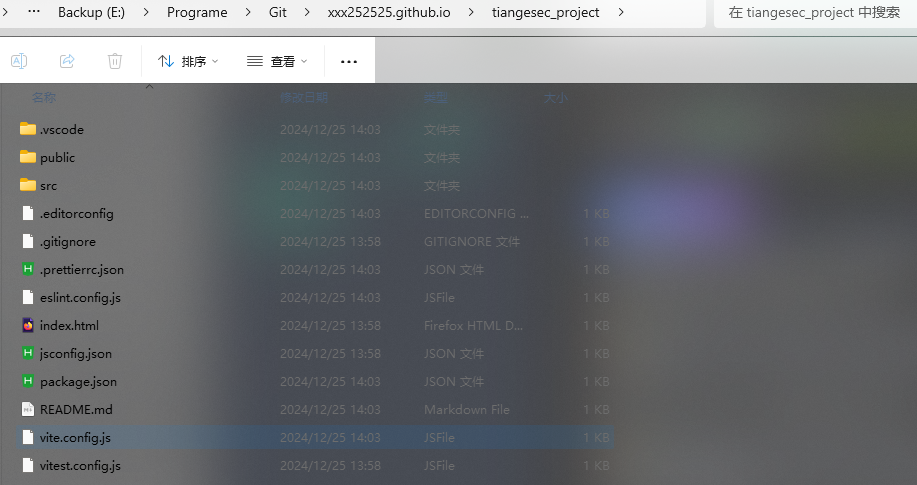
我的项目地址如下:
在克隆好的项目目录中进行操作,就不需要创建新的目录了。
使用包管理器初始化项目,生成package.json文件,推荐操作。
npm init
# 或者
pnpm init
yarm init
初始化工程,并验证,注意:这一步操作和上面的只能二选一,因为这个操作会直接自动创建一个完整的Vue项目
npm init vue@latest
使用第二条命令操作的时候会自动创建一个vue的项目在当前目录,如图:

我们需要把里面的文件剪切到上一级目录。
将 VuePress、Vue安装为本地依赖
c
# 或者
pnpm install -D vuepress@next vue@next
yarn add -D vuepress@next vue@next
# @next可选择加上或者不加,版本区别而已,next是Vue3,推荐使用3,因为2和1有很多的安全漏洞
安装成功之后的目录如下:
⚠️缺失vue依赖会造成项目运行和部署失败。
安装打包工具、主题、插件、TS
npm install -D @vuepress/bundler-vite@next @vuepress/theme-default@next
npm install --save-dev typescript @types/node @vue/cli-plugin-typescript
安装其他依赖防止出现错误
npm install -D sass-embedded
项目部署
创建docs目录和docs/.vuepress目录,VuePress 会以 docs 为文档根目录,所以这个 README.md 相当于主页,.vuepress存放的是vue配置文件。
mkdir docs
mkdir docs/.vuepress
注意:改命令仅在Windows Powershell7命令行、Linux shell、MAC shell中生效,Windows的CMD中是无法使用该命令的。
如果不想使用命令常见,在文件夹中右键新建也是可以的。
在.vuepress目录下面创建config.js配置文件内容如下
import { viteBundler } from '@vuepress/bundler-vite'
import { defaultTheme } from '@vuepress/theme-default'
import { defineUserConfig } from 'vuepress'
export default defineUserConfig({
bundler: viteBundler(),
theme: defaultTheme(),
})
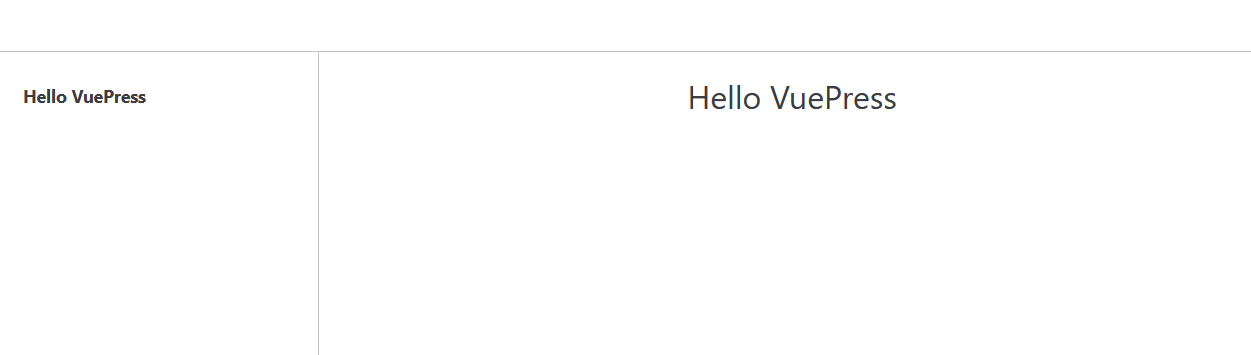
新建一篇文档docs/README.md,内容随意,我这里演示快捷操作
echo '# Hello VuePress' > docs/README.md # 不推荐此方式
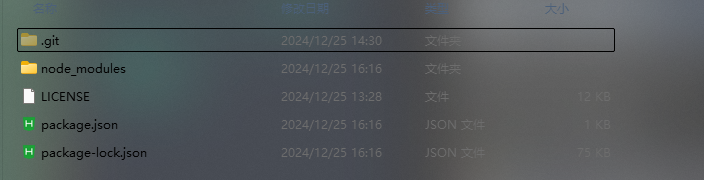
创建好之后,你当前的目录结构是这样的:
yourname.github.io #项目目录,也是github仓库目录
|-- .git/
|-- node_modules/
|-- docs/
| |-- README.md
| |-- .vuepress/
| |__ config.js
|-- package.json
|__ package-lock.json
在package.json文件添加以下scripts
{
"scripts": {
"docs:dev": "vuepress dev docs",
"docs:build": "vuepress build docs"
}
}
启动本地服务器查看运行效果
选择一个即可。推荐使用npm,默认自带
npm run docs:dev
pnpm run docs:dev
yarn run docs:dev
服务启动成功如下

访问IP:port地址结果如下
DIY你的项目
我们要定制自己的项目就需要去修改config.js配置文件。
导航栏
代码如下:
export default defineUserConfig({
bundler: viteBundler(),
theme: defaultTheme({
// 默认主题配置
navbar: [
{ text: '首页', link: '/' },
{
text: '...',
children: [
{ text: 'Github', link: 'https://github.com/...' },
//...
],
},
],
}),
title: '...',
description: '...',
});
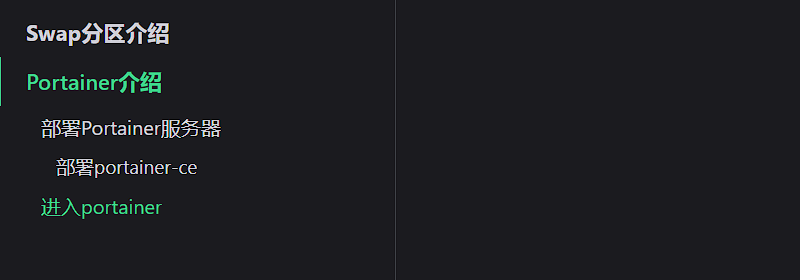
侧边栏
目录结构
.
├─ docs/
│ ├─ README.md
| |- Linux设置Swap分区.md
| |- Docker可视化工具Portainer安装使用.md
| |- Docker可视化工具Portainer安装使用.assets/
│ └─ .vuepress/
│ └─ config.js
└─ package.json
代码如下:
module.exports = {
themeConfig: {
nav: [...],
sidebar: [
"/Linux设置Swap分区.md",
"/Docker可视化工具Portainer安装使用.md"
],
}
}
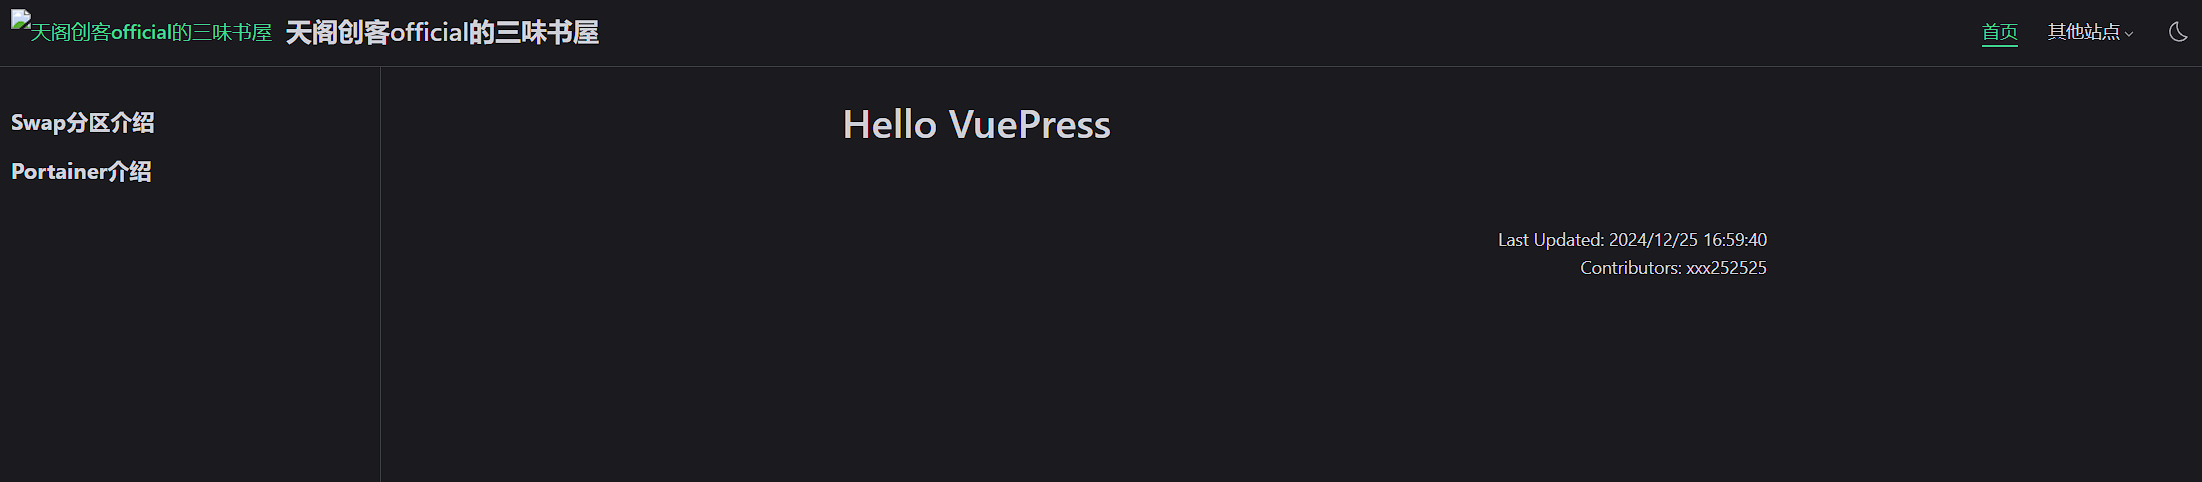
实现效果
主题
你需要在你的配置文件中通过theme配置项来使用它:
export default defineUserConfig({
theme: defaultTheme({
// 默认主题配置
navbar: [
{
text: '首页',
link: '/',
},
],
}),
})
安装第三方主题
npm install --save-dev vuepress-theme-reco
# 或者使用
npm install @vuepress-reco/theme-cli@1.0.7 -g
theme-cli init
# 手动安装
npm install vuepress-theme-reco@next --save-dev
修改主题配置即可,推荐使用默认的主题,减少安全漏洞问题。
部署到Github
自动化部署
创建一个docs同级的目录名字叫做.github,创建如下目录和文件/workflows/docs.yml:
yourname.github.io #项目目录,也是github仓库目录
|-- .git/
|-- node_modules/
|-- .github/
|__ workflows/
|__ docs.yml
|-- docs/
| |-- README.md
| |-- .vuepress/
| |__ config.js
|-- package.json
|__ package-lock.json
配置文件docs.yml
name: docs
on:
# 每当 push 到 main 分支时触发部署
push:
branches: [main]
# 手动触发部署
workflow_dispatch:
jobs:
docs:
runs-on: ubuntu-latest
steps:
- uses: actions/checkout@v4
with:
# “最近更新时间” 等 git 日志相关信息,需要拉取全部提交记录
fetch-depth: 0
- name: 设置 pnpm
uses: pnpm/action-setup@v4
- name: 设置 Node.js
uses: actions/setup-node@v4
with:
# 选择要使用的 node 版本
node-version: 22
# 缓存 pnpm 依赖
cache: pnpm
- name: 安装依赖
run: pnpm install --frozen-lockfile
# 运行构建脚本
- name: 构建 VuePress 站点
run: pnpm docs:build
# 查看 workflow 的文档来获取更多信息
# @see https://github.com/crazy-max/ghaction-github-pages
- name: 部署到 GitHub Pages
uses: crazy-max/ghaction-github-pages@v4
with:
# 部署到 gh-pages 分支
target_branch: gh-pages
# 部署目录为 VuePress 的默认输出目录
build_dir: docs/.vuepress/dist
env:
# @see https://docs.github.com/cn/actions/reference/authentication-in-a-workflow#about-the-github_token-secret
GITHUB_TOKEN: ${{ secrets.GITHUB_TOKEN }}
然后推送到github即可。访问网址https://yourname.github.io/即可,如下
可能会遇到的问题
-
网络问题,使用npm和pnpm下载的时候需要使用国际网络,还是有可能会失败。
-
第二种方法就是换源,使用国内源,但是会有依赖缺失
中途依赖错误
使用npm install vuepress@next下载的vueprss是2.0.0.-rc.19,vuepress-theme-reco@2.0.0-rc.25 要求 vuepress 版本为 2.0.0-rc.18
卸载旧版本
npm uninstall vuepress
npm install vuepress@2.0.0-rc.18 --save-dev
npm install vuepress-theme-reco@next --save-dev
vuepress-theme-reco 与当前 vuepress 版本兼容的最新主题版本:
npm info vuepress-theme-reco versions
强制安装
npm install vuepress@next vuepress-theme-reco@next --save-dev --legacy-peer-deps
npm install -D vuepress@next vue@3 vuepress-theme-reco@next --legacy-peer-deps

 浙公网安备 33010602011771号