

AssetBundleMaster_ReadMe_EN
Before we start use it, you'd better import it to an empty project, following the ReadMe to learn this framework step by step, it may take 2 hours.
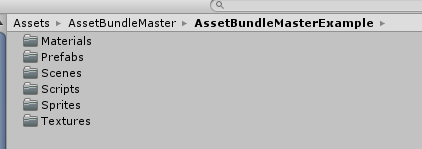
Let's see the folder structure :

It has 4 folders in the AssetBundleMaster folder:
[AssetBundleMasterExample] is Demo for leaning basical APIs, It include load assets, load scenes, and how to do unload.
[AssetBundleMasterExample2] is Demo for testing how Built-In Shader multi compiled and how AssetBundleMaster to optimize it.
[Editor] is editor scripts.
[Plugins] is runtime scripts, asset load is basic logic for a project, so we put it in Plugins.
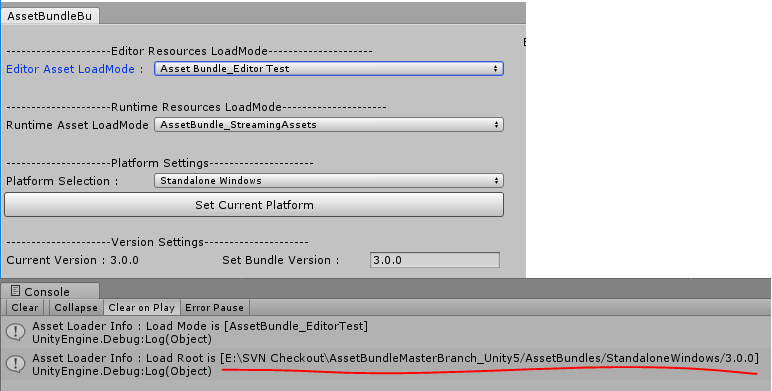
Let's try to run API Demo scenes in Editor Mode, open AssetBundleMaster Window first :

window shows :

We need to set only 2 variables can make it run in Editor, developer friendly, ignor other options now :
1. Editor Asset LoadMode : load mode in Editor, select AssetDataBase_Editor, it means load asset directly.
2. Build Root : It is the root folder for loading assets, click [Change Build Root...] to change the folder, set to AssetBundleMasterExample so that we can run API Demo scenes. The entry scene is StartScene1, you can find it in AssetBundleMasterExample/Scenes folder:
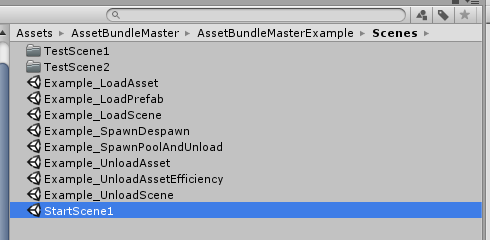

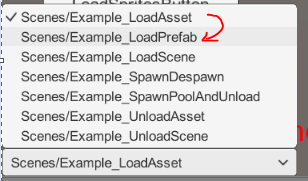
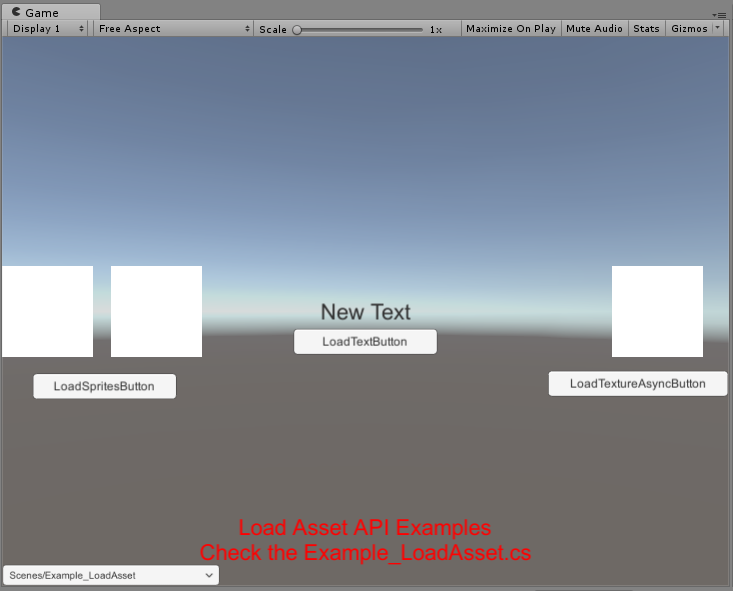
Run StartScene1, the bottom-left shows a dropdown for selecting demo scenes :

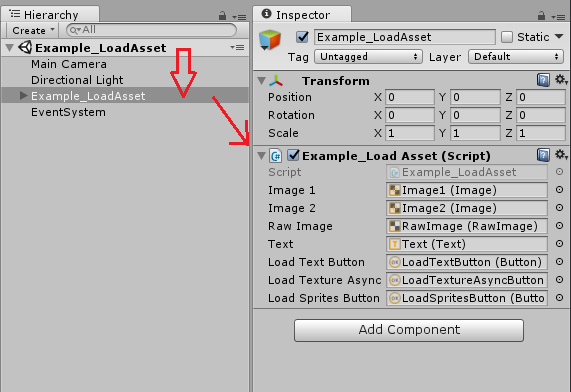
These are all the API demo scenes, select any scene, you can see the hierarchy that a GameObject has the same name with the scene, and the same named script attached on it, it is the demo script.
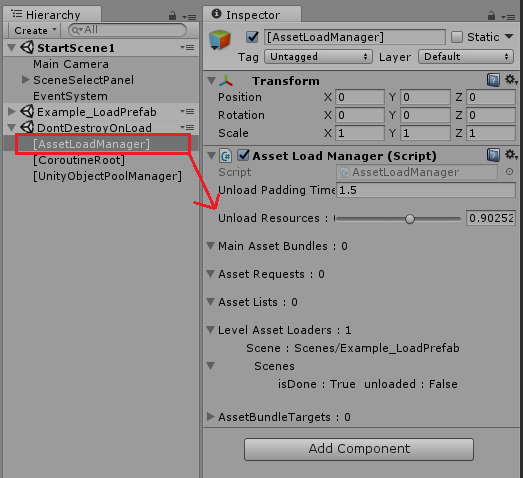
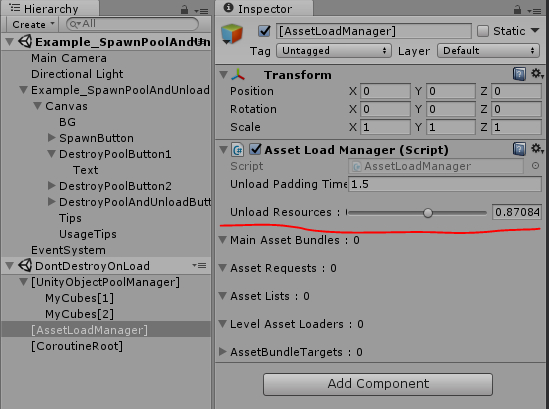
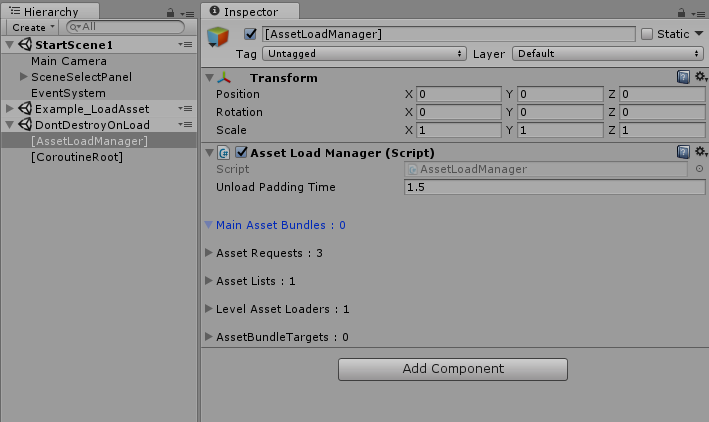
We must explain how the scene load proccess working, when we select any scene it will unload all assets loaded before, so that any asset will be loaded in the new scene will be new load, this is convenient for testing asset load and unload, you can open Profiler window to check all the time. The unload proccess has a padding time when you switch the scene. You can see Hierarchy select [AssetLoadManager] GameObject and the inspector will shows it :
Change the scene, then you can see [AssetLoadManager] Inspector has a count down Slider shows unload padding left time:
If you use Profiler : Memory > Detailed > Take Sample to check assets in memory, check after the unload proccess done.
Let's see every demo scene and how to use APIs, we set the Build Root path, so all the asset load paths are relative path from it, the assets in this folder are called main assets that commonly should be load by your script, like Scenes, and assets not in this folder called referenced assets like Meshes that will not be loaded directly by your code, so you don't need to put all assets into the Build Root. keep this in mind.
PS : when using AssetDataBase_Editor mode, it has no asynchronous loading, all asset loading will be sync load because we use AssetDataBase.LoadAssetAtPath as Editor load function. The unload logic also diferent with AssetBundle mode, it based on Resources.UnloadUnusedAssets(); while AseetBundle mode using AssetBundle.Unload() and Resources.UnloadUnusedAssets().
You can check what kinds of assets we have in the AssetBundleMasterExample folder.
After all we can load assets in Editor, not so much things to learn, if you want it work for your project, only to set Build Root to your asset folder.
Now you can see AssetBundleMaster generate a file in your Resources Folder, this is the basic settings of AssetBundleMaster, you can upload it for other teammates can use it :

Let's start learn how to use API by Demo scenes. How to create AssetBundle written at the end.
1. Example_LoadAsset (Script : Example_LoadAsset.cs)
This Demo shows how to load common assets, loading with ResourceLoadManager .
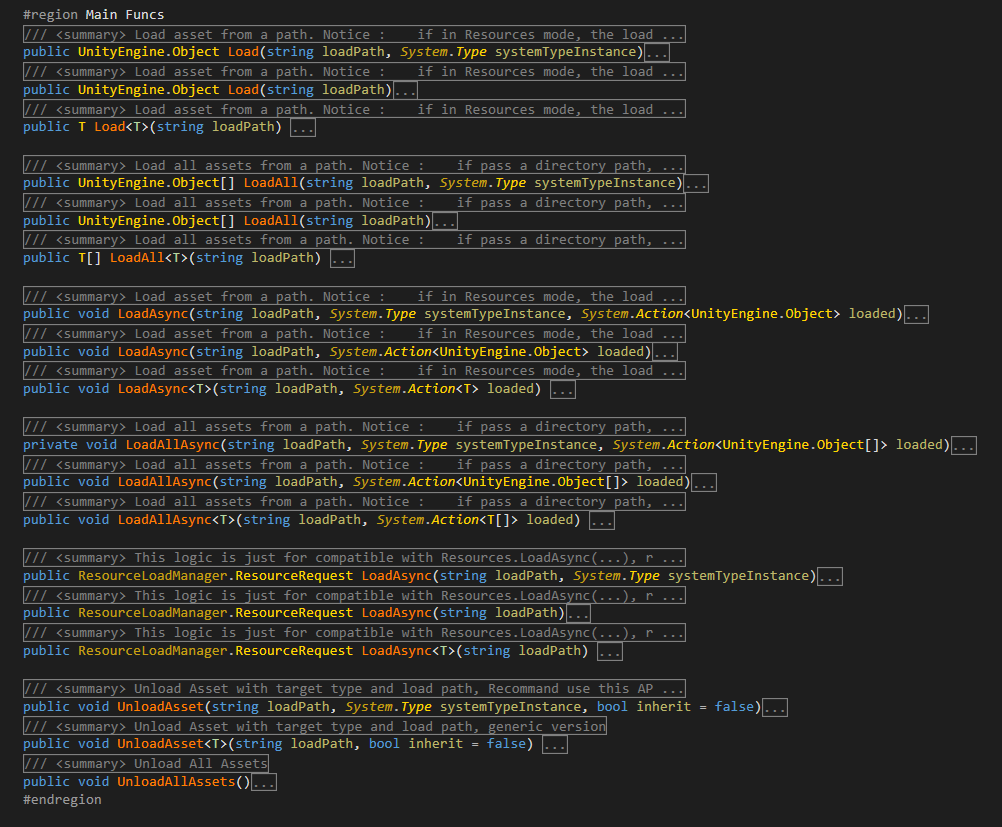
API (namespace AssetBundleMaster.ResourceLoad):
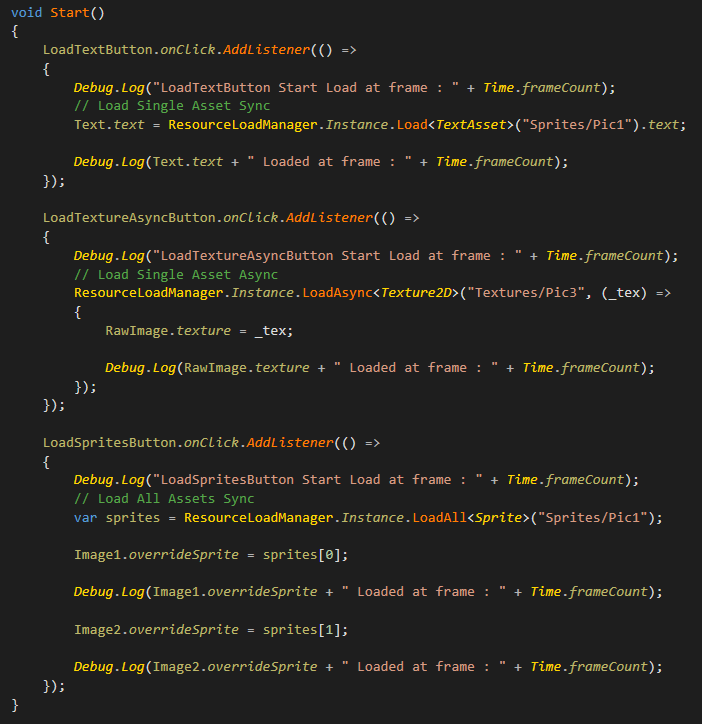
ResourceLoadManager.Instance.Load<T>(string loadPath)
ResourceLoadManager.Instance.LoadAsync<T>(string loadPath, System.Action<T> loaded)
ResourceLoadManager.Instance.LoadAll<T>(string loadPath)
It load assets in Sprites and Textures folder, the path "Sprites/Pic1" is kind of special, let's see :
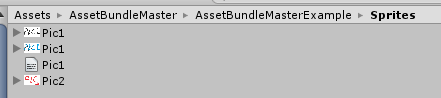

It contains 3 assets have the same asset name Pic1.jpg / Pic1.png / Pic1.txt, in this situation our asset load API use no ext name path to load assets( like Resources.Load API ), so these 3 assets have the same load path, the API can load asset by limit its type, for example ResourceLoadManager.Instance.Load<TextAsset>("Sprites/Pic1").text; load the first TextAsset in the path, and ResourceLoadManager.Instance.LoadAll<Sprite>("Sprites/Pic1"); load all Sprites from this path, if you change "Sprites/Pic1" to "Sprites" that targeting the folder, it will also load asset correctly, the logic is the same as UnityEngine.Resources load API. This feature solved the problem when in Android load from StreamingAssets that has no way to load all assets from target folder.
If you load asset by path without extension, and the file name is not unique like Pic1 above, the asset loader will load assets iteratively until target asset is loaded. that's unnecessary overhead. If a load path with extension the path must be unique, so we enhanced the load APIs, support the load path with extension :
ResourceLoadManager.Instance.Load<TextAsset>("Sprites/Pic1").text;
can be rewrite to :
ResourceLoadManager.Instance.Load<TextAsset>("Sprites/Pic1.txt").text;
We don't have any load overhead now. In the Demo scripts all asset load do not use file extension is just for make it looks like Resources.Load API, you should use load path with extension when the asset name is not unique while loading a single asset for preventing the overhead ( with a good naming habit and well resource classification can make a good project ) .
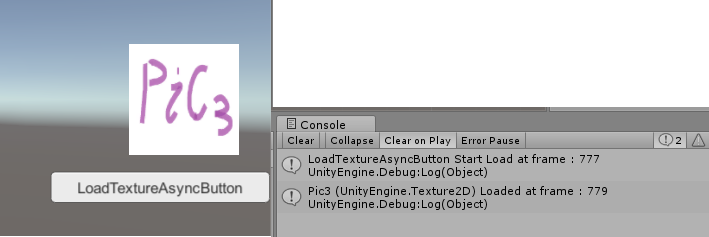
Tips for AssetBunlde load mode : if you are loading asset async, and a sync requst happened while the asset is still loading, the Console will pop an error message, but the function still work correctly. see below :

Load Sync while Async loading, this code was not written in demo, just for reference.
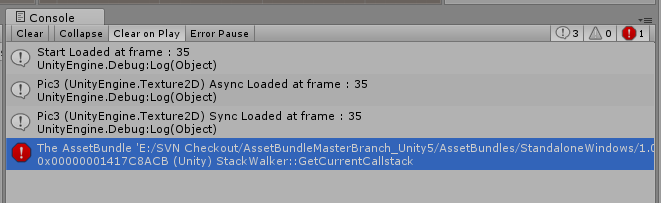
This is because Unity has no provide any API for stop an AssetBundle async load, and load sync while async loading will pop error, the AssetBundleMaster's Low-Level API handles it to ensure all call backs and returns working correctly. you don't need to worry about it.
Other APIs can be check in ResourceLoadManager.cs, include Generic and Non-Generic version, convenient for users using Lua script.
2. Example_LoadPrefab (Script : Example_LoadPrefab.cs)
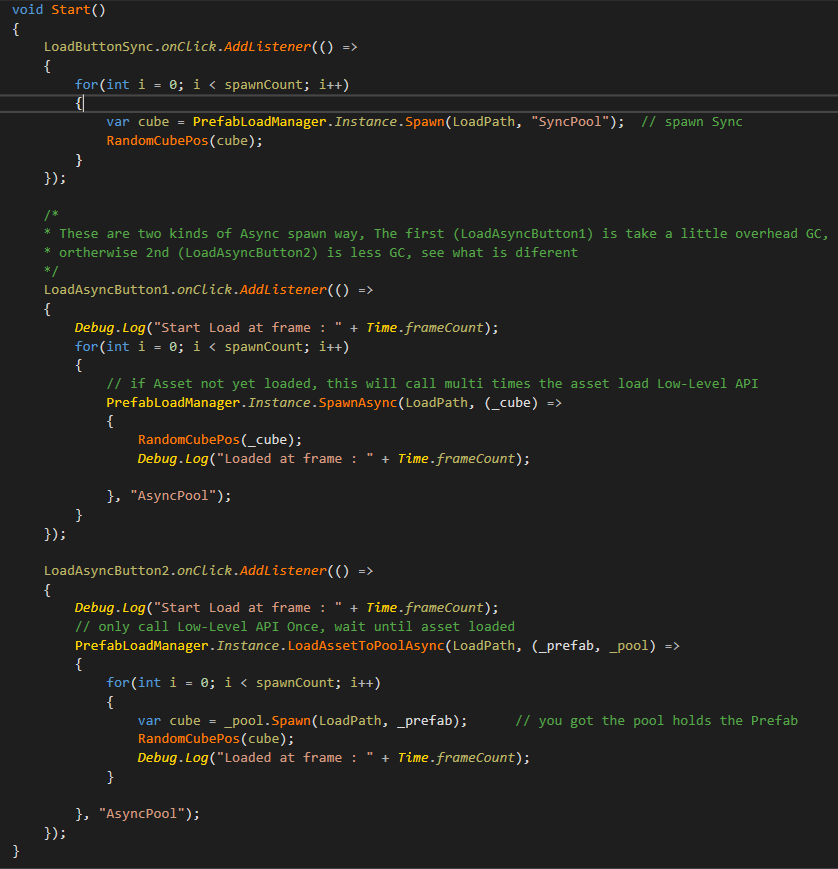
This demo shows how to load and Instantiate GameObjects. load with PrefabLoadManager. the sctips shows 2 ways to Instantiate GameObject async, with a little overhead diferent.

API (namespace AssetBundleMaster.ResourceLoad):
PrefabLoadManager.Instance.Spawn(string loadPath, string poolName = null, bool active = true)
Spawn is to load and Instantiate GameObject.
PrefabLoadManager.Instance.SpawnAsync(string loadPath, System.Action<GameObject> loaded = null, string poolName = null, bool active = true)
SpawnAsync is to load Async and Instantiate GameObject.
PrefabLoadManager.Instance.LoadAssetToPoolAsync(string loadPath, System.Action<GameObject, GameObjectPool> loaded = null, string poolName = null)
LoadAssetToPoolAsync is to load prefab asset Async to target pool.
The script shows 2 async load logic, if the prefab asset is not yet loaded, the second one is more efficiency than the first one, but is hard to use. the overhead of PrefabLoadManager.Instance.SpawnAsync is acceptable. You should always load and instantiate GameObject with PrefabLoadManager ( UI, Particle Effect, Weapon...etc ), you are not only get benefit from ObjectPool, but also get auto resources control. The auto resource contrl logic can be check in the appendix.
you can use file extension also.
3. Example_LoadScene (Script : Example_LoadScene.cs)
This demo shows how to load scenes, be aware no need to add scenes to Build Settings, developer friendly. If no special needs you should not add scenes to Build Settings when publish app.
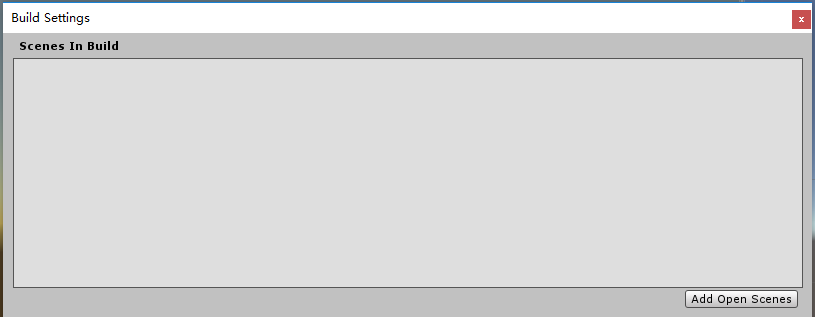
Don't add any scene to Build Settings, the scene load is like asset load which using relative load path.
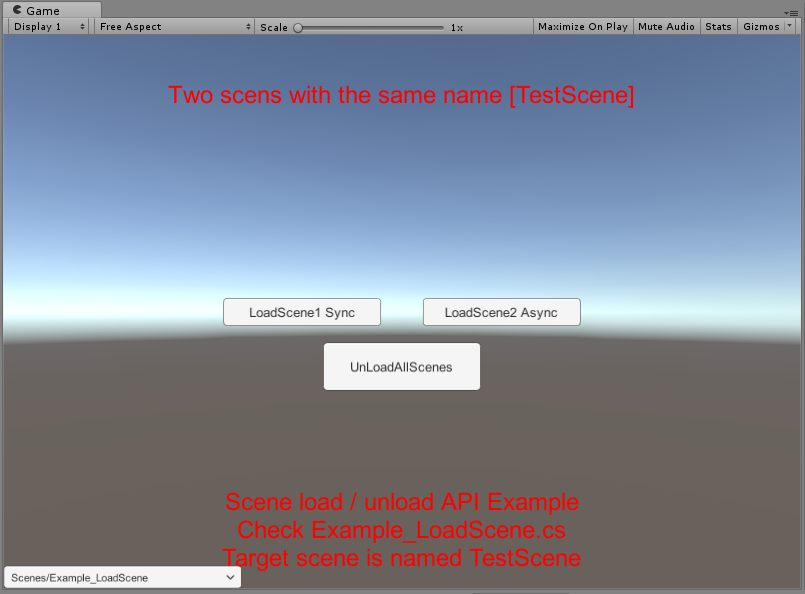
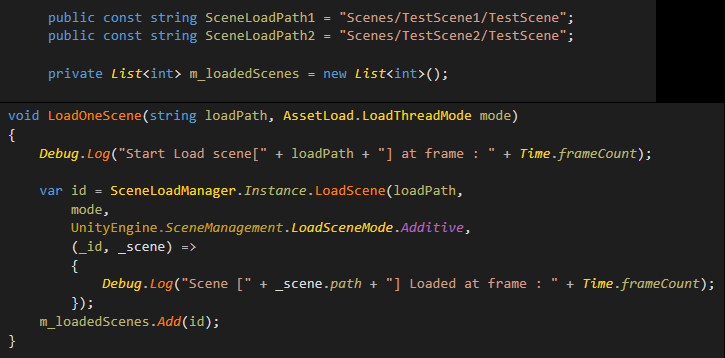
API (namespace AssetBundleMaster.ResourceLoad):
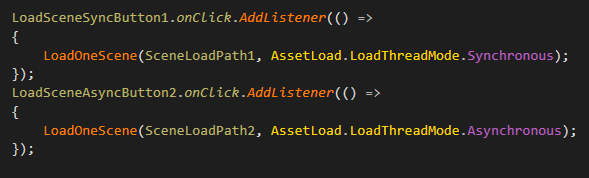
SceneLoadManager.Instance.LoadScene(string sceneLoadPath,
AssetBundleMaster.AssetLoad.LoadThreadMode loadMode = AssetBundleMaster.AssetLoad.LoadThreadMode.Asynchronous,
UnityEngine.SceneManagement.LoadSceneMode loadSceneMode = LoadSceneMode.Single,
System.Action<int, Scene> loaded = null )
It do load scene like an asset using its relative load path, can load with async/sync mode and LoadSceneMode. Please notice it that load scene must wait for the call back UnityEngine.SceneManagement.SceneManager.sceneLoaded that means no matter load scene Sync or Async, you'd better wait for loaded call back.
It returns a hashcode as handler of this scene. you can use file extension also.
4. Example_SpawnDespawn (Script : Example_SpawnDespawn.cs)
This demo shows how the objectpool do spawn and despawn GameObject.
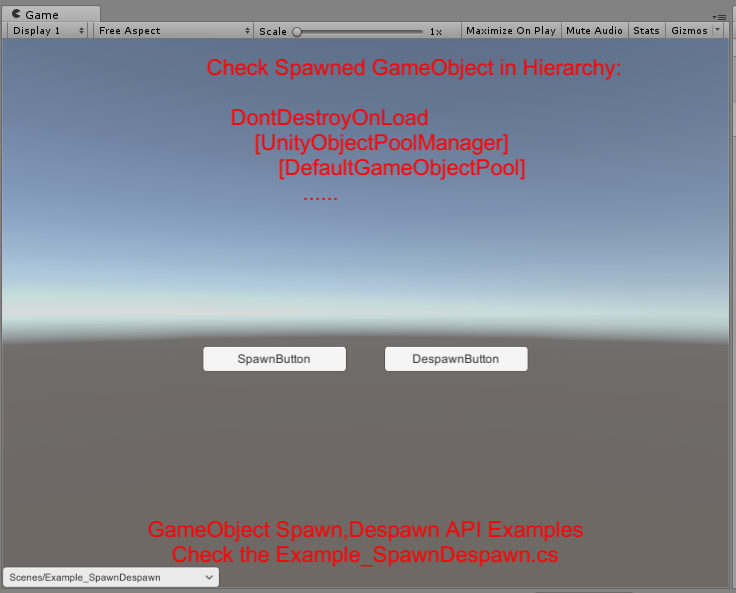
API (namespace AssetBundleMaster.ResourceLoad):
PrefabLoadManager.Instance.Spawn(string loadPath, string poolName = null, bool active = true);
PrefabLoadManager.Instance.Despawn(GameObject go, string poolName = null);
We do auto load and Instantiate prefab, and set active when spawn a GameObject, with the poolName parameter, you must despawn GameObject to the same poolName where it spawned from. The GameObject will be set active false while despawn to pool, if you have spacial needs, rewrite the code at AssetBundleMaster.ObjectPool.GameObjectPool.Despawn function.
PS : if you call the PrefabLoadManager.Instance.Despawn(GameObject go, string poolName = null); poolName is incorrect, it will search all pools to find the correct pool where the gameobject is spawned from, if you have many pools you'd better fill the correct poolName for less search.
5. Example_SpawnPoolAndUnload (Script : Example_SpawnPoolAndUnload.cs)
This deom shows how to destroy GameObject and how's the auto unload working.

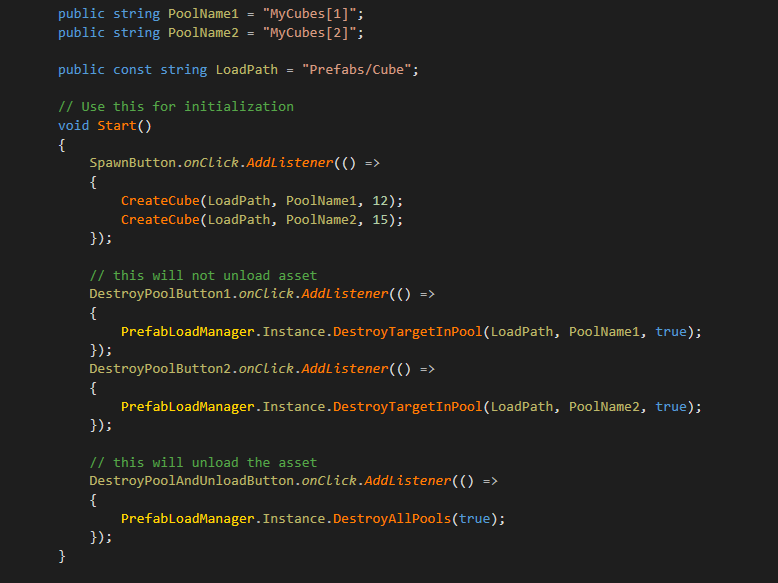
API (namespace AssetBundleMaster.ResourceLoad):
PrefabLoadManager.Instance.DestroyTargetInPool(string loadPath, string poolName = null, bool tryUnloadAsset = true);
This API is to destroy a target spawned GameObjects from target Pool by loadPath and poolName. if tryUnloadAsset is true, PrefabLoadManager will do check referenced assets, if all pools do not reference to the prefab asset, it will do unload asset proccess.
PS : click [Spawn Cubes] button in scene, there are 2 pools will be created, and every pool create some Cubes, see Hierarchy there are some Cubes was set no parent, it just for telling you that the connection of spawned GameObject to pool will not be break from parent changed. GameObject still controlled by pool even not child of the pool in Hierarchy.
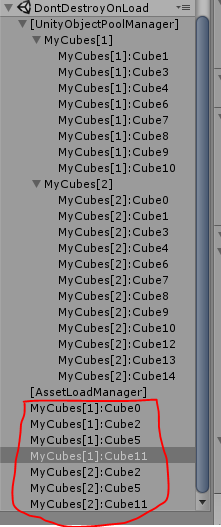
click [DestroyCubesInPool:MyCubes[1]] button, the MyCubes[1] pool will destroy all Cubes controlled by it, we can see pool is alive but spawned cubes was destroied.
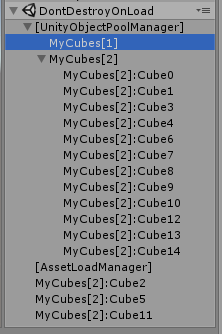
The asset(prefab) is still referenced by MyCubes[2] pool, so it will not trigger the unload asset proccess, click [DestroyCubesInPool:MyCubes[2]] button, now all GameObjects was destroied, see [AssetLoadManager] inspector, unload asset was triggered.
So that PrefabLoadManager can auto control the resources. every developer in your team can have their unique object pools by using unique pool names, every one just to control their pools to load and unload, the auto resource control will handle when to unload the assets.
PS : here we using the AssetDataBase_Editor mode, it will unload the assets depending on Resources.UnloadUnusedAssets(); while the AssetBundle mode will use AssetBundle.Unload(true); to unload assets, it is more faster ( more about it see the appendix) .
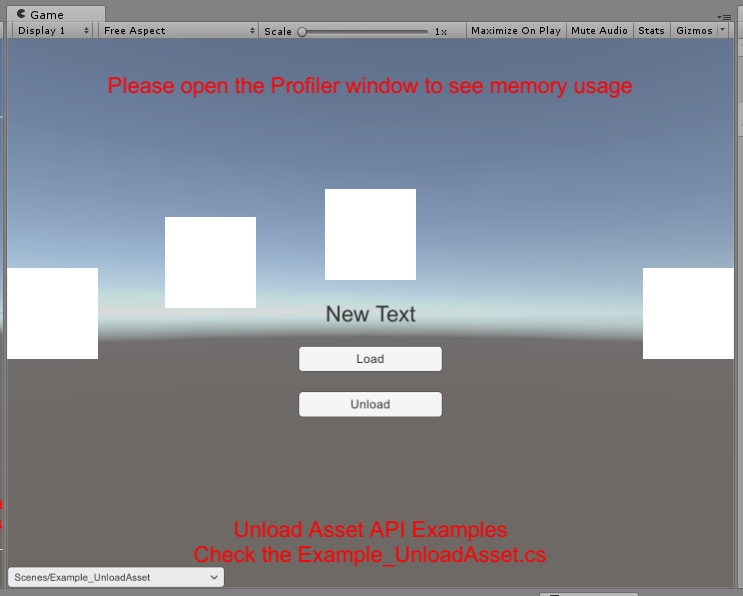
6. Example_UnloadAsset (Script : Example_UnloadAsset.cs)
This deom shows common asset unload proccess. the API is to unload asset :
API (namespace AssetBundleMaster.ResourceLoad):
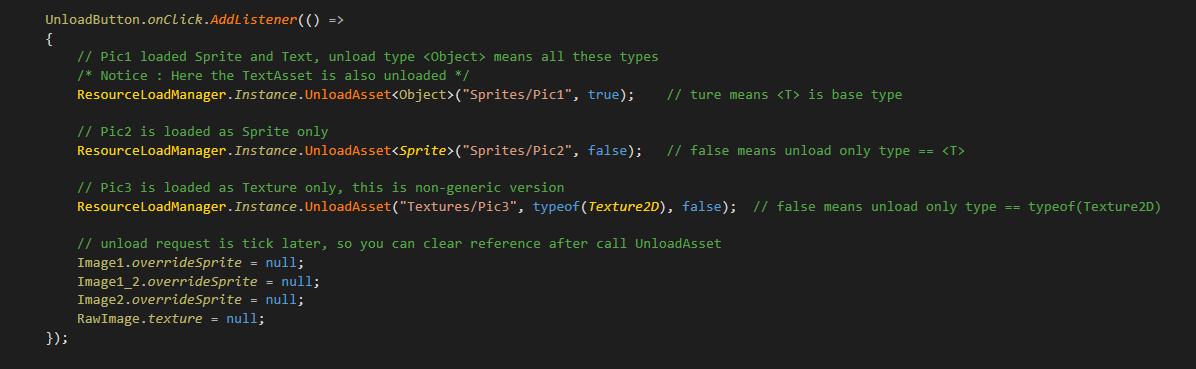
ResourceLoadManager.Instance.UnloadAsset(string loadPath, System.Type systemTypeInstance, bool inherit = false);
ResourceLoadManager.Instance.UnloadAsset<T>(string loadPath, bool inherit = false);
Unload asset is not like UnityEngine.Resources.UnloadAsset , the parameter is not the asset, but the load path + load type, this is because to load the same asset it may have diferent load types, for example a picture can be load as Texture2D or Object, so the unload logic is also the same. The unload type can be inherit, like the picture shows above, ResourceLoadManager.Instance.UnloadAsset<Object>("Sprites/Pic1", true); means to unload all type inherit from Object that load from path "Sprites/Pic1", and the ResourceLoadManager.Instance.UnloadAsset<Sprite>("Sprites/Pic2", false); means only to unload Sprite type load from "Sprites/Pic2". this API is more accurate than the UnityEngine.Resources.UnloadAsset.
This API is privide a flexible asset unload logic that it do reduce the reference count of assets, if any asset reference count was set to 0, the unload proccess will be triggered. if you set all references of assets to null, the assets will be unloaded, but if not, the ResourceLoadManager holds weakreference to the assets too, and someone request the same asset next time, ResourceLoadManager will return the weakreferenced target and no need to reload asset, this is the core logic to make sure asset will not duplicated in memory.
Unload procccess will be diferent by diferent asset load mode, the AssetDataBase_Editor is totally use Resources.UnloadUnusedAssets(); and the AssetBundle mode may use AssetBundle.Unload(true); or AssetBundle.Unload(false); + Resources.UnloadUnusedAssets(); it depends on the auto resource control logic.
If you do request unload asset by ResourceLoadManager, the AssetLoadManager will increase the unload counter number, if the number is greater than AssetLoadManager.Instance.unloadAssetCountGreater it will enter the unload proccess, finally will trigger the Resources.UnloadUnusedAssets(). you can adjust the value of it, default is 0. AssetLoadManager have only 2 variables can be access :
1. AssetLoadManager.Instance.unloadAssetCountGreater : the min unload number to enter unload proccess. change this value if you don't want unload too frequently.
2. AssetBundleMaster.AssetLoad.AssetLoadManager.Instance.unloadPaddingTime : the padding time from unload proccess started to unload function called, default is 1.5s. The async load API's callback is System.Action or Lambda, they do referencing the return assets, logically we should wait the GC to collect them before call unload function, but when the CG will be called is unknow, 1.5s is an appropriate waiting time that has been tested. In runtime the asset load / unload will happened often, so you don't have to mind it.
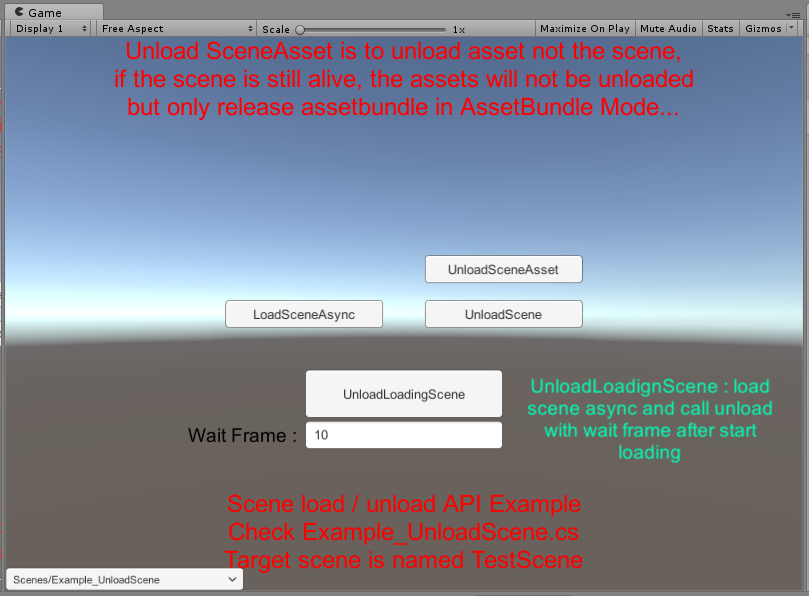
7. Example_UnloadScene (Script : Example_UnloadScene.cs)
This demo shows unload scene features, scene loading can have both async and sync proccess, the scene loaded event is triggered by SceneManager.sceneLoaded, so to unload scene is a little complex :
API (namespace AssetBundleMaster.ResourceLoad, AssetBundleMaster.AssetLoad):
AssetLoadManager.Instance.UnloadLevelAssets(int hashCode);
This is a Low-Level API to clear scene assets, it only works in AssetBundle mode, and only can clear AssetBundle serializedfile which scene referenced, if you don't load scene again while this scene exists, and the serializedfile was eat up your memory, you can call it but we recommand don't call it, it may cause asset duplicated. This example is to show if you call this function and load scene again, the assets in memory will duplicated(if you don't unload any scene).
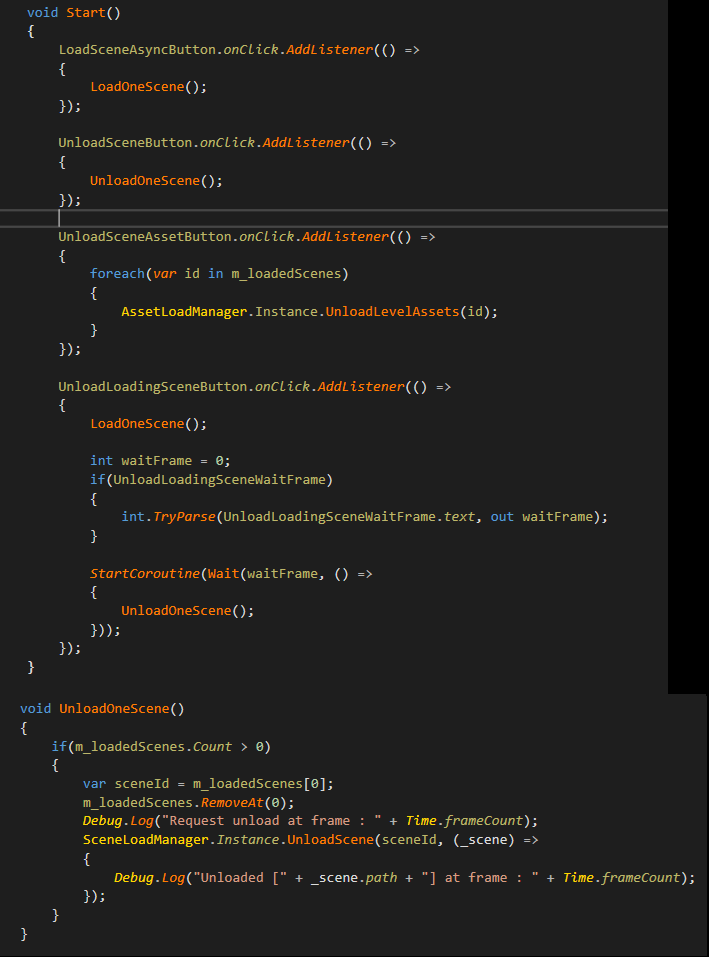
SceneLoadManager.Instance.UnloadScene(int id, System.Action<Scene> unloaded = null);
The scene load API ( SceneLoadManager.Instance.LoadScene ) retuen a HashCode, UnloadScene is use this HashCode. and the unload asset proccess will triggered if any scene asset can be unload. it is also auto resource control. The scene load has async proccess, the unload flow chart is like below(if not AssetBundle mode, no AssetBundle step) :
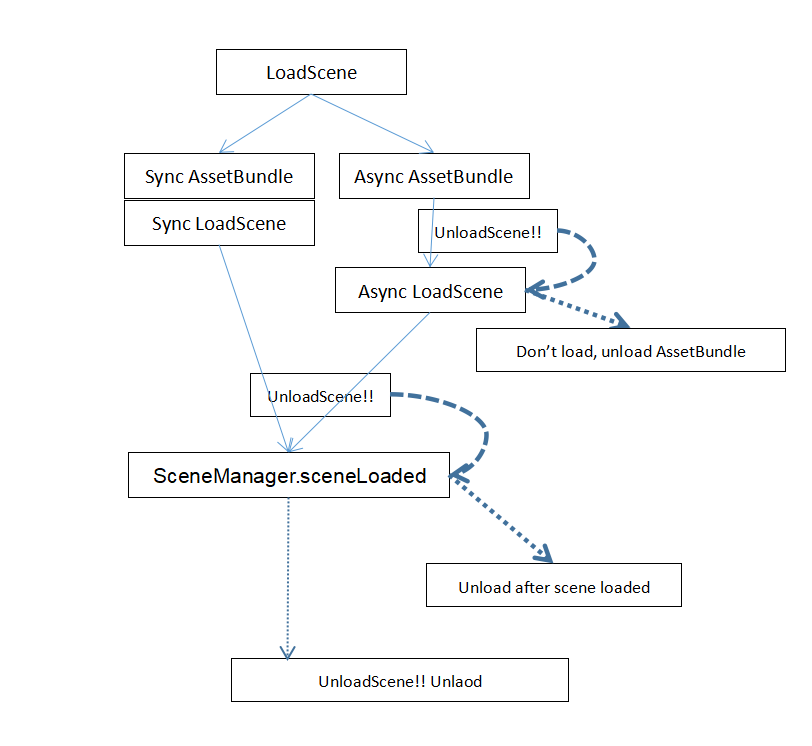
The Async loading may be :
1. Async load AssetBundle
2. Async load Scene
3. Wait SceneManager.sceneLoaded called no matter load scene Async/Sync
So the UnloadScene function wrapped all situations to make sure unload request work at any loading step.
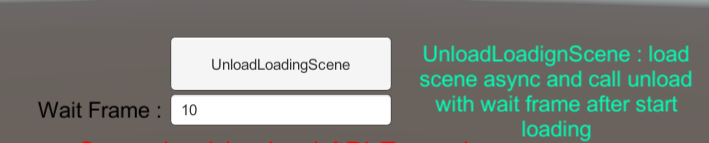
This is to test UnloadScene function, it do load scene Aync and unload after Wait Frames, change to 1,2,3...etc, can see in all step it works.
Thats all the Asset load, GameObject load, Scene load and unload logic, controlled by only 3 managers:
1. ResourceLoadManager
2. PrefabLoadManager
3. SceneLoadManager
if you run in editor mode, some tests may not work as well such as Async load and asset duplicate. Let's start build AssetBundle, and runs it in Editor and published app.
PS : StartScene1 Dropdown has a scene Example_UnloadAssetEfficiency is to explain how auto resources unload logic work with diferent LoadManagers, see appendix.
--------------------------------------- Build AssetBundles -----------------------------------------
Open the AssetBundleMaster Window
We have 5 load modes, and have 3 published asset load modes.
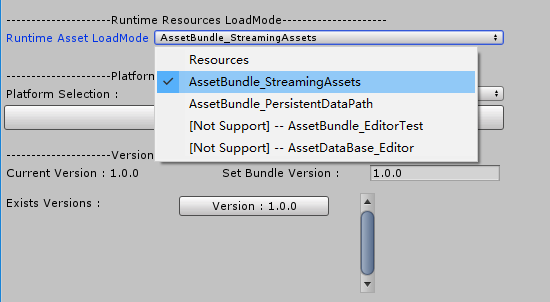
1. Resoueces mode: used as default Resources load mode, meaningless for us.
2. AssetBundle_StreamingAssets mode: load AssetBundle from StreamingAssets.
3. AssetBundle_PersistentDataPath mode : updatable resource mode, load from PersistentDataPath, if no asset in PersistentDataPath, load from StreamingAssets.
4. AssetBundle_EditorTest mode: load from temp AssetBundle folder, build AssetBundle will build to temp folde (Editor Only).
5. AssetDataBase_Editor mode: no need to build AssetBundle, load asset directly (Editor Only).
Let's check all the settings on AssetBundleMaster Window :
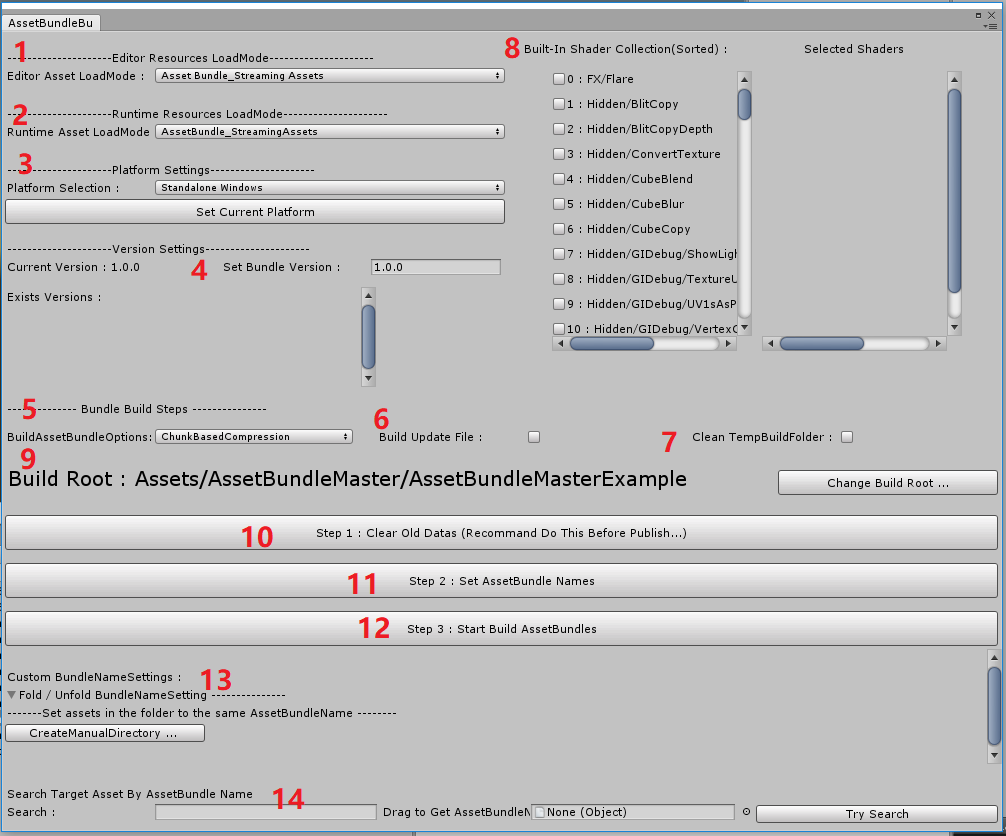
1. Editor Asset LoadMode (EnumPop) : Asset load mode in Editor.
2. Runtime Asset LoadMode (EnumPop) : Asset load mode in Published.
3. Platform Selection (EnumPop) : AssetBundle target platform, click [Set Current Platform] can set to current platform.
4. Set Bundle Version (Text) : The version of AssetBundle.
5. BuildAssetBundleOptions (EnumFlagPop) : BuildAssetBundleOptions.
6. Build Update File (CheckBox) : Create Patch between versions, Patch file is Josn, serialized from AssetBundleMaster.AssetLoad.LocalVersion.UpdateInfo.
7. Clean TempBuildFolder (CheckBox) : Clear any file in temp folder not in this build.
8. Built-In Shader Collection (Scroll View CheckBox) : Deal with Built-In Shader, no multi compiled.
9. Build Root (Label, Button) : Root folder, asset in this folder can be load.
10. Step1 Clear Old Datas (Button) : Clear all AssetImporter.AssetBundleName.
11. Step 2 Set AssetBundle Names (Button) : Auto set AssetBundleNames, some asset auto proccess. see appendix.
12. Step 3 Start Build AssetBundles (Button) : Start Build AssetBundles.
13. Custom BundleNameSettings (Scroll View) : Custom force set all files in target folder to a same AssetBundleName.
14. Search Target Asset By AssetBundle Name : Search AssetBundleName files, Debug.
That's all settings. Let's set editor load mode and runtime load mode to AssetBundle_StreamingAssets, this is the most simple publish mode. and click :
Step1...
Step2...
Step3...
It will auto build AssetBundle for you. every step shows tips :
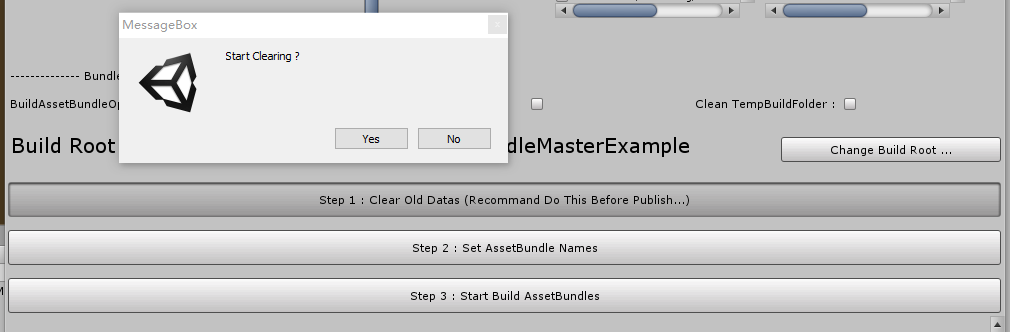
Step1
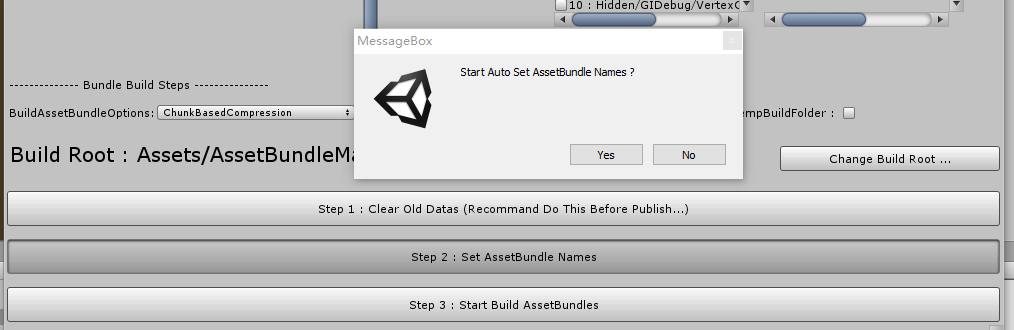
Step2
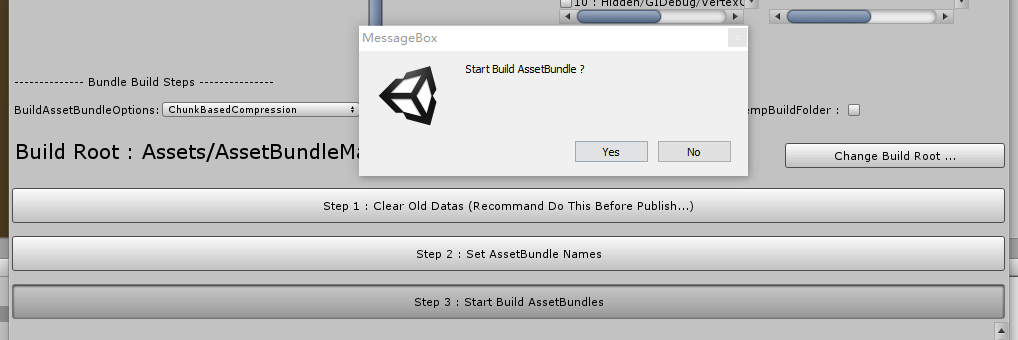
Step3
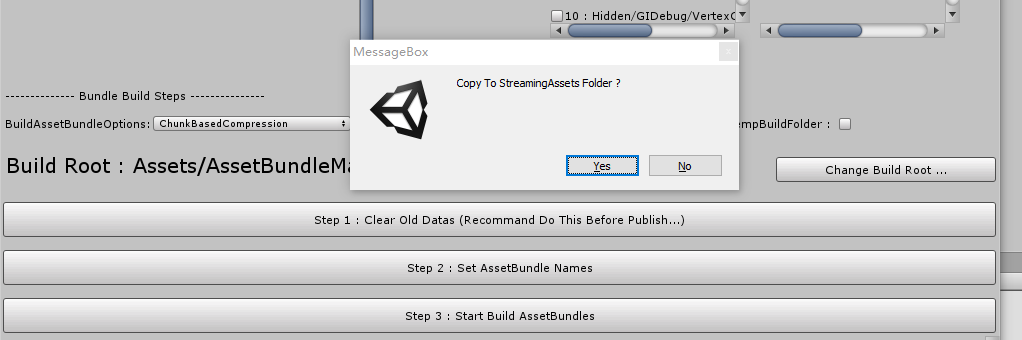
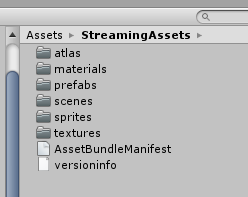
When build finished, It will ask you to copy built AssetBundles from temp folder to StreamingAssets? Yes.
You can see StreamingAssets got built AssetBundles :
So the AssetBundle build successed, if you run in Editor, just open the StartScene1, repeat the API tutorial again. This time the Async load is working.
And the [AssetLoadManager] shows different if you noticed :
AssetDataBase_Editor no AssetBundle load

AssetBundle_StreamingAssets loaded AssetBundle
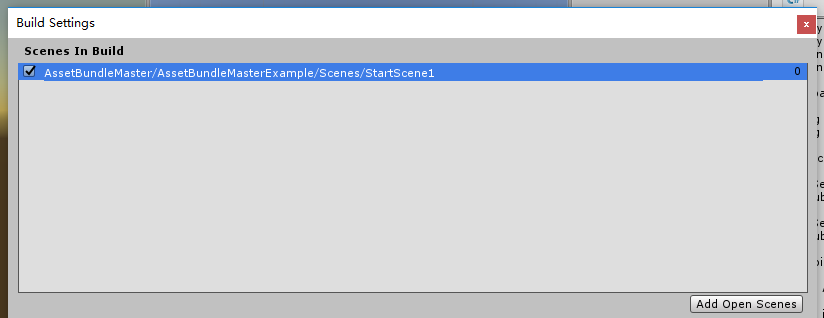
We did successed building AssetBundles and load AssetBundle in Editor, if we want to publish it, make sure your Platform Selection correct, the next one is very important, scene and the Build Settings :
When you pubilsh your project, there is no need to add any scene to build Settings, because the scenes in Build Root folder will be built to AssetBundle, and any scene added to Build Settings will be packed to Resources too. So how to publish the app and load the StartScene1 as default scene? there are 2 ways :
1. Add entry scene to scene build as default scene
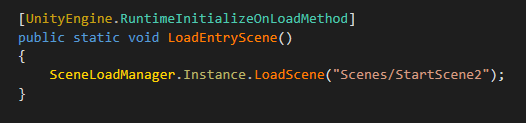
2. Or you can use the [UnityEngine.RuntimeInitializeOnLoadMethod] attribute to load the entry scene.

You should add this code to any script yourself. This is pretty good to avoid scene build duplicated.
No need to add any scene, just build it and run. it is quite simple to build App.
Now let' me explain the function 8. Built-In Shader Collection, change the Build Root to AssetBundleMasterExample2 :
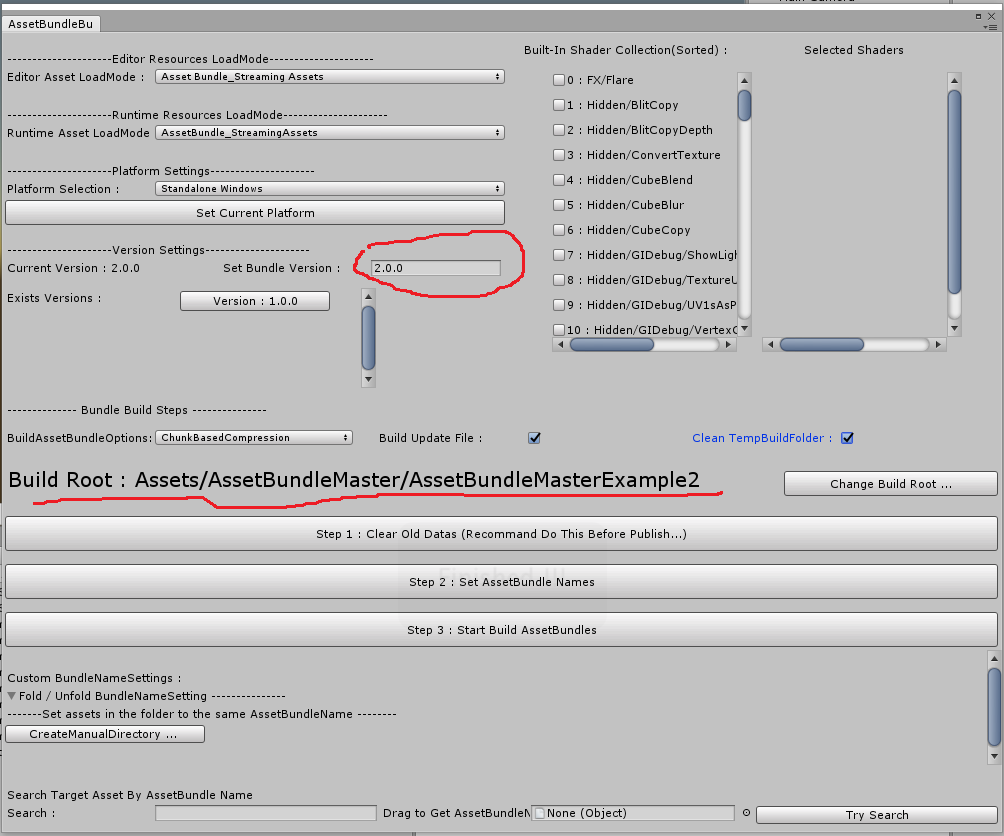
And chagne the version to 2.0.0, We Built 1.0.0 before, so Exists Versions shows 1.0.0 Exists, check the Build Update File, we can see Patch file will be generated later. Build Root is AssetBundleMasterExample2, let's see what is in this folder :

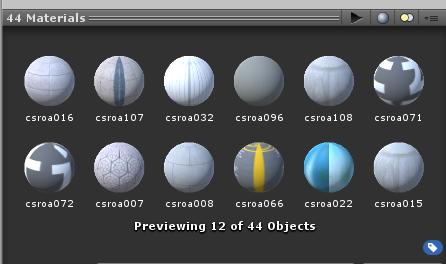
There are 44 materials were used in the Example_ShaderCollection scene, they all used the Standard Shader :
These materials may cause the issue. We need to change the entry scene to StartScene2, it will load Example_ShaderCollection, now change the entry scene :
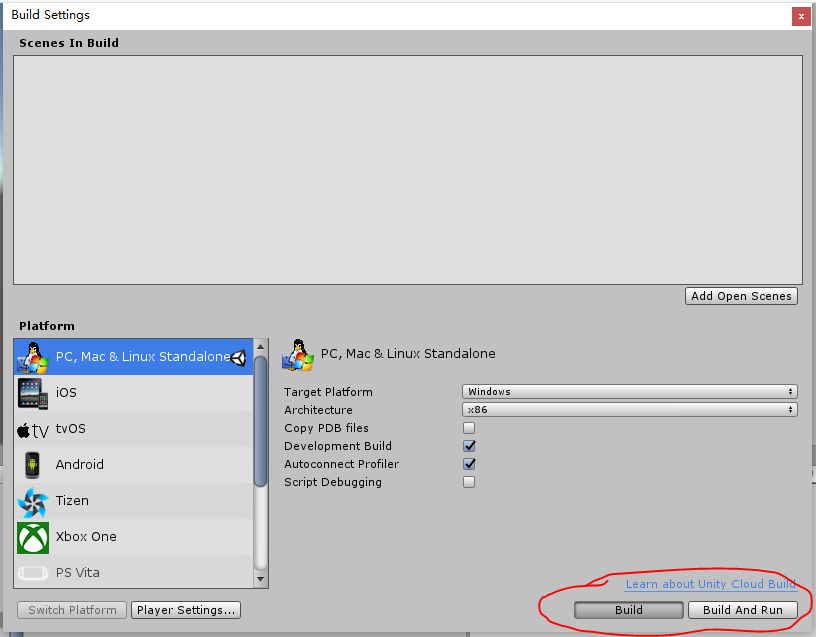
1. Change the entry scene by Build Settings

2. Or change code
Do build AssetBundle Steps again,
Step1...
Step2...
Step3...
This time the Step3 shows new tips :
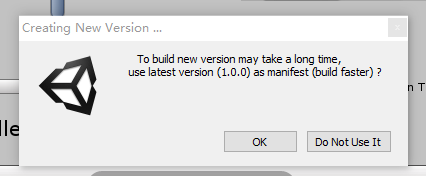
This is because we built 1.0.0 version bundles already, and if we create 2.0.0 version it can be a incremental build, it will be faster than build a totally new version. But this build is to build AssetBundleMasterExample2, is totally diferent with AssetBundleMasterExample, no shared assets, so whatever you choose, it will build a totally new version.
So the function 7. Clean TempBuildFolder (CheckBox) is used for it, if checked, the temp folder will do clean files that not in this version.
After the build AssetBunlde finished, we build app to check what happened at the runtime. don't forget to select the [Development Build] and [Autoconnect Profiler] in Build Settings. My platform is macro soft windows 10.

Total AssetBundle size : 11.2MB

The task manager shows the app runtime memory : 219.7MB
Profiler
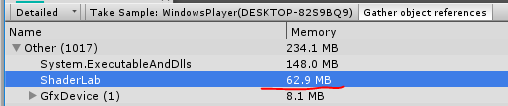
Profiler : ShaderLab 62.9MB

Profiler : Shader > Standard was compiled many times
This issue happend on Standard Shader, let's use the Shader Collection to collect Standard Shader, and build a 3.0.0 version, the shader changes will not cause the changes of referencing assets, so we must select the ForeRebuildAssetBundle on BuildAssetBundleOption, otherwise we will lost the reference of materials :
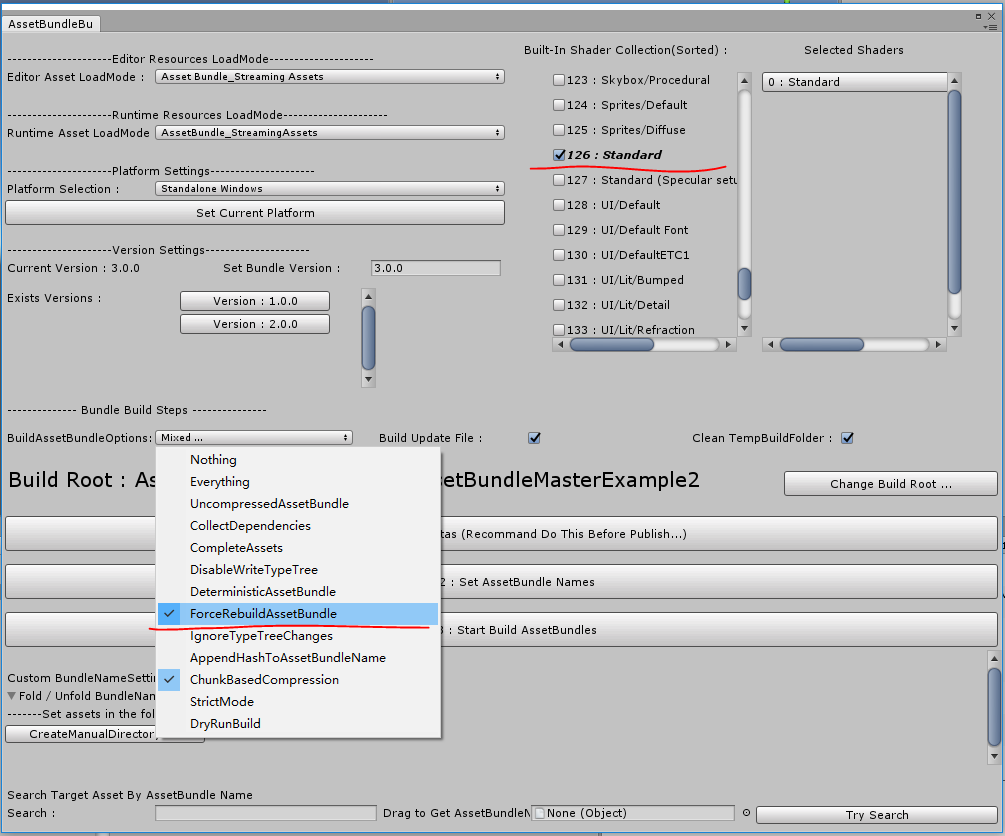
PS : the default setting of BuildAssetBundleOption is ChunkBasedCompression, it is just for building AssetBundle faster, you can change the settings by your need, and the setting serialized files is in the editor folder shows below, you can upload to SVN share to your teammate :

Do build AssetBundle Steps again,
Step1...
Step2...
Step3...
And build app to run :
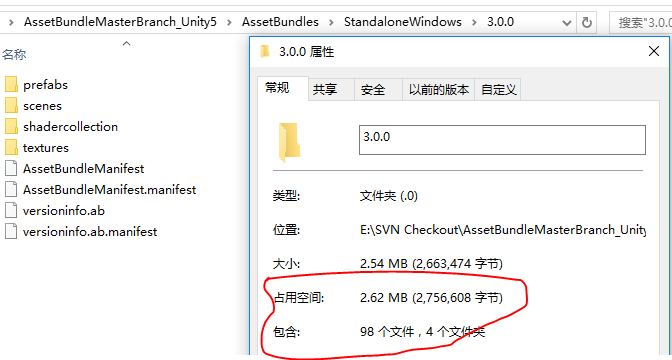
Total AssetBundle size : 2.62MB vs 11.2MB

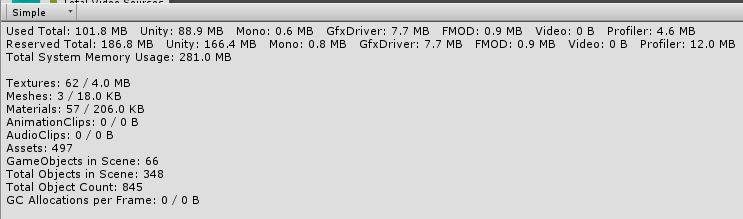
Task manager shows runtime memory 81.6MB VS 219.7MB
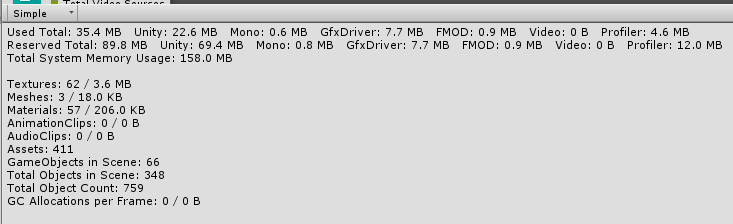
Profiler
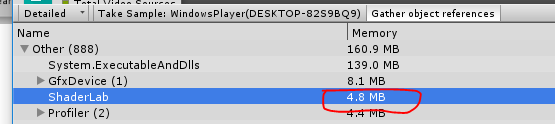
Profiler : ShaderLab 4.8M vs 62.9MB
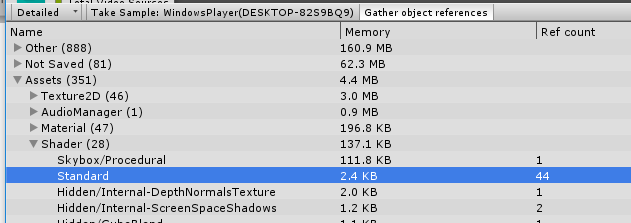
Profiler : Shader > Standard compiled once only.
You can see the big different between 2.0.0 and 3.0.0, this issue mainly caused by Built-In Shader, so the shader collectoin is used for Built-In Shaders.
All tests was tested on Unity5/Unity2017/Unity2018/Unity2019, nearly got the same result.
Let's take a look at AssetBundle temp folder, it is at the same layer as the Assets folder, in the AssetBundles folder :
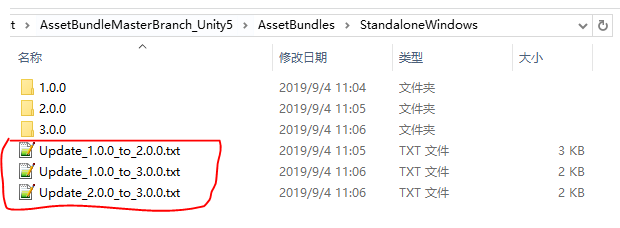
The patch file was generated between versions, it is a update list, serialized from AssetBundleMaster.AssetLoad.LocalVersion.UpdateInfo, json format.

If you are using AssetBundle_EditorTest mode, it load AssetBundles from temp folder, you can switch load between built versions easily, just change the [Platform Selection] and [Set Bundle Version] :
Other functions in the Tools Bar:
1. Copy built AssetBundle from temp folder to StreamingAssetsfolder :

This is the same function as to the AssetBundle build finished tips.
2. Clear AssetBundleMaster serialized datas :

It will clear the generated settings files said before, AssetBundleMaster can not run without these files.
These are all about AssetBundleMaster, it was designed for small or middle-class projects and provide the convenience and correctness for resource control, give you a friendly developing flow chat, and it has the potential to work for large project. Have Fun.
Appendix
Auto asset processing, the Editor code written in AssetBundleBuildWindow.cs, we do proccess some assets :
1. SpriteAtlas, you can not create SpriteAtlas yourself in Unity5, it can be created after Unity2017, code in AssetBundleBuildWindow::1762 line, CreateSpriteAtlasAssets function, it do set all Sprites with same Packing Tag to the same AssetBundle, avoid the SpriteAtlas duplicated(works in Unity5). The Packing Tag is the basis for packing AssetBundle, but in Unity2019 the Packing Tag do not shows up in the Inspector, but it exists in the serialize file. AssetBundleMaster overwrite the Inspector for it, Packing Tag was added, the script is TextureImporterInspector.cs :
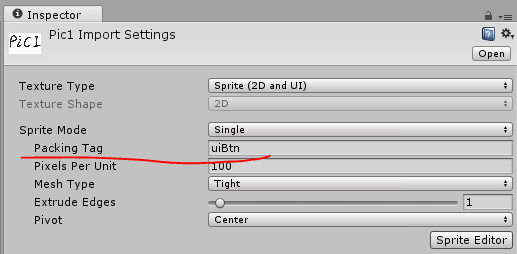
Unity5
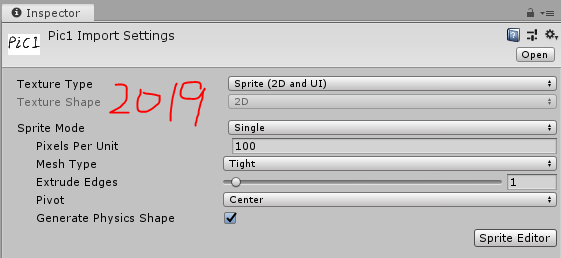
Unity2019
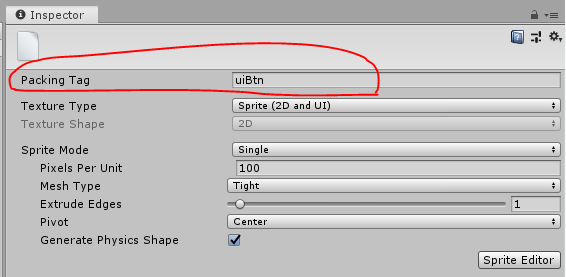
Unity2019 AssetBundleMaster overwrite Inspector
In some cases the [Include in Build] info of SpriteAtlas may lost ( for exp AssetBundle update ), ResourceLoadManager added a callback to UnityEngine.U2D.SpriteAtlasManager.atlasRequested as a fallback to ensure the Sprites will be load correctly, if you got the issue that can not load Sprite, debug the ResourceLoadManager.RequestAtlas function(Unity2017 or newer).

SpriteAtlas will be created to Assets/AssetBundleMasterSpriteAtlas folder(Unity2017 or newer).
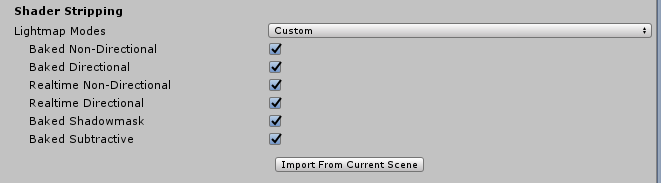
2. EditorConfigSettings, some of the editor settings will be set, you can take a look codes at AssetBundleBuildWindow::1679 line, EditorConfigSettings function, it did set the UnityEditor.EditorSettings.spritePackerMode for create SpriteAtlas, and change GraphicsSettings > Lightmap Modes to Custom mode, for preventing the LightMap info being stripped while build AssetBundle :
3. TerrainData, the used textures must set to isReadable(Read/Write Enabled in AssetImport Inspector), or it will pop error message after AssetBundle built.
The logic of auto resource control in AssetBundle mode, we can see Demo : Example_UnloadAssetEfficiency. please select any AssetBundle mode and build AssetBundles, and select this scene to load assets. when we loading assets, we have only 3 Managers ( namespace AssetBundleMaster.ResourceLoad ) :
1. ResourceLoadManager not auto controlled, can't unload by AssetBundle.Unload(true);
2. PrefabLoadManager auto controlled, unload by AssetBundle.Unload(true);
3. SceneLoadManager auto controlled, unload by AssetBundle.Unload(true);
That's means commonly the PrefabLoadManager and SceneLoadManager do unload assets, it will call AssetBundle.Unload(true); but the assets loaded by ResourceLoadManager will unload by AssetBundle.Unload(false); + Resources.UnloadUnusedAssets(); it is not good efficiency but it can keep the resources unload safe, the assets will not lost by any unexcepted unload.
When these referenced assets were cross referenced, the unload logic may changed too. for example a Prefab referencing a Texture named Pic3, the GameObject was instantiated by PrefabLoadManager and destroied, the AssetBundle of Pic3 should be unload by AssetBundle.Unload(true); but before it unload, the ResourceLoadManager do load the Pic3, so the Pic3 Asset was changed to be not auto controlled, the unload call should be AssetBundle.Unload(false); ...... the logic about unload control is in AssetBundleMaster.AssetLoad.AssetBundleTarget , the variable is unloadable.
Let's run the scene Example_UnloadAssetEfficiency in any AssetBundle Mode:
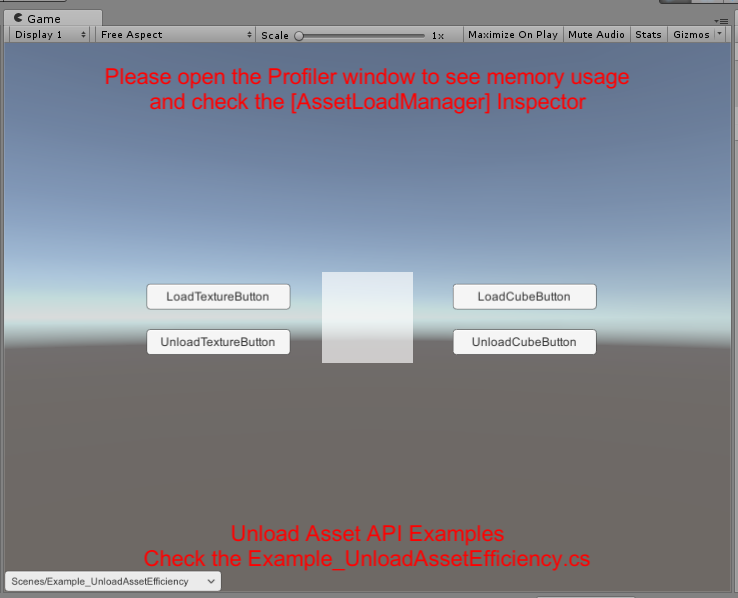
Click LoadCubeButton to load GameObject, we can see AssetBundles are auto controled:

Click UnloadCubeButton, The Unload log shows AssetBundle.Unload(true); was called:
This time we do load both assets, Cube and Pic3, Click LoadCubeButton, LoadTextureButton:
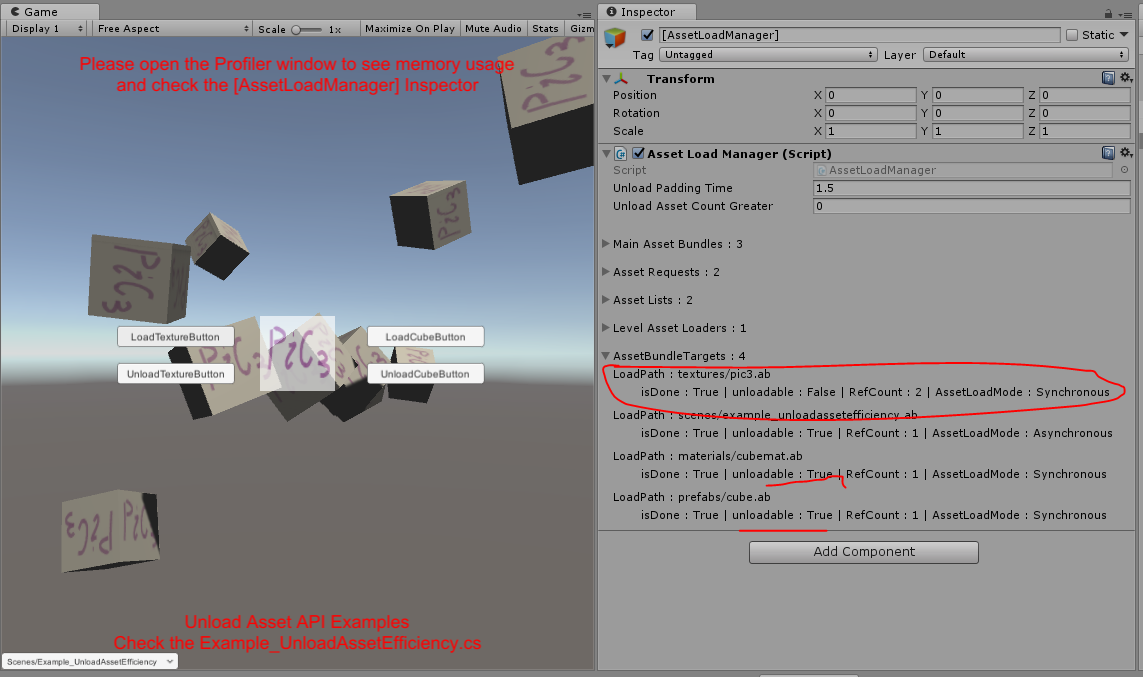
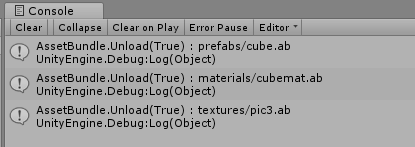
We can see textures/pic3.ab was set to unloadable : False, it means Pic3 asset was set to not auto control asset, Click UnloadCubeButton, you can see the unload log:

Only 2 assets was unloaded, the AssetBundle textures/pic3.ab was kept, because it loaded by ResourceLoadManager and was referenced by it, Click UnloadTextureButton:

Finally the Pic3 was unloaded by AssetBundle.Unload(false); + Resources.UnloadUnusedAssets();
That's the basic unload logic.
Update support, as we can see the update file can be generated by 6. Build Update File (CheckBox) selected, no matter which version of AssetBundles you build or rebuild, all update files will be refresh again, so the update info can support any version to update to any higher version directly, no need to update versional one by one.
The update info file [Update_1.0.0_to_3.0.0.txt] means you can update from 1.0.0 to 3.0.0 directly, this is the update infomation support. The updatable asset load system is just to set Asset Load Mode to AssetBundle_PersistentDataPath, it will load assets from Application.persistentDataPath, if there is no target asset, it will fallback to load asset from Application.streamingAssetsPath. When you publish your basic version or latest version app, you just need to put the basic AssetBundles into your StreamingAssets folder, and check AssetBundle version in runtime. download the latest version of AssetBundles to Application.persistentDataPath.
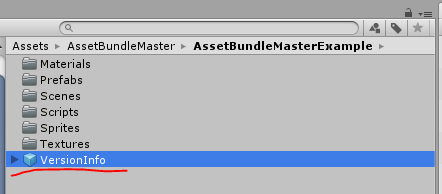
How to get current local AssetBundle version : LocalVersion.Instance.versionInfo.BundleVerison
the local AssetBundle version saved in the auto created VersionInfo prefab :
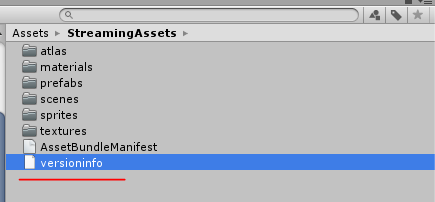
The VersionInfo build to AssetBundle :
So to update AssetBundle is quite simple, first get the local AssetBundle version (maybe 1.0.0), and get latest AssetBundle version from remote (maybe 3.0.0), if it needs to update, get the update list (Update_1.0.0_to_3.0.0.txt) from server, it is Json serialized from AssetBundleMaster.AssetLoad.LocalVersion.UpdateInfo, you can use UnityEngine.JsonUtility deserialize it, do remove local files and download update files from CDN according to the UpdateInfo, you can update to 3.0.0 version directly because the AssetBundles are increasemental build.

 浙公网安备 33010602011771号