
Windows Azure Cloud Service (43) 使用Azure In-Role Cache缓存(2)Dedicated Role
《Windows Azure Platform 系列文章目录》
Update 2016-01-12
https://azure.microsoft.com/zh-cn/documentation/articles/cache-dotnet-how-to-use-in-role/
微软宣布Azure Managed Cache Service和Azure In-Role Cache会在2016年11月30日下线,建议所有的用户采用Redis Cache。
有关Redis Cache的内容,请参考:
http://www.cnblogs.com/threestone/category/741409.html
在上一篇的博文中Windows Azure Cloud Service (42) 使用Azure In-Role Cache缓存(1)Co-located Role
笔者介绍了如何使用Co-located Role Cache来使用缓存,本章部分内容与该博文重复,请各位读者提前预习相关知识。
本篇博客,笔者将介绍使用Dedicated Role Cache。
为什么要使用Dedicated Role Cache?
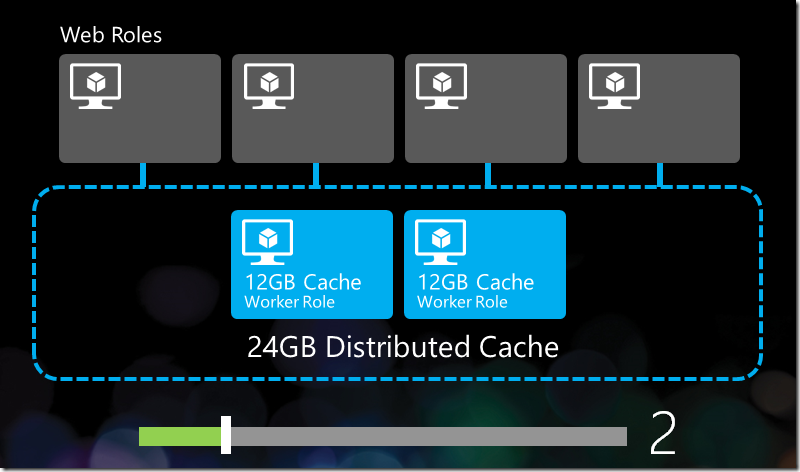
Co-located Role(共享模式)的Cache,是保存在多个Cloud Service Instance上的。
在某些情况下,企业网站的负载非常大,这时候,就需要额外的Dedicated Role Cache来专门负责Caching。
Co-located Role的架构图,请参考http://weblogs.asp.net/scottgu/meet-the-new-windows-azure
接下来开始本章内容:
1.使用管理员身份,运行Visual Studio 2013,创建一个新的Cloud Project,命名为LeiDedicatedRole。图略。
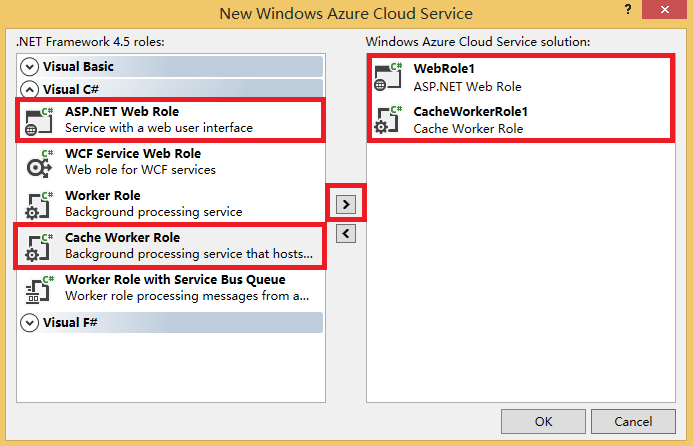
2.在New Windows Azure Cloud Service中,添加Web Role和Cache Worker Role。如下图:
3.我们点击Cloud Project,选择WebRole1,右键,选择Properties。如下图:
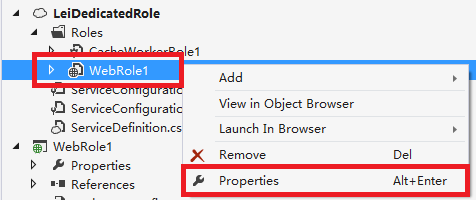
将Web Role的Instance Count设置为2。(Web Role Instance设置为2或者2以上,就实现了高可用。)

4.配置完WebRole1后,我们接下来配置CacheWorkerRole,如下图:

将CacheWorkerRole的Instance设置为2(或者2以上,配置高可用),图略
5.然后继续配置CacheWorkerRole的Caching信息,如下图:

(1)默认已经勾选了Enable Caching
(2)设置了Dedicated Role
(3)设置Storage Account,因为Cache Cluster(PaaS Web Role Instance)会将Runtime的信息保存在Storage,所以这里一定要设置正确
(4)Named Cache默认是default,我们可以通过Add Named Cache,增加新的Cache Name。
另外,笔者在步骤4设置了Instance Count=2,所以我们可以勾选High Availability,保证高可用。这样不会因为某台Cache Worker Role Instance因为故障宕机导致Caching丢失
6.然后我们在WebRole配置NuGet,增加Windows Azure Cache的引用。图略。具体请参考Windows Azure Cloud Service (42) 使用Azure In-Role Cache缓存(1)Co-located Role
7.修改WebRole1下的Web.config,找到autoDiscover节点,如下图:

将上图中的[Cache role name or Service Endpoint]中的节点,修改为项目文件的Cache Worker Role Name,在笔者的Sample Code中,我们设置为CacheWorkerRole1
设置完毕后的结果如下图:

这样相关的配置就完成了。
参考资料:http://blog.sanc.idv.tw/2012/06/windows-azure-windows-azure.html

 浙公网安备 33010602011771号