12_网络编程
前言
如今,计算机已经成为人们学习、工作、生活必不可少的工具。我们利用计算机可以和亲朋好友网上聊天,也可以玩网游、发邮件等等,这些功能实现都离不开计算机网络。计算机网络实现了不同计算机之间的通信,这必须依靠编写网络程序来实现。下面,我们将教大家如何编写网络程序。
1、计算机网络
计算机网络是指将地理位置不同的具有独立功能的多台计算机及其外部设备,通过通信线路连接起来,在网络操作系统,网络管理软件及网络通信协议的管理和协调下,实现资源共享和信息传递的计算机系统。
从中我们可以提取到一下内容:
- 计算机网络的作用:资源共享和信息传递。
- 计算机网络的组成:
- 计算机硬件:计算机(大中小型服务器、台式机、笔记本等)、外部设备(路由器、交换机等)、通信线路(双绞线、光纤等)。
- 计算机软件:网络操作系统(Windows2000 Server/Advance Server、Unix、Linux等)、网络管理软件(WorkWin、SugarNMS等)、网络通信协议(如TCP/IP协议栈等)。
- 计算机网络的多台计算机是具有独立功能的,而不是脱离网络就无法存在的。
2、网络通信的要素
-
通信双方地址:
- ip
- 端口号
- 192.168.7.124:5900
-
规则:网络通信协议
通过计算机网络可以实现不同计算机之间的连接与通信,但是计算机网络中实现通信必须有一些约定即通信协议,对速率、传输代码、代码结构、传输控制步骤、出错控制等制定标准。就像两个人想要顺利沟通就必须使用同一种语言一样,如果一个人只懂英语而另一人只懂中文,这样就会造成没有共同语言而无法沟通。
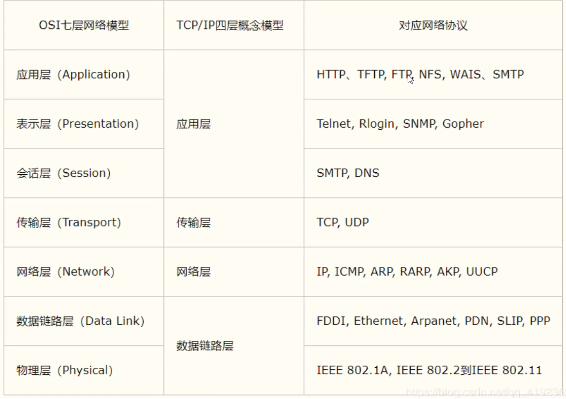
- TCP/IP参考模型:
我们网络编程重点关注传输层(TCP、UDP)
-
虽然国际标准化组织制定了这样一个网络通信协议的模型,但是实际上互联网通讯使用最多的网络通信协议是TCP/IP网络通信协议。
-
TCP/IP 是一个协议族,也是按照层次划分,共四层:应用层,传输层,互连网络层,网络接口层(物理+数据链路层)。
-
TCP/IP协议和OSI模型的区别:
OSI网络通信协议模型,是一个参考模型,而TCP/IP协议是事实上的标准。TCP/IP协议参考了OSI 模型,但是并没有严格按照OSI规定的七层标准去划分,而只划分了四层,这样会更简单点,当划分太多层次时,你很难区分某个协议是属于哪个层次的。TCP/IP协议和OSI模型也并不冲突,TCP/IP协议中的应用层协议,就对应于OSI中的应用层,表示层,会话层。就像以前有工业部和信息产业部,现在实行大部制后只有工业和信息化部一个部门,但是这个部门还是要做以前两个部门一样多的事情,本质上没有多大的差别。TCP/IP中有两个重要的协议,传输层的TCP协议和互连网络层的IP协议,因此就拿这两个协议做代表,来命名整个协议族了,再说TCP/IP协议时,是指整个协议族。
3、IP
ip地址:InetAddress
-
唯一定位一台网络上的计算机
-
127.0.0.1:本机localhost
-
IP地址的分类
-
IPV4/IPV6
-
IPV4:32位(4个字节组成),0~255,42亿,30亿都在北美,亚洲4亿,2011年就用尽。
-
IPV6:128位(16个字节),8个无符号整数,09、ae。可以给地球上的每一粒沙子分配一个IP。
2001: 0bb2: aaaa: 0015 :00o0; 0000 :laaa: 1312
-
-
公网(互联网)-私网(局域网)
- ABCD类地址
- 192.168.xx.xx专门给组织内部使用的
-
-
示例代码
import java.net.InetAddress;
import java.net.UnknownHostException;

public class TestInetAddress {
    public static void main(String[] args) {
        try {
            //查询本机地址
            InetAddress inetAddress1 = InetAddress.getByName("127.0.0.1");
            System.out.println(inetAddress1);
            InetAddress inetAddress2 = InetAddress.getByName("localhost");
            System.out.println(inetAddress2);
            InetAddress inetAddress3 = InetAddress.getLocalHost();
            System.out.println(inetAddress3);

            //查询网站ip地址
            InetAddress inetAddress4 = InetAddress.getByName("www.baidu.com");
            System.out.println(inetAddress4);

            //常用方法
            System.out.println(inetAddress4.getAddress());
            System.out.println(inetAddress4.getCanonicalHostName());
            System.out.println(inetAddress4.getHostAddress());
            System.out.println(inetAddress4.getHostName());
        } catch (UnknownHostException e) {
            e.printStackTrace();
        }
    }
}
输出结果:
/127.0.0.1
localhost/127.0.0.1
DESKTOP-LRL79VJ/192.168.1.107
www.baidu.com/14.215.177.38
[B@74a14482
14.215.177.38
14.215.177.38
www.baidu.com
4、端口
端口表示计算机上的一个程序的进程:
-
不同的进程有不同的端口号,用来区分软件。
-
被规定0~65535。
-
TCP、UDP:65535*2,单个协议下,端口号不能冲突。
-
端口分类
-
公有端口:0~1023
- HTTP:80
- HTTPS:443
- FTP:21
- Telent:23
-
程序注册端口:1024~49151,分配给用户或者程序
- Tomcat:8080
- MySQL:3306
- Oracle:1521
-
动态、私有:49152~65535
netstat -ano #查看所有端口 netstat -ano|findstr "8080" #查看指定的端口 tasklist|findstr "7600" #查看指定端口的进程 ctrl + shift + Esc #打开任务管理器 -
示例代码
import java.net.InetSocketAddress;

public class TestInetSocketAddress {
    public static void main(String[] args) {
        InetSocketAddress socketAddress1 = new InetSocketAddress("127.0.0.1", 8080);
        InetSocketAddress socketAddress2 = new InetSocketAddress("localhost", 8080);
        System.out.println(socketAddress1);
        System.out.println(socketAddress2);
        System.out.println(socketAddress1.getAddress());
        System.out.println(socketAddress1.getHostName());
        System.out.println(socketAddress1.getPort());
    }
}
输出结果:
/127.0.0.1:8080
localhost/127.0.0.1:8080
/127.0.0.1
127.0.0.1
8080
-
5、通信协议
协议:一种约定,就好比我们现在说的是普通话。
网络通信协议:速率、传输码率、代码结构、传输控制……
问题:非常的复杂?
大事化小:分层!
TCP/IP协议簇:实际上是一组协议
重要:
- TCP:用户传输协议
- UDP:用户数据报协议
出名的协议:
- TCP
- IP:网络互连协议
TCP、UDP对比
-
TCP:打电话
-
连接、稳定
-
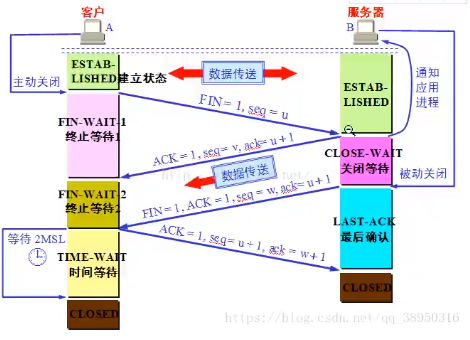
三次握手、四次挥手
最少需要三次,才能保证稳定连接!
A:你瞅啥?
B:瞅你咋地?
A:干一场!

A:我要走了!
B:你真的要走了吗?
B:你真的真的要走了吗?
A:我真的要走了!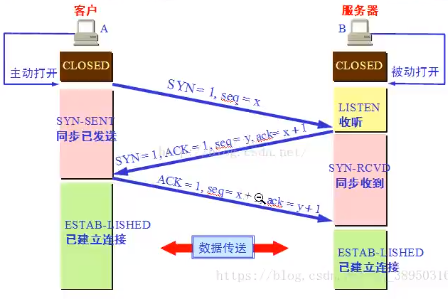
-
分为客户端和服务端
-
传输完成、释放连接、效率低
-
-
UDP:发短信
- 不连接、不稳定
- 客户端、服务端,没有明确的界限
- 不管你有没有准备好,都可以发给你
- DDOS:洪水攻击!(饱和攻击)
6、TCP
6.1、实现简单聊天
客户端
- 连接服务器 Socket
- 发送消息
import java.io.IOException;
import java.io.OutputStream;
import java.net.InetAddress;
import java.net.Socket;

public class TcpClientDemo01 {
    public static void main(String[] args) {
        Socket s = null;
        OutputStream os = null;
        try {
            //1.要知道服务器的地址、端口号
            InetAddress serverIP = InetAddress.getByName("127.0.0.1");
            int port = 9999;
            //2.创建一个socket连接
            s = new Socket(serverIP, port);
            //3.发送消息 IO流
            os = s.getOutputStream();
            os.write("你好,服务器!".getBytes());
            System.out.println("消息已发送");
        } catch (Exception e) {
            e.printStackTrace();
        } finally {
            if (os != null) {
                try {
                    os.close();
                } catch (IOException e) {
                    e.printStackTrace();
                }
            }
            if (s != null) {
                try {
                    s.close();
                } catch (IOException e) {
                    e.printStackTrace();
                }
            }
        }
    }
}
服务端
- 建立服务的端口 ServerSocket
- 等待用户的连接 accept
- 接收用户的消息
import java.io.ByteArrayOutputStream;
import java.io.IOException;
import java.io.InputStream;
import java.net.ServerSocket;
import java.net.Socket;

public class TcpServerDemo01 {
    public static void main(String[] args) {
        ServerSocket ss = null;
        Socket s = null;
        InputStream is = null;
        ByteArrayOutputStream baos = null;
        try {
            //1.建立服务的端口
            ss = new ServerSocket(9999);
            while (true) {
                //2.等待客户端连接过来
                s = ss.accept();
                //3.读取客户端的消息
                is = s.getInputStream();
                baos = new ByteArrayOutputStream();
                byte[] buffer = new byte[1024];
                int len;
                while ((len = is.read(buffer)) != -1) {
                    baos.write(buffer, 0, len);
                }
                System.out.println(baos.toString());
            }
        } catch (Exception e) {
            e.printStackTrace();
        } finally {
            //关闭资源,先开后关的原则
            if (baos != null) {
                try {
                    baos.close();
                } catch (IOException e) {
                    e.printStackTrace();
                }
            }
            if (is != null) {
                try {
                    is.close();
                } catch (IOException e) {
                    e.printStackTrace();
                }
            }
            if (s != null) {
                try {
                    s.close();
                } catch (IOException e) {
                    e.printStackTrace();
                }
            }
            if (ss != null) {
                try {
                    ss.close();
                } catch (IOException e) {
                    e.printStackTrace();
                }
            }
        }
    }
}
6.2、实现文件上传
客户端
import java.io.*;
import java.net.InetAddress;
import java.net.Socket;

public class TcpClientDemo02 {
    public static void main(String[] args) {
        Socket s = null;
        OutputStream os = null;
        FileInputStream fis = null;
        InputStream is = null;
        ByteArrayOutputStream baos = null;
        try {
            //1.创建一个socket连接
            s = new Socket(InetAddress.getByName("127.0.0.1"), 9000);
            //2.创建一个输出流
            os = s.getOutputStream();
            //3.读取文件
            fis = new FileInputStream(new File("1.jpg"));
            //4.写出文件
            byte[] buffer = new byte[1024];
            int len;
            while ((len = fis.read(buffer)) != -1) {
                os.write(buffer, 0, len);
            }
            //通知服务器,我已经传输完了
            s.shutdownOutput();

            //确定服务器接收完毕,才能断开连接
            is = s.getInputStream();
            baos = new ByteArrayOutputStream();
            byte[] buffer2 = new byte[1024];
            int len2;
            while((len2 = is.read(buffer2)) != -1) {
                baos.write(buffer2, 0, len2);
            }
            System.out.println(baos.toString());
        } catch (IOException e) {
            e.printStackTrace();
        } finally {
            //5.关闭资源
            if (baos != null) {
                try {
                    baos.close();
                } catch (IOException e) {
                    e.printStackTrace();
                }
            }
            if (is != null) {
                try {
                    is.close();
                } catch (IOException e) {
                    e.printStackTrace();
                }
            }
            if (fis != null) {
                try {
                    fis.close();
                } catch (IOException e) {
                    e.printStackTrace();
                }
            }
            if (os != null) {
                try {
                    os.close();
                } catch (IOException e) {
                    e.printStackTrace();
                }
            }
            if (s != null) {
                try {
                    s.close();
                } catch (IOException e) {
                    e.printStackTrace();
                }
            }
        }
    }
}
服务端
import java.io.*;
import java.net.ServerSocket;
import java.net.Socket;

public class TcpServerDemo02 {
    public static void main(String[] args) {
        ServerSocket ss = null;
        Socket s = null;
        InputStream is = null;
        FileOutputStream fos = null;
        OutputStream os = null;
        try {
            //1.创建服务
            ss = new ServerSocket(9000);
            //2.监听客户端连接
            s = ss.accept();//阻塞式监听,会一直等待客户端连接
            //3.获取输入流
            is = s.getInputStream();
            //4.文件输出
            fos = new FileOutputStream(new File("receive.jpg"));
            byte[] buffer = new byte[1024];
            int len;
            while((len = is.read(buffer)) != -1) {
                fos.write(buffer, 0, len);
            }

            //通知客户端我接收完毕了
            os = s.getOutputStream();
            os.write("我接受完毕了,你可以断开了".getBytes());
        } catch (IOException e) {
            e.printStackTrace();
        } finally {
            //5.关闭资源
            if (os != null) {
                try {
                    os.close();
                } catch (IOException e) {
                    e.printStackTrace();
                }
            }
            if (fos != null) {
                try {
                    fos.close();
                } catch (IOException e) {
                    e.printStackTrace();
                }
            }
            if (is != null) {
                try {
                    is.close();
                } catch (IOException e) {
                    e.printStackTrace();
                }
            }
            if (s != null) {
                try {
                    s.close();
                } catch (IOException e) {
                    e.printStackTrace();
                }
            }
            if (ss != null) {
                try {
                    ss.close();
                } catch (IOException e) {
                    e.printStackTrace();
                }
            }
        }
    }
}
6.3、初识Tomcat
服务端
- 自定义 Server
- Tomcat服务器 Server
客户端
- 自定义 Client
- 浏览器 Brower
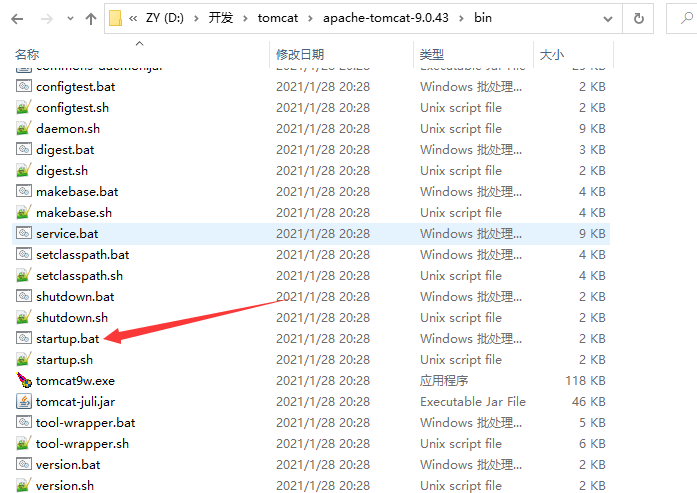
下载地址:https://tomcat.apache.org/download-90.cgi#9.0.43
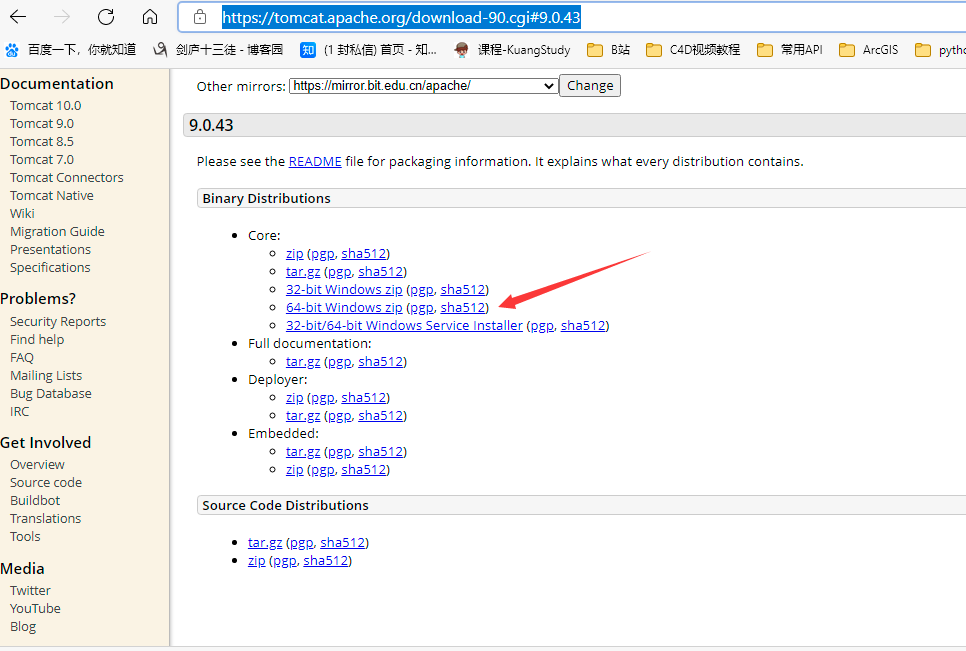
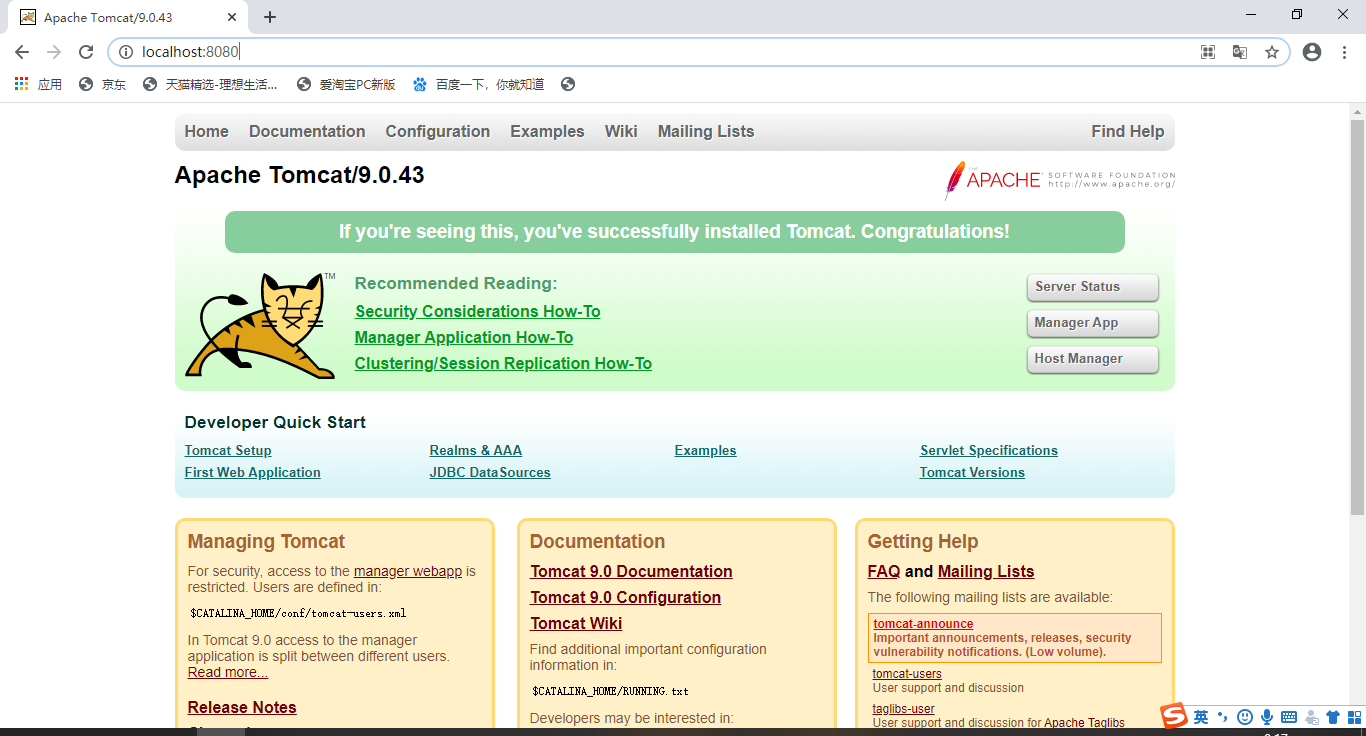
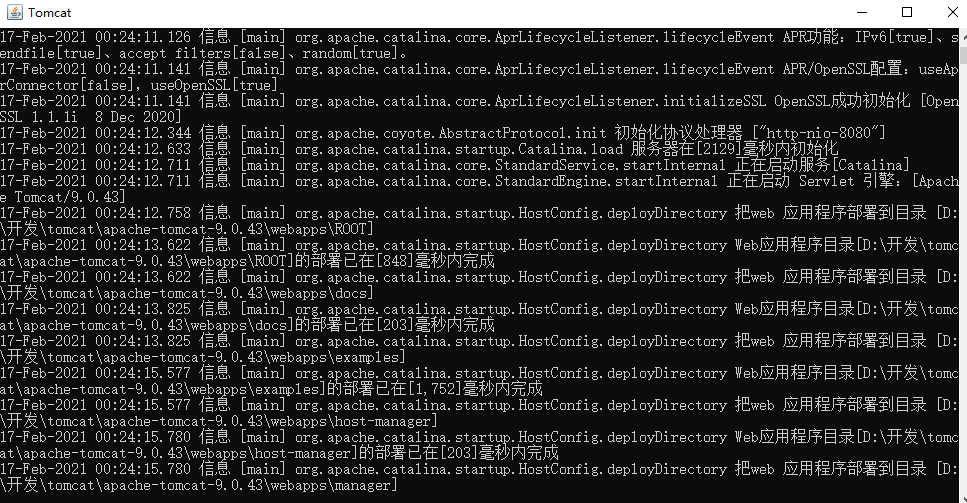
解压之后即可使用,在bin文件中找到startup.bat文件双击启动,在浏览器输入:http://localhost:8080,若出现以下页面说明启动成功~!
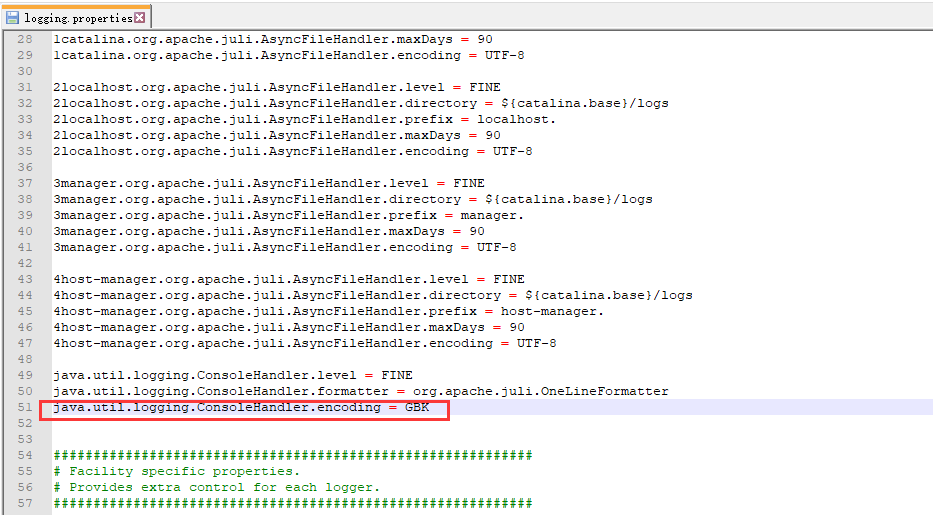
控制台出现中文乱码的解决方法:
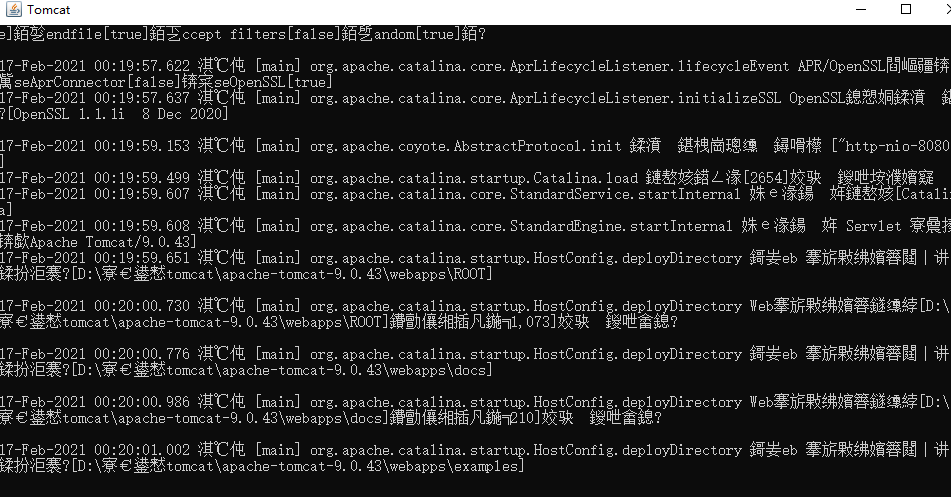
找到conf文件夹下的logging.properties文件,修改编码,windows默认的编码是GBK,所以把UTF-8修改为GBK即可。
7、UDP
类似发短信:不用连接,但需要知道对方的地址!
7.1、消息发送
发送端:
import java.net.DatagramPacket;
import java.net.DatagramSocket;
import java.net.InetAddress;

public class UdpClient {
    public static void main(String[] args) throws Exception {
        //1.建立一个socket
        DatagramSocket socket = new DatagramSocket();
        //2.建个包
        String msg = "你好,服务器";
        InetAddress localhost = InetAddress.getByName("localhost");
        int port = 9090;
        byte[] buffer = msg.getBytes();
        DatagramPacket packet = new DatagramPacket(buffer, 0, buffer.length, localhost, port);
        //3.发送包
        socket.send(packet);
        //4.关闭流
        socket.close();
    }
}
接收端:
public class UdpServer {
    public static void main(String[] args) throws Exception {
        //1.开放端口
        DatagramSocket socket = new DatagramSocket(9090);
        //2.接收数据包
        byte[] buffer = new byte[1024];
        DatagramPacket packet = new DatagramPacket(buffer, 0, buffer.length);
        socket.receive(packet);  //阻塞式接收
        System.out.println(packet.getAddress().getHostAddress());
        System.out.println(new String(packet.getData(), 0, packet.getLength()));
        //3.关闭连接
        socket.close();
    }
}
7.2、在线咨询实现
-
先实现循环发送消息和循环接收消息
循环发送消息:
import java.io.BufferedReader;
import java.io.InputStreamReader;
import java.net.DatagramPacket;
import java.net.DatagramSocket;
import java.net.InetSocketAddress;

public class UdpSender {
    public static void main(String[] args) throws Exception {
        DatagramSocket socket = new DatagramSocket(9999);
        //准备数据:控制台读取System.in
        BufferedReader reader = new BufferedReader(new InputStreamReader(System.in));
        while(true) {
            String msg = reader.readLine();
            byte[] data = msg.getBytes();
            InetSocketAddress address = new InetSocketAddress("localhost", 6666);
            DatagramPacket packet = new DatagramPacket(data, 0, data.length, address);
            socket.send(packet);
            if (msg.equals("bye")) {
                break;
            }
        }
        socket.close();
    }
}
循环接收消息:
public class UdpReceiver { public static void main(String[] args) throws Exception { DatagramSocket socket = new DatagramSocket(6666); while(true) { //准备接收包裹 byte[] buffer = new byte[1024]; DatagramPacket packet = new DatagramPacket(buffer, 0, buffer.length); socket.receive(packet); //阻塞式接收包裹 byte[] data = packet.getData(); String msg = new String(data, 0, data.length); System.out.println(msg); if (msg.trim().equals("bye")) { break; } } socket.close(); } } -
两个人都可以是发送方,也都可以是接收方
发送工具类:
import java.io.BufferedReader;
import java.io.IOException;
import java.io.InputStreamReader;
import java.net.DatagramPacket;
import java.net.DatagramSocket;
import java.net.InetSocketAddress;
import java.net.SocketException;

public class TalkSend implements Runnable {
    DatagramSocket socket = null;
    BufferedReader reader = null;

    private String toIP;
    private int toPort;

    public TalkSend(int fromPort, String toIP, int toPort) {
        this.toIP = toIP;
        this.toPort = toPort;
        try {
            socket = new DatagramSocket(fromPort);
            //准备数据:控制台读取System.in
            reader = new BufferedReader(new InputStreamReader(System.in));
        } catch (SocketException e) {
            e.printStackTrace();
        }
    }

    @Override
    public void run() {
        while(true) {
            try {
                String msg = reader.readLine();
                byte[] data = msg.getBytes();
                InetSocketAddress address = new InetSocketAddress(toIP, toPort);
                DatagramPacket packet = new DatagramPacket(data, 0, data.length, address);
                socket.send(packet);
                if (msg.equals("bye")) {
                    break;
                }
            } catch (IOException e) {
                e.printStackTrace();
            }
        }
        socket.close();
    }
}
接收工具类:
import java.io.IOException;
import java.net.DatagramPacket;
import java.net.DatagramSocket;
import java.net.SocketException;

public class TalkReceive implements Runnable {
    DatagramSocket socket = null;
    private String fromUser;

    public TalkReceive(String fromUser, int port) {
        this.fromUser = fromUser;
        try {
            socket = new DatagramSocket(port);
        } catch (SocketException e) {
            e.printStackTrace();
        }
    }

    @Override
    public void run() {
        while(true) {
            try {
                //准备接收包裹
                byte[] buffer = new byte[1024];
                DatagramPacket packet = new DatagramPacket(buffer, 0, buffer.length);
                socket.receive(packet); //阻塞式接收包裹
                byte[] data = packet.getData();
                String msg = new String(data, 0, data.length);
                System.out.println(fromUser + ":" + msg);
                if (msg.trim().equals("bye")) {
                    break;
                }
            } catch (IOException e) {
                e.printStackTrace();
            }
        }
        socket.close();
    }
}
学生发送和接收:
public class TalkStudent {
    public static void main(String[] args) {
        new Thread(new TalkSend(7777, "localhost", 9999)).start();
        new Thread(new TalkReceive("老师", 6666)).start();
    }
}
老师发送和接收:
public class TalkTeacher {
    public static void main(String[] args) {
        new Thread(new TalkSend(5555, "localhost", 6666)).start();
        new Thread(new TalkReceive("学生", 9999)).start();
    }
}
测试结果:
学生端:
老师好
老师:你好
我想咨询一个问题
老师:请说
老师端:
学生:老师好
你好
学生:我想咨询一个问题
请说
8、URL
统一资源定位符:定位资源的,定位互联网上的某一个资源。
DNS域名解析 把www.baidu.com转换为xxx.xxx.xxx.xxx的ip地址。
URL的组成:协议://ip地址:端口/项目名/资源
import java.net.MalformedURLException;
import java.net.URL;

public class URLDemo01 {
    public static void main(String[] args) throws MalformedURLException {
        URL url = new URL("http://localhost:8080/helloworld/index.jsp?username=zhangsan&password=123");
        System.out.println(url.getProtocol());  //协议
        System.out.println(url.getHost());    //主机ip
        System.out.println(url.getPort());    //端口
        System.out.println(url.getPath());    //全路径
        System.out.println(url.getFile());    //文件
        System.out.println(url.getQuery());   //参数
    }
}
8.1、利用URL下载网络资源
import java.io.FileOutputStream;
import java.io.InputStream;
import java.net.HttpURLConnection;
import java.net.URL;

public class UrlDown {
    public static void main(String[] args) throws Exception {
        //1.下载地址
        URL url = new URL("这里写你要下载的网络资源的地址");
        //2.连接到这个资源
        HttpURLConnection conn = (HttpURLConnection) url.openConnection();
        InputStream is = conn.getInputStream();
        FileOutputStream fos = new FileOutputStream("");
        byte[] buffer = new byte[1024];
        int len;
        while ((len = is.read(buffer)) != -1) {
            fos.write(buffer, 0, len);
        }
        fos.close();
        is.close();
        conn.disconnect();
    }
}

 浙公网安备 33010602011771号