三 clickhouse基础入门
基本语法演示
-- show databases ;
-- create database if not exists test1 ;
-- use test1 ;
-- select currentDatabase() ;
-- drop database test1 ;
1 数据类型
注意在CK中关键字严格区分大小写
create table tb_test1(
id Int8 ,
 name String
)engine=Memory;
┌─name─┬─type───┬─default_type─┬─default_expression─┬─comment─┬─codec_expression─┬─ttl_expression─┐
│ id   │ Int8   │              │                    │         │                  │                │
│ name │ String │              │                    │         │                  │                │
└──────┴────────┴──────────────┴────────────────────┴─────────┴──────────────────┴────────────────┘
1.1 数值类型
1) IntX和UIntX
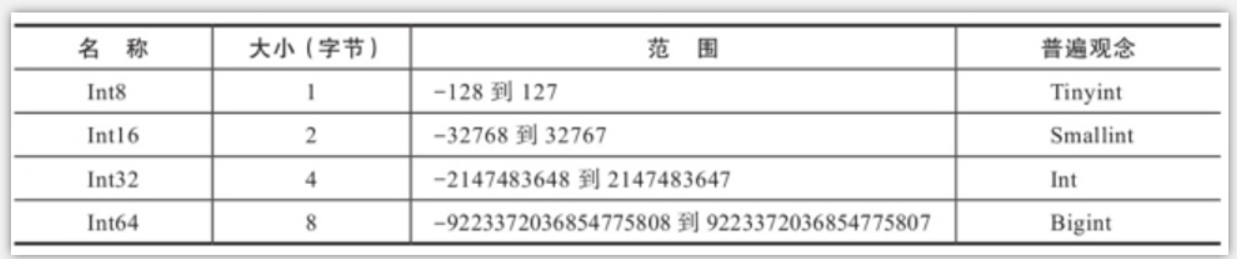
*ClickHouse支持无符号的整数,使用前缀U表示*

create table test_int(
    id Int8 ,
    age UInt8 ,
    cdId Int32
)engine=Memory ;

注意: 和我以前的认知是一样的,这种数据类型在数据特别精准的情况下可能出现数据精度问题!
Select 8.0/0 -->inf 正无穷
Select -8.0/0 -->inf 负无穷
Select 0/0 -->nan 非数字
如果要求更高精度的数值运算,则需要使用定点数。ClickHouse提 供了Decimal32、Decimal64和Decimal128三种精度的定点数。可以通过 两种形式声明定点:简写方式有Decimal32(S)、Decimal64(S)、
Decimal128(S)三种,原生方式为Decimal(P,S),其中:
·P代表精度,决定总位数(整数部分+小数部分),取值范围是1 ~38;·S代表规模,决定小数位数,取值范围是0~P

在使用两个不同精度的定点数进行四则运算的时候,它们的小数点 位数S会发生变化。
在进行加法运算时,S取最大值。例如下面的查询,toDecimal64(2,4)与toDecimal32(2,2)相加后S=4:
在进行减法运算时,S取最大值。例如下面的查询,toDecimal64(2,4)与toDecimal32(2,2)相减后S=4:
在进行乘法运算时,S取最和。例如下面的查询,toDecimal64(2,4)与toDecimal32(2,2)相乘后S=4+2:
在进行除法运算时,S取最大值。例如下面的查询,toDecimal64(2,4)与toDecimal32(2,2)相除后S=4:但是要保证被除数的S大于除数的S,否则会报错

1.2 字符串类型
1) String
字符串由String定义,长度不限。因此在使用String的时候无须声明大小。它完全代替了传统意义上数据库的Varchar、Text、Clob和Blob等字符类型。String类型不限定字符集,因为它根本就没有这个概念,所以可以将任意编码的字符串存入其中。但是为了程序的规范性和可维护性,在同一套程序中应该遵循使用统一的编码,例如“统一保持UTF-8编码”就是一种很好的约定。所以在对数据操作的时候我们不在需要区关注编码和乱码问题!
2) FixedString
FixedString类型和传统意义上的Char类型有些类似,对于一些字符有明确长度的场合,可以使用固定长度的字符串。定长字符串通过FixedString(N)声明,其中N表示字符串长度。但与Char不同的是,FixedString使用null字节填充末尾字符,而Char通常使用空格填充。比如在下面的例子中,字符串‘abc’虽然只有3位,但长度却是5,因为末尾有2位空字符填充 !
create table test_str(
name String ,
job FixedString(4) -- 最长4个字符
)engine=Memory ;
3) UUID
CREATE TABLE test_uuid
(
    `uid` UUID,
    `name` String
)
ENGINE = Memory ;
DESCRIBE TABLE test_uuid

┌─name─┬─type───┬
│ uid  │ UUID   │
│ name │ String │
└──────┴────────┴
insert into test_uuid select generateUUIDv4() , 'zss' ;
select * from test_uuid ;
┌──────────────────────────────────uid─┬─name─┐
│ 47e39e22-d2d6-46fd-8014-7cd3321f4c7b │ zss  │
└──────────────────────────────────────┴──────┘

-------------------------UUID类型的字段默认补位0-----------------------------
insert into test_uuid (name) values('hangge') ;
┌──────────────────────────────────uid─┬─name─┐
│ 47e39e22-d2d6-46fd-8014-7cd3321f4c7b │ zss  │
└──────────────────────────────────────┴──────┘
┌──────────────────────────────────uid─┬─name───┐
│ 00000000-0000-0000-0000-000000000000 │ hangge │
└──────────────────────────────────────┴────────┘
1) Date
Date类型不包含具体的时间信息,只精确到天,支持字符串形式写入:
CREATE TABLE test_date
(
    `id` int,
    `ct` Date
)
ENGINE = Memory ;
DESCRIBE TABLE test_date  ;
┌─name─┬─type──┬
│ id   │ Int32 │
│ ct   │ Date  │
└──────┴───────┴
insert into test_date vlaues(1,'2021-09-11'),(2,now()) ;
select id , ct from test_date ;

┌─id─┬─────────ct─┐
│  1 │ 2021-09-11 │
│  2 │ 2021-05-17 │
└────┴────────────┘
DateTime类型包含时、分、秒信息,精确到秒,支持字符串形式写入:
create table testDataTime(ctime DateTime) engine=Memory ;
insert into testDataTime values('2021-12-27 01:11:12'),(now()) ;
select * from testDataTime ;
DateTime64可以记录亚秒,它在DateTime之上增加了精度的设置
-- 建表
CREATE TABLE test_date_time64
(
    `ctime` DateTime64
)
ENGINE = Memory ;
-- 建表
CREATE TABLE test_date_time64_2
(
    `ctime` DateTime64(2)
)
ENGINE = Memory ;
-- 分别插入数据
insert into test_date_time64 values('2021-11-11 11:11:11'),(now()) ;
insert into test_date_time64_2 values('2021-11-11 11:11:11'),(now()) ;
-- 查询数据
SELECT *
FROM test_date_time64;
┌───────────────────ctime─┐
│ 2021-11-11 11:11:11.000 │
│ 2021-05-17 10:40:51.000 │
└─────────────────────────┘
SELECT
    *, toTypeName(ctime)
FROM test_date_time64

┌───────────────────ctime─┬─toTypeName(ctime)─┐
│ 2021-11-11 11:11:11.000 │ DateTime64(3)     │
│ 2021-05-17 10:40:51.000 │ DateTime64(3)     │
------------------------------------------------
SELECT
    *, toTypeName(ctime)
FROM test_date_time64_2

┌──────────────────ctime─┬─toTypeName(ctime)─┐
│ 2021-11-11 11:11:11.00 │ DateTime64(2)     │
│ 2021-05-17 10:41:26.00 │ DateTime64(2)     │
└────────────────────────┴───────────────────┘
1.4 复杂类型
1) Enum
create table test_enum(id Int8 , color Enum('red'=1 , 'green'=2 , 'blue'=3)) engine=Memory ;
insert into  test_enum values(1,'red'),(1,'red'),(2,'green');
也可以使用这种方式进行插入数据:
insert into test_enum values(3,3) ;
在定义枚举集合的时候,有几点需要注意。首先,Key和Value是不允许重复的,要保证唯一性。其次,Key和Value的值都不能为Null,但Key允许是空字符串。在写入枚举数据的时候,只会用到Key字符串部分,
注意: 其实我们可以使用字符串来替代Enum类型来存储数据,那么为什么是要使用枚举类型呢?这是出于性能的考虑。因为虽然枚举定义中的Key属于String类型,但是在后续对枚举的所有操作中(包括排序、分组、去重、过滤等),会使用Int类型的Value值 ,提高处理数据的效率!
-
限制枚举类型字段的值
-
底层存储的是对应的Int类型的数据
-
可以使用String
2) Array(T)
CK支持数组这种复合数据类型 , 并且数据在操作在今后的数据分析中起到非常便利的效果!数组的定义方式有两种 : array(T) [e1,e2...] , 我们在这里要求数组中的数据类型是一致的!
数组的定义
[1,2,3,4,5]
array('a' , 'b' , 'c')
[1,2,3,'hello']   -- 错误
create table test_array(
id Int8 ,
hobby Array(String)
)engine=Memory ;
insert into test_array values(1,['eat','drink','la']),(2,array('sleep','palyg','sql'));
┌─id─┬─hobby───────────────────┐
│  1 │ ['eat','drink','la']    │
│  2 │ ['sleep','palyg','sql'] │
└────┴─────────────────────────┘
select id , hobby  , toTypeName(hobby) from test_array ;
┌─id─┬─hobby───────────────────┬─toTypeName(hobby)─┐
│  1 │ ['eat','drink','la']    │ Array(String)     │
│  2 │ ['sleep','palyg','sql'] │ Array(String)     │
└────┴─────────────────────────┴───────────────────┘
 select id , hobby[2]  , toTypeName(hobby) from test_array ; -- 数组的取值 [index]  1-based
3) Tuple
select tuple(1,'asb',12.23) as x , toTypeName(x) ;
 ┌─x───────────────┬─toTypeName(tuple(1, 'asb', 12.23))─┐
│ (1,'asb',12.23) │ Tuple(UInt8, String, Float64)      │
└─────────────────┴────────────────────────────────────┘
---简写形式
SELECT
    (1, 'asb', 12.23) AS x,
    toTypeName(x)

┌─x───────────────┬─toTypeName(tuple(1, 'asb', 12.23))─┐
│ (1,'asb',12.23) │ Tuple(UInt8, String, Float64)      │
└─────────────────┴────────────────────────────────────┘
注意:建表的时候使用元组的需要制定元组的数据类型
CREATE TABLE test_tuple (
c1 Tuple(UInt8, String, Float64)
) ENGINE = Memory;
-
-
tuple(1,2,3,'abc')
-
4) Nested
Nested是一种嵌套表结构。一张数据表,可以定义任意多个嵌套类型字段,但每个字段的嵌套层级只支持一级,即嵌套表内不能继续使用嵌套类型。对于简单场景的层级关系或关联关系,使用嵌套类型也是一种不错的选择。
create table test_nested(
    uid Int8 ,
    name String ,
    props Nested(
        pid Int8,
        pnames String ,
        pvalues String
    )
)engine = Memory ;
desc test_nested ;
┌─name──────────┬─type──────────┬
│ uid           │ Int8          │
│ name          │ String        │
│ props.pid     │ Array(Int8)   │
│ props.pnames  │ Array(String) │
│ props.pvalues │ Array(String) │
└───────────────┴───────────────┴
嵌套类型本质是一种多维数组的结构。嵌套表中的每个字段都是一个数组,并且行与行之间数组的长度无须对齐。需要注意的是,在同一行数据内每个数组字段的长度必须相等。
insert into test_nested values(1,'hadoop',[1,2,3],['p1','p2','p3'],['v1','v2','v3']);
-- 行和行之间的属性的个数可以不一致 ,但是当前行的Nested类型中的数组个数必须一致
insert into test_nested values(2,'spark',[1,2],['p1','p2'],['v1','v2']);
SELECT *
FROM test_nested

┌─uid─┬─name───┬─props.pid─┬─props.pnames─────┬─props.pvalues────┐
│   1 │ hadoop │ [1,2,3]   │ ['p1','p2','p3'] │ ['v1','v2','v3'] │
└─────┴────────┴───────────┴──────────────────┴──────────────────┘
┌─uid─┬─name──┬─props.pid─┬─props.pnames─┬─props.pvalues─┐
│   2 │ spark │ [1,2]     │ ['p1','p2']  │ ['v1','v2']   │
└─────┴───────┴───────────┴──────────────┴───────────────┘
SELECT
    uid,
    name,
    props.pid,
    props.pnames[1]
FROM test_nested;
┌─uid─┬─name───┬─props.pid─┬─arrayElement(props.pnames, 1)─┐
│   1 │ hadoop │ [1,2,3]   │ p1                            │
└─────┴────────┴───────────┴───────────────────────────────┘
┌─uid─┬─name──┬─props.pid─┬─arrayElement(props.pnames, 1)─┐
│   2 │ spark │ [1,2]     │ p1                            │
└─────┴───────┴───────────┴───────────────────────────────┘
create table test_nested(
id Int8 ,
name String  ,
scores Nested(
       seq  UInt8 ,
	   sx Float64 ,
       yy Float64 ,
	   yw Float64
	   )
)engine = Memory ;

insert into test_nested values (1,'wbb',[1,2,3],[11,12,13],[14,14,11],[77,79,10]);
insert into test_nested values (2,'taoge',[1,2],[99,10],[14,40],[77,11]);
-- 注意 每行中的数组的个数一致  行和行之间可以不一直被

┌─id─┬─name─┬─scores.seq─┬─scores.sx──┬─scores.yy──┬─scores.yw──┐
│  1 │ wbb  │ [1,2,3]    │ [11,12,13] │ [14,14,11] │ [77,79,10] │
└────┴──────┴────────────┴────────────┴────────────┴────────────┘
┌─id─┬─name──┬─scores.seq─┬─scores.sx─┬─scores.yy─┬─scores.yw─┐
│  2 │ taoge │ [1,2]      │ [99,10]   │ [14,40]   │ [77,11]   │
└────┴───────┴────────────┴───────────┴───────────┴───────────┘
SELECT
    name,
    scores.sx
FROM test_nested;
┌─name─┬─scores.sx──┐
│ wbb  │ [11,12,13] │
└──────┴────────────┘
┌─name──┬─scores.sx─┐
│ taoge │ [99,10]   │
└───────┴───────────┘
https://repo.yandex.ru/clickhouse/rpm/testing/x86_64/ 下载新版本的CK安装包
SET allow_experimental_geo_types = 1;
CREATE TABLE geo_point (p Point) ENGINE = Memory();
INSERT INTO geo_point VALUES((10, 10));
SELECT p, toTypeName(p) FROM geo_point;
┌─p───────┬─toTypeName(p)─┐
│ (10,10) │ Point         │
└─────────┴───────────────┘
SET allow_experimental_geo_types = 1;
CREATE TABLE geo_ring (r Ring) ENGINE = Memory();
INSERT INTO geo_ring VALUES([(0, 0), (10, 0), (10, 10), (0, 10)]);
SELECT r, toTypeName(r) FROM geo_ring;

┌─r─────────────────────────────┬─toTypeName(r)─┐
│ [(0,0),(10,0),(10,10),(0,10)] │ Ring          │
└───────────────────────────────┴───────────────┘
SET allow_experimental_geo_types = 1;
CREATE TABLE geo_polygon (pg Polygon) ENGINE = Memory();
INSERT INTO geo_polygon VALUES([[(20, 20), (50, 20), (50, 50), (20, 50)], [(30, 30), (50, 50), (50, 30)]]);
SELECT pg, toTypeName(pg) FROM geo_polygon;
SET allow_experimental_geo_types = 1;
CREATE TABLE geo_multipolygon (mpg MultiPolygon) ENGINE = Memory();
INSERT INTO geo_multipolygon VALUES([[[(0, 0), (10, 0), (10, 10), (0, 10)]], [[(20, 20), (50, 20), (50, 50), (20, 50)],[(30, 30), (50, 50), (50, 30)]]]);
SELECT mpg, toTypeName(mpg) FROM geo_multipolygon;
7)IPV4
域名类型分为IPv4和IPv6两类,本质上它们是对整型和字符串的进一步封装。IPv4类型是基于UInt32封装的
(1)出于便捷性的考量,例如IPv4类型支持格式检查,格式错误的IP数据是无法被写入的,例如:
INSERT INTO IP4_TEST VALUES ('www.51doit.com','192.0.0')
Code: 441. DB::Exception: Invalid IPv4 value.
(2)出于性能的考量,同样以IPv4为例,IPv4使用UInt32存储,相比String更加紧凑,占用的空间更小,查询性能更快。IPv6类型是基于FixedString(16)封装的,它的使用方法与IPv4别无二致, 在使用Domain类型的时候还有一点需要注意,虽然它从表象上看起来与String一样,但Domain类型并不是字符串,所以它不支持隐式的自动类型转换。如果需要返回IP的字符串形式,则需要显式调用 IPv4NumToString或IPv6NumToString函数进行转换。
create table test_domain(
id Int8 ,
ip IPv4
)engine=Memory ;
insert  into test_domain values(1,'192.168.133.2') ;
insert  into test_domain values(1,'192.168.133') ; 在插入数据的会进行数据的检查所以这行数据会报错
-- Exception on client:
-- Code: 441. DB::Exception: Invalid IPv4 value.
-- Connecting to database doit1 at localhost:9000 as user default.
-- Connected to ClickHouse server version 20.8.3 revision 54438.
8) Boolean和Nullable
ck中没有Boolean类型 ,使用1和0来代表true和false
Nullable 某种数据类型允许为null , 或者是没有给值的情况下模式是NULL
create table test_null( id Int8 , age Int8 )engine = Memory ; create table test_null2( id Int8 , age Nullable(Int8) )engine = Memory ;
2.1 DDL基础
-
建表
目前只有MergeTree、Merge和Distributed这三类表引擎支持 ALTER查询,所以在进行alter操作的时候注意表的引擎!
注意在建表的时候一般要求指定表的引擎
CREATE TABLE tb_test1
(
    `id` Int8,
    `name` String
)
ENGINE = Memory() ;
-- 只有 MergeTree支持表结构的修改
-- MergeTree一定指定主键和排序字段  order by 代表两个含义
CREATE TABLE test_alter1
(
    `id` Int8,
    `name` String
)
ENGINE = MergeTree()
order by id ;
-- 查看建表语句  查看引擎类型参数值
show  create table test_alter1 ;
-----------------------------------
CREATE TABLE doit23.test_alter1
(
    `id` Int8,
    `name` String
)
ENGINE = MergeTree()
ORDER BY id
SETTINGS index_granularity = 8192;
-- 查看表结构
desc tb_test1 ;
┌─name─┬─type───┬
│ id   │ Int8   │
│ name │ String │
└──────┴────────┴
-- 添加字段
alter table tb_test1 add column age UInt8 ;-- 报错 , 因为修改的表引擎是内存引擎,不支持表结构的修改
-- 创建一张MergeTree引擎的表
CREATE TABLE tb_test2
(
    `id` Int8,
    `name` String
)
ENGINE = MergeTree()
ORDER BY id ;
┌─name─┬─type───┬
│ id   │ Int8   │
│ name │ String │
└──────┴────────┴
-- 添加字段
alter table tb_test2 add column age UInt8 ;
┌─name─┬─type───┬
│ id   │ Int8   │
│ name │ String │
│ age  │ UInt8  │
└──────┴────────┴
alter table tb_test2 add column gender String after name ;
┌─name───┬─type───┬
│ id     │ Int8   │
│ name   │ String │
│ gender │ String │
│ age    │ UInt8  │
└────────┴────────┴
-- 删除字段
alter table tb_test2 drop column age ;
-- 修改字段的数据类型
alter  table  tb_test2 modify column  gender UInt8 default 0 ;
┌─name───┬─type───┬─default_type─┬─default_expression─┬
│ id     │ Int8   │              │                    │
│ name   │ String │              │                    │
│ gender │ UInt8  │ DEFAULT      │ 0                  │
└────────┴────────┴──────────────┴────────────────────┴
-- 作为一个优秀的程序员,表的字段使用注释一种良好的习惯, 所以建议大家在操作的时候使用注释来描述字段的意义
-- 修改 / 添加字段的注释  内部使用的编码默认是UTF8
alter table tb_test2 comment column name '用户名' ;
┌─name───┬─type───┬─default_type─┬─default_expression─┬─comment─┬
│ id     │ Int8   │              │                    │         │
│ name   │ String │              │                    │ 用户名  │
│ gender │ UInt8  │ DEFAULT      │ 0                  │         │
└────────┴────────┴──────────────┴────────────────────┴─────────┴
-
移动表
在Linux系统中,mv命令的本意是将一个文件从原始位置A移动到目标位置B,但是如果位 置A与位置B相同,则可以变相实现重命名的作用。ClickHouse的RENAME查询就与之有着异曲同工之妙,RENAME语句的完整语法如下所示:
-- 修改表名
rename table tb_test1 to t1 ;
-- 修改多张表名
rename table tb_test2 to t2 , t1 to tt1 ;
-- 移动表到另一数据库中
rename table t2 to test1.t ;
-- 查看数据库下的所有的表
show tables ;
show tables from db_name ;
-
设置表属性
-- 设置列的默认值
create table tb_test3(
   id Int8 ,
    name String comment '用户名' ,
    role String comment '角色' default 'VIP'
)engine = Log ;
┌─name─┬─type───┬─default_type─┬─default_expression─┬
│ id   │ Int8   │              │                    │
│ name │ String │              │                    │
│ role │ String │ DEFAULT      │ 'VIP'              │
└──────┴────────┴──────────────┴────────────────────┴
insert into tb_test3 (id , name) values(1,'HANGGE') ;
SELECT *
FROM tb_test3 ;
┌─id─┬─name───┬─role─┐
│  1 │ HANGGE │ VIP  │
└────┴────────┴──────┘
2.2 DML基础
1) 插入数据
INSERT语句支持三种语法范式,三种范式各有不同,可以根据写入的需求灵活运用。
第一种方式
使用VALUES格式的常规语法
INSERT INTO [db.]table [(c1, c2, c3…)] VALUES (v11, v12, v13…), (v21, v22, v23…), ...
其中,c1、c2、c3是列字段声明,可省略。VALUES后紧跟的是由元组组成的待写入数据,通过下标位 与列字段声明一一对应。数据支持批量声明写入,多行数据之间使用逗号分隔
第二种方式
静态数据: cat user.txt
1,zss,23,BJ,M
2,lss,33,NJ,M
3,ww,21,SH,F
create table test_load1(
    id UInt8 ,
    name String ,
    age UInt8 ,
    city String ,
    gender String
)engine=Log ;
-- 将数据导入到表中
cat user.txt  | clickhouse-client  -q 'insert into default.test_load1 format CSV'
clickhouse-client  -q 'insert into default.test_load1 format CSV'  <  user.txt
上面的两种方式都可以将数据导入到表中
-- 我们还可以执行数据行属性的分割符
clickhouse-client --format_csv_delimiter=',' -q 'insert into default.test_load1 format CSV'  <   user.txt
第三种方式
INSERT INTO [db.]table [(c1, c2, c3…)] SELECT ...
虽然VALUES和SELECT子句的形式都支持声明表达式或函数,但是表达式和函数会带来额外的性能开销,从而导致写入性能的下降。所以如果追求极致的写入性能,就应该尽可能避免使用它们。
create table log3 as log2 ;
Insert into log3 select * from log2 ;
ClickHouse内部所有的数据操作都是面向Block数据块的,所以INSERT查询最终会将数据转换为Block数据块。也正因如此,INSERT语句在单个数据块的写入过程中是具有原子性的。在默认的情况下,每个数据块最多可以写入1048576行数据(由max_insert_block_size参数控制)。也就是说,如果一条INSERT语句写入的数据少于max_insert_block_size行,那么这批数据的写入是具有原子性的,即要么全部成功,要么全部失败。需要注意的是,只有在ClickHouse服务端处理数据的时候才具有这种原子写入的特性,例如使用JDBC或者HTTP接口时。因为max_insert_block_size参数在使用CLI命令行或 者INSERT SELECT子句写入时是不生效的。
2) 更新删除数据
ClickHouse提供了DELETE和UPDATE的能力,这类操作被称为Mutation查询,它可以看作ALTER语句的变种。虽然Mutation能最终实现修改和删除,但不能完全以通常意义上的UPDATE和DELETE来理解,我们必须清醒地认识到它的不同:首先,Mutation语句是一种“很重”的操作,更适用于批量数据的修改和删除;其次,它不支持事务,一旦语句被提交执行,就会立刻对现有数据产生影响,无法回滚;最后, Mutation语句的执行是一个异步的后台过程,语句被提交之后就会立即返回。所以这并不代表具体逻辑已经执行完毕,它的具体执行进度需要通过system.mutations系统表查询。注意数据的修改和删除操作是使用用MergeTree家族引擎:
只有MergeTree引擎的数据才能修改
删除分区数据
-- 创建表
create table test_muta(
    id UInt8 ,
    name String ,
    city String
)engine=MergeTree()
partition  by city
order by id ;
-- 导入数据
clickhouse-client  -q 'insert into test_muta format CSV' < data.csv
-- 删除分区数据
alter table test_muta drop  partition 'SH' ;
条件删除数据
alter table test_muta delete where id=3 ; -- 一定加条件
条件更新数据
ALTER TABLE [db_name.]table_name UPDATE column1 = expr1 [, ...] WHERE filter_expr ALTER TABLE test_ud UPDATE name = 'my', job = 'teacher' WHERE id = '2' ; alter table test_muta update name='李思思' where id=3 ;
但是注意的时候一定指定where条否则会报错,这种语法的where条件也可以使用子查询 ;
2.3 分区表操作
目前只有MergeTree系列 的表引擎支持数据分区,分区的基本概念和意义和hive中的意义一样,这里不过多赘述!
区内排序 , 合并 ,去重
create table test_partition1(
id String ,
ctime DateTime
)engine=MergeTree()
partition by toYYYYMM(ctime)
order by (id) ;
-- 查看建表语句
│ CREATE TABLE default.test_partition1
(
`id` String,
`ctime` DateTime
)
ENGINE = MergeTree()
PARTITION BY toYYYYMM(ctime)
ORDER BY id
SETTINGS index_granularity = 8192 │
-- 插入数据
insert into test_partition1 values(1,now()) ,(2,'2021-06-11 11:12:13') ;
-- 查看数据
SELECT *
FROM test_partition1 ;
┌─id─┬───────────────ctime─┐
│ 2 │ 2021-06-11 11:12:13 │
└────┴─────────────────────┘
┌─id─┬───────────────ctime─┐
│ 1 │ 2021-05-19 13:38:29 │
└────┴─────────────────────┘
-- 查看表中的分区
ClickHouse内置了许多system系统表,用于查询自身的状态信息。 其中parts系统表专门用于查询数据表的分区信息。
SELECT
name,
table,
partition
FROM system.parts
WHERE table = 'test_partition1' ;
┌─name─────────┬─table───────────┬─partition─┐
│ 202105_1_1_0 │ test_partition1 │ 202105 │
│ 202106_2_2_0 │ test_partition1 │ 202106 │
└──────────────┴─────────────────┴───────────┘
insert into test_partition1 values(1,now()) ,(2,'2021-06-12 11:12:13') ;
┌─name─────────┬─table───────────┬─partition─┐
│ 202105_1_1_0 │ test_partition1 │ 202105 │
│ 202105_3_3_0 │ test_partition1 │ 202105 │
│ 202106_2_2_0 │ test_partition1 │ 202106 │
│ 202106_4_4_0 │ test_partition1 │ 202106 │
└──────────────┴─────────────────┴───────────┘
-- 删除分区
alter table test_partition1 drop partition '202105' ;
删除分区以后 , 分区中的所有的数据全部删除
SELECT
name,
table,
partition
FROM system.parts
WHERE table = 'test_partition1'
┌─name─────────┬─table───────────┬─partition─┐
│ 202106_2_2_0 │ test_partition1 │ 202106 │
│ 202106_4_4_0 │ test_partition1 │ 202106 │
└──────────────┴─────────────────┴───────────┘
SELECT *
FROM test_partition1
┌─id─┬───────────────ctime─┐
│ 2 │ 2021-06-12 11:12:13 │
└────┴─────────────────────┘
┌─id─┬───────────────ctime─┐
│ 2 │ 2021-06-11 11:12:13 │
└────┴─────────────────────┘
-- 复制分区
clickHouse支持将A表的分区数据复制到B表,这项特性可以用于快速数据写入、多表间数据同步和备份等场景,它的完整语法如下:
ALTER TABLE B REPLACE PARTITION partition_expr FROM A
不过需要注意的是,并不是任意数据表之间都能够相互复制,它们还需要满足两个前提 条件:
·两张表需要拥有相同的分区键
·它们的表结构完全相同。
create table test_partition2 as test_partition1 ;
show create table test_partition2 ; -- 查看表2的建表语句
│ CREATE TABLE default.test_partition2
(
`id` String,
`ctime` DateTime
)
ENGINE = MergeTree()
PARTITION BY toYYYYMM(ctime)
ORDER BY id
SETTINGS index_granularity = 8192 │ -- 两张表的结构完全一致
-- 复制一张表的分区到另一张表中
SELECT *
FROM test_partition2
┌─id─┬───────────────ctime─┐
│ 2 │ 2021-06-12 11:12:13 │
└────┴─────────────────────┘
┌─id─┬───────────────ctime─┐
│ 2 │ 2021-06-11 11:12:13 │
└────┴─────────────────────┘
┌─id─┬───────────────ctime─┐
│ 2 │ 2021-06-21 11:12:13 │
└────┴─────────────────────┘
----------------------------
alter table test_partition2 replace partition '202106' from test_partition1
SELECT
name,
table,
partition
FROM system.parts
WHERE table = 'test_partition2'
┌─name─────────┬─table───────────┬─partition─┐
│ 202106_2_2_0 │ test_partition2 │ 202106 │
│ 202106_3_3_0 │ test_partition2 │ 202106 │
│ 202106_4_4_0 │ test_partition2 │ 202106 │
└──────────────┴─────────────────┴───────────┘
-- 重置分区数据
如果数据表某一列的数据有误,需要将其重置为初始值,如果设置了默认值那么就是默认值数据,如果没有设置默认值,系统会给出默认的初始值,此时可以使用下面的语句实现:
ALTER TABLE tb_name CLEAR COLUMN column_name IN PARTITION partition_expr ;
注意: 不能重置主键和分区字段
示例:
alter table test_rep clear column name in partition '202105' ;
-- 卸载分区
表分区可以通过DETACH语句卸载,分区被卸载后,它的物理数据并没有删除,而是被转移到了当前数据表目录的detached子目录下。而装载分区则是反向操作,它能够将detached子目录下的某个分区重新装载回去。卸载与装载这一对伴生的操作,常用于分区数据的迁移和备份场景
┌─id─┬─name─┬───────────────ctime─┐
│ 1 │ │ 2021-05-19 13:59:49 │
│ 2 │ │ 2021-05-19 13:59:49 │
└────┴──────┴─────────────────────┘
┌─id─┬─name─┬───────────────ctime─┐
│ 3 │ ww │ 2021-04-11 11:12:13 │
└────┴──────┴─────────────────────┘
alter table test_rep detach partition '202105' ;
┌─id─┬─name─┬───────────────ctime─┐
│ 3 │ ww │ 2021-04-11 11:12:13 │
└────┴──────┴─────────────────────┘
-- 装载分区
alter table test_rep attach partition '202105' ;
┌─id─┬─name─┬───────────────ctime─┐
│ 1 │ │ 2021-05-19 13:59:49 │
│ 2 │ │ 2021-05-19 13:59:49 │
└────┴──────┴─────────────────────┘
┌─id─┬─name─┬───────────────ctime─┐
│ 3 │ ww │ 2021-04-11 11:12:13 │
└────┴──────┴─────────────────────┘