google protocol buffer——protobuf的编码原理二
2020-08-30 17:31 tera 阅读(1124) 评论(0) 收藏 举报这一系列文章主要是对protocol buffer这种编码格式的使用方式、特点、使用技巧进行说明,并在原生protobuf的基础上进行扩展和优化,使得它能更好地为我们服务。
在上一篇文章中,我们主要通过一些示例了解了protobuf的使用特性,以及和这些特性相关的基础编码原理。
编码原理只开了个头,所以本文将继续展示protobuf剩余的编码原理
在之前的文章中,我们只是定义了一些非常简单的模型,其中只包含了string、int和一个Name对象,所以我们首先先定义一个更复杂的模型
.proto文件如下
syntax = "proto3";

option java_package = "cn.tera.protobuf.model";
option java_outer_classname = "ProtobufStudent";

message Student{
  int32 age = 1;
  int64 hairCount = 2;
  bool isMale = 3;
  string name = 4;
  double height = 5;
  float weight = 6;
  Parent father = 7;
  Parent mother = 8;
  repeated string friends = 9;
  repeated Hobby hobbies = 10;
  Color hairColor = 11;
  bytes scores = 12;
  uint32 uage = 13;
  sint32 sage = 14;
}

message Parent {
  string name = 1;
  int32 age = 2;
}

message Hobby {
  string name = 1;
  int32 cost = 2;
}

enum Color {
  BLACK = 0;
  RED = 1;
  YELLOW = 2;
}
相比之前定义的模型,这里新增了int64,bool,double,float,repeated,enum,uint,sint类型
repeated类型对应的是java中的list
protobuf将这些具体的类型分为了几个大类,如下面这个表格所示
| Type | Meaning | Used For |
|---|---|---|
| 0 | Varint | int32, int64, uint32, uint64, sint32, sint64, bool, enum |
| 1 | 64-bit | fixed64, sfixed64, double |
| 2 | Length-delimited | string, bytes, embedded messages, packed repeated fields |
| 5 | 32-bit | fixed32, sfixed32, float |
接着我们就通过实例来看下每种数据结构的编码方式
1.Varint
这种类型的数据,在序号字节中的类型部分表示为000,即表格中的Type字段0
首先我们看最简单的4种类型,protobuf类型为int32、int64、bool、enum,模型中对应这种类型的字段是age、hairCount、isMale、hairColor,因此我们分别给这4个字段赋值
age测试代码
/**
 * protobuf基础编码,varint类型
 */
@Test
void protobufBaseEncodeTest() {
    ProtobufStudent.Student student = ProtobufStudent.Student.newBuilder()
            .setAge(15)
    Utility.printByte(student.toByteArray());
}
输出结果
8    15
00001000 00001111
这里复习一下上一篇文章中关于protobuf的编码基础
第一个字节表示字段的序号和类型
黄色底000,表示该数据类型是varint
蓝色0001,表示序号为1
红色0,表示序号解析到了最后一个字节
第二个字节表示数字的值15
通过varint解码后,即是15
hairCount测试代码
@Test
void protobufBaseEncodeTest() {
    ProtobufStudent.Student student = ProtobufStudent.Student.newBuilder()
            .setHairCount(239281373231123L)
            .build();
    Utility.printByte(student.toByteArray());
}
输出结果
16    -109    -16    -126    -54    -128    -76    54
00010000 10010011 11110000 10000010 11001010 10000000 10110100 00110110
第一个字节表示字段的序号和类型
黄色底000,表示该数据类型是varint
蓝色0010,表示序号为2
红色0,表示序号解析到了最后一个字节
后面7个字节,通过varint解码后,即是239281373231123L
isMale测试代码
@Test
void protobufBaseEncodeTest() {
    ProtobufStudent.Student student = ProtobufStudent.Student.newBuilder()
            .setIsMale(true)
            .build();
    Utility.printByte(student.toByteArray());
}
输出结果
24    1
00011000 00000001
序号字节结构和之前一样
这里因为赋值的是true,所以值是1,如果赋值是false的话,那么该字段就不会被编码了(因为bool类型默认就是false)
hairColor测试代码
@Test
void protobufBaseEncodeTest() {
    ProtobufStudent.Student student = ProtobufStudent.Student.newBuilder()
            .setHairColor(ProtobufStudent.Color.RED)
            .build();
    Utility.printByte(student.toByteArray());
}
输出结果
88    1
01011000 00000001
序号字节结构和之前一样,这里因为赋值的是Color.RED,我们查看枚举值表即为1,如果赋值的是Color.BLACK,则该字段将不会被编码(因为int类型默认值就是0)
上面4个例子是可以通过正数就可以表达的类型,接着我们看对于有符号的正数,protobuf是如何表达的
protobuf类型为int32、uint32、sint32,对应模型中的age、uage、sage(这里注意,虽然在.proto文件中我们分了3个类型进行定义,但最终映射到java的类型都是int)
负数age测试代码
/**
 * protobuf基础编码,有符号的整数
 */
@Test
void negativeIntTest() {
    ProtobufStudent.Student student = ProtobufStudent.Student.newBuilder()
            .setAge(-7)
            .build();
    Utility.printByte(student.toByteArray());
}
输出结果
8    -1    -1    -1    -1    -1    -1    -1    -1    -1    1
00001000 11111001 11111111 11111111 11111111 11111111 11111111 11111111 11111111 11111111 00000001
可以看到数据体占用了10个字节,通过varint解码后就可以得到-7
因为一般负数的二进制结果都是采用正数补码的形式存储,所以protobuf使用了一个长度固定为10个字节的空间对负数进行编码,即使是-7也需要10个字节进行存储,其实是十分不合理的,因此我们看下uint和sint的表现
uage测试代码
/**
 * protobuf基础编码,有符号的整数
 */
@Test
void negativeIntTest() {
    ProtobufStudent.Student student = ProtobufStudent.Student.newBuilder()
            .setUage(-7)
            .build();
    Utility.printByte(student.toByteArray());
}
输出结果
104    -1    -1    -1    -1    15
01101000 11111001 11111111 11111111 11111111 00001111
如果定义为uint32的话,那么固定的数据存储空间则会缩减为5个字节
sage测试代码
/**
 * protobuf基础编码,有符号的整数
 */
@Test
void negativeIntTest() {
    ProtobufStudent.Student student = ProtobufStudent.Student.newBuilder()
            .setSage(-7)
            .build();
    Utility.printByte(student.toByteArray());
}
输出结果
112    13
01110000 00001101
粗看一下还不错,至少是用一个字节就表示了,但是仔细观察就会发现,我们传入的数字明明是-7,但是编码结果却是13
原因在于如果我们定义的是sint32,那么protobuf会采用一种叫做ZigZag的编码方式,即一种数据的映射,表格如下
| Signed Original | Encoded As |
|---|---|
| 0 | 0 |
| -1 | 1 |
| 1 | 2 |
| -2 | 3 |
| 2 | 4 |
| ... | ... |
即设需要编码的整数为n:如果n>=0,则映射为2n;如果n<0,则映射为-2n-1
用代码来表示的话:
对于int32类型,映射规则为
(n << 1) ^ (n >> 31)
对于int64类型,映射规则为
(n << 1) ^ (n >> 63)
映射之后,再将映射的值通过varint的方式编码成字节
回过头看-7,对应的映射正是13,因此编码结果中也就是13
当然采取这种ZigZag进行映射后,对于负数编码所需的空间会减少,但对于正数的编码结果则会多出1个bit(看一下映射规则,如果n>=0,则映射为2n)
因此综上测试结果,如果我们能够预知在使用的过程中会遇到负数,那么从编码结果字节数的角度来说,采用sint定义.proto的字段将会是一个更优的选择
这里总结一下Varint的编码方式,首先由一个序号字节标识字段的序号和类型,数据体无论是int、long、bool、enum,因为其最终总能用一个数字表示,因此他们都能统一地通过varint进行编码,所以这种数据类型的分类就叫Varint
对于正数来说,直接通过varint编码即可
而对于负数来说,int会采用固定的10个字节对补码进行varint编码,uint会采用固定的5个字节对补码进行varint编码,而sint则是采用ZigZag的映射将负数映射成一个正数后再进行varint编码
顺带一提,在进行varint解码的时候,我们会发现它是需要将字节顺序反转之后才能解析出我们需要的数字(这里详解见protobuf的使用特性及编码原理),而这种反转存放的形式正是小端存储,即little-endian,这部分有兴趣的同学可以自己再去了解一下
2.64-bit和32-bit
这里我将64bit和32bit放到一起,因为他们之间的编码区别仅在于最终字节数量的不同,而编码原理是一样的
这两种类型的数据,在序号字节中的类型部分表示为001和101,即表格中的Type字段0和5
模型中对应这种类型的字段是height、weight因此我们分别给这2个字段赋值
height测试代码
/**
 * protobuf基础编码,double和float类型
 */
@Test
void protobufBaseEncodeTestDoubleAndFloat() {
    ProtobufStudent.Student student = ProtobufStudent.Student.newBuilder()
            .setHeight(99.6)
            .build();
    Utility.printByte(student.toByteArray());
}
输出结果
41    102    102    102    102    102    -26    88    64
00101001 01100110 01100110 01100110 01100110 01100110 11100110 01011000 01000000
第一个字节表示字段的序号和类型
黄色底001,即十进制的1,表示该数据类型64-bit
蓝色0101,表示序号为5
红色0,表示序号解析到了最后一个字节
后续的8个字节正是99.6的二进制表达形式,protobuf采用的标准是IEEE754。不过因为该标准的内容比较复杂,可以单独成文,所以就不放在这里展开了,本文还是专注于protobuf本身。
这里提供两个网址
维基百科:https://zh.wikipedia.org/wiki/IEEE_754
线上转换:http://www.binaryconvert.com/result_double.html
我们进入线上转换站点,输入99.6,得到结果
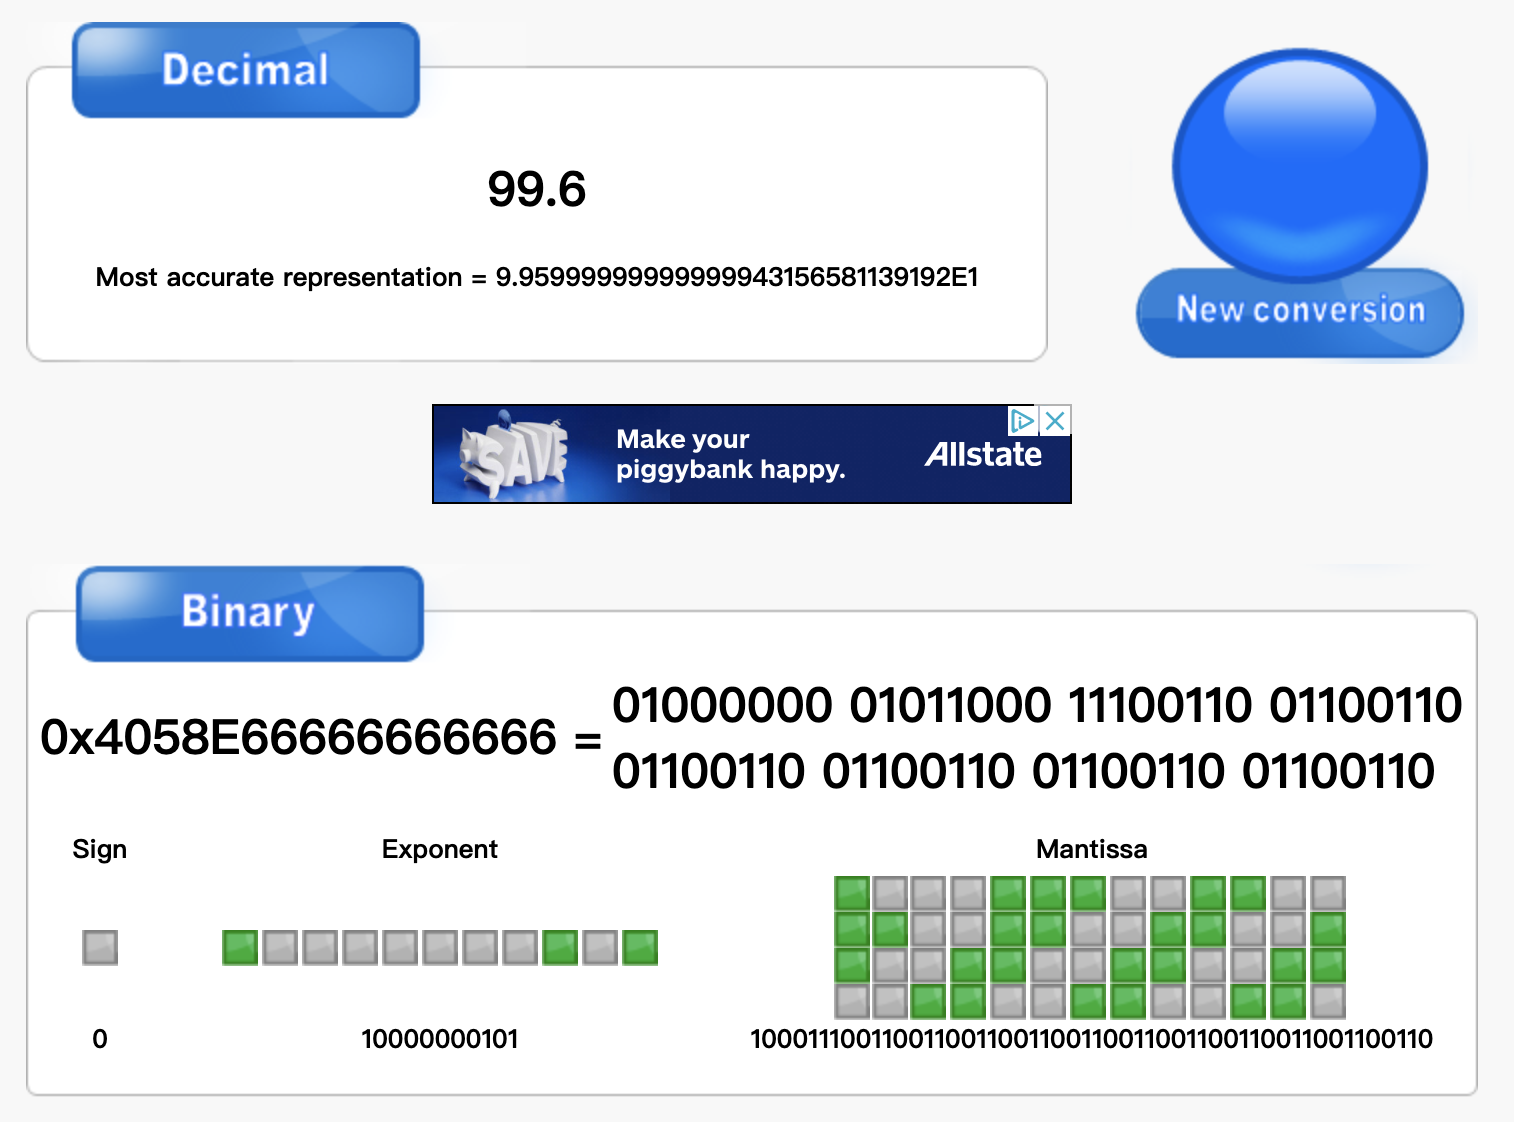
和varint类型数据的存储方式一样,这里采用的也是小端存储(little-endian),因此将图中的字节反转之后,即可得到我们前面代码输出的内容
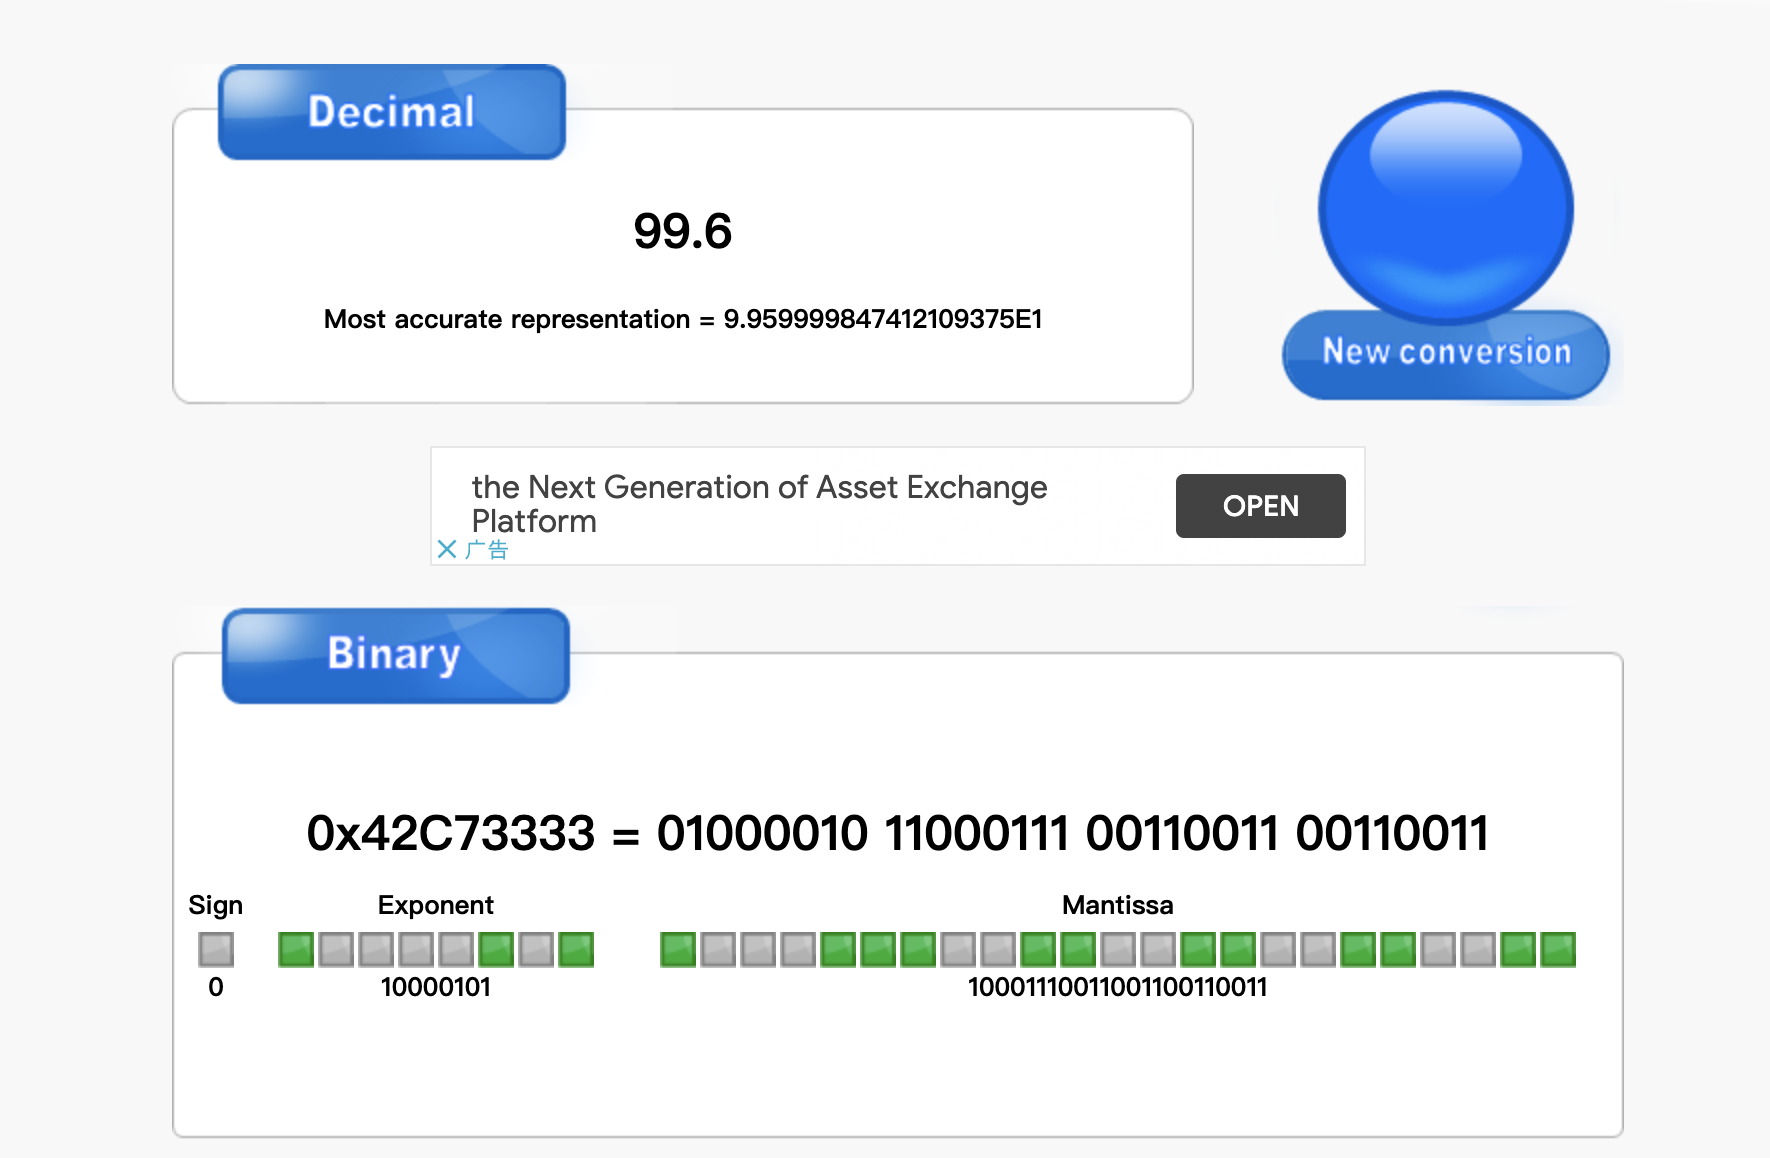
weight测试代码
/**
 * protobuf基础编码,double和float类型
 */
@Test
void protobufBaseEncodeTestDoubleAndFloat() {
    ProtobufStudent.Student student = ProtobufStudent.Student.newBuilder()
            .setWeight(99.6F)
            .build();
    Utility.printByte(student.toByteArray());
}
输出结果
53    51    51    -57    66
00110101 00110011 00110011 11000111 01000010
序号字节结构和double一样,只不过表示类型的3个bit是101,即十进制的5,表示bit-32类型
后面4个字节,也是float类型的IEEE754标准编码,并且采用小端存储的方式,我们可以再去转换验证一下,如下图
这里总结一下bit64和bit32的编码方式:和varint一样,通过一个序号字节来标识序号和类型,而数据体是long和double类型,采用的都是IEEE754标准的编码方式,并且字节是小端存储
3.Length-delimited
这种类型的数据,在序号字节中的类型部分表示为010,即表格中的Type字段2
从名字上来看,就是“长度限定”的意思,也就是说这种类型的数据都是需要指定长度的
包括string, 字节数组, 子对象,list,对应我们模型中的name、scores、father、friends
name测试代码
/**
 * protobuf基础编码,LengthDelimited类型
 */
@Test
void protobufBaseEncodeTestLengthDelimited() {
    ProtobufStudent.Student student = ProtobufStudent.Student.newBuilder()
            .setName("tera")
            .build();
    Utility.printByte(student.toByteArray());
}
输出结果
34    4    116    101    114    97
00100010 00000100 01110100 01100101 01110010 01100001
第一个字节表示字段的序号和类型
黄色底010,即十进制的2,表示该数据类型Length-delimited
蓝色0100,表示序号为4
红色0,表示序号解析到了最后一个字节
之前提到这种类型的名称叫“长度限定”,因此和varint以及64bit类型的数据相比,这里会额外多出一个字节,代表后续数据的字节长度,用粉色底表示
这里我们看到长度为00000100,即十进制的4,也就是说后面4个字节是实际的数据
而"tera"4个英文字母对应的utf-8字节正是01110100 01100101 01110010 01100001
scores测试代码
/**
 * protobuf基础编码,LengthDelimited类型
 */
@Test
void protobufBaseEncodeTestLengthDelimited() {
    ProtobufStudent.Student student = ProtobufStudent.Student.newBuilder()
            .setScores(ByteString.copyFrom(new byte[200]))
            .build();
    Utility.printByte(student.toByteArray());
}
输出结果
98    -56    1    0    0   ...   0
01100010 11001000 00000001 00000000 00000000 ... 00000000
因为数组的长度我设定为200,所以就用...表示中间省略的输出
序号字节结构和之前一样
第二和第三个字节为长度字节,编码方式为varint,解码后得到11001000,即十进制的200,表示后面200个字节都是数据
没有给byte数组赋值,所以数据的值默认都是0
friends测试代码
/**
 * protobuf基础编码,LengthDelimited类型
 */
@Test
void protobufBaseEncodeTestLengthDelimited() {
    ProtobufStudent.Student student = ProtobufStudent.Student.newBuilder()
            .addFriends("a")
            .addFriends("b")
            .build();
    Utility.printByte(student.toByteArray());
}
输出结果
74    1    97    74    1    98
01001010 00000001 01100001 01001010 00000001 01100010
因为这是一个list,因此其中包含了多个数据段
第一和第四个字节分别表示2个数据的序号和类型,特别注意的是,因为这2个数据是属于同一个list的,所以序号都是1001,即十进制的9
第二和第五个字节表示数据的长度,因为我这里只是添加了a和b,所以数据长度都是1
第三和第六个字节表示数据的值,也就是a和b对应的utf-8编码
father测试代码
/**
 * protobuf基础编码,lengthDelimited类型
 */
@Test
void protobufBaseEncodeTestLengthDelimited() {
    ProtobufStudent.Student student = ProtobufStudent.Student.newBuilder()
            .setFather(ProtobufStudent.Parent.newBuilder()
                    .setName("MrTera"))
            .build();
    Utility.printByte(student.toByteArray());
}
输出结果
58    8    10    6    77    114    84    101    114    97
00111010 00001000 00001010 00000110 01001101 01110010 01010100 01100101 01110010 01100001
第一个字节为序号和类型,表示序号7,Length-Delimited类型的数据
第二个字节为十进制的8,即表示后面8个字节就是数据体
这里特别注意,因为father字段本身就是一个Parent对象,所以这个数据体本身就是一个完整的protobuf的数据结构
此时我们就可以将后8个字节看成一个独立的protobuf结构
第三个字节为father中的字段序号和类型,表示序号1,Length-Delimited类型的数据,注意,这里的序号1代表的是father字段的Parent类中序号为1
第四个字节为father中的数据长度,表示后面6个字节为数据体
最后6个字节即为字符串"MrTera"的utf-8编码
这里总结一下Length-Delimited类型的数据,同样通过一个序号字节来标识序号和类型,额外有字节标识数据体的长度。
对于string和byte数组的数据体,以utf-8的形式进行编码
而对于子对象来说,数据体就是一个独立完整的protobuf结构
对于list来说,则根据其内容的不同,分别采用直接utf-8或者完整protobuf结构编码
这里额外展示一个示例,用list存储对象,我将bit相应的含义都用颜色标识好,具体的含义留给读者自行分析,从而可以更好地理解protobuf的编码原理
/**
 * protobuf基础编码,lengthDelimited类型
 */
@Test
void protobufBaseEncodeTestLengthDelimited() {
    ProtobufStudent.Student student = ProtobufStudent.Student.newBuilder()
            .addHobbies(ProtobufStudent.Hobby.newBuilder().setName("a"))
            .addHobbies(ProtobufStudent.Hobby.newBuilder().setName("b"))
            .build();
    Utility.printByte(student.toByteArray());
}
输出结果
82    3    10    1    97    82    3    10    1    98
01010010 00000011 00001010 00000001 01100001 01010010 00000011 00001010 00000001 01100010
最后让我们把前面所讲到的编码原理结合到一起,看一下一个相对完整的编码结果
测试代码
/**
 * 一个相对完整的模型
 */
@Test
void entireModelTest() {
    ProtobufStudent.Student student = ProtobufStudent.Student.newBuilder()
            .setAge(12)
            .setName("tera")
            .setIsMale(true)
            .setFather(ProtobufStudent.Parent.newBuilder()
                    .setName("MrTera"))
            .addFriends("peter")
            .build();
    Utility.printByte(student.toByteArray());
}
输出结果
8    12    24    1    34    4    116    101    114    97    58    8    10    6    77    114    84    101    114    97    74    5    112    101    116    101    114
00001000 00001100 00011000 00000001 00100010 00000100 01110100 01100101 01110010 01100001 00111010 00001000 00001010
00000110 01001101 01110010 01010100 01100101 01110010 01100001 01001010 00000101 01110000 01100101 01110100 01100101 01110010
整个结果就是之前每一组单独示例的结果拼合到一起,这里我大致标识下每个字节的意义,序号字节就不细分了,而是全部采用黄色背景,其他颜色和之前的都一致。有兴趣的同学可以再仔细分析一下
此时我们考虑这样一个问题,对于所属大类相同,但是实际类型不同的数据,在解码的时候该如何区分?
例如,我们编码如下一组数据
/**
 * 数据类型的分辨
 */
@Test
void differDatatype() {
    ProtobufStudent.Student student = ProtobufStudent.Student.newBuilder()
            .setAge(14)
            .setSage(-7)
            .build();
    Utility.printByte(student.toByteArray());
}
输出结果
8    14    112    14
00001000 00001110 01110000 00001110
可以看到age和sage的在编码后的值都是00001110,而且数据类型都是000(varint),唯一有区别的仅仅是序号
那么当我们仅仅拿到这4个字节的时候,是完全无法将编码后的数据还原成原始数据的!!
任何大类型相同,而实际类型不同的数据都有可能发生这种情况,例如字符串和字节数组
/**
 * 数据类型的分辨
 */
@Test
void differDatatype() {
    ProtobufStudent.Student student = ProtobufStudent.Student.newBuilder()
            .setName("aaa")
            .setScores(ByteString.copyFrom(new byte[]{97, 97, 97}))
            .build();
    Utility.printByte(student.toByteArray());
}
输出结果
34    3    97    97    97    98    3    97    97    97
00100010 00000011 01100001 01100001 01100001 01100010 00000011 01100001 01100001 01100001
可以看到数据类型、长度、值都是相同的
这里再次强调,protobuf是一个不可以自解释的编码方式,除了字段的名字被抛弃之外,数据解析的歧义性也是其不可自解释的原因之一
所以protobuf的正确解析必须依赖于我们在编译.proto文件时,自动生成的那个巨大的java文件(这部分的详细解析可以看protobuf的基本使用和模型分析)
也正是因为这个protobuf的不可自解释,在我们传递protobuf编码的时候,数据发送方和数据接收方都必须有相同的.proto文件,其中的字段序号必须一一对应,一旦有偏差,那么最终的解析一定是有问题的,再次说明序号是protobuf编码的灵魂所在
最后总结一下protobuf的编码原理
1.最重要的序号字节,每一个数据段都必须有该字节;标识字段的序号和类型;类型共有3种大类型;
2.varint,可以转化为int类型的数据,包括各种int32、int64等整型相关类型以及bool、enum,编码方式为varint,字节顺序为小端存储
3.double和float,浮点类型数据,编码方式为IEEE754标准,字节顺序为小端存储
4.Length-Delimited类型,需要指定数据体长度的类型,包括string、list、byte数组、子对象等,除了序号字节和数据内容字节,还需要额外的字节标识数据的长度
5.对于大类型相同,而小类型不同的数据,在解码的时候是通过编译时生成的java代码对其进行区分,仅依靠字节数据本身是无法区分的

 浙公网安备 33010602011771号