爬虫----day04( selenium与requests模块半自动点赞、 )
昨日回顾
#1  beautifulsoup4 使用
	-xml解析库,用它来解析爬取回来的html内容,从中找出我们需要的内容
#2 遍历文档树
	-  .  的使用    soup.html.body.p.a
    - 获取属性   对象.attrs.get('href')
    - 获取文本    对象.text  string  strings
    - 子节点,父节点,兄弟节点获取

# 3 搜索文档树
	-find  find_all
    -5 种过滤器:字符串,正则表达式,列表,布尔,方法
    -find(name='a',class_='sister',href='sss',text='sss',attrs={'class':'xxx'}) # 字符串形式
    -find(name=re.combine('^b'),class_=re.combine('^sister')) # 正则形式
    -find(name=[b,body]) # 列表
    -find(id=True) # 布尔


# 4 find   其他参数
	-limit  限制查找的条数
    -recursive:默认递归,子子孙孙都会找
# 5 css选择器
	#
    .
    div
    div a
    div>a
    终极大招
	soup.select('#xx')


# 6 selenium 快速使用
	-自动化测试,用来做爬虫,解决requests模块无法直接执行js的问题
    -安装:pip install selenium
    -下载驱动:建议使用谷歌----》一定要跟谷歌浏览器版本对应
    -使用python代码,操作浏览器


# 7 查找标签
	-find_element
    -find_elements

    -by参数	有很多
    	-按id查找
        -按a标签文字内容
        -按a标签文字内容模糊匹配
        -按标签 tag_name
        -按类名
        -按css选择器
        -按xpath


# 8 操作标签
	-写文字
    -清除文字
    -点击
    -窗口放到最大
    -截图


# 9 执行js
	excute_script

# 10 打开标签,切换到某个打开的标签 ,滑动屏幕
# 11 等待元素加载
# 13 模拟浏览器的前进后退
# 14 获取cookie (重要)
# 15 异常捕获
.
.
.
.
.
今日内容
selenium 登录cnblogs
# 讲该案例的作用是,学会如何获取cookie
# 这样就可以搭建cookie池,这样以后就可以把获取的cookie都放到redis中,变成一个cookie池
# 然后再每次从redis的cookie池中,随机取一个cookie,拿着该cookie直接发请求,
# 这样每次的发请求,代表的都是不同的用户在发请求


from selenium import webdriver
from selenium.webdriver.common.by import By
import time
import json

bro = webdriver.Chrome(executable_path='./chromedriver.exe')

try:
    # 1 获取cookie
    bro.get('https://www.cnblogs.com/')
    bro.implicitly_wait(10)
    login_btn = bro.find_element(by=By.LINK_TEXT, value='登录')
    login_btn.click()

    ## 找输入框标签
    username = bro.find_element(By.ID, 'mat-input-0')
    password = bro.find_element(By.ID, 'mat-input-1')
    submit_btn = bro.find_element(By.CSS_SELECTOR,'body > app-root > app-sign-in-layout > div > div > app-sign-in > app-content-container > div > div > div > form > div > button')

    username.send_keys('965493842@qq.com')
    password.send_keys('tengyifan888')
    submit_btn.click()  # 点击登录

    # 手动搞好验证码,都成功,后端再敲回车,继续往下运行
    input()

    # 2 取出当前浏览器里所有的cookie  多个cookiejar字典 放在一个列表里
    cookie = bro.get_cookies()
    print(cookie)
    # 3 保存到本地文件
    with open('cnblogs.json', 'w', encoding='utf-8') as f:
        json.dump(cookie, f)


    ### 2 打开首页
    bro.get('https://www.cnblogs.com/')  # 没有登录状态
    bro.implicitly_wait(10)
    time.sleep(2)

    # 打开本地的cookie的json文件
    with open('cnblogs.json', 'r', encoding='utf-8') as f:
        cookies = json.load(f)  # 读并反序列化成列表套字典的原始数据

    # 再将列表里的一个个字典就是cookiejar对象,添加到浏览器里
    for cookie in cookies:
        bro.add_cookie(cookie)  # 括号里面只能放字典格式的数据

    bro.refresh()  # 刷新当前页面

    time.sleep(5)


except Exception as e:
    print(e)

finally:
    bro.close()
.
.
.
.
.
.
.
1 抽屉半自动点赞
# 1 使用selenium 半自动登录-----取到cookie
# 2 使用requests模块,解析出点赞的请求地址---》模拟发送请求---》携带cookie
# selenium模块取出的cookie,还不能直接给requests模块用!!!
# selenium取出的cookie不能直接给requests模块使用,需要额外处理一下
# selenium取出的cookie是个列表套字典的形式,并且字典里的数据较多!!!
# 要把列表里面,套的字典里的name键对应的值拿出,再把value键对应的值拿出来

# 然后把这两个值,一个作为键,一个作为值,放到一个空字典里去,作为requests模块要用的cookie字典
# requests模块用的cookie必须是字典的形式

--------------------------------------------------


# 在公司要爬取一个网站,先用selenium模拟浏览器,拿出cookie来
# 再用requests发送请求,并带着cookie
# 因为selenium的操作比较慢,所以发送请求一般还是用requests模块来做

--------------------------------------------------

from selenium import webdriver
from selenium.webdriver.common.by import By
import time
import json
import requests

# bro = webdriver.Chrome(executable_path='./chromedriver.exe')

try:

    ####1 先登录,获取cookie
    # bro.get('https://dig.chouti.com/')
    # bro.maximize_window()
    # bro.implicitly_wait(10)
    #
    # login_btn = bro.find_element(By.LINK_TEXT, '登录')
    # # login_btn.click() # 会报错,不能这么点击了


    # # 换一种方式 ,使用js代码点击它,把传入的对象,点击一下
    # 这个地方login_btn标签对象会被*接收组织成元祖,赋值给arguments,所以arguments[0]
    # 相当于支持给要执行的js代码传点东西
    # bro.execute_script("arguments[0].click()", login_btn)
    # time.sleep(3)


    # username = bro.find_element(By.CSS_SELECTOR,
    #                             'body > div.login-dialog.dialog.animated2.scaleIn > div > div.login-body > div.form-item.login-item.clearfix.phone-item.mt24 > div.input-item.input-item-short.left.clearfix > input')
    # password = bro.find_element(By.NAME, 'password')
    #
    # username.send_keys('18953675221')
    # password.send_keys('lqz123')
    # time.sleep(1)
    # submit_btn = bro.find_element(By.CSS_SELECTOR,
    #                               'body > div.login-dialog.dialog.animated2.scaleIn > div > div.login-footer > div:nth-child(4) > button')
    # submit_btn.click()
    #
    # input('')  # 万一有验证码,手动操作一下
    # with open('chouti.json', 'w', encoding='utf-8') as f:
    #     json.dump(bro.get_cookies(), f)

    ### 使用request模拟点赞,携带cookie
    # 先把cookie打开
    with open('chouti.json', 'r', encoding='utf-8') as f:
        cookies = json.load(f)


    # selenium 的cookie不能直接给requests模块使用,需要额外处理一下
    request_cookies = {}
    for cookie in cookies:
        request_cookies[cookie['name']] = cookie['value']

    print(request_cookies)
    headers = {
        'User-Agent': 'Mozilla/5.0 (Windows NT 10.0; Win64; x64) AppleWebKit/537.36 (KHTML, like Gecko) Chrome/111.0.0.0 Safari/537.36'
    }
    res = requests.get('https://dig.chouti.com/top/24hr?_=1679277434856', headers=headers)
    # res.json().get('data')  拿出data对应的列表,再for循环,拿出一个个的字典,
    # 再拿出里面的键id对应的值
    # 再点加载更多按钮,又会朝后端发送ajax请求,找一下发ajax的规律
    # 通过requests就能把所有的新闻的id都找出来,这样就可以实现给每个新闻都点个赞!!!

    for item in res.json().get('data'):
        id_link = item.get('id')
        data = {
            'linkId': id_link
        }
        res2 = requests.post('https://dig.chouti.com/link/vote', headers=headers, data=data, cookies=request_cookies)
        print(res2.text)

except Exception as e:
    print(e)

finally:
    # bro.close()
    pass
.
.
.
.
.
.
.
2 xpath的使用
# 每个解析器,都会有自己的标签查找方法
	-bs4  find 和find_all
	-selenium  find_element和 find_elements
	-lxml 也是个解析器,支持xpath和css

# 这些解析器,基本上都会支持两种统一的 css和xpath
	-css咱们会了
	-xpath需要学习

-------------------------------------------


# xpath是什么?
    # XPath即为XML路径语言(XML Path Language)
    # 它是一种用来确定XML文档中,某部分位置的语言
    # 本质就是在XML查找某个位置   的一种方法


# 有终极大招,只需要记住几个用法就可以了
     /     从当前路径下开始找
     /div  从当前路径下开始找div
    //     递归查找,子子孙孙
    //div  递归查找div

    @     取属性
     .    当成
     ..   上一层
    *  任意标签
-------------------------------------------
doc = '''
<html>
 <head>
  <base href='http://example.com/' />
  <title>Example website</title>
 </head>
 <body>
  <div id='images'>
   <a href='image1.html'>Name: My image 1 <br /><img src='image1_thumb.jpg'/></a>
   <a href='image2.html'>Name: My image 2 <br /><img src='image2_thumb.jpg' /></a>
   <a href='image3.html'>Name: My image 3 <br /><img src='image3_thumb.jpg' /></a>
   <a href='image4.html'>Name: My image 4 <br /><img src='image4_thumb.jpg' /></a>
   <a href='image5.html' class='li li-item' name='items'>Name: My image 5 <br /><img src='image5_thumb.jpg' /></a>
   <a href='image6.html' name='items'><span><h5>test</h5></span>Name: My image 6 <br /><img src='image6_thumb.jpg' /></a>
  </div>
 </body>
</html>
'''
from lxml import etree

html = etree.HTML(doc)
html=etree.parse('search.html',etree.HTMLParser())

# 1 所有节点
# a=html.xpath('//*')
# 2 指定节点(结果为列表)
# a=html.xpath('//head')
# 3 子节点,子孙节点
# a=html.xpath('//div/a')
# a=html.xpath('//body/a') #无数据

# a = html.xpath('//body//a')
# 4 父节点
# a=html.xpath('/html/body')
# a=html.xpath('//body//a[@href="image1.html"]/..')   # 属性a[@href="image1.html"]    .. 表示上一层
# a=html.xpath('//body//a[1]/..')   # 从1 开始的

# 也可以这样
# a=html.xpath('//body//a[1]/parent::*')
# a=html.xpath('//body//a[1]/parent::p')
# a=html.xpath('//body//a[1]/parent::div')
# 5 属性匹配
# a=html.xpath('//body//a[@href="image1.html"]')

# 6 文本获取  /text()
# a=html.xpath('//body//a[@href="image1.html"]/text()')

# 7 属性获取
# a=html.xpath('//body//a/@href')
# # 注意从1 开始取(不是从0)
# a=html.xpath('//body//a[1]/@href')

# 8 属性多值匹配
#  a 标签有多个class类,直接匹配就不可以了,需要用contains
# a=html.xpath('//body//a[@class="li"]')  # 这个取不到
# a=html.xpath('//body//a[contains(@class,"li")]')
# a=html.xpath('//body//a[contains(@class,"li")]/text()')
# 9 多属性匹配
# a=html.xpath('//body//a[contains(@class,"li") or @name="items"]')
# a=html.xpath('//body//a[contains(@class,"li") and @name="items"]/text()')

# 10 按序选择
# a=html.xpath('//a[2]/text()')
# a=html.xpath('//a[2]/@href')
# 取最后一个
# a=html.xpath('//a[last()]/@href')
# 位置小于3的
# a=html.xpath('//a[position()<3]/@href')
# 倒数第二个
# a=html.xpath('//a[last()-2]/@href')


# 11 节点轴选择
# ancestor:祖先节点
# 使用了* 获取所有祖先节点
# a=html.xpath('//a/ancestor::*')
# # 获取祖先节点中的div
# a=html.xpath('//a/ancestor::div')
# attribute:属性值
# a=html.xpath('//a[1]/attribute::*')
# child:直接子节点
# a=html.xpath('//a[1]/child::*')
# descendant:所有子孙节点
# a=html.xpath('//a[6]/descendant::*')
# following:当前节点之后所有节点
# a=html.xpath('//a[1]/following::*')
# a=html.xpath('//a[1]/following::*[1]/@href')
# following-sibling:当前节点之后同级节点
# a=html.xpath('//a[1]/following-sibling::*')
# a=html.xpath('//a[1]/following-sibling::a')
# a=html.xpath('//a[1]/following-sibling::*[2]')
# a=html.xpath('//a[1]/following-sibling::*[2]/@href')

print(a)

-------------------------------------------

# 使用xpath的终极大招,直接还是在浏览器里面,打开检查页面,对标签右键,复制xpath,即可

import requests

res=requests.get('https://www.runoob.com/xpath/xpath-syntax.html')
print(res.text)
html = etree.HTML(res.text)
a=html.xpath('//*[@id="content"]/h2[2]/text()')
# 任意标签但id必须叫content的标签,下的第2个h2标签里的文本

print(a)

-------------------------------------------
.
.
.
.
.
.
.
.
.
3 selenium 动作链
# 人可以滑动某些标签

# 网站中有些按住鼠标,滑动的效果
	滑动验证码


# 两种形式
形式一:
    actions=ActionChains(bro)    # 拿到动作链对象
    actions.drag_and_drop(sourse,target)   # 按住一个sourse标签直接拖到另一个target标签上
    actions.perform()   # 松开鼠标

方式二:
    actions = ActionChains(bro)
    actions.click_and_hold(sourse).perform()  # 点住sourse标签后,鼠标不松
    distance=target.location['x']-sourse.location['x']  # 算出两标签的距离
        track=0
        # 起一个循环,每次往前移动2,直到移动的距离小于,两标签的距离了,松开鼠标
        while track < distance:
            ActionChains(bro).move_by_offset(xoffset=2,yoffset=0).perform()
            track+=2
.
.
.
.
3.1 动作链案例
import time

from selenium import webdriver
from selenium.webdriver import ActionChains
from selenium.webdriver.common.by import By  # 按照什么方式查找,By.ID,By.CSS_SELECTOR
from selenium.webdriver.common.keys import Keys  # 键盘按键操作
from selenium.webdriver.support import expected_conditions as EC
from selenium.webdriver.support.wait import WebDriverWait  # 等待页面加载某些元素

try:
    browser = webdriver.Chrome(executable_path='./chromedriver.exe')
    browser.get('http://www.runoob.com/try/try.php?filename=jqueryui-api-droppable')

    browser.switch_to.frame('iframeResult')  # 切换到id为iframeResult的frame

    target = browser.find_element(By.ID, 'droppable')  # 目标
    source = browser.find_element(By.ID, 'draggable')  # 源

    # 方案1
    # actions = ActionChains(browser)  # 拿到动作链对象
    # actions.drag_and_drop(source, target)  # 把动作放到动作链中,准备串行执行
    # actions.perform()


    # 方案2
    # ActionChains(browser).click_and_hold(source).perform()
    # distance = target.location['x'] - source.location['x']
    # track = 0
    # while track < distance:
    #     ActionChains(browser).move_by_offset(xoffset=2, yoffset=0).perform()
    #     track += 2

    time.sleep(2)

finally:
    browser.close()
.
.
.
.
.
.
.
4 自动登录12306
# 使用selenium自动登录12306,目的就是为了拿到cookie,能拿到cookie
# 就能用requests 去查询车票和下单了!!!
# 抢票软件就是这个原理

import time

from selenium import webdriver
from selenium.webdriver import ActionChains
from selenium.webdriver.common.by import By  # 按照什么方式查找,By.ID,By.CSS_SELECTOR
from selenium.webdriver.common.keys import Keys  # 键盘按键操作
from selenium.webdriver.support import expected_conditions as EC
from selenium.webdriver.support.wait import WebDriverWait  # 等待页面加载某些元素
from selenium.webdriver.chrome.options import Options

try:
    options = Options()
    options.add_argument("--disable-blink-features=AutomationControlled")
    # 去掉自动化控制,就是为了不让网站检测到我们使用了selenium
    browser = webdriver.Chrome(executable_path='./chromedriver.exe', chrome_options=options)


    browser.get('https://kyfw.12306.cn/otn/resources/login.html')
    browser.maximize_window()


    username = browser.find_element(By.ID, 'J-userName')
    password = browser.find_element(By.ID, 'J-password')
    username.send_keys('18752386213')
    password.send_keys('密码')
    login_btn = browser.find_element(By.ID, 'J-login')

    time.sleep(2)
    login_btn.click()  # 点击登录按钮
    time.sleep(5)

    span = browser.find_element(By.ID, value='nc_1_n1z')
    ActionChains(browser).click_and_hold(span).perform()  # 点住该span标签
    ActionChains(browser).move_by_offset(xoffset=300, yoffset=0).perform()
    # x轴偏移量为300

    # 滑动完成了,但是进不去,
    # 原因是它检测到我们使用了selenium,  所以需要屏蔽掉了
    time.sleep(3)

finally:
    browser.close()
.
.
.
.
.
.
5 打码平台使用
# 云打码,超级鹰(以它为例)  平台


# 登录网站,会有些验证码,可以借助于第三方的打码平台,破解验证码,只需要花钱解决


# 免费的:纯数字,纯字母的----》python有免费模块破解,但识别率不高


# 云打码:https://zhuce.jfbym.com/price/
# 超级鹰:http://www.chaojiying.com/price.html

# 价格体系:破解什么验证码,需要多少钱


# 下载该打码平台python的sdk,解压后里面文件拖到项目里面去
.
.
.
.
6 使用打码平台自动登录
# 使用selenium打开页面---》截取整个屏幕----》使用pillow---》
# 根据验证码图片位置,截取出验证码图片---》使用第三方打码平台破解---》写入到验证码框中,点击登录


import time

from selenium import webdriver
from selenium.webdriver.common.by import By
from chaojiying import ChaojiyingClient
from PIL import Image
bro = webdriver.Chrome(executable_path='./chromedriver.exe')
bro.get('http://www.chaojiying.com/apiuser/login/')
bro.implicitly_wait(10)
bro.maximize_window()
try:
    username = bro.find_element(by=By.XPATH, value='/html/body/div[3]/div/div[3]/div[1]/form/p[1]/input')
    password = bro.find_element(by=By.XPATH, value='/html/body/div[3]/div/div[3]/div[1]/form/p[2]/input')
    code = bro.find_element(by=By.XPATH, value='/html/body/div[3]/div/div[3]/div[1]/form/p[3]/input')
    btn = bro.find_element(by=By.XPATH, value='/html/body/div[3]/div/div[3]/div[1]/form/p[4]/input')
    username.send_keys('306334678')
    password.send_keys('lqz123')
    # 获取验证码:
    #1 整个页面截图
    bro.save_screenshot('main.png')
    # 2 使用pillow,从整个页面中截取出验证码图片 code.png
    img = bro.find_element(By.XPATH, '/html/body/div[3]/div/div[3]/div[1]/form/div/img')
    location = img.location
    size = img.size
    print(location)
    print(size)
    # 使用pillow扣除大图中的验证码
    img_tu = (int(location['x']), int(location['y']), int(location['x'] + size['width']), int(location['y'] + size['height']))
    # # 抠出验证码
    # #打开
    img = Image.open('./main.png')
    # 抠图
    fram = img.crop(img_tu)
    # 截出来的小图
    fram.save('code.png')
    # 3 使用超级鹰破解
    chaojiying = ChaojiyingClient('306334678', 'lqz123', '937234')  # 用户中心>>软件ID 生成一个替换 96001
    im = open('code.png', 'rb').read()  # 本地图片文件路径 来替换 a.jpg 有时WIN系统须要//
    print(chaojiying.PostPic(im, 1902))  # 1902 验证码类型  官方网站>>价格体系 3.4+版 print 后要加()
    res_code=chaojiying.PostPic(im, 1902)['pic_str']
    code.send_keys(res_code)
    time.sleep(5)
    btn.click()
    time.sleep(10)
except Exception as e:
    print(e)
finally:
    bro.close()
.
.
.
.
.
.
.
7 使用selenium爬取京东商品信息
import time

from selenium import webdriver
from selenium.webdriver.common.by import By
from selenium.webdriver.common.keys import Keys  # 键盘按键操作


def get_goods(bro):
    # 找到所有类名叫gl-item 的li标签
    li_list = bro.find_elements(By.CLASS_NAME, 'gl-item')
    for li in li_list:
        try:
            img_url = li.find_element(By.CSS_SELECTOR, '.p-img img').get_attribute('src')
            if not img_url:
                img_url = 'https:' + li.find_element(By.CSS_SELECTOR, '.p-img img').get_attribute('data-lazy-img')
            price = li.find_element(By.CSS_SELECTOR, '.p-price i').text
            name = li.find_element(By.CSS_SELECTOR, '.p-name a').text
            url = 'https:' + li.find_element(By.CSS_SELECTOR, '.p-img a').get_attribute('href')
            commit = li.find_element(By.CSS_SELECTOR, '.p-commit a').text
            print('''
            商品图片地址:%s
            商品地址:%s
            商品名字:%s
            商品价格:%s
            商品评论数:%s
            ''' % (img_url, url, name, price, commit))
        except Exception as e:
            print(e)
            continue

    # 查找下一页,点击,在执行get_goods
    next = bro.find_element(By.PARTIAL_LINK_TEXT, '下一页')
    time.sleep(1)
    next.click()
    get_goods(bro)


try:
    bro = webdriver.Chrome(executable_path='./chromedriver.exe')
    bro.get('http://www.jd.com')
    bro.implicitly_wait(10)

    input_key = bro.find_element(By.ID, 'key')
    input_key.send_keys('茅台')
    input_key.send_keys(Keys.ENTER)  # 敲回车
    # 滑动屏幕到最底部
    bro.execute_script('scrollTo(0,5000)')
    get_goods(bro)


except Exception as e:
    print('sasdfsadfasdfa',e)
finally:
    bro.close()
.
.
.
.
.
.
8 scrapy介绍
# requsets bs4 selenium 模块
# 框架 :django ,scrapy--->专门做爬虫的框架,爬虫界的django,大而全,爬虫有的东西,它都自带
# 安装 (win看人品,linux,mac一点问题没有)
-pip3.8 install scrapy
-装不上,基本上是因为twisted装不了,单独装
1、pip3 install wheel #安装后,便支持通过wheel文件安装软件,wheel文件官网:https://www.lfd.uci.edu/~gohlke/pythonlibs
3、pip3 install lxml
4、pip3 install pyopenssl
5、下载并安装pywin32:https://sourceforge.net/projects/pywin32/files/pywin32/
6、下载twisted的wheel文件:http://www.lfd.uci.edu/~gohlke/pythonlibs/#twisted
7、执行pip3 install 下载目录\Twisted-17.9.0-cp36-cp36m-win_amd64.whl
8、pip3 install scrapy
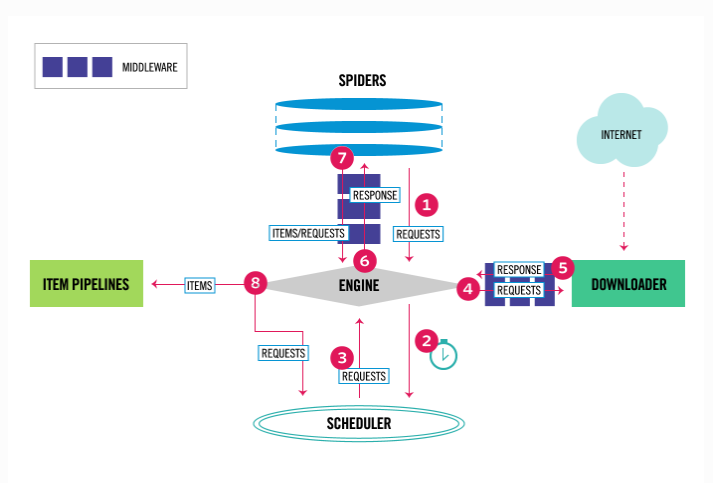
# 架构分析
-爬虫:spiders(自己定义的,可以有很多),定义爬取的地址,解析规则
-引擎:engine ---》控制整个框架数据的流动,大总管
-调度器:scheduler---》要爬取的 requests对象,放在里面,排队
-下载中间件:DownloaderMiddleware---》处理请求对象,处理响应对象
-下载器:Downloader ----》负责真正的下载,效率很高,基于twisted的高并发的模型之上
-爬虫中间件:spiderMiddleware----》处于engine和爬虫直接的(用的少)
-管道:piplines---》负责存储数据
# 创建出scrapy项目
scrapy startproject firstscrapy # 创建项目
scrapy genspider 名字 网址 # 创建爬虫 等同于 创建app
# pycharm打开
作业
# 今天讲的代码敲一遍

 浙公网安备 33010602011771号