2. 路由
一、路由的基本使用
- 五个固定步骤
- 下载 VueRouter 模块到当前工程,版本3.6.5,
yarn add vue-router@3.6.5 - main.js中引入VueRouter,
import VueRouter from 'vue-router' - 安装注册,
Vue.use(VueRouter) - 创建路由对象,
const router = new VueRouter() - 注入,将路由对象注入到new Vue实例中,建立关联
new Vue({
  render: h => h(App),
  router:router
}).$mount('#app')
- 示例
// 路由的使用步骤 5 + 2
// 5个基础步骤
// 1. 下载 v3.6.5
// yarn add vue-router@3.6.5
// 2. 引入
// 3. 安装注册 Vue.use(Vue插件)
// 4. 创建路由对象
// 5. 注入到new Vue中,建立关联


import VueRouter from 'vue-router'
Vue.use(VueRouter) // VueRouter插件初始化

const router = new VueRouter()

new Vue({
  render: h => h(App),
  router
}).$mount('#app')
- 两个核心步骤
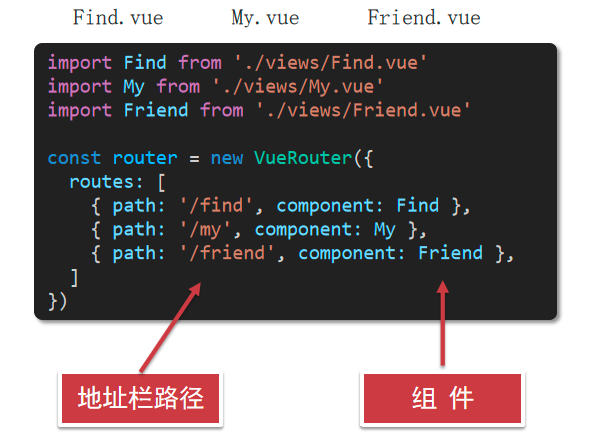
-
创建需要的组件 (views目录),配置路由规则
![]()
-
配置导航,配置路由出口(路径匹配的组件显示的位置)
//App.vue
<div class="footer_wrap">
  <a href="#/find">发现音乐</a>
  <a href="#/my">我的音乐</a>
  <a href="#/friend">朋友</a>
</div>
<div class="top">
  <router-view></router-view>
</div>
二、路由的封装和抽离
- 步骤
![]()
- 路径简写:
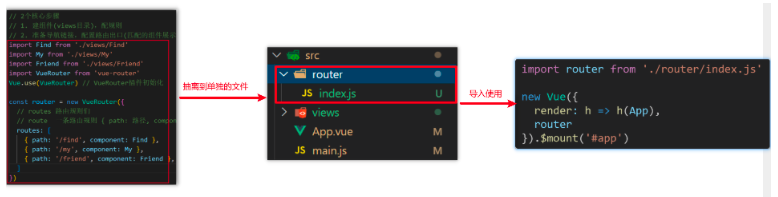
- 脚手架环境下 @指代src目录,可以用于快速引入组件
三、 声明式导航——导航链接
- vue-router 提供了一个全局组件 router-link (取代 a 标签)
<div>
    <div class="footer_wrap">
      <router-link to="/find">发现音乐</router-link>
      <router-link to="/my">我的音乐</router-link>
      <router-link to="/friend">朋友</router-link>
    </div>
    <div class="top">
      <!-- 路由出口 → 匹配的组件所展示的位置 -->
      <router-view></router-view>
    </div>
  </div>
- 声明式导航-两个类名
- 模糊匹配,
router-link-active - 精确匹配,
router-link-exact-active
- 声明式导航-自定义类名
const router = new VueRouter({
  routes: [...],
  linkActiveClass: "类名1",
  linkExactActiveClass: "类名2"
})
四、声明式导航-查询参数传参
- 传参,
<router-link to="/path?参数名=值"></router-link> - 接受参数,
$router.query.参数名 - 案例
//app.vue
<template>
  <div id="app">
    <div class="link">
      <router-link to="/home">首页</router-link>
      <router-link to="/search">搜索页</router-link>
    </div>

    <router-view></router-view>
  </div>
</template>

<script>
export default {};
</script>

<style scoped>
.link {
  height: 50px;
  line-height: 50px;
  background-color: #495150;
  display: flex;
  margin: -8px -8px 0 -8px;
  margin-bottom: 50px;
}
.link a {
  display: block;
  text-decoration: none;
  background-color: #ad2a26;
  width: 100px;
  text-align: center;
  margin-right: 5px;
  color: #fff;
  border-radius: 5px;
}
</style>

//Home.vue
<template>
  <div class="home">
    <div class="logo-box"></div>
    <div class="search-box">
      <input type="text">
      <button>搜索一下</button>
    </div>
    <div class="hot-link">
      热门搜索:
      <router-link to="">黑马程序员</router-link>
      <router-link to="">前端培训</router-link>
      <router-link to="">如何成为前端大牛</router-link>
    </div>
  </div>
</template>

<script>
export default {
  name: 'FindMusic'
}
</script>

<style>
.logo-box {
  height: 150px;
  background: url('@/assets/logo.jpeg') no-repeat center;
}
.search-box {
  display: flex;
  justify-content: center;
}
.search-box input {
  width: 400px;
  height: 30px;
  line-height: 30px;
  border: 2px solid #c4c7ce;
  border-radius: 4px 0 0 4px;
  outline: none;
}
.search-box input:focus {
  border: 2px solid #ad2a26;
}
.search-box button {
  width: 100px;
  height: 36px;
  border: none;
  background-color: #ad2a26;
  color: #fff;
  position: relative;
  left: -2px;
  border-radius: 0 4px 4px 0;
}
.hot-link {
  width: 508px;
  height: 60px;
  line-height: 60px;
  margin: 0 auto;
}
.hot-link a {
  margin: 0 5px;
}
</style>

//search.vue
<template>
  <div class="search">
    <p>搜索关键字: 黑马程序员</p>
    <p>搜索结果: </p>
    <ul>
      <li>.............</li>
      <li>.............</li>
      <li>.............</li>
      <li>.............</li>
    </ul>
  </div>
</template>

<script>
export default {
  name: 'MyFriend',
  created () {
    // 在created中,获取路由参数
  }
}
</script>

<style>
.search {
  width: 400px;
  height: 240px;
  padding: 0 20px;
  margin: 0 auto;
  border: 2px solid #c4c7ce;
  border-radius: 5px;
}
</style>

//router/index.js
import Home from '@/views/Home'
import Search from '@/views/Search'
import Vue from 'vue'
import VueRouter from 'vue-router'
Vue.use(VueRouter) // VueRouter插件初始化

// 创建了一个路由对象
const router = new VueRouter({
  routes: [
    { path: '/home', component: Home },
    { path: '/search', component: Search }
  ]
})

export default router

//main.js
...
import router from './router/index'
...
new Vue({
  render: h => h(App),
  router
}).$mount('#app')
五、声明式导航-动态路由传参
- 语法
- 配置动态路由,
const router = new VueRouter({
  routes: [
    ...,
    {
      path: '/search/:words',
      component: Search
    }
  ]
})
-
配置导航链接,
to="/path/参数值" -
对应页面组件,接受参数,
$route.params.参数名
六、查询参数传参 VS 动态路由传参
- 查询参数传参 (比较适合传多个参数)
- 跳转:to="/path?参数名=值&参数名2=值"
- 获取:$route.query.参数名
- 动态路由传参 (优雅简洁,传单个参数比较方便)
- 配置动态路由:path: "/path/:参数名"
- 跳转:to="/path/参数值"
- 获取:$route.params.参数名
- 注意:动态路由也可以传多个参数,但一般只传一个
七、动态路由参数的可选符
/search/:words表示,必须要传参数。如果不传参数,也希望匹配,可以加个可选符"?"
const router = new VueRouter({
  routes: [
 	...
    { path: '/search/:words?', component: Search }
  ]
})
八、Vue路由-重定向
- 重定向 → 匹配 / 后, 强制跳转 /home 路径
- 语法
{ path: 匹配路径, redirect: 重定向到的路径 },
比如:
{ path:'/' ,redirect:'/home' }
- 案例
const router = new VueRouter({
  routes: [
    { path: '/', redirect: '/home'},
 	 ...
  ]
})
九、Vue路由-404
- 语法
import NotFind from '@/views/NotFind'

const router = new VueRouter({
  routes: [
    ...
    { path: '*', component: NotFind } //最后一个
  ]
})
- 案例
<template>
  <div>
    <h1>404 Not Found</h1>
  </div>
</template>

<script>
export default {

}
</script>

<style>

</style>
十、Vue路由-模式设置
- 路由的路径看起来不自然, 有#,能否切成真正路径形式?
- 语法
const router = new VueRouter({
    mode:'histroy', //默认是hash
    routes:[]
})
十一、编程式导航-两种路由跳转方式
- path 路径跳转 (简易方便)
//简单写法
this.$router.push('路由路径')

//完整写法
this.$router.push({
  path: '路由路径'
})
- name 命名路由跳转 (适合 path 路径长的场景)
//路由规则
{ name: '路由名', path: '/path/xxx', component: XXX },

//通过name来进行跳转
this.$router.push({
  name: '路由名'
})
十二、编程式导航-path路径跳转传参
- 传参方式
- 查询参数
- 动态路由传参
- path路径跳转传参(query传参)
//简单写法
this.$router.push('/路径?参数名1=参数值1&参数2=参数值2')
//完整写法
this.$router.push({
  path: '/路径',
  query: {
    参数名1: '参数值1',
    参数名2: '参数值2'
  }
})

//接受参数的方式依然是:$route.query.参数名
- path路径跳转传参(动态路由传参)
//简单写法
this.$router.push('/路径/参数值')
//完整写法
this.$router.push({
  path: '/路径/参数值'
})

//接受参数的方式依然是:$route.params.参数值
十三、编程式导航-name命名路由传参
- name 命名路由跳转传参 (query传参)
this.$router.push({
  name: '路由名字',
  query: {
    参数名1: '参数值1',
    参数名2: '参数值2'
  }
})
- name 命名路由跳转传参 (动态路由传参)
this.$router.push({
  name: '路由名字',
  params: {
    参数名: '参数值',
  }
})
十四、编程式导航跳转传参总结
1.path路径跳转
- query传参
this.$router.push('/路径?参数名1=参数值1&参数2=参数值2')
this.$router.push({
  path: '/路径',
  query: {
    参数名1: '参数值1',
    参数名2: '参数值2'
  }
})
- 动态路由传参
this.$router.push('/路径/参数值')
this.$router.push({
  path: '/路径/参数值'
})
2.name命名路由跳转
- query传参
this.$router.push({
  name: '路由名字',
  query: {
    参数名1: '参数值1',
    参数名2: '参数值2'
  }
})
- 动态路由传参 (需要配动态路由)
this.$router.push({
  name: '路由名字',
  params: {
    参数名: '参数值',
  }
})

 浙公网安备 33010602011771号