springboot:异步调用@Async
在后端开发中经常遇到一些耗时或者第三方系统调用的情况,我们知道Java程序一般的执行流程是顺序执行(不考虑多线程并发的情况),但是顺序执行的效率肯定是无法达到我们的预期的,这时就期望可以并行执行,常规的做法是使用多线程或线程池,需要额外编写代码实现。在spring3.0后引入了@Async注解,使用该注解可以达到线程池的执行效果,而且在开发上非常简单。
一、概述
springboot是基于spring框架的,在springboot环境下演示@Async注解的使用方式。先看下该注解的定义,
@Target({ElementType.METHOD, ElementType.TYPE})
@Retention(RetentionPolicy.RUNTIME)
@Documented
public @interface Async {

    /**
     * A qualifier value for the specified asynchronous operation(s).
     * <p>May be used to determine the target executor to be used when executing this
     * method, matching the qualifier value (or the bean name) of a specific
     * {@link java.util.concurrent.Executor Executor} or
     * {@link org.springframework.core.task.TaskExecutor TaskExecutor}
     * bean definition.
     * <p>When specified on a class level {@code @Async} annotation, indicates that the
     * given executor should be used for all methods within the class. Method level use
     * of {@code Async#value} always overrides any value set at the class level.
     * @since 3.1.2
     */
    String value() default "";

}
可以看到该注解只有一个属性,那就是value,从注释上知道value指定的是执行该任务的线程池,也就是说我们可以使用子定义的线程池执行我们的任务,而不是系统默认的。在看该注解上的注解,
@Target({ElementType.METHOD, ElementType.TYPE})
@Retention(RetentionPolicy.RUNTIME)
@Documented
也就是说该注解可以用在方法和类上。标记在类上表示类中的所有方法都以异步方式执行,也就是提交到线程池执行。
二、详述
上面简单对@Async注解进行了解释,下面看用法。
1、@EnableAsync注解
在springboot中要使用@Async注解必须在springboot启动类上使用@EnableAsync注解,开启@Async注解的自动配置,如下,
package com.example.demo;

import com.example.demo.properties.ApplicationPro;
import org.springframework.boot.SpringApplication;
import org.springframework.boot.autoconfigure.SpringBootApplication;
import org.springframework.boot.context.properties.ConfigurationProperties;
import org.springframework.boot.context.properties.EnableConfigurationProperties;
import org.springframework.scheduling.annotation.EnableAsync;
import org.springframework.scheduling.annotation.EnableScheduling;

@SpringBootApplication
@EnableConfigurationProperties({ApplicationPro.class})
//开启@Async注解的自动配置
@EnableAsync
public class DemoApplication {

    public static void main(String[] args) {
        SpringApplication.run(DemoApplication.class, args);
    }

}
只有在启动类上使用@EnableAsync注解,@Async注解才会生效。
2、@Async注解
上面使用@EnableAsync注解已经开启了对@Async注解的配置,下面看具体的异步调用类,
package com.example.demo.service;

import com.example.demo.Student;
import org.springframework.scheduling.annotation.Async;
import org.springframework.scheduling.annotation.AsyncResult;
import org.springframework.stereotype.Service;

import java.util.concurrent.Future;

@Service
@Async
public class AsyncService {
    public Future<Student> get(){
        Student stu=new Student("1","3");
        try {
            Thread.sleep(10000l);
        } catch (InterruptedException e) {
            e.printStackTrace();
        }
        return AsyncResult.forValue(stu);
    }

    public void  executeRemote(){
        try {
            Thread.sleep(10000l);
        } catch (InterruptedException e) {
            e.printStackTrace();
        }
    }
}
首先,要使该类让spring管理必须使用@Service注解(或其他注解也可以),然后在类上标记@Async注解,前面说过@Async注解可以在方法或类上使用,在类上使用则表示类中的所有方法均使用异步执行的方式。异步执行类中有两个方法,每个方法为了演示执行的耗时操作均睡眠10s。这两个方法一个是有返回值的,另一个是无返回值的,重点看有返回值的,
public Future<Student> get(){
        Student stu=new Student("1","3");
        try {
            Thread.sleep(10000l);
        } catch (InterruptedException e) {
            e.printStackTrace();
        }
        return AsyncResult.forValue(stu);
    }
为什么方法的返回值是Future,在@Async注释上有下面这句话,
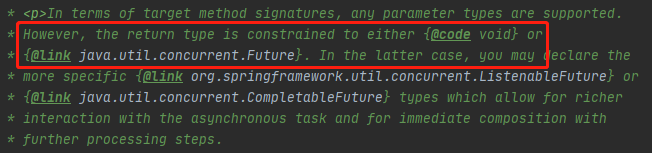
从上面的注解正好可以说明返回Future是没问题,但是我们的方法就是一个普通的方法,要怎么才能返回Future类那,不慌,spring针对@Async注解提供了AsyncResult类,从类名就知道该类就是为了@Async注解准备的,
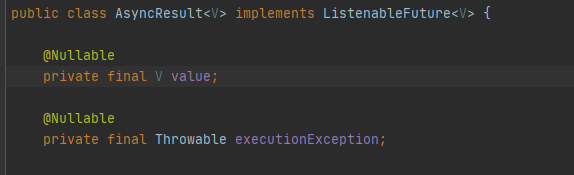
使用其中的forValue方法,便可以返回一个带有泛型的Future类了。
看下测试类,
package com.example.demo.controller;

import com.example.demo.Student;
import com.example.demo.service.AsyncService;
import org.springframework.beans.factory.annotation.Autowired;
import org.springframework.stereotype.Controller;
import org.springframework.web.bind.annotation.RequestMapping;
import org.springframework.web.bind.annotation.ResponseBody;

import java.util.concurrent.ExecutionException;
import java.util.concurrent.Future;
@Controller
@RequestMapping("async")
public class ControllerAsyncTest {
    @Autowired
    private AsyncService asyncService;
    @RequestMapping("/test")
    @ResponseBody
    public Student get(){
        try {
        long start=System.currentTimeMillis();
        //调用带有返回值的get方法
        Future<Student> result=asyncService.get();
        //调用无返回值的executeRemote方法
        asyncService.executeRemote();

        Student student=result.get();
        long end=System.currentTimeMillis();
        System.out.println("执行时间:"+(end-start));
        return  student;
        } catch (InterruptedException e) {
            e.printStackTrace();
        } catch (ExecutionException e) {
            e.printStackTrace();
        }
        return null;
    }
}
测试类就是一个简单的controller,调用了get和executeRemote方法,这两个方法分别会睡眠10s,而且get会有返回值,下面看是否可以拿到get的返回值,并看下调用这两个方法的时间,
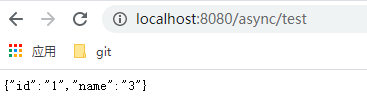
可以成功拿到返回值,看执行时间,
2020-12-12 21:37:43.556  INFO 11780 --- [nio-8080-exec-1] o.s.web.servlet.DispatcherServlet        : Completed initialization in 5 ms
执行时间:10006
执行时间是10006ms,也就是10s多,按照上面的分析两个方法分别睡眠了10s,如果同步执行那肯定是20s,把@Async注解去掉看执行时间,
2020-12-12 21:41:07.840  INFO 11584 --- [nio-8080-exec-1] o.s.web.servlet.DispatcherServlet        : Completed initialization in 5 ms
执行时间:20001
执行时间是20001ms,算上两个方法睡眠的时间,和测试类本身的时间,20001ms是没错的。从这里可以看出@Async注解的作用,把每个方法当作任务提交给了线程池,提高了任务执行的时间。
另外,在获取异步的执行结果使用了下面的方法,
Future<Student> result=asyncService.get();
asyncService.executeRemote();
//获得执行结果
Student student=result.get();
由于在主线程要获得任务的执行结果,使用Future类的get方法获得结果,该结果需要等到任务执行完以后才可以获得。
三、总结
本文讲解了异步调用@Async注解的使用,
1、使用@EnableAsync注解开启对@Async注解的支持;
2、在类或方法上使用@Async注解;
有不当之处,欢迎指正,谢谢!


 浙公网安备 33010602011771号