


5.4案例:用scrapy抓取小猪短租网的一页租房信息
5.4.1 创建scrapy项目
本节以小猪短租网的一页租房信息为例,如下图所示,进行scrapy爬虫代码的编写工作。

对于scrapy爬虫框架而言,需在命令窗口进行scrapy爬虫项目的创建。
E:
scrapy startproject xiaozhu

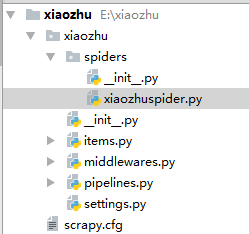
这样就能在本地E盘的scrapy文件夹下创建xiaozhu这个Scrapy项目了。通过PyCharm可查看xiaozhu项目下的所有文件,如图所示。

最后在spiders文件夹下新建xiaozhuspider.py的python文件,用于爬虫代码的编写,最后的xiaozhu文件内容如图所示。
5.4.2 Scrapy文件介绍
上图为Scrapy项目的所有文件,下面看看个文件的内容和相应的作用。
⑴最顶层的xiaozhu文件夹是项目名。
⑵第2层由与项目同名的文件夹xiaozhu和scrapy.cfg文件构成。这里的xiaozhu文件夹就是模块,通常叫包,所有的爬虫代码都在这个包中添加。scrapy.cfg文件为该Scrapy项目的配置文件,其中的内容如下:
# Automatically created by: scrapy startproject
#
# For more information about the [deploy] section see:
# https://scrapyd.readthedocs.io/en/latest/deploy.html

[settings]
default = xiaozhu.settings

[deploy]
#url = http://localhost:6800/
project = xiaozhu
除了注销的代码以外,该文件声明了两件事:
- 定义默认设置文件的位置为xiaozhu模块下的settings文件;
- 定义项目名称为xiaozhu。
⑶第3层由5个Python文件和spiders文件夹构成。spiders文件夹实际上也是一个模块。在这5个Python文件中,__init__.py是空文件,主要作用为供Python导入使用。middlewares.py为Spiders的中间件,在基础环节不做讲解,该书主要介绍其他3个Python文件的使用。
1、items.py文件
items.py文件的作用为定义爬虫爬取的项目,简单来说,就是定义爬取的字段信息。
items.py文件内容如下:
# -*- coding: utf-8 -*-

# Define here the models for your scraped items
#
# See documentation in:
# https://doc.scrapy.org/en/latest/topics/items.html

import scrapy


class XiaozhuItem(scrapy.Item):
    # define the fields for your item here like:
    # name = scrapy.Field()
    pass
2、pipelines.py 文件
pipelines.py 文件的主要作用为爬取数据的处理,在实际爬虫项目中,主要用于爬虫数据的清洗和入库操作。pipelines.py 文件的内容如下:
# -*- coding: utf-8 -*-

# Define your item pipelines here
#
# Don't forget to add your pipeline to the ITEM_PIPELINES setting
# See: https://doc.scrapy.org/en/latest/topics/item-pipeline.html


class XiaozhuPipeline(object):
    def process_item(self, item, spider):
        return item
3、settings.py文件
settings.py文件的主要作用是对爬虫项目的一些设置,如请求头的填写、设置pipelines.py 处理爬虫数据等。settings.py文件的部分内容如下:
# -*- coding: utf-8 -*-

# Scrapy settings for xiaozhu project
#
# For simplicity, this file contains only settings considered important or
# commonly used. You can find more settings consulting the documentation:
#
#     https://doc.scrapy.org/en/latest/topics/settings.html
#     https://doc.scrapy.org/en/latest/topics/downloader-middleware.html
#     https://doc.scrapy.org/en/latest/topics/spider-middleware.html

BOT_NAME = 'xiaozhu'

SPIDER_MODULES = ['xiaozhu.spiders']
NEWSPIDER_MODULE = 'xiaozhu.spiders'


# Crawl responsibly by identifying yourself (and your website) on the user-agent
#USER_AGENT = 'xiaozhu (+http://www.yourdomain.com)'

# Obey robots.txt rules
ROBOTSTXT_OBEY = True

# Configure maximum concurrent requests performed by Scrapy (default: 16)
#CONCURRENT_REQUESTS = 32
⑷第4层为spiders模块下的2个python文件,前面已介绍过__init__.py文件,这里不在赘述。xiaozhuspider.py文件是笔者新建的Python文件,用于爬虫代码的编写。
综上所述,Scrapy爬虫框架像是做填空题,把相对应文件中的代码补全就能实现爬虫。items.py文件用于定义爬虫字段、xiaozhuspider.py文件用于数据的爬取、pipelines.py文件用于爬虫数据的处理、settings.py文件用于设置爬虫的设置。
5.4.3 Scrapy爬虫编写
1、items.py文件
下面以小猪短租网的一页租房信息为例,需爬取的字段有标题、地址、价格、出租类型、居住人数和床位数,如图所示,在items.py文件中填写代码即可。

from scrapy.item import Item,Field


class XiaozhuItem(Item):
    # define the fields for your item here like:
    # name = scrapy.Field()
    title = Field()
    address = Field()
    price = Field()
    lease_type = Field()
    suggestion = Field()
    bed = Field()
除了注释部分不用修改外,其他部分替换为以上代码,这样就定义好了爬虫的字段。
2、xiaozhuspider.py文件
该文件用于爬虫代码的编写,代码如下:
 1 from scrapy.spiders import CrawlSpider
 2 from scrapy.selector import Selector
 3 from xiaozhu.items import XiaozhuItem
 4
 5 class xiaozhu(CrawlSpider):
 6     name = 'xiaozhu'
 7     start_urls = ['http://sz.xiaozhu.com/fangzi/6257935516.html']
 8
 9     def parse(self, response):
10         item = XiaozhuItem()
11         selector = Selector(response)
12         title = selector.xpath('//h4/em/text()').extract()[0]
13         address = selector.xpath('//p/span[@class="pr5"]/text()').extract()[0].strip()
14         price = selector.xpath('//*[@id="pricePart"]/div[1]/span/text()').extract()[0]
15         lease_type = selector.xpath('//*[@id="introduce"]/li[1]/h6/text()').extract()[0]
16         suggestion = selector.xpath('//*[@id="introduce"]/li[2]/h6/text()').extract()[0]
17         bed = selector.xpath('//*[@id="introduce"]/li[3]/h6/text()').extract()[0]
18
19         item['title'] = title
20         item['address'] = address
21         item['price'] = price
22         item['lease_type'] = lease_type
23         item['suggestion'] = suggestion
24         item['bed'] = bed
25
26         yield item
代码分析:
⑴第1~3行导入相应的库。CrawlSpider是xiaozhu类的父类。Selector 用于解析请求网页后返回的数据,其实与Lxml库的用法是一样的。XiaozhuItem就是前面定义需爬虫的字段类。
⑵第5~7行定义xiaozhu类,该类继承CrawlSpider类。name定义该爬虫的名称。start_urls定义爬虫的网页,用列表存储,也可以为多个网页。
⑶第9~26行定义parse()函数,该函数的参数为response,也就是请求网页返回的数据。其中,第10行初始化item,第11~26行为数据爬取到存储的过程,利用Selector就可以使用Xpath语法,但需要使用extract()方法才可以获取到正确的信息。
3、pipelines.py文件
把获取的item存入TXT文档中,这需要使用pipelines.py文件对爬取的数据进行处理,代码如下:
class XiaozhuPipeline(object):
    def process_item(self, item, spider):
        fp = open('E:/xiaozhu.txt','a+')
        fp.write(item['title']+'\n')
        fp.write(item['address'] + '\n')
        fp.write(item['price'] + '\n')
        fp.write(item['lease_type'] + '\n')
        fp.write(item['suggestion'] + '\n')
        fp.write(item['bed'] + '\n')
        return item
在pipelines.py源代码基础上加入写入TXT文件的代码即可。
4、settings.py文件
在原有的代码上,加入下面一行代码,就可以指定爬取的信息用pipelines.py处理。
ITEM_PIPELINES = {'xiaozhu.pipelines.XiaozhuPipeline':300}
5.4.4 Scrapy爬虫运行
Scrapy爬虫框架的运行也需要使用命令行窗口。回到xiaozhu文件夹中,输入下面命令即可运行爬虫程序,运行结果如图所示。
scrapy crawl xiaozhu
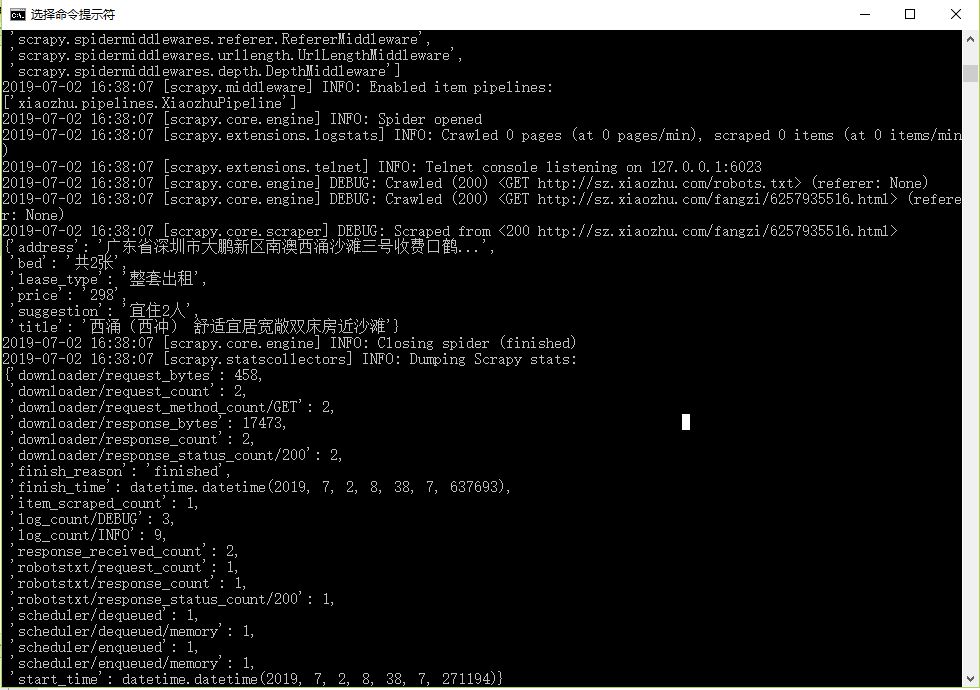
TXT文件内容如图所示。

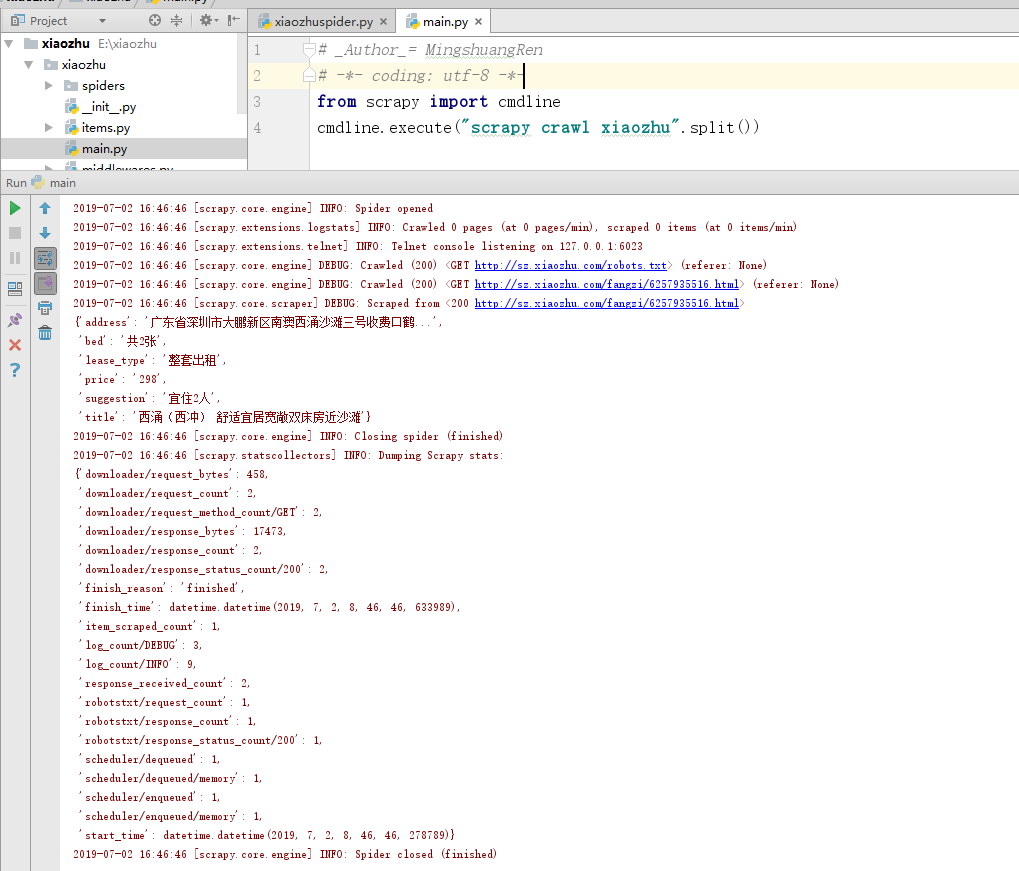
除了使用命令行窗口运行爬虫程序外,可以在xiaozhu文件夹中新建一个mian.py的Python文件,代码如下,这样运行main.py即可运行爬虫程序。
from scrapy import cmdline
cmdline.execute("scrapy crawl xiaozhu".split())
程序运行结果如图所示。

 浙公网安备 33010602011771号