
Windows 10下搭建以太坊私有链环境
通过网上的资料,结合自己的搭建的eth环境,希望能对大家搭建区块链环境有所帮助了解。下面开始进入准备。
本次是windows环境下的私有链环境搭建,所以需要做以下准备:
1.win10系统(家庭版),64位
2.以太坊钱包Ethereum-Wallet-win64-0-10-0(我用的版本0.10.0)
3.以太坊geth客户端(我用的是1.4.11版)
1.1 安装geth
Windows要求必须是64位系统,从官方网站下载编译好的win64客户端,下载解压后只有一个Geth.exe,运行安装即可。
安装后用cmd命令打开命令行,进入到你安装geth的目录下,输入geth –help 命令,如果输出关于geth的信息如下图则说明安装成功。
D:\Study\geth>geth -help
NAME:
geth - the go-ethereum command line interface
USAGE:
geth [options] command [command options] [arguments...]
VERSION:
1.4.11-stable
1.1.1 配置创世块
配置自己的创世块是为了区分公有链,同一个网络中,创世块必须是一样的,否则无法联通。在刚刚Geth安装目录下放置初始化创世块文件名字为genesis.json,文件内容如下:
{
"config": {
"chainId": 7878,
"homesteadBlock": 0,
"eip155Block": 0,
"eip158Block": 0
},
"difficulty": "200",
"gasLimit": "4294967295",
"alloc": {
"7df9a875a174b3bc565e6424a0050ebc1b2d1d82": { "balance": "300000" },
"f41c74c9ae680c1aa78f42e5647a62f353b7bdde": { "balance": "400000" }
}
}
参数说明:
备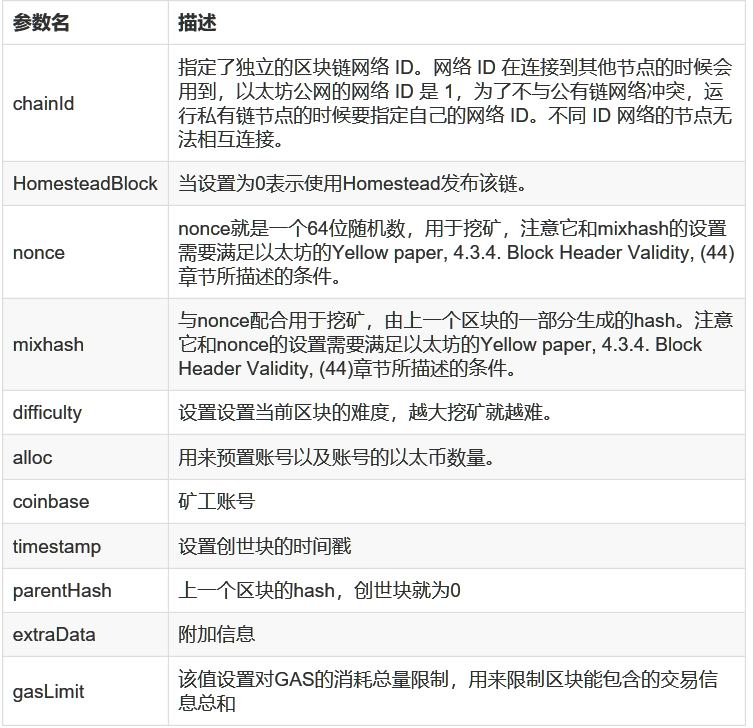
1.1.2 初始化私有链节点
执行geth的init命令初始化私链节点:
D:\Study\geth>geth --datadir .\data init private.json
I0301 22:59:16.676485 ethdb/database.go:82] Alloted 16MB cache and 16 file handles to data\chaindata
I0301 22:59:16.717405 cmd/geth/main.go:299] successfully wrote genesis block and/or chain rule set: f26adf7a562fc8c4cc60e31d2ac6dad88d57e52c4b38e9fd7337b580e90f025c
这会在当前目录下创建data目录,用来保存区块数据及账户信息。
1.1.3 启动私有链节点
执行如下命令:
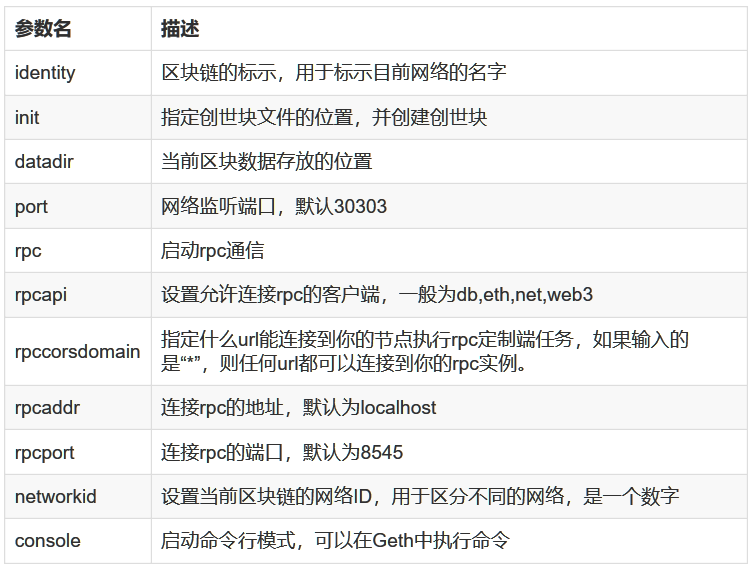
D:\Study\geth>geth --rpc --datadir .\data --networkid 7878 console
D:\Study\geth>geth --rpc --rpcapi "eth,net,web3,personal" --datadir .\data --networkid 7878 console
I0301 22:59:41.986822 ethdb/database.go:82] Alloted 128MB cache and 1024 file handles to data\chaindata
I0301 22:59:42.044666 ethdb/database.go:169] closed db:data\chaindata
I0301 22:59:42.044666 cmd/utils/flags.go:592] WARNING: No etherbase set and no accounts found as default
I0301 22:59:42.046660 ethdb/database.go:82] Alloted 128MB cache and 1024 file handles to data\chaindata
I0301 22:59:42.066609 eth/backend.go:621] upgrading db log bloom bins
I0301 22:59:42.066609 eth/backend.go:629] upgrade completed in 0
I0301 22:59:42.066609 ethdb/database.go:82] Alloted 16MB cache and 16 file handles to data\dapp
I0301 22:59:42.074587 eth/backend.go:172] Protocol Versions: [63 62], Network Id: 7878
I0301 22:59:42.074587 eth/backend.go:201] Blockchain DB Version: 3
I0301 22:59:42.074587 core/blockchain.go:206] Last header: #0 [f26adf7a…] TD=200
I0301 22:59:42.075584 core/blockchain.go:207] Last block: #0 [f26adf7a…] TD=200
I0301 22:59:42.075584 core/blockchain.go:208] Fast block: #0 [f26adf7a…] TD=200
I0301 22:59:42.076581 p2p/server.go:313] Starting Server
I0301 22:59:44.140065 p2p/discover/udp.go:217] Listening, enode://c33036ee5e687263b037973b8e0a2839ae7a6c8152fd952ad52d058c3c16875bdd8310adff378435b60fdba46d8cfdaf39fba8e4c8e8fd43554df2b727a2f390@100.94.99.164:30303
I0301 22:59:44.141062 p2p/server.go:556] Listening on [::]:30303
I0301 22:59:44.143057 node/node.go:296] IPC endpoint opened: \\.\pipe\geth.ipc
I0301 22:59:44.150040 node/node.go:366] HTTP endpoint opened: http://localhost:8545
I0301 22:59:44.198928 p2p/nat/nat.go:111] mapped network port udp:30303 -> 30303 (ethereum discovery) using UPNP IGDv1-IP1
I0301 22:59:44.214865 p2p/nat/nat.go:111] mapped network port tcp:30303 -> 30303 (ethereum p2p) using UPNP IGDv1-IP1
Welcome to the Geth JavaScript console!
instance: Geth/v1.4.11-stable/windows/go1.6.2
modules: admin:1.0 debug:1.0 eth:1.0 miner:1.0 net:1.0 personal:1.0 rpc:1.0 txpool:1.0 web3:1.0
参数说明:
1.1.4 账户管理
l 创建新账户
在geth控制台,使用personal对象的newAccount()方法创建一个新账户,参数为你自己选择的密码。
> personal.newAccount('11111111')
"0x059d9cfef0ea9f8bffff395f436d7bb342858047"
> personal.newAccount('22222222')
"0x9d7aad5c92db134e58620260da9f923ccf78b7e9"
输出就是新创建的账户地址(公钥),你的输出不会和上面的示例相同。geth会保存到数据目录下的keystore文件中。密码要自己记住,以后还需要用到。
l 查询账户
> eth.accounts
["0x059d9cfef0ea9f8bffff395f436d7bb342858047", "0x9d7aad5c92db134e58620260da9f923ccf78b7e9"]
l 删除账户
Geth没有提供直接删除以太坊账户的命令,不过可以通过删除本地文件来删除以太坊账户,因为每一个以太坊账户对应一个文件
D:\>cd D:\Study\geth\data\keystore
2019/03/01 22:48 <DIR> .
2019/03/01 22:48 <DIR> ..
2019/03/01 22:48 491 UTC--2019-03-01T14-48-27.614861000Z--465f228819aa4f6b271ccbad6b60d472bbf34149
2019/03/01 22:48 491 UTC--2019-03-01T14-48-44.969795100Z--4b7254d0c7e7fec9a7e459fad506f7c8ef506129
l 查询账户余额
> eth.getBalance(eth.accounts[0])
0
l 挖矿
没钱的账户什么也干不了,因此需要挖矿来挣点钱。 操作方式是在geth控制台执行miner对象的start()方法来启动挖矿,命令执行如下
> miner.start(1)
I0301 23:01:24.884233 miner/miner.go:119] Starting mining operation (CPU=1 TOT=2)
I0301 23:01:24.884233 miner/worker.go:573] commit new work on block 1 with 0 txs & 0 uncles. Took 0
I0301 23:01:24.885229 eth/backend.go:454] Automatic pregeneration of ethash DAG ON (ethash dir: C:\Users\45014\AppData\Ethash)
I0301 23:01:24.888222 ethash.go:259] Generating DAG for epoch 0 (size 1073739904) (0000000000000000000000000000000000000000000000000000000000000000)
tI0301 23:01:24.888222 eth/backend.go:461] checking DAG (ethash dir: C:\Users\45014\AppData\Ethash)
rue
> I0301 23:01:25.878153 ethash.go:276] Done generating DAG for epoch 0, it took 989.9318ms
I0301 23:01:28.413715 miner/worker.go:339] Mined block (#1 / 9386c990). Wait 5 blocks for confirmation
I0301 23:01:28.413715 miner/worker.go:573] commit new work on block 2 with 0 txs & 0 uncles. Took 0
I0301 23:01:28.414718 miner/worker.go:573] commit new work on block 2 with 0 txs & 0 uncles. Took 0
I0301 23:01:29.496834 miner/worker.go:339] Mined block (#2 / 56bc0db5). Wait 5 blocks for confirmation
I0301 23:01:29.496834 miner/worker.go:573] commit new work on block 3 with 0 txs & 0 uncles. Took 0
I0301 23:01:29.497846 miner/worker.go:573] commit new work on block 3 with 0 txs & 0 uncles. Took 0
I0301 23:01:30.054354 miner/worker.go:339] Mined block (#3 / 2c125710). Wait 5 blocks for confirmation
等几分钟以后,检查账户余额:
> eth.getBalance(eth.accounts[0])
75000000000000000000
> eth.getBalance(eth.accounts[1])
0
执行miner对象的stop()方法停止挖矿:
> miner.stop()
l 查看区块数
> eth.blockNumber
15
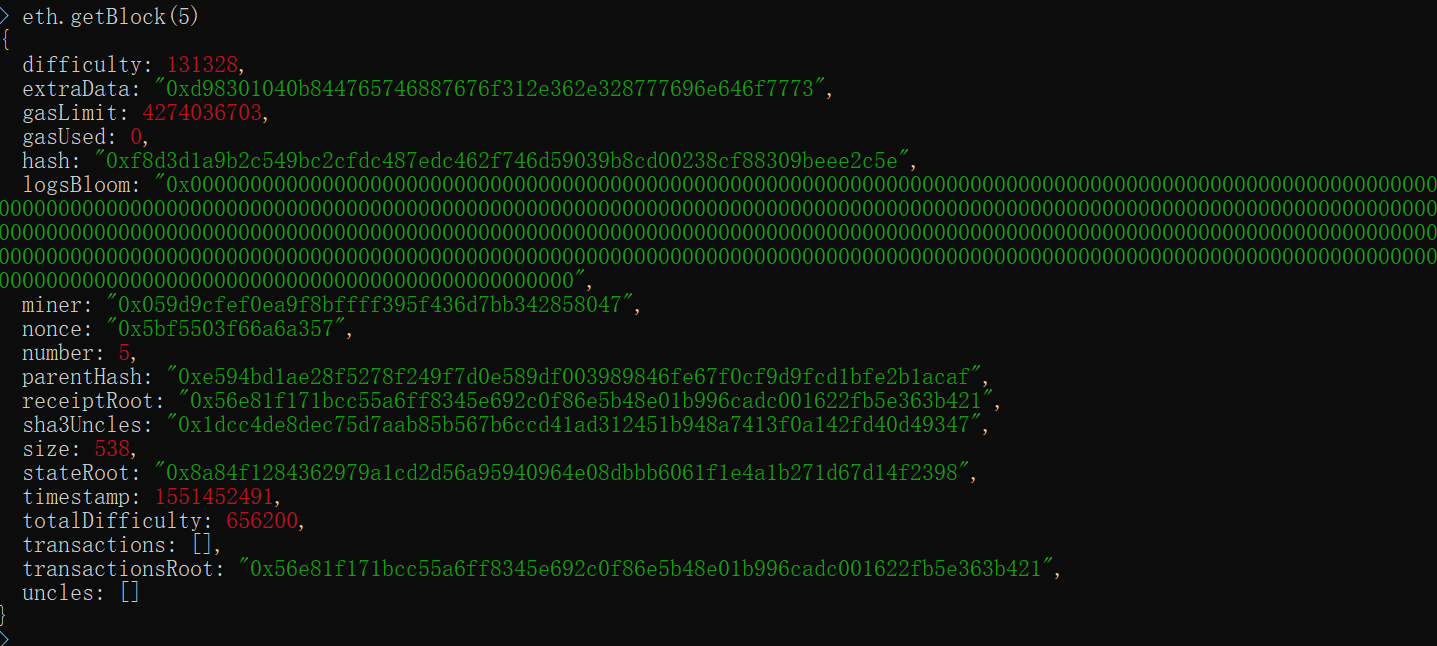
l 查看区块信息
eth.getBlock(5)
l 解锁账户
在部署合约时需要一个解锁的账户。在geth控制台使用personal对象的unlockAccount()方法来解锁指定的账户,参数为账户地址和账户密码(在创建账户时指定的那个密码):
> personal.unlockAccount(acc0)
Unlock account 0x059d9cfef0ea9f8bffff395f436d7bb342858047
Passphrase:
true
>
l 转账操作
acc0 = eth.accounts[0]
acc1= eth.accounts[1]
amount = web3.toWei(0.01)
personal.unlockAccount(acc0)
eth.sendTransaction({from: acc0, to: acc1, value: amount})
查看交易状态:
> txpool.status
{
pending: 1,
queued: 0
}
执行挖矿:
miner.start()
停止挖矿:
miner.stop()
查询账户1:
> eth.getBalance(acc0)
169677500000000000000
> eth.getBalance(acc1 )
10000000000000000
> txpool.status
{
pending: 0,
queued: 0
}
结论:转账操作只有在启动挖矿后才能生效,切记!!!!
1.2 以太坊钱包
1.2.1 启动钱包
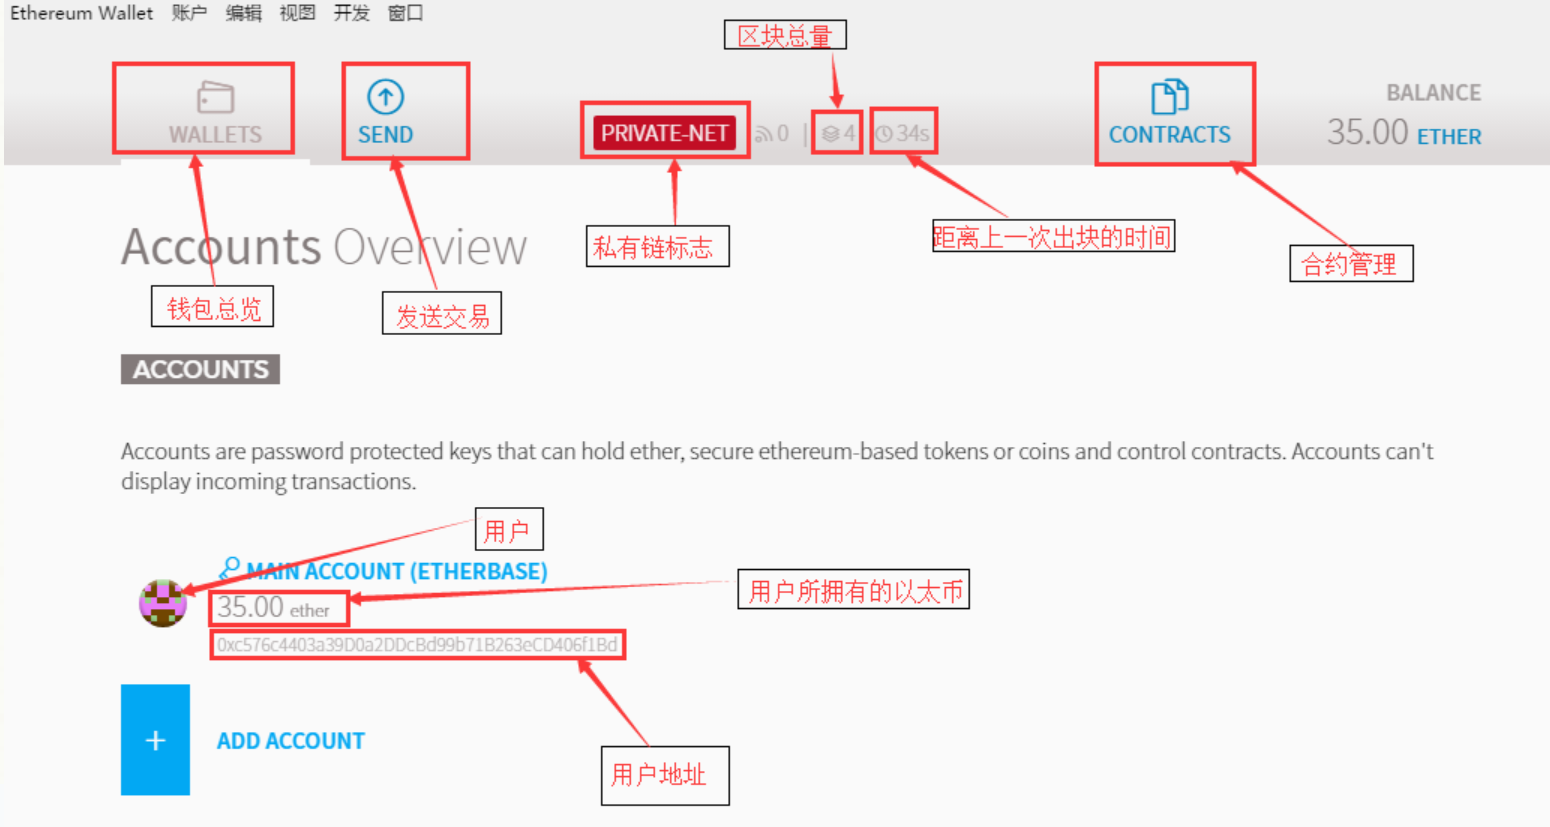
打开ethwallet文件夹,运行Ethereum-Wallet.exe 如果右上角出现“PRIVATE-NET”则证明钱包客户端已经连接到了我们的私有节点。

点击“LAUNCH APPLICATION”
进入钱包主页面


 浙公网安备 33010602011771号