
TestNG简单介绍以及安装—学习笔记1
2015-05-17 13:30 tao先生 阅读(399) 评论(0) 收藏 举报TestNG是什么
到这里,大家肯定已经运行了一些关于Selenium的测试用例了(这里主要是站着一个自动化测试工程师的角度来看待TestNG的,所以这里所说的也都是基于Web测试的验证点来说的,而不是针对单元测试来说。这里就涉及到了Selenium),也产生了相应的格式的测试输出结果了。现在我们将学习一下怎样利用TestNG这个测试框架将测试结果报告显示出来。
TestNG和Junit一样都是一种测试框架,不过它克服了Junit存在的一些局限性。NG意味着"Next Generation".大部分的Selenium测试工程师都选择TestNG而非Junit就是因为TestNG的优势。在TestNG中出现了更多的功能相对于Junit来说,但是在这里我们只关注在Selenium测试中应用比较多的功能。
TestNG VS Junit
TestNG相对于JUnit有三点主要的优势:
- 注释更容易理解
- 测试用例能以组的概念出现会显得更简单
- 并行测试成为可能
Installing TestNG in Eclipse
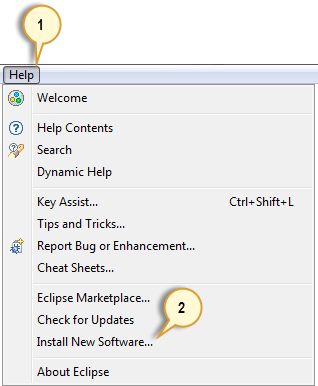
步骤1
-
Launch Eclipse.
-
On the menu bar, click Help.
-
Choose the "Install New Software..." option.
Step 2
In the Install dialog box, click the Add button

Step 3
-
In "Name", type TestNG.
-
In "Location", type http://beust.com/eclipse.
-
Click OK

Step 4
-
Notice that "TestNG - http://beust.com/eclipse" was populated onto the "Work with:" textbox.
-
Check the "TestNG" check box as shown below, then click Next.
-
Note: In the latest Eclipse (Kepler) you don't have a checkbox for testNG, instead you click on question mark (help) icon which will open up the form, and you can select all and installation will continue as for the remaining instructions. Thanks Jana for the tip!

Step 5
-
Click Next again on the succeeding dialog box until you reach the License Agreement dialog.
-
Click "I accept the terms of the license agreement" then click Finish.

Step 6
Wait for the installation to finish

If you encounter a Security warning, just click OK

Step 7
When Eclipse prompts you for a restart, just click Yes.

Step 8
After restart, verify if TestNG was indeed successfully installed. Click Window > Preferences and see if TestNG is included on the Preferences list.

Step9
We will now start to import the TestNG Libraries onto our project. Click on the "Libraries" tab, and then "Add Library…"

Step 10
On the Add Library dialog, choose "TestNG" and click Next.

Step 11
Click Finish.

You should notice that TestNG is included on the Libraries list.

Step 12
We will now add the JAR files that contain the Selenium API. These files are found in the Java client driver that we downloaded from http://docs.seleniumhq.org/download/ when we were installing Selenium and Eclipse in the previous chapters.

————————————————————————————————
WHOOOOSHHHHHHHHHHHH…………
Blimey what was that?
That was your life mate
Oh, I was not quite ready. Can I have another go?
Sorry mate, only one per person.

 浙公网安备 33010602011771号