
SpringBoot
Spring Boot
1.微服务
1.1什么是微服务架构
微服务是一种架构风格(可以对比mvc三层架构,mvvm前端架构对比),要求我们在开发一个应用的时候,这个应用必须构建成一系列小的服务组合。可以通过http的方式进行互通。其演变过程:
1.1.1单体应用架构
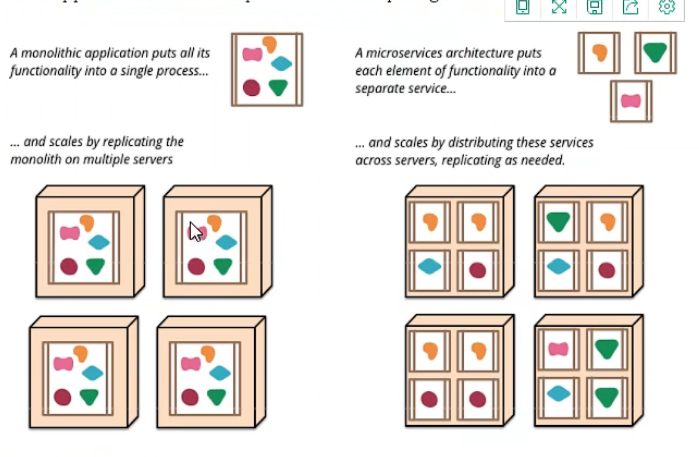
单体应用架构(all in one)是指,将一个应用中的所有应用服务都封装在一个应用中
好处:易于开发和测试,方便部署
缺点:修改任何一处都需要关掉服务器,重新打包和部署。不利于大型项目的维护和分工
1.1.2微服务架构
打破all in one的架构方式,每个工功能元素独立起来。独立的元素动态组合,需要哪一些功能元素就拿来组合,
简而言之,微服务架构样式[1]是一种将单个应用程序开发为一组小服务的方法,每个小服务都在自己的进程中运行并与轻量级机制(通常是HTTP资源API)进行通信。这些服务围绕业务功能构建,并且可以由全自动部署机制独立部署。这些服务的集中管理几乎没有,可以用不同的编程语言编写并使用不同的数据存储技术。
相关文献推荐:微服务论文(马丁·福勒) - 简书 (jianshu.com)
一个大型系统的微服务架构,就像一个复杂交织的神经网络,每个神经元就是一个功能元素,他们各自完成自己的功能,然后通过http相互请求调用,但是这种庞大的系统架构给部署和运维带来很大的难度,即spring带来了大型分布式服务的全套,全程产品
- springboot构建一个个独立的微服务应用单元,帮我们快速构建一个应用
- springcloud完成大型分布式网络服务调用,实现分布式
- spring cloud data flow在分布式中间进行流式数据计算,批处理
组件是独立可替换和可升级的软件单元。
我们将库定义 为链接到程序中并使用内存中函数调用进行调用的组件
而服务则是进程外组件,它们通过某种机制(例如Web服务请求或远程过程调用)进行通信。(这与许多OO程序中的服务对象的概念不同[3]。)
2.第一个Spring Boot程序
springboot提供快速生成的网站,官网下载后解压导入idea
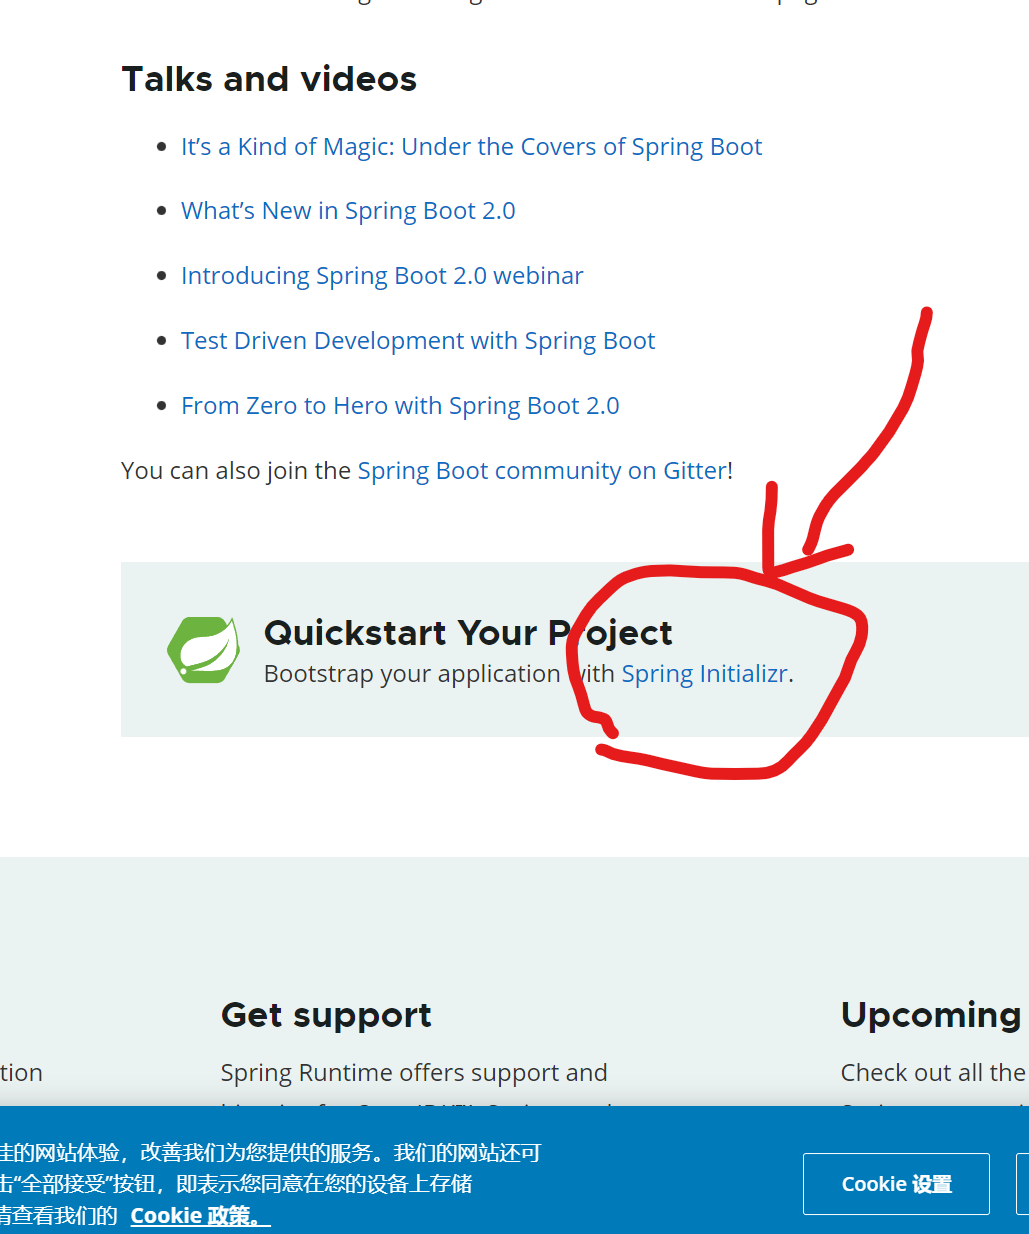
同时idea也集成了该网站功能,直接使用idea创建一个springboot项目

也可生成一个空白的springboot项目,然后导入web包
 <dependency>
            <groupId>org.springframework.boot</groupId>
            <artifactId>spring-boot-starter-web</artifactId>
        </dependency>
在application.properties包里,基本配置可以更改端口号:
server.port=8081
2.1自动装配原理
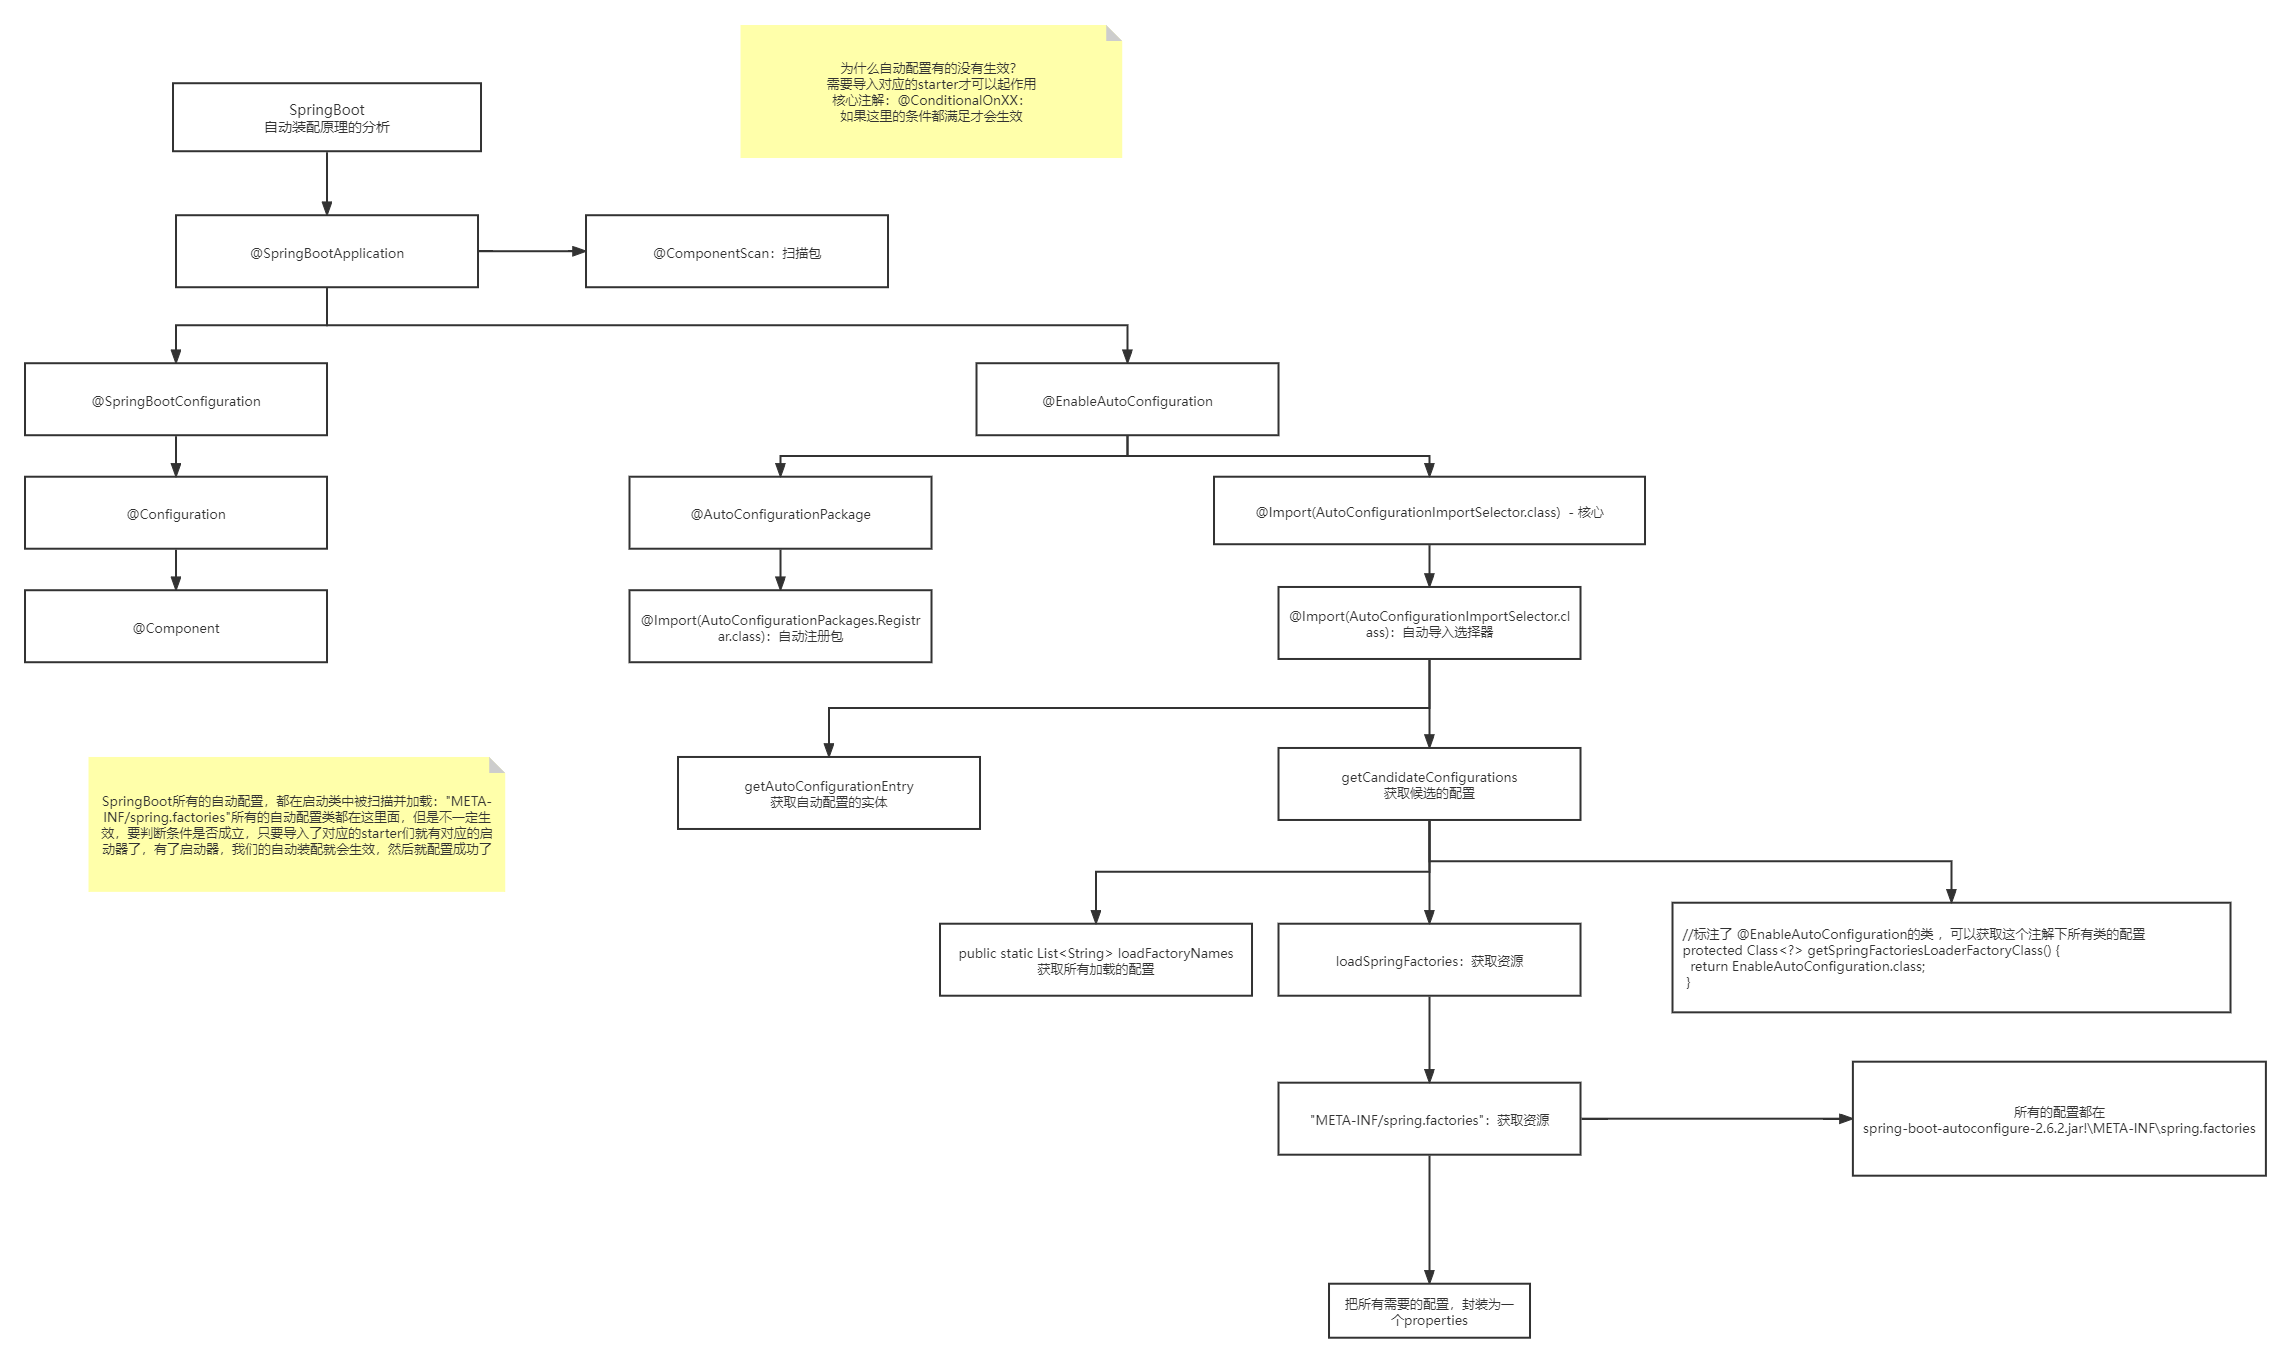
springboot是通过main方法下的SpringApplication.run方法启动的,启动的时候他会调用refshContext方法,先刷新容器,然后根据解析注解或者解析配置文件的形式祖册bean,而它是通过启动类的SpringBootApplication注解进行开始解析的,他会根据EnableAutoConfiguration开启自动化配置,里面有个核心方法ImportSelect选择性的导入,根据loadFanctoryNames根据classpash路径以MATA-INF/spring.factorces下面以什么什么EnableAutoConfiguration开头的key去加载里面所有对应的自动化配置,他并不是把这一百二十多个自动化配置全部导入,在他每个自动化配置里面都有条件判断注解,先判断是否引入相互的jar包,再判断容器是否有bean再进行注入到bean容器
pom.xml
-
核心依赖都在父工程中

<parent>
    <groupId>org.springframework.boot</groupId>
    <artifactId>spring-boot-starter-parent</artifactId>
    <version>2.7.4</version>
    <relativePath/> <!-- lookup parent from repository -->
</parent>
启动器
<dependency>
    <groupId>org.springframework.boot</groupId>
    <artifactId>spring-boot-starter</artifactId>
</dependency>
- 启动器:就是springboot的启动场景。如spring-boot-starter-web会自动导入web环境所有依赖
- springboot会将所有功能场景,编程一个个启动器。需要什么功能,只需要找到所需要启动器即可
主程序(@SpringBootApplication 主程序类标志)
springboot所有的自动配置文件都是在启动的时候扫描并加载:
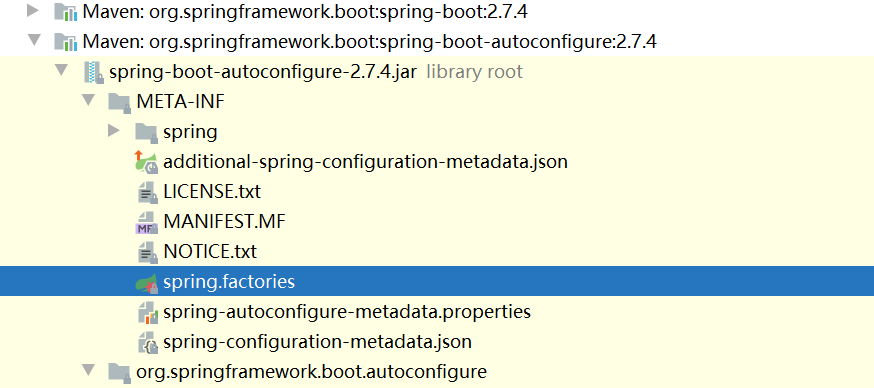
spring.factories所有的自动配置类都在这里,但是不一定生效,因为需要满足ConditionalOnClass()里面所有的条件,其中就必须包括启动类,只有导入了相关的star启动器,这些自动装配的包才有效
-
SpringBoot在启动的时候,从类路径下/META-INF/spring.factories获取指定的值
-
将这些自动配置的类导入容器,自动配置类就会生效,帮我们进行自动配置
-
以前我们需要自动配置的东西,现在不需要了
-
整合javaEE,解决方案和自动配置的东西都在Spring-boot-autoconfigure下
-
它会把所有需要导入的组件,以类名的方式返回这些组件,这些组件就会被添加到容器
-
容器中也会存在非常多的XXXAutoConfigure的文件(@Bean),就是这个类给容器导入了这个场景所需要的所有组件并自动配置
2.2主程序
SpringApplication.run()
1.推断应用的类型是普通的项目还是web项目
2.查找并加载所有可用初始化器,设置到initializers属性中
3.找出所有的应用程序监听器,设置到listeners中
4.推断并设置main方法的定义类,找到运行的主类(加载主类)
3.配置文件
yaml是一种标记语言(对空格的要求十分严格),语法: k: v
# 普通的key-value
name: tzf

#对象
student:
  name: tzf
  age: 18

#行内写法
student: {name: tzf , age: 18}

#数组
pets:
  -cat
  -dog
  -pig

pets: [cat,dog,pig]
xxxconfigeration组件装配了大量的xxxpropertiesz自动装配类,我们在yaml的配置其实就是在给xxxpropertiesz自动装配类的属性赋值,以达到自动配置的效果。
另外我们可以通过在yaml配置debug=true在控制台输出查看哪些配置以及开启,哪些还未开启
还有就是并不是所有的xxxautoconfigeration自动装配都会起作用,因为这些自动装配类内部都有@ConditionalOneClass(xxx,xxx,xxx),只有满足@ConditionalOneClass这个注解里面所有条件,被注解的配置类才会起作用,而这些条件就包括一个个的start启动类
3.1个属性赋值的几种方式
1.使用@Value("...")注解
@Value("旺财")
    private String name;
    @Value("1")
    private Integer age;
2.使用yml配置文件对对象赋值
注意:实体类需要用到@ConfigurationProperties(prefix = "person"),与配置文件yaml里的对象相对应
Person
@Component
@Data
@AllArgsConstructor
@NoArgsConstructor
@ConfigurationProperties(prefix = "person")
public class Person {
    private String name;
    private Integer age;
    private Boolean happy;
    private Date birth;
    private Map<String,Object> map;
    private List<Object> lists;
    private Dog dog;
}
yaml
person:
  name: tzf
  age: 18
  happy: true
  birth: 2022/10/14
  map: {k1: v1,k2: v2}
  lists:
    - cat
    - dag
    - girl
  dog:
    name: 旺财
    age: 1
测试类
@SpringBootTest
class Spring01HelloworldApplicationTests {
    @Autowired
    Person person;
    @Test
    void contextLoads() {
        System.out.println(person);
    }

}
3.使用.propertysource配置文件(了解,这里不做详细介绍)
3.2配置文件的优先级
1.file:./config/ (根目录下的config包下的配置文件)
2.file:./ (根目录下的配置文件)
3.classpath:/config/ (java/resource下的config下的配置文件)
4.classpath:/ (java/resource下的配置文件)
3.3springboot的多环境配置文件,可以选择激活哪一个配置文件
server:
  port: 8080
spring:
  profiles:
    active: test
---

server:
  port: 8081
spring:
  profiles: dev
---

server:
  port: 8082
spring:
  profiles: test

#最后测试的结果用的是8082端口号
下一个问题,配置文件能配那些设置?
其实xxx.properties或xxx.yml文件能配置的东西是固定,@ConfigurationProperties()与你写的配置文件绑定,其默认值都写在@xxxproperties里面,如果想修改默认值,按照对应配置规则去配置
精髓:
1、SpringBoot启动会加载大量的自动配置类
2、我们看我们需要的功能有没有在SpringBoot默认写好的自动配置类当中;
3、我们再来看这个自动配置类中到底配置了哪些组件;(只要我们要用的组件存在在其中,我们就不需要再手动配置了)
4、给容器中自动配置类添加组件的时候,会从properties类中获取某些属性。我们只需要在配置文件中指定这些属性的值即可;
xxxxAutoConfigurartion:自动配置类;给容器中添加组件
xxxxProperties:封装配置文件中相关属性;
3.4读取yaml数据方式
方式一:
使用@Value读取单个数据,属性名引用方式:${一级属性名.二级属性名……}
lesson: SpringBoot

server:

  port: 82

enterprise:

  name: itcast

  age: 16

  tel: 4006184000

  subject:

        - Java

        - 前端

        - 大数据
@RestController
@RequestMapping("/books")
public class BookController {
@Value("${lesson}")
private String lessonName;
@Value("${server.port}")
private int port;
@Value("${enterprise.subject[1]}")
private String[] subject_01;
}
baseDir: /usr/local/fire
center:
dataDir: ${baseDir}/data
tmpDir: ${baseDir}/tmp
logDir: ${baseDir}/log
msgDir: ${baseDir}/msgDir
方式二:
封装全部数据到Environment对象
lesson: SpringBoot

server:

  port: 82

enterprise:

  name: itcast

  age: 16

  tel: 4006184000

  subject:

        - Java

        - 前端

        - 大数据
@RestController
@RequestMapping("/books")
public class BookController {
     @Autowired
    private Environment env;
     @GetMapping("/{id}")
public String getById(@PathVariable Integer id){

   System.out.println(env.getProperty("lesson"));
    System.out.println(env.getProperty("enterprise.name"));
System.out.println(env.getProperty("enterprise.subject[0]"));
return "hello , spring boot!";
     }
}
方式四:
自定义对象封装指定数据的作用
datasource:
driver-class-name: com.mysql.cj.jdbc.Driver
url: jdbc:mysql://localhost:3306/ssm_db?serverTimezone=UTC
username: root
password: root
@Component
@ConfigurationProperties(prefix = "datasource")
public class DataSource {
private String driverClassName;
private String url;
private String userName;
private String password;
}
4.JSR303数据校验
松散绑定:即"ab"可以用“a-b"表示
JSR303数据校验 : 这个就是我们可以在字段是增加一层过滤器验证 , 可以保证数据的合法性
使用需要先添加依赖
<!-- https://mvnrepository.com/artifact/org.hibernate.validator/hibernate-validator -->
<dependency>
    <groupId>org.hibernate.validator</groupId>
    <artifactId>hibernate-validator</artifactId>
    <version>6.0.16.Final</version>
</dependency>
- 类似于html页面的input的type属性,指定类型
<input type="text">
springboot中使用jsp303需要@Validated注解
Bean Validation 中内置的 constraint
Hibernate Validator 附加的 constraint
@Validated
public class Person {
    @Email(message = "邮件文件格式错误")
    private String email;//属性email必须符合邮件格
}
静态资源导入:
1.在springboot中,我们可以使用一下方式处理静态资源
- webjars localhost:8080/webjars/
- public,static,/**,resources localhost:8080/
优先级:resources>static(默认)>public
5.Thymeleaf引擎模板
之前我们收到前端的html页面,会把它转换成jsp页面,jsp页面可以很轻松把后台数据显示到前端上面,并且实现交互,但是springboot项目 是以jar包,不是以war包,并且我们使用的嵌入式的tomcat不支持jsp。然而纯静态页面无法实现交互,所以springboot推荐我们使用模板引擎,如freemarker,其实jsp也是一种模板引擎,以及springboot推荐我们使用的thymeleaf。
1.导入相关启动器依赖
 <dependency>
            <groupId>org.springframework.boot</groupId>
            <artifactId>spring-boot-starter-thymeleaf</artifactId>
        </dependency>
2.创建templates包,将静态网页放在templates中
原因:约定大于配置,springboot的配置文件ThymeleafProperties表明文件的前缀和后缀
public static final String DEFAULT_PREFIX = "classpath:/templates/";
public static final String DEFAULT_SUFFIX = ".html";
首页面模式
<!DOCTYPE html>

<html xmlns:th="http://www.thymeleaf.org">

  <head>
    <title>Good Thymes Virtual Grocery</title>
    <meta http-equiv="Content-Type" content="text/html; charset=UTF-8" />
    <link rel="stylesheet" type="text/css" media="all"
          href="../../css/gtvg.css" th:href="@{/css/gtvg.css}" />
  </head>

  <body>

    <p th:text="#{home.welcome}">Welcome to our grocery store!</p>

  </body>

</html>
3.语法表达式
具体参考官网:Tutorial: Using Thymeleaf
-
- Variable Expressions:
${...}变量 - Selection Variable Expressions:
*{...}选择 - Message Expressions:
#{...}消息 - Link URL Expressions:
@{...}URL - Fragment Expressions:
~{...}
- Variable Expressions:
所有的html元素都被thymeleaf接管替代,格式为:th:元素名
例如:th:class="" th:style=""
<div th:text="${name}"></div>
取后端传来的参数‘name'的值,属性为text,使用时为:th:text=""
字符转义(可识别标签):th:utext=""
遍历的两种方式
<div th:each="user:${users}" th:text="${user}"></div>
<div th:each="user:${users}">[[${user}]]</div>
6.拓展使用springMVC
springboot在自动配置的时候会用到很多组件,会首先看容器中有没有用户配置的文件(如果用户自己配置@Bean),如果有优先使用用户配置文件,没有才会使用默认配置。有些配置存在多个,比如视图解析器,用户配置和默认配置可以结合使用。
扩展MVC使用即我们自己要编写一个@Configeration注解的类,并且类型为WebMvcConfigurer,还不能加@EnableWebMvc注解,如:
import org.springframework.context.annotation.Configuration;
import org.springframework.web.servlet.config.annotation.ViewControllerRegistry;
import org.springframework.web.servlet.config.annotation.WebMvcConfigurer;
@Configuration
public class MyMvcConfig implements WebMvcConfigurer {
    //视图跳转
    @Override
    public void addViewControllers(ViewControllerRegistry registry) {
        registry.addViewController("/tzf").setViewName("success");
    }
}
注意:springboot中有很多的xxxConfiguration配置类帮助我们扩展配置,只要我们看到这个类型的类,就说明它在修改和扩展原来的配置功能。
7.整合jdbc
补充@Autowired与@Resource区别
- @Autowired注解是Spring提供的,而@Resource注解是J2EE本身提供的
- @Autowird注解默认通过byType方式注入,而@Resource注解默认通过byName方式注入
- @Autowired注解注入的对象需要在IOC容器中存在,否则需要加上属性required=false,表示忽略当前要注入的bean,如果有直接注入,没有跳过,不会报错
yaml配置数据库DataSource:
spring:
  datasource:
    url: jdbc:mysql://localhost:3306/mybatis?useUnicode=tru&characterEncoding=utf-8
    password: 123456
    username: root
    driver-class-name: com.mysql.jdbc.Driver
@RestController
public class JdbcController {

    @Autowired
    JdbcTemplate jdbcTemplate;

    @RequestMapping("/userList")
    public List<Map<String,Object>> userList(){
        String sql="select * from user1";
        List<Map<String, Object>> maps = jdbcTemplate.queryForList(sql);
        return maps;
    }

    @RequestMapping("/userAdd")
    public String addUser(){
        String sql="insert into user1 values(3,'aa','12345')";
        jdbcTemplate.update(sql);
        return "add-Success";
    }

    @RequestMapping("/userupdate/{id}")
    public String updateUser(@PathVariable("id")int id){
        String sql="update user1 set name = ?,pwd=? where id="+id;
        Object[] objects = new Object[2];
        objects[0]="tzf6";
        objects[1]="520";
        jdbcTemplate.update(sql,objects);
        return "add-Success";
    }
}
8.自定义数据源(DruidDataSource)
第一种自定义整合:
Druid是阿里开源平台数据库连接池的实现,结合了数据库线程池和日志监控
导包:
<!-- https://mvnrepository.com/artifact/com.alibaba/druid -->
<dependency>
    <groupId>com.alibaba</groupId>
    <artifactId>druid</artifactId>
    <version>1.2.15</version>
</dependency>
<dependency>
     <groupId>log4j</groupId>
     <artifactId>log4j</artifactId>
     <version>1.2.17</version>
</dependency>
yaml配置data数据源为的druid
spring:
  datasource:
    url: jdbc:mysql://localhost:3306/mybatis?useUnicode=true&characterEncoding=utf-8
    password: 123456
    username: root
    driver-class-name: com.mysql.jdbc.Driver
    type: com.alibaba.druid.pool.DruidDataSource
    #   数据源其他配置
    #初始化时建立物理连接的个数
    initial-size: 5
    #最小连接池数量
    min-idle: 5
    #最大连接池数量 maxIdle已经不再使用
    max-active: 20
    #获取连接时最大等待时间,单位毫秒
    max-wait: 60000
    #申请连接的时候检测,如果空闲时间大于timeBetweenEvictionRunsMillis,执行validationQuery检测连接是否有效。
    test-while-idle: true
    #既作为检测的间隔时间又作为testWhileIdel执行的依据
    time-between-eviction-runs-millis: 60000
    #销毁线程时检测当前连接的最后活动时间和当前时间差大于该值时,关闭当前连接
    min-evictable-idle-time-millis: 30000
    #用来检测连接是否有效的sql 必须是一个查询语句
    #mysql中为 select 'x'
    #oracle中为 select 1 from dual
    validation-query: select 'x'
    #申请连接时会执行validationQuery检测连接是否有效,开启会降低性能,默认为true
    test-on-borrow: false
    #归还连接时会执行validationQuery检测连接是否有效,开启会降低性能,默认为true
    test-on-return: false
    # 是否缓存preparedStatement
    pool-prepared-statements: true
#   配置监控统计拦截的filters,去掉后监控界面sql无法统计,'wall'用于防火墙
    #配置监拉统计挡成的filters. stat: 监控统计、Log4j:日志记录、waLL: 防御sqL注入
    #如果启用日志记录时报错java.lang.ClassNotFoundException: org.apache.log4j.Priority
    #则导入Log4j 依赖即时,Maven 地址: https://mvnrepository. com/artifact/log4j/log4
    filters: stat,wall,1og4j
    max-pool-prepared-statement-per-connection-size: 20
    use-global-data-source-stat: true
    connect-properties: druid.stat.mergeSql=true;druid.stat.slowSqlMillis=5000
虽然我们配置了druid连接池的其他属性但是不会生效,因为默认使用的是java.sql.Datasource的类来获取属性的,有些属性datasource没有。如果想要配置生效需要手动创建Druid的配置文件
 * 描述:  Spring Boot 手动整合 Druid 连接池
 */
// @Deprecated
@Configuration
public class MyDataSourceConfig {

    /**
     * 配置 Druid 数据源。(Spring Boot 会在 IoC 容器自动读取类型为 DataSource 的对象。故这个 bean 注入后,即与Spring Boot整合好了)
     * @return DruidDataSource 数据源
     * @throws SQLException
     */
    @Bean
    @ConfigurationProperties(prefix = "spring.datasource",ignoreUnknownFields = false) // 读取配置文件中的数据源信息。Druid会以此建立数据库连接
    public DataSource dataSource() throws SQLException {
        DruidDataSource druidDataSource = new DruidDataSource();
        druidDataSource.setFilters("stat"); // 开启
        return druidDataSource;
    }

    /**
     * (非必要)开启前台监控页面对应的 Servlet,并设置密码(通过 http://域名/druid/index.html 即可访问监控页面)
     * 此 Servlet 是由 Druid 提供的 StatViewServlet
     * @return
     */
    @Bean
    public ServletRegistrationBean<StatViewServlet> druidServlet(){
        ServletRegistrationBean<StatViewServlet> statViewServletServletRegistrationBean = new ServletRegistrationBean<>(new StatViewServlet(), "/druid/*");
        statViewServletServletRegistrationBean.addInitParameter("loginUsername","root");
        statViewServletServletRegistrationBean.addInitParameter("loginPassword","131121");
        return statViewServletServletRegistrationBean;
    }

    /**
     * (非必要)配置Druid的Filter,用于记录 web 请求记录。
     * 此 Filter 是由 Druid 提供的 WebStatFilter
     * @return
     */
    @Bean
    public FilterRegistrationBean<WebStatFilter> druidFilter(){
        WebStatFilter webStatFilter = new WebStatFilter();
        FilterRegistrationBean<WebStatFilter> webStatFilterFilterRegistrationBean = new FilterRegistrationBean<>(webStatFilter);
        // 除以下路径的访问不记录,其它都会进行记录
        webStatFilterFilterRegistrationBean.addInitParameter("exclusions","*.js,*.gif,*.jpg,*.png,*.css,*.ico,/druid/*");
        // 记录 session 时,记录下 session 中记录的用户名
        webStatFilterFilterRegistrationBean.addInitParameter("principalSessionName","userName");
        return webStatFilterFilterRegistrationBean;
    }

}
第二种方法使用starter:
导资源包:
此时就不需要Druid的依赖了,starter中已经包含druid的包了
<dependency>
    <groupId>com.alibaba</groupId>
    <artifactId>druid-spring-boot-starter</artifactId>
    <version>1.2.16</version>
</dependency>
配置数据源:
  datasource:
    url: jdbc:mysql://localhost:3306/mybatis?useUnicode=true&characterEncoding=utf-8
    password: 123456
    username: root
    driver-class-name: com.mysql.jdbc.Driver
# 连接池配置:
    druid:
      initial-size: 2 # 初始化时建立物理连接的个数。默认0
      max-active: 10 # 最大连接池数量,默认8
      min-idle: 1 # 最小连接池数量
      max-wait: 2000 # 获取连接时最大等待时间,单位毫秒。
      pool-prepared-statements: false # 是否缓存preparedStatement,也就是PSCache。PSCache对支持游标的数据库性能提升巨大,比如说oracle。在mysql下建议关闭。
      max-pool-prepared-statement-per-connection-size: -1 # 要启用PSCache,必须配置大于0,当大于0时,poolPreparedStatements自动触发修改为true。在Druid中,不会存在Oracle下PSCache占用内存过多的问题,可以把这个数值配置大一些,比如说100
      # ……druid节点下的其它参数见官方文档:https://github.com/alibaba/druid/wiki/DruidDataSource%E9%85%8D%E7%BD%AE%E5%B1%9E%E6%80%A7%E5%88%97%E8%A1%A8

      # 启用Druid内置的Filter,会使用默认的配置。可自定义配置,见下方的各个filter节点。
      filters: stat,wall


      # StatViewServlet监控器。开启后,访问http://域名/druid/index.html
      stat-view-servlet:
        enabled: true # 开启 StatViewServlet,即开启监控功能
        login-username: daniel # 访问监控页面时登录的账号
        login-password: 1234 # 密码
        url-pattern: /druid/* # Servlet的映射地址,不填写默认为"/druid/*"。如填写其它地址,访问监控页面时,要使用相应的地址
        reset-enable: false # 是否允许重置数据(在页面的重置按钮)。(停用后,依然会有重置按钮,但重置后不会真的重置数据)
        allow: 192.168.1.2,192.168.1.1 # 监控页面访问白名单。默认为127.0.0.1。与黑名单一样,支持子网掩码,如128.242.127.1/24。多个ip用英文逗号分隔
        deny: 18.2.1.3 # 监控页面访问黑名单


      # 配置 WebStatFilter(StatFilter监控器中的Web模板)
      web-stat-filter:
        enabled: true # 开启 WebStatFilter,即开启监控功能中的 Web 监控功能
        url-pattern: /* # 映射地址,即统计指定地址的web请求
        exclusions: '*.js,*.gif,*.jpg,*.png,*.css,*.ico,/druid/*' # 不统计的web请求,如下是不统计静态资源及druid监控页面本身的请求
        session-stat-enable: true # 是否启用session统计
        session-stat-max-count: 1 # session统计的最大个数,默认是1000。当统计超过这个数,只统计最新的
        principal-session-name: userName # 所存用户信息的serssion参数名。Druid会依照此参数名读取相应session对应的用户名记录下来(在监控页面可看到)。如果指定参数不是基础数据类型,将会自动调用相应参数对象的toString方法来取值
        principal-cookie-name: userName # 与上类似,但这是通过Cookie名取到用户信息
        profile-enable: true # 监控单个url调用的sql列表(试了没生效,以后需要用再研究)

      filter:
        wall:
          enabled: true  # 开启SQL防火墙功能
          config:
            select-allow: true # 允许执行Select查询操作
            delete-allow: false # 不允许执行delete操作
            create-table-allow: false # 不允许创建表
            # 更多用法,参考官方文档:https://github.com/alibaba/druid/wiki/%E9%85%8D%E7%BD%AE-wallfilter
9.整合mybatis
整体工程预览:
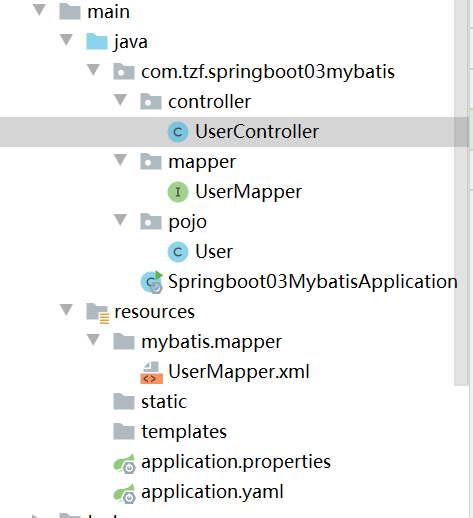
1.导包:
<!--        此依赖不是springboot官方提供的-->
        <dependency>
            <groupId>org.mybatis.spring.boot</groupId>
            <artifactId>mybatis-spring-boot-starter</artifactId>
            <version>2.2.2</version>
        </dependency>
        <dependency>
            <groupId>org.projectlombok</groupId>
            <artifactId>lombok</artifactId>
        </dependency>
        <dependency>
            <groupId>org.springframework.boot</groupId>
            <artifactId>spring-boot-starter-data-jdbc</artifactId>
        </dependency>
        <dependency>
            <groupId>org.springframework.boot</groupId>
            <artifactId>spring-boot-starter-web</artifactId>
        </dependency>

        <dependency>
            <groupId>mysql</groupId>
            <artifactId>mysql-connector-java</artifactId>
        </dependency>
2.实体类
@Data
@AllArgsConstructor
@NoArgsConstructor
public class User {
    private Integer id;
    private String name;
    private String ped;

}
3.mapper
@Mapper
@Repository
public interface UserMapper {

    List<User> userList();

    User queryUserById(int id);

    int add(User user);

    int update(User user);

    int delete(int id);
}
4.resource下面配置xml文件
<?xml version="1.0" encoding="UTF-8" ?>
<!DOCTYPE mapper
        PUBLIC "-//mybatis.org//DTD Mapper 3.0//EN"
        "https://mybatis.org/dtd/mybatis-3-mapper.dtd">
<mapper namespace="com.tzf.springboot03mybatis.mapper.UserMapper">
    <select id="userList" resultType="User">
        select * from user1
    </select>

    <select id="queryUserById" resultType="User">
        select * from user1 where id=#{id}
    </select>

    <update id="update" parameterType="User">
        update user1 set name=#{name},pwd=#{pwd} where id=#{id}
    </update>

    <insert id="add" parameterType="User">
        insert into user1(id,name,pwd) values(#{id},#{name},#{pwd})
    </insert>

    <delete id="delete" parameterType="int">
        delete from user1 where id=#{id}
    </delete>

</mapper>
5.yaml配置mybatis
spring:
  datasource:
    username: root
    password: 123456
    url: jdbc:mysql://localhost:3306/mybatis?useUnicode=true&characterEncoding=utf-8
    driver-class-name: com.mysql.cj.jdbc.Driver
#mybatis配置
mybatis:
#起别名
  type-aliases-package: com/tzf/springboot03mybatis/pojo
  #xml文件与mapper绑定
  mapper-locations: classpath:mybatis/mapper/*.xml
  #com\tzf\springboot03mybatis\pojo
6.controller层
@RestController
public class UserController {
    @Autowired(required = false)
    UserMapper userMapper;
// rest行为方法,get查询,post添加,put修改,delete删除
    @GetMapping("/userList")
    public List<User> userList(){
        List<User> userlist = userMapper.userList();
        for (User user:userlist) {
            System.out.println(user);
        }
        return userlist;
    }

}
rest行为方法get查询,post添加,put修改,delete删除
注意:
@PathVariablez(“xx”)注解,表示简单参数从路径中获取,xx是路径中的参数名字,与形参绑定
 @RequestBody参数量比较大,如实体类参数,使用该注解用json格式传参
10.springSecurity
安全验证
官方文档:
https://docs.spring.io/spring-security/site/docs/5.5.8/reference/html5
中文文档:
Introduction · Spring Boot 中文文档 (felord.cn)
(http://felord.cn/_doc/_springboot/2.1.5.RELEASE/_book/)
Spring Security 中文文档 :: Spring Security Reference (springdoc.cn)
1.导包
<dependency>
    <groupId>org.springframework.boot</groupId>
    <artifactId>spring-boot-starter-security</artifactId>
</dependency>
11.工程打包与运行
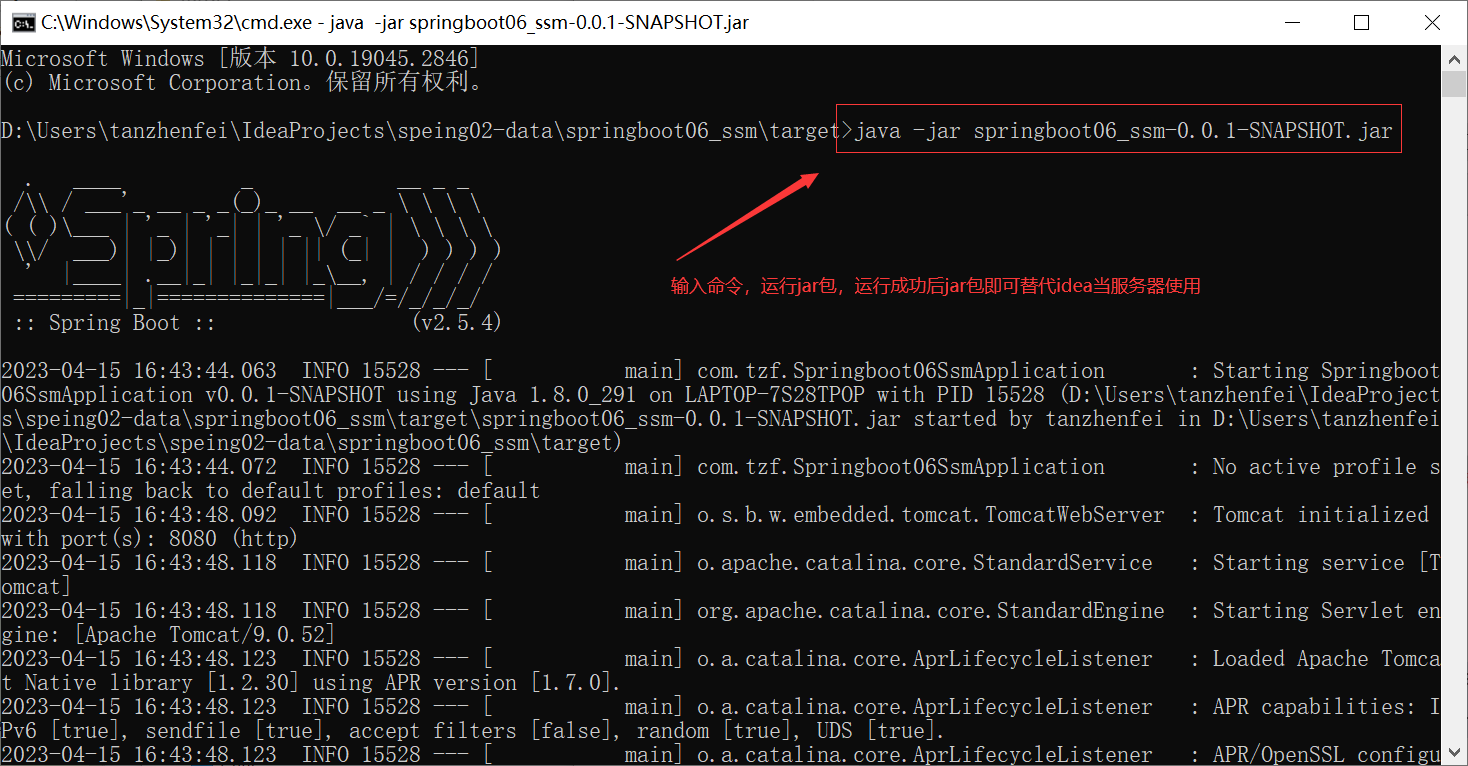
windows环境
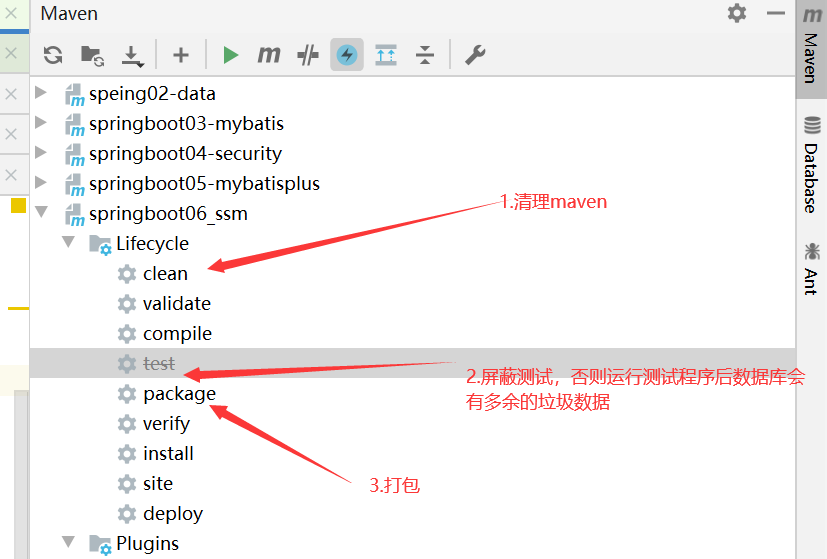
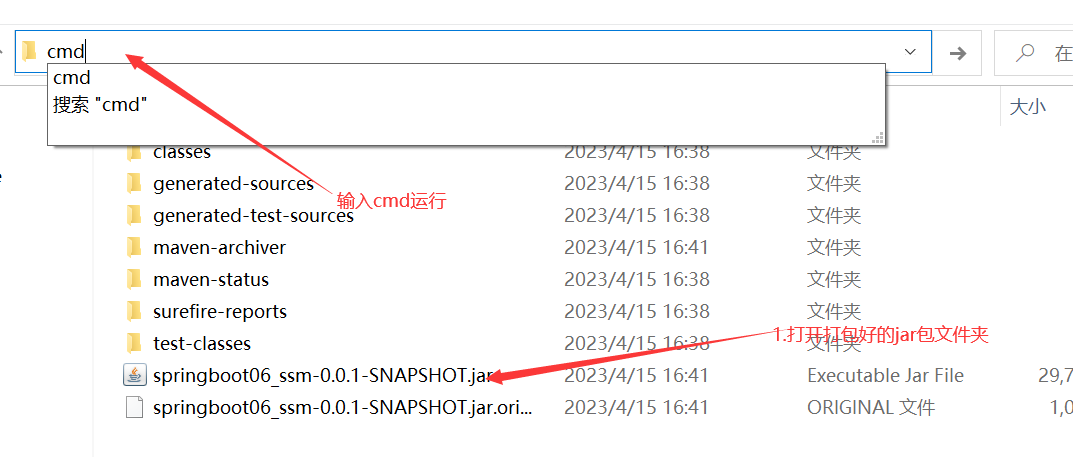
可能会遇到的问题:
1.“没有主清单属性”问题,可能是没有引入springboot-maven打包插件
 <build>
        <plugins>
            <plugin>
                <groupId>org.springframework.boot</groupId>
                <artifactId>spring-boot-maven-plugin</artifactId>
            </plugin>
        </plugins>
    </build>
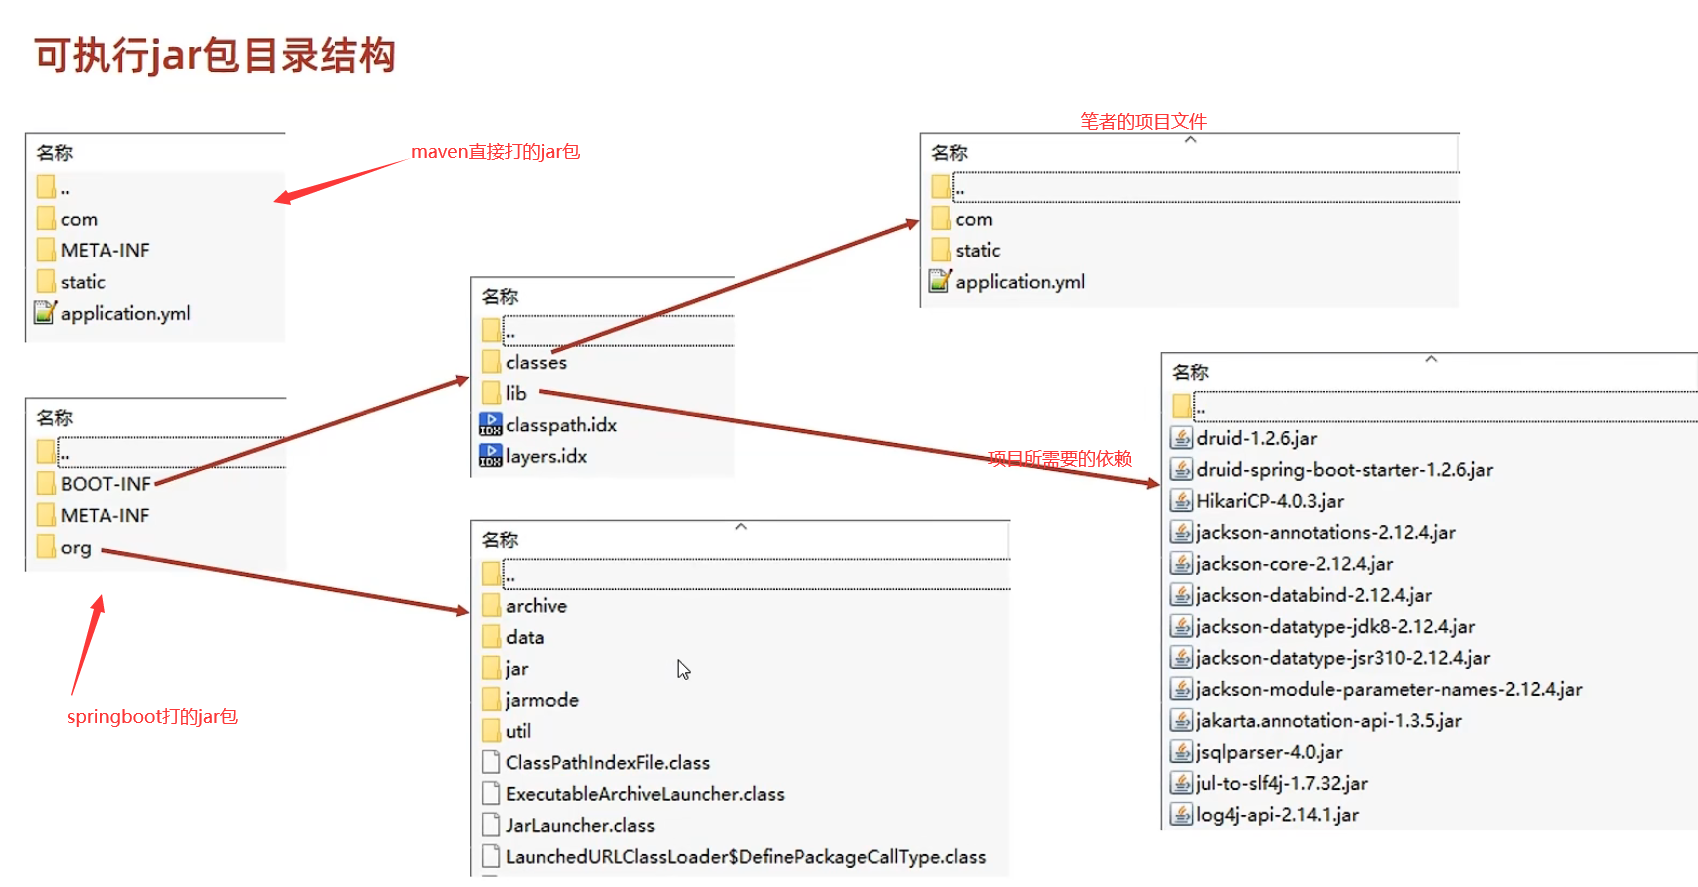
springboot打的jar包包含maven打的jar包所有内容,以及程序运行所依赖的环境(比如需要的所有jar包)
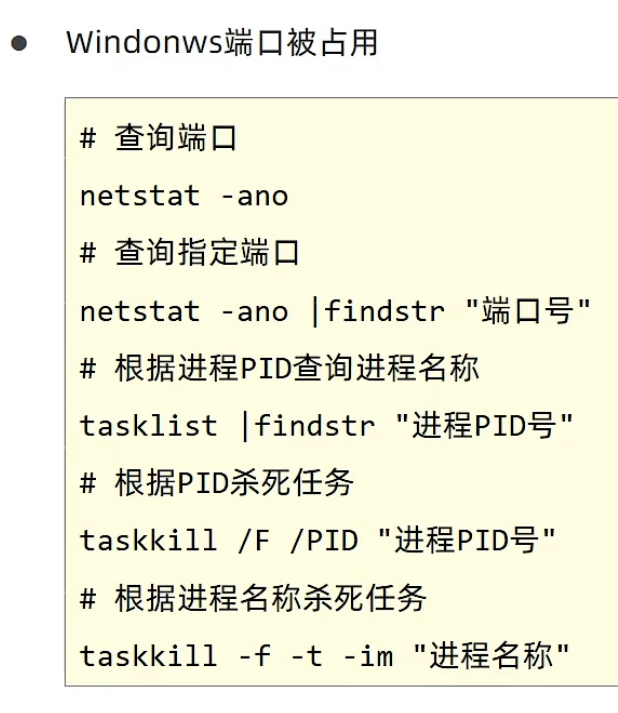
2.端口占用问题
linux环境
与windows环境基本一致,注意linux前提配置好jar包运行的换将,如SQL环境,jdk环境
12.临时属性
使用临时属性覆盖原有的属性,因此不同文件位置设置属性是有优先级的,优先级高的文件的属性值会会覆盖掉优先级低的属性值
在jar包运行环境下临时属性设置:
1.使用jar命令启动SpringBoot工程时可以使用临时属性替换配置件中的属性
java -jar springboot.jar --server.port=80
2.临时属性添加方式:java -jar工程名.jar --属性名=值
3.多个临时属性之间使用空格分隔
分
4.临时属性必须是当前boot工程支持的属性,否则设置无效
优先级详情:
参看https://docs.spring.io/spring-boot/docs/current/reference/html/spring-boot-features.html#boot-features-external-config
在idea环境设置临时属性:
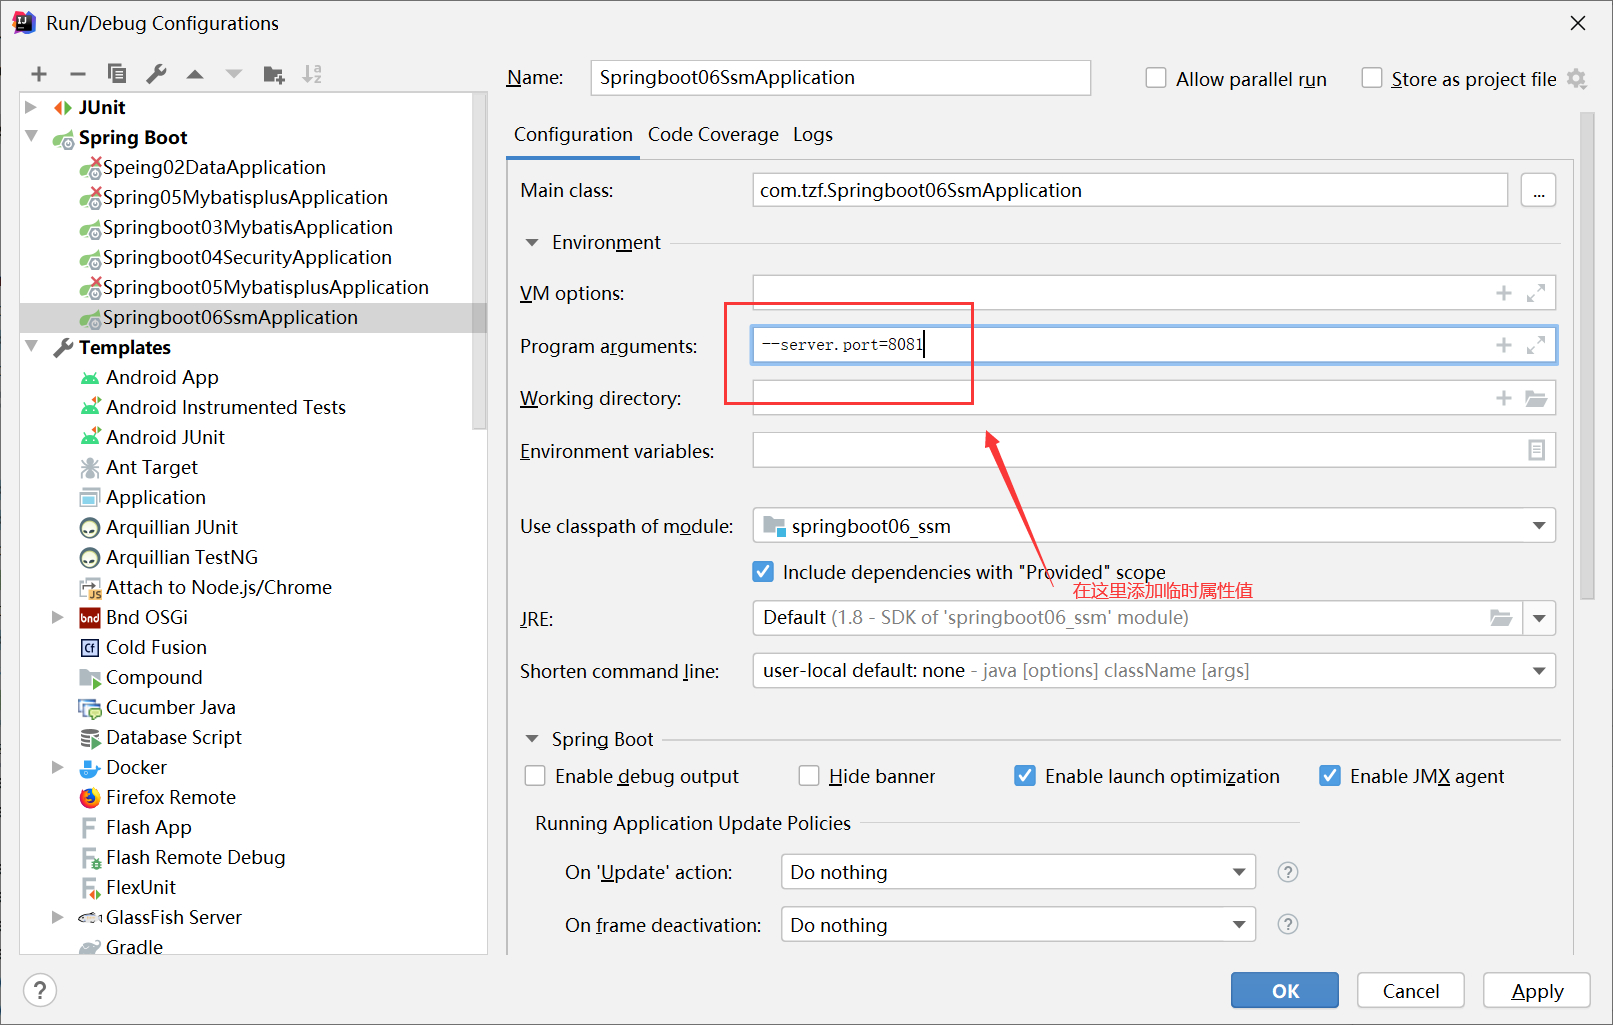
临时属性实则在启动类中作为args参数传入springboot:
@SpringBootApplication
public class Springboot06SsmApplication {

    public static void main(String[] args) {
        SpringApplication.run(Springboot06SsmApplication.class, args);
        //args="server.port=8081"
    }
}
如果将启动类中的args参数剔除,则不会有临时属性起作用,断开外部临时配置的入口。
如:
@SpringBootApplication
public class Springboot06SsmApplication {

    public static void main(String[] args) {
        SpringApplication.run(Springboot06SsmApplication.class);

    }
}
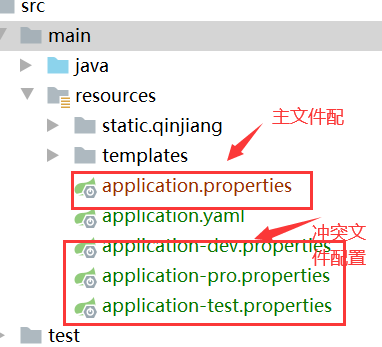
同一种文件不同位置优先级:
项目工程/config/application.yml>项目工程/application.yml>resources/config/application.yml>resources/application.yml
不同文件同一位置优先级:
xx.properties>xx.ym>xx.yaml
SpringBoot中4级配置文件
1级: file : config/application.ym 【最高】
2级: file : application.yml
3级: classpath: config/application.yml
4级: classpath: application.yml【最低】
2.作用:
1级与2级留做系统打包后设置通用属性,1级常用于运维经理进行线上整体项目部署方案调控
3级与4级用于系统开发阶段设置通用属性,3级常用于项目经理进行整体项目属性调控
13.多环境开发
yaml版本
spring:
  profiles:
    active: dev


#生产环境
---
spring:
  profiles: dev
server:
  port: 8080

#开发环境
---
spring:
  profiles: tt      #格式过时
server:
  port: 8082
#测试环境
---
spring:
  config:
    activate:
      on-profile: zf  #新格式
server:
  port: 8083
properties版本:
与yaml相同,yaml现在也是使用冲突文件分开的形式,不再写在一个文件里了
多环境分组管理:
spring:
  profiles:
    active: dev #启动的是dev组而不是单独的某个文件
 #   include: devDB,devMVC 之前运用的功能
    group:
      "dev":devDB,devMVC
      "pro":proDB,proMVC
 #启动配置是dev文件为主,也包括devDB,devMVC文件,有冲突了按照dev文件配置执行,如果dev没有配置则最后文件执行的属性会覆盖前面文件(不包括主文件)冲突的属性
14.整合Redis
是一款key-value存储结构的内存集NoSQL数据库
启动服务器:
redis-server.exe redis.windows.conf
启动服务器之后窗口不要关,新打开一个窗口启动redis
redis-cli.exe -h 127.0.0.1 -p 6379
将Redis启动之后我们来用idea使用,注意此时的Redis服务不要关
首先将Redis相关的配置依赖导入
<dependency>
            <groupId>org.springframework.boot</groupId>
            <artifactId>spring-boot-starter-data-redis</artifactId>
        </dependency>
        <dependency>
            <groupId>org.springframework.boot</groupId>
            <artifactId>spring-boot-starter-data-redis-reactive</artifactId>
        </dependency>
在yaml文件配置相关信息
spring:
  redis:
    host: localhost
    port: 6379
测试Redis:
@SpringBootTest
class Sptingboot07RedisApplicationTests {
    @Autowired(required = false)
    RedisTemplate redisTemplate;

    @Test
    void contextLoads() {
    }

    @Test
    void set(){
//        每一种数据都有不同的操作对象,现获取操作对象然后再对数据进行相关操作
        ValueOperations valueOperations = redisTemplate.opsForValue();

        valueOperations.set("gtt","mylover");
    }

    @Test

    void get(){
        ValueOperations valueOperations = redisTemplate.opsForValue();
        Object gtt = valueOperations.get("gtt");
        System.out.println(gtt);
    }

    @Test
    void hset()
    {
//        opsForHash,对hash数据操作对象
        HashOperations hashOperations = redisTemplate.opsForHash();
        hashOperations.put("option","a1","aaa");
    }

    @Test
    void hget(){
        HashOperations hashOperations = redisTemplate.opsForHash();
        Object o = hashOperations.get("option", "a1");
        System.out.println(o);
    }
}
注意:
//    以对象操作的基本单元
    @Autowired(required = false)
    RedisTemplate redisTemplate;
//    以字符串操作的基本单元
    @Autowired(required = false)
    StringRedisTemplate stringRedisTemplate;

    @Test
    void get(){
//        ValueOperations<String, String> ops = stringRedisTemplate.opsForValue();
//        System.out.println(ops.get("gtt"));
        ValueOperations valueOperations = redisTemplate.opsForValue();
        Object gtt = valueOperations.get("gtt");
        System.out.println(gtt);
Redis实现客户端切换(jedis):
导包:
<dependency>
    <groupId>redis.clients</groupId>
    <artifactId>jedis</artifactId>
</dependency>
配置:
spring:
  redis:
    host: localhost
    port: 6379
    client-type: jedis
jedis就是基于java语言的redis客户端,集成了redis的命令操作,提供了连接池管理。
lettcus与jedis区别:
springboot默认使用lettcus
- jedis连接Redis服务器是直连模式,当多线程模式下使用jedis会存在线程安全问题,解决方案可以通过配置连接池使每个连接专用,这样整体性能就大受影响。
- lettcus基于Netty框架进行与Redis服务器连接,底层设计中采用StatefulRedisConnection。StatefulRedisConnection自身是线程安全的,可以保障并发访问安全问题,所以一个连接可以被多线程复用。当然lettcus也支持多连接实例一起工作。
15.Mongodb
mysql不够快,redis速度快但是不能结构化,为了满足速度快且能够结构化特点,引入Mongodb存入经常修改的数据的变化
MongoDB是一个开源、高性能、无模式的文档型数据库。NoSQL数据库产品中的一种,是最像关系型数据库的非关系型数据库
iddea整合mongodb
1.导包
        <dependency>
            <groupId>org.springframework.boot</groupId>
            <artifactId>spring-boot-starter-data-mongodb</artifactId>
        </dependency>
2.在 yaml中配置mongo属性
spring:
  data:
    mongodb:
      uri: mongodb://localhost/test
3.使用MongoTemplet操作MongoDB数据库中的数据
 @Autowired
    MongoTemplate mongoTemplate;
    @Test
    void contextLoads() {
        Users users = new Users();
        users.setAge(18);
        users.setName("tzf");
        users.setPwd("123456");
        mongoTemplate.insert(users);
    }

    @Test
    void FindTest(){
        System.out.println(mongoTemplate.findAll(Users.class));
    }
16.ES(分布式全文搜索引擎)
倒排索引:
通过提供的数据分词,分词后的关键字对应主键,再根据主键查找详细的信息。此操作大幅度加快了查找的速度
17.mybatisplus小结
mybatisplus的条件查询:
//方式一常规格式
Querywrapper<User> qw = new Querywrapper<User>();//查询年龄大于等于18岁,小于65岁的用户
qw.lt( "age" ,65);
qw.ge( "age",18);
List<User> userList = userDao.selectlist(qw);
system.out.print1n(userList);


//方式二: Lambda格式接条件合海
Querywrapper<User> qw= new Querywrapper<User>( );
qw.Lambda( ).lt(User : : getAge,10);
List<User> userList = userDao.seLectList(qw) ;
System.out.println(userList);


//方式三
LambdaQuerywrapper<User> lqw = new LambdeQueryiwrapper<User>();
//10.到30岁之间,lt小于,gt表示大于
lqw.Lt(user: : getAge,30 ).gt(User: :getAge,10);
//il小子1日岁或者人于30岁,.or()条件或者关系
lqw.lt(User : :getAge,val: 10).or().gt(User: : getAge,val: 30);
//应对参数为空
lqw.lt(null!=uq.getage,User : :getAge,val: 10);
List<User> userList = userDao.selectlist(lqw) ;
system.out.println(userList);

 浙公网安备 33010602011771号