
opencv与pytorch在spyder中的安装
网络稳定才能切换源后创建虚拟环境。
网络不稳定是切换源的原因。对各种报错问题,网上给出各种安装方法。
我的安装发现我主要问题是网络不稳定,且切换源后网络也不行,用有线网也是时好时坏。
或许要在自己的电脑上安装试试。
创建虚拟环境spyder,我的尝试流程:
1、换源:anaconda | 镜像站使用帮助 | 清华大学开源软件镜像站 | Tsinghua Open Source Mirror
Windows 用户无法直接创建名为 .condarc 的文件,可先执行 conda config --set show_channel_urls yes 生成该文件之后再修改。
.condarc 更改:
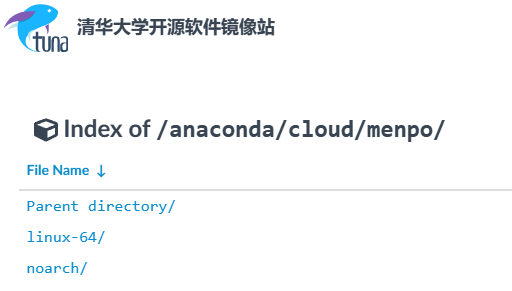
channels:
  - http://mirrors.tuna.tsinghua.edu.cn/anaconda/pkgs/free/
  - http://mirrors.tuna.tsinghua.edu.cn/anaconda/cloud/conda-forge/
  - http://mirrors.tuna.tsinghua.edu.cn/anaconda/cloud/msys2/
  - http://mirrors.tuna.tsinghua.edu.cn/anaconda/cloud/bioconda/
  - http://mirrors.tuna.tsinghua.edu.cn/anaconda/pkgs/main/
show_channel_urls: true
default_channels:
  - http://mirrors.tuna.tsinghua.edu.cn/anaconda/cloud/pytorch/
  - http://mirrors.tuna.tsinghua.edu.cn/anaconda/pkgs/main
  - http://mirrors.tuna.tsinghua.edu.cn/anaconda/pkgs/r
  - http://mirrors.tuna.tsinghua.edu.cn/anaconda/pkgs/msys2
  - http://mirrors.tuna.tsinghua.edu.cn/anaconda/cloud/menpo/
  - http://pypi.douban.com/simple/
  - http://mirrors.aliyun.com/pypi/simple/

custom_channels:
  conda-forge: http://mirrors.tuna.tsinghua.edu.cn/anaconda/cloud
  msys2: http://mirrors.tuna.tsinghua.edu.cn/anaconda/cloud
  bioconda: http://mirrors.tuna.tsinghua.edu.cn/anaconda/cloud
  menpo: http://mirrors.tuna.tsinghua.edu.cn/anaconda/cloud
  pytorch: http://mirrors.tuna.tsinghua.edu.cn/anaconda/cloud
  pytorch-lts: http://mirrors.tuna.tsinghua.edu.cn/anaconda/cloud
  simpleitk: http://mirrors.tuna.tsinghua.edu.cn/anaconda/cloud
ssl_verify: false
2、复制base环境。因为创建虚拟环境还需要安装spyder,我conda install spyder 报错,所以直接复制base;base环境已经装有spyder。
conda create -n 新环境名 --clone 旧环境名
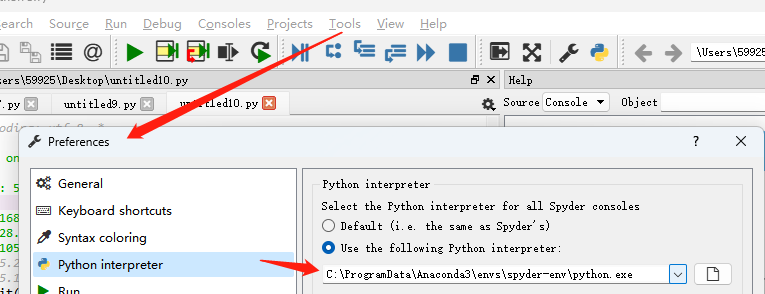
把spyder解析器改成虚拟环境下的python解析器。
3、安装opencv 和pytorch
#opencv3在python中导入是cv2
#conda install opencv3 -c http://mirrors.tuna.tsinghua.edu.cn/anaconda/cloud/menpo/pakages/opencv3
估计是清华源的opencv不在导致安装报错。

0.安装opencv,
conda install -c conda-forge opencv
1.查看

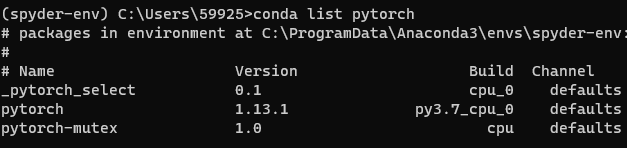
0.安装pytorch
conda install pytorch
1.查看

安装成功,但是在prompt中不能使用
找到一个连接:Pytorch学习笔记(1):import torch无法使用,就老老实实按照官方建议做就对了 - 知乎 (zhihu.com)
按照这个连接重新安装:
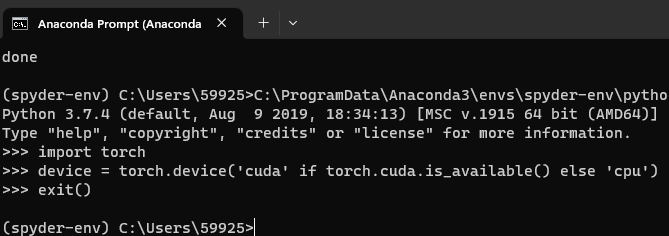
conda install pytorch torchvision torchaudio cpuonly -c pytorch结果:(需要重新打开spyder)在prompt中能使用,spyder中不能使用。
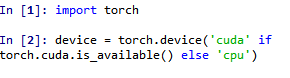
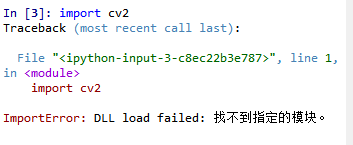
关闭spyder重新打开,import torch可以使用了。

import cv2 报下图错:与未更换torch时报错一样,几乎可以确定是版本安装错误的原因了。
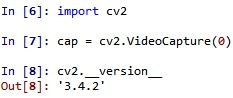
更改opencv版本。根据下面链接确定安装3.4.2版本的opencv,
[保姆级教程]在Anaconda环境中安装OpenCV(WIN 10, 64, Python3.7) - 哔哩哔哩 (bilibili.com)
后根据这里进行操作(8条消息) 【实用】使用WHL包的方式安装OPENCV的办法_展桑~~的博客-CSDN博客
我下载的版本是这一个

至此opencv与torch均可在spyder中使用。


 浙公网安备 33010602011771号