Linux + Python的第一天
1、源码安装python
[root@tanuki ~]# yum -y groupinstall "Development Tools"
[root@tanuki ~]# yum -y  install zlib-devel bzip-devel openssl-devel sqlite-devel readline-devel libffi-devel
[root@tanuki ~]# wget https://www.python.org/ftp/python/3.7.6/Python-3.7.6.tar.xz
# 这里做出说明,本次安装的是python3.7.6,大版本号3.7是稳定的,小版本号无所谓,想要安装别的版本可以去官网查看别的版本号。
[root@tanuki ~]# tar -xf Python-3.7.6.tar.xz
[root@tanuki ~]# cd Python-3.7.6/
[[root@tanuki Python-3.7.6]#  sed -ri 's/^#readline/readline/' Modules/Setup.dist
[[root@tanuki Python-3.7.6]#  sed -ri 's/^#(SSL=)/\1/' Modules/Setup.dist
[[root@tanuki Python-3.7.6]#  sed -ri 's/^#(_ssl)/\1/' Modules/Setup.dist
[[root@tanuki Python-3.7.6]#  sed -ri 's/^#([\t]*-DUSE)/\1/' Modules/Setup.dist
[[root@tanuki Python-3.7.6]#  sed -ri 's/^#([\t]*-L\$\(SSL\))/\1/' Modules/Setup.dist
[[root@tanuki Python-3.7.6]# ./confgure --enable-shared
# 安装共享库,共享库再使用其他需要调用python的软件时会用到,比如使用mod_wgsi连接apache与python时需要。
[root@tanuki Python-3.7.6]# echo $?
0
[root@tanuki Python-3.7.6]# make -j 2 && make install
# 这里指定当前主机的cpu核数,我设置的是2,因为安装部署比较耗时。
[root@tanuki Python-3.7.6]# echo $?
0
[root@tanuki Python-3.7.6]# cat  /etc/profile.d/python3_lib.sh
export LD_LIBRARY_PATH=$LD_LIBRARY_PATH:/usr/local/lib
[root@tanuki Python-3.7.6]# cat  /etc/ld.so.conf.d/python3.conf
/usr/local/lib
[root@tanuki ~]# ldconfig
[root@tanuki ~]# source /etc/profile
[root@tanuki ~]# python3 -V
[root@tanuki ~]# python3
[root@tanuki Python-3.7.6]# python3
Python 3.7.6 (default, May  8 2022, 08:55:29)
[GCC 4.8.5 20150623 (Red Hat 4.8.5-44)] on linux
Type "help", "copyright", "credits" or "license" for more information.
>>> exit()
2、安装pip
[root@tanuki ~]# pip3 -V
[root@tanuki ~]# mkdir ~/.pip
[root@tanuki ~]# cat  /root/.pip/pip.conf
[global]
index-url=https://mirrors.aliyun.com/pypi/simple
[root@tanuki ~]# pip3 install ipython
# 安装增强版解析器
Installing collected packages: backcall, traitlets, matplotlib-inline, pickleshare, decorator, parso, jedi, pygments
Successfully installed backcall-0.2.0 decorator-5.1.1 ipython-7.33.0 jedi-0.18.1 matplotlib-inline-0.1.3 parso-0.8.3ments-2.12.0 traitlets-5.1.1 wcwidth-0.2.5
WARNING: You are using pip version 19.2.3, however version 22.0.4 is available.
You should consider upgrading via the 'pip install --upgrade pip' command.
# 已经安装成功,问需不需要更新”pip“,但是如果直接按照他提示的命令我们默认升级的是pip2,而不是pip3。
[root@tanuki Python-3.7.6]# python -V
Python 2.7.5
# 系统中默认已经安装了pthon-2.7.5的版本,而pip2与pip3不兼容,所以如果我们想要升级pip3需要修改命令。
[root@tanuki ~]# pip3 install --upgrade pip
Installing collected packages: pip
  Found existing installation: pip 19.2.3
    Uninstalling pip-19.2.3:
      Successfully uninstalled pip-19.2.3
Successfully installed pip-22.0.4
# pip3升级完成。
3、安装ipython
[root@tanuki ~]# python3
Python 3.7.6 (default, May  8 2022, 08:55:29)
[GCC 4.8.5 20150623 (Red Hat 4.8.5-44)] on linux
Type "help", "copyright", "credits" or "license" for more information.
>>> s = 'hello'
>>> s.
s.capitalize(    s.format(        s.isidentifier(  s.ljust(         s.rjust(         s.swapcase(
s.casefold(      s.format_map(    s.islower(       s.lower(         s.rpartition(    s.title(
s.center(        s.index(         s.isnumeric(     s.lstrip(        s.rsplit(        s.translate(
s.count(         s.isalnum(       s.isprintable(   s.maketrans(     s.rstrip(        s.upper(
s.encode(        s.isalpha(       s.isspace(       s.partition(     s.split(         s.zfill(
s.endswith(      s.isascii(       s.istitle(       s.replace(       s.splitlines(
s.expandtabs(    s.isdecimal(     s.isupper(       s.rfind(         s.startswith(
s.find(          s.isdigit(       s.join(          s.rindex(        s.strip(
>>> s.upper()
'HELLO'
>>> exit()
[root@tanuki ~]# pip3 install ipython
Looking in indexes: https://mirrors.aliyun.com/pypi/simple
Requirement already satisfied: ipython in /usr/local/lib/python3.7/site-packages (7.33.0)
Requirement already satisfied: matplotlib-inline in /usr/local/lib/python3.7/site-packages (from ipython) (0.1.3)
Requirement already satisfied: decorator in /usr/local/lib/python3.7/site-packages (from ipython) (5.1.1)
Requirement already satisfied: pexpect>4.3 in /usr/local/lib/python3.7/site-packages (from ipython) (4.8.0)
Requirement already satisfied: jedi>=0.16 in /usr/local/lib/python3.7/site-packages (from ipython) (0.18.1)
Requirement already satisfied: prompt-toolkit!=3.0.0,!=3.0.1,<3.1.0,>=2.0.0 in /usr/local/lib/python3.7/site-packages (from ipython) (3.0.29)
Requirement already satisfied: pickleshare in /usr/local/lib/python3.7/site-packages (from ipython) (0.7.5)
Requirement already satisfied: traitlets>=4.2 in /usr/local/lib/python3.7/site-packages (from ipython) (5.1.1)
Requirement already satisfied: pygments in /usr/local/lib/python3.7/site-packages (from ipython) (2.12.0)
Requirement already satisfied: backcall in /usr/local/lib/python3.7/site-packages (from ipython) (0.2.0)
Requirement already satisfied: setuptools>=18.5 in /usr/local/lib/python3.7/site-packages (from ipython) (41.2.0)
Requirement already satisfied: parso<0.9.0,>=0.8.0 in /usr/local/lib/python3.7/site-packages (from jedi>=0.16->ipython) (0.8.3)
Requirement already satisfied: ptyprocess>=0.5 in /usr/local/lib/python3.7/site-packages (from pexpect>4.3->ipython) (0.7.0)
Requirement already satisfied: wcwidth in /usr/local/lib/python3.7/site-packages (from prompt-toolkit!=3.0.0,!=3.0.1,<3.1.0,>=2.0.0->ipython) (0.2.5)
WARNING: Running pip as the 'root' user can result in broken permissions and conflicting behaviour with the system package manager. It is recommended to use a virtual environment instead: https://pip.pypa.io/warnings/venv
[root@tanuki ~]# echo $?
0
# ipython一个tab可以出现方法,双tab可以去选择方法,也可以使用方向键进行选择,但是新tab出来的,相比较于python3是没有添加括号的。
[root@tanuki ~]# ipython
Python 3.7.6 (default, May  8 2022, 08:55:29)
Type 'copyright', 'credits' or 'license' for more information
IPython 7.33.0 -- An enhanced Interactive Python. Type '?' for help.

In [1]: h = 'hello'
In [2]: h.upper()
Out[2]: 'HELLO'
In [3]: ??open         # 内置函数使用说明,使用q退出
In [4]: !vi hello.py
In [5]: %run hello.py
hello
In [6]: !cat hello.py
print("hello")
In [7]: exit()
# ipython不是用于写代码的,更多是用于代码测试的,起到调试作用,代码的编辑需要使用visconde。
4、安装viscode
# 我们可以直接访问viscode的官网进行访问得到安装过程,此次我将它安装在linux上,具体流程直接复制粘贴官网的就ok了,这里不赘述。

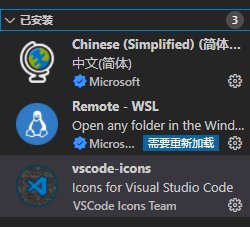
# 安装成功后,我们需要添加几个插件,用来让我们的使用更加方便。
# Chinese 不多说就是汉化;
# wsl 是因为我用的是linux-window;
# icons 将我们的图标进行美化...
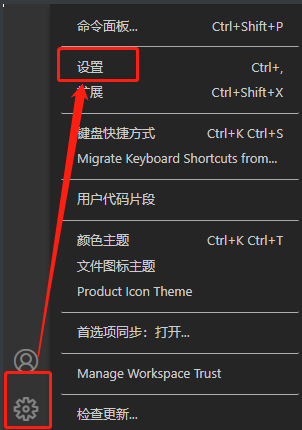
# 我们可以使用点点点的方式去设置,也可以使用我下面的方法。
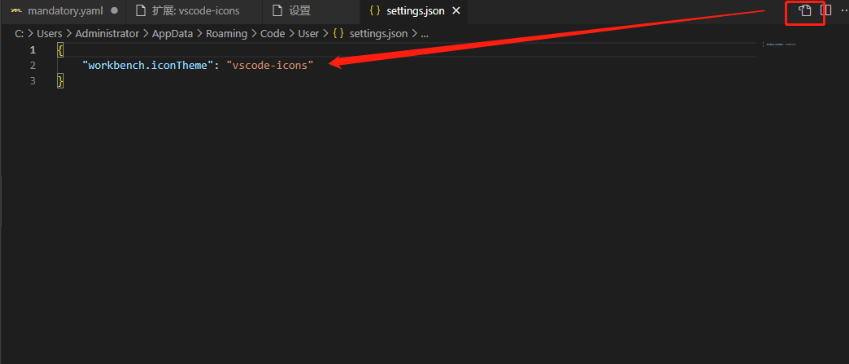

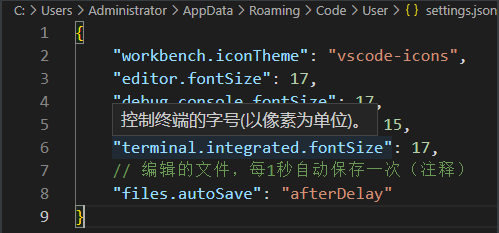
{
    "workbench.iconTheme": "vscode-icons",
    "editor.fontSize": 17,
    "debug.console.fontSize": 17,
    "markdown.preview.fontSize": 15,
    "terminal.integrated.fontSize": 17,
    // 编辑的文件,每1秒自动保存一次(注释)
    "files.autoSave": "afterDelay"
}
    // 这里使用的是JavaScript,这些配置可以直接点点点进行配置,不过为了以后方便,我这里保存下代码。control + s 保存使用。
	// 到这里配置也就结束了。
5、创建python文件
# viscode中运行python文件,需要安装相关扩展,比如python扩展,如果你是在window环境安装的viscode,还需要去安装python解析器。
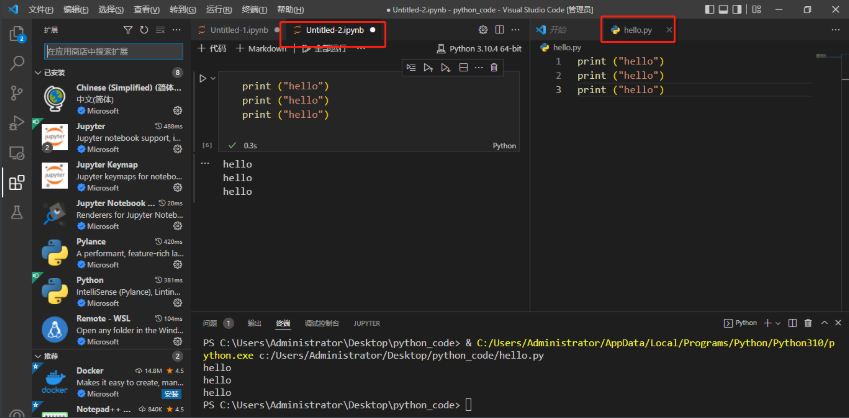
# 看大家喜好,决定用哪种。我这里使用window举的例子,并没有用linux。
# window在安装code runner后也出现了一个问题,顺便解决了一下,这里记录一下。
# 问题1、已经编辑了配置无法清屏。
# 问题2、执行.py文件失败。
# 解决:在安装部署code runner后需要我们去做一下配置,声明我们配置的文件路径,这里的路径和window不同,需要注意。
# 顺便记录快捷方式:contr + ?快速注释
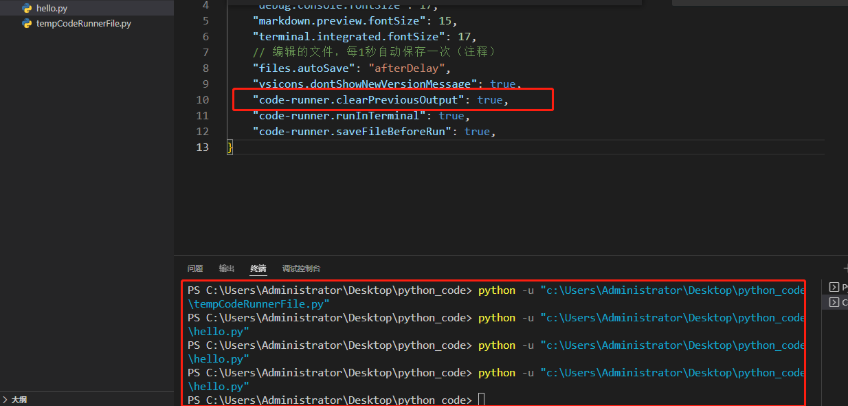
// 此时的配置文件
{
    "workbench.iconTheme": "vscode-icons",
    "editor.fontSize": 17,
    "debug.console.fontSize": 17,
    "markdown.preview.fontSize": 15,
    "terminal.integrated.fontSize": 17,
    // 编辑的文件,每1秒自动保存一次(注释)
    "files.autoSave": "afterDelay"
    // "vsicons.dontShowNewVersionMessage": true,
    // "code-runner.saveFileBeforeRun": true,
    "[python]": {
        "editor.wordBasedSuggestions": false
    },
    "python.linting.flake8Enabled": true,
    "python.formatting.provider": "yapf",
    "python.linting.pylintEnabled": false,
    "code-runner.clearPreviousOutput": true,
    // "code-runner.runInTerminal": true,
    "workbench.startupEditor": "newUntitledFile",
    "python.pythonPath":"C:\\Users\\Administrator\\AppData\\Local\\Programs\\Python\\Python310\\p
    ython.exe",
    "python.linting.enabled": false,
    "code-runner.executorMap": {
        "javascript": "node",
        "java": "cd $dir && javac $fileName && java $fileNameWithoutExt",
        "c": "cd $dir && gcc $fileName -o $fileNameWithoutExt && $dir$fileNameWithoutExt",
        "cpp": "cd $dir && g++ $fileName -o $fileNameWithoutExt && $dir$fileNameWithoutExt",
        "objective-c": "cd $dir && gcc -framework Cocoa $fileName -o $fileNameWithoutExt && $dir$fileNameWithoutExt",
        "php": "php",
        "python": "$pythonPath -u $fullFileName",
        "perl": "perl",
        "perl6": "perl6",
        "ruby": "ruby",
        "go": "go run",
        "lua": "lua",
        "groovy": "groovy",
        "powershell": "powershell -ExecutionPolicy ByPass -File",
        "bat": "cmd /c",
        "shellscript": "bash",
        "fsharp": "fsi",
        "csharp": "scriptcs",
        "vbscript": "cscript //Nologo",
        "typescript": "ts-node",
        "coffeescript": "coffee",
        "scala": "scala",
        "swift": "swift",
        "julia": "julia",
        "crystal": "crystal",
        "ocaml": "ocaml",
        "r": "Rscript",
        "applescript": "osascript",
        "clojure": "lein exec",
        "haxe": "haxe --cwd $dirWithoutTrailingSlash --run $fileNameWithoutExt",
        "rust": "cd $dir && rustc $fileName && $dir$fileNameWithoutExt",
        "racket": "racket",
        "scheme": "csi -script",
        "ahk": "autohotkey",
        "autoit": "autoit3",
        "dart": "dart",
        "pascal": "cd $dir && fpc $fileName && $dir$fileNameWithoutExt",
        "d": "cd $dir && dmd $fileName && $dir$fileNameWithoutExt",
        "haskell": "runhaskell",
        "nim": "nim compile --verbosity:0 --hints:off --run",
        "lisp": "sbcl --script",
        "kit": "kitc --run",
        "v": "v run",
        "sass": "sass --style expanded",
        "scss": "scss --style expanded",
        "less": "cd $dir && lessc $fileName $fileNameWithoutExt.css",
        "FortranFreeForm": "cd $dir && gfortran $fileName -o $fileNameWithoutExt && $dir$fileNameWithoutExt",
        "fortran-modern": "cd $dir && gfortran $fileName -o $fileNameWithoutExt && $dir$fileNameWithoutExt",
        "fortran_fixed-form": "cd $dir && gfortran $fileName -o $fileNameWithoutExt && $dir$fileNameWithoutExt",
        "fortran": "cd $dir && gfortran $fileName -o $fileNameWithoutExt && $dir$fileNameWithoutExt"
    }
}
// 到这里对viscode扩展的了解到此为止,已经不影响以后使用了,所以先放到这,以后做了什么优化在回头更新。

 浙公网安备 33010602011771号