keepalived基础知识总结(2)
上一篇博客已经对keepalived原理,应用,配置以及和nginx做了简单的搭配,这一篇主要对keepalived+lvs做个实验和总结。
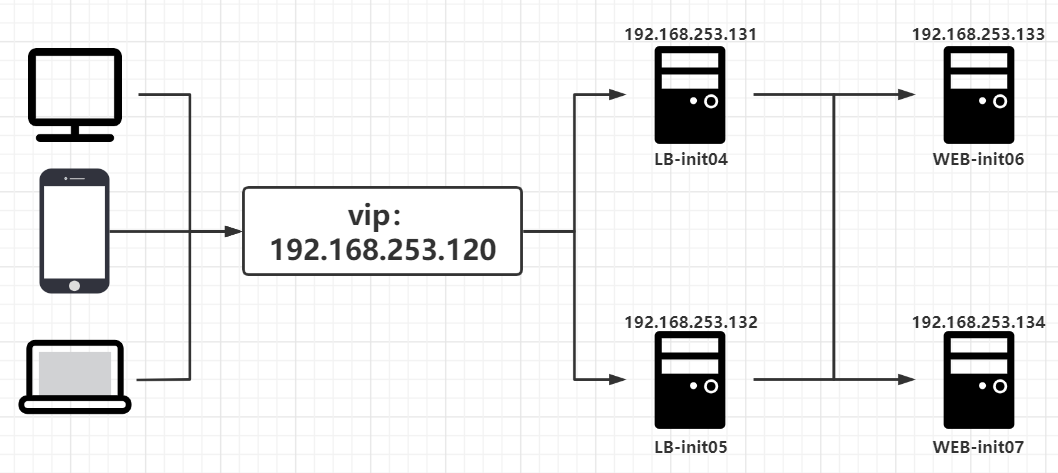
1、拓扑图
2、安装配置
[root@init-04 ~]# yum install keepalived  ipvsadm -y
[root@init-05 ~]# yum install keepalived  ipvsadm -y
# 修改配置文件
[root@init-04 ~]# vim /etc/keepalived/keepalived.conf
! Configuration File for keepalived
global_defs {
	router_id LB1                           # 两边不一样。
	}

vrrp_instance VI_2 {
	state MASTER				# 另外一台机器是BACKUP
	interface ens33				# 心跳网卡
	virtual_router_id 51			# 虚拟路由编号,主备要一致
	priority 150				# 优先级
	advert_int 1				# 检查间隔,单位秒
	authentication {
		auth_type PASS
		auth_pass 1111
		}
	virtual_ipaddress {
		192.168.253.120/24       dev      ens33   	#VIP和工作接口
		}
	}

virtual_server 192.168.253.120 80 {		# LVS 配置,VIP
	delay_loop 3				# 服务论询的时间间隔,#每隔3秒检查一次real_server状态
	lb_algo rr				# LVS 调度算法
	lb_kind DR	 			# LVS 集群模式
	protocol TCP
	real_server 192.168.253.133 80 {
		weight 1
		TCP_CHECK {
			connect_timeout 3       # 健康检查方式,连接超时时间
			}
		}
	real_server 192.168.253.134 80 {
		weight 1
		TCP_CHECK {
			connect_timeout 3
			}
		}
}

[root@init-05 ~]# vim /etc/keepalived/keepalived.conf
! Configuration File for keepalived
global_defs {
	router_id LB2                           # 两边不一样。
	}

vrrp_instance VI_2 {
	state BACKUP				# 另外一台机器是BACKUP
	interface ens33				# 心跳网卡
	virtual_router_id 51			# 虚拟路由编号,主备要一致
	priority 100				# 优先级
	advert_int 1				# 检查间隔,单位秒
	authentication {
		auth_type PASS
		auth_pass 1111
		}
	virtual_ipaddress {
		192.168.253.120/24       dev      ens33   	#VIP和工作接口
		}
	}

virtual_server 192.168.253.120 80 {		# LVS 配置,VIP
	delay_loop 3				# 服务论询的时间间隔,#每隔3秒检查一次real_server状态
	lb_algo rr				# LVS 调度算法
	lb_kind DR	 			# LVS 集群模式
	protocol TCP
	real_server 192.168.253.133 80 {
		weight 1
		TCP_CHECK {
			connect_timeout 3       # 健康检查方式,连接超时时间
			}
		}
	real_server 192.168.253.134 80 {
		weight 1
		TCP_CHECK {
			connect_timeout 3
			}
		}
}
[root@init-04 ~]# systemctl enable keepalived && reboot
[root@init-05 ~]# systemctl enable keepalived && reboot
[root@init-06 ~]# yum install -y httpd && systemctl start httpd && systemctl enable httpd
[root@init-07 ~]# yum install -y httpd && systemctl start httpd && systemctl enable httpd
[root@init-06 ~]# netstat -antp | grep httpd
tcp6       0      0 :::80                   :::*                    LISTEN      6820/httpd
[root@init-07 ~]# netstat -antp | grep httpd
tcp6       0      0 :::80                   :::*                    LISTEN      7184/httpd
[root@init-06 ~]# echo init-06 > /var/www/html/index.html
[root@init-07 ~]# echo init-07 > /var/www/html/index.html
[root@init-06 ~]# cp /etc/sysconfig/network-scripts/{ifcfg-lo,ifcfg-lo:0}
[root@init-06 ~]# vim /etc/sysconfig/network-scripts/ifcfg-lo:0
DEVICE=lo:0
IPADDR=192.168.253.120
NETMASK=255.255.255.255
#NETWORK=127.0.0.0
# If you're having problems with gated making 127.0.0.0/8 a martian,
# you can change this to something else (255.255.255.255, for example)
#BROADCAST=127.255.255.255
ONBOOT=yes
#NAME=loopback

[root@init-06 ~]# scp /etc/sysconfig/network-scripts/ifcfg-lo:0 192.168.253.134:/etc/sysconfig/network-scripts/
[root@init-06 ~]# vim /etc/rc.local
#!/bin/bash
# THIS FILE IS ADDED FOR COMPATIBILITY PURPOSES
#
# It is highly advisable to create own systemd services or udev rules
# to run scripts during boot instead of using this file.
#
# In contrast to previous versions due to parallel execution during boot
# this script will NOT be run after all other services.
#
# Please note that you must run 'chmod +x /etc/rc.d/rc.local' to ensure
# that this script will be executed during boot.

touch /var/lock/subsys/local
/sbin/route add -host 192.168.253.120  dev lo:0

[root@init-07 ~]# vim /etc/rc.local
#!/bin/bash
# THIS FILE IS ADDED FOR COMPATIBILITY PURPOSES
#
# It is highly advisable to create own systemd services or udev rules
# to run scripts during boot instead of using this file.
#
# In contrast to previous versions due to parallel execution during boot
# this script will NOT be run after all other services.
#
# Please note that you must run 'chmod +x /etc/rc.d/rc.local' to ensure
# that this script will be executed during boot.

touch /var/lock/subsys/local
/sbin/route add -host 192.168.253.120  dev lo:0

[root@init-06 ~]# vim /etc/sysctl.conf
# sysctl settings are defined through files in
# /usr/lib/sysctl.d/, /run/sysctl.d/, and /etc/sysctl.d/.
#
# Vendors settings live in /usr/lib/sysctl.d/.
# To override a whole file, create a new file with the same in
# /etc/sysctl.d/ and put new settings there. To override
# only specific settings, add a file with a lexically later
# name in /etc/sysctl.d/ and put new settings there.
#
# For more information, see sysctl.conf(5) and sysctl.d(5).
net.ipv4.conf.all.arp_ignore = 1
net.ipv4.conf.all.arp_announce = 2
net.ipv4.conf.default.arp_ignore = 1
net.ipv4.conf.default.arp_announce = 2
net.ipv4.conf.lo.arp_ignore = 1
net.ipv4.conf.lo.arp_announce = 2

[root@init-07 ~]# vim /etc/sysctl.conf
# sysctl settings are defined through files in
# /usr/lib/sysctl.d/, /run/sysctl.d/, and /etc/sysctl.d/.
#
# Vendors settings live in /usr/lib/sysctl.d/.
# To override a whole file, create a new file with the same in
# /etc/sysctl.d/ and put new settings there. To override
# only specific settings, add a file with a lexically later
# name in /etc/sysctl.d/ and put new settings there.
#
# For more information, see sysctl.conf(5) and sysctl.d(5).
net.ipv4.conf.all.arp_ignore = 1
net.ipv4.conf.all.arp_announce = 2
net.ipv4.conf.default.arp_ignore = 1
net.ipv4.conf.default.arp_announce = 2
net.ipv4.conf.lo.arp_ignore = 1
net.ipv4.conf.lo.arp_announce = 2

[root@init-06 ~]# reboot
[root@init-07 ~]# reboot
[root@init-04 ~]# ipvsadm -L
IP Virtual Server version 1.2.1 (size=4096)
Prot LocalAddress:Port Scheduler Flags
  -> RemoteAddress:Port           Forward Weight ActiveConn InActConn
TCP  init-05:http rr
  -> 192.168.253.133:http         Route   1      0          0
  -> 192.168.253.134:http         Route   1      0          0
3、应用测试
# 对两个web进行访问测试。


# 根据vip进行访问。

# 测试1,将master宕掉,查看vip和路由情况,并对页面进行访问。
# 测试2,将web-init06宕掉,查看页面访问情况。
# 总结:本次实验答题思路是通过lvs+keepalived的方式,对来自虚拟ip的流量进行分发,通过路由转发至lo:0,再将请求转到后端真实的服务器上。所以大体思路就可以进行划分为配置keepalived并配置lvs四层负载均衡,配置后端服务器应用与回环接口lo:0,而keepalived.conf分为两部分,一部分为keepalived相关配置文件,一部分为lvs的配置。四层负载均衡是通过ip+端口的方式进行流量分发,所以在keepalive.conf文件中采用ip加端口的形式,原理和流程更加熟悉和理解,更方便我们进行环境部署、应用配置和故障排查。

 浙公网安备 33010602011771号