Canny边缘检测
Canny边缘检测算法
1986年提出,是OpenCV使用的边缘检测算法。
包含下面几个步骤
高斯滤波
滤波的目的一般是为了去除图像中的噪声,使图像变得更加平滑,减少噪点,从直观上来看就是使图像变得模糊。
对一幅图像,其中的点用\((m,n)\)表示,其灰度值使用函数表示:\(f(m,n)\)。
那么经过高斯滤波之后的灰度值变为:
\[g_\sigma(m,n)=\frac{1}{\sqrt{2\pi{\sigma}^2}}e^{-\frac{m^2+n^2}{2\sigma^2}}·f(m.n)
\]
简单说就是用一个高斯矩阵乘以每一个像素点及其邻域,取其带权重的平均值作为最后的灰度值。
计算梯度值和梯度方向
图像内容的边缘就是灰度值变化极大的区域的集合,图像中的梯度就代表像素的灰度值改变的程度与方向。
它可以通过点乘一个sobel或其它算子得到不同方向的梯度值 ,
。
综合梯度通过以下公式计算梯度值和梯度方向:
过滤非最大值
由于上一步计算出的边缘大小可能范围比真实的边缘要大一些,也就是说边缘被放大了,这个步骤使用一个规则来过滤掉不是边缘的点,使边缘的宽度尽可能为一个像素点,如果一个像素点是边缘上的点,那么这个点的梯度方向上的梯度值就是最大值,否则就不被认为是边缘,并将其设为0 。

使用上下阈值来检测边缘
一般情况下,使用一个阀值来检测边缘,但是这样做未免太武断了。如果能够使用启发式的方法确定一个上阀值和下阀值,位于下阀值之上的都可以作为边缘,这样就可能提高准确度。
它的步骤是这样的。
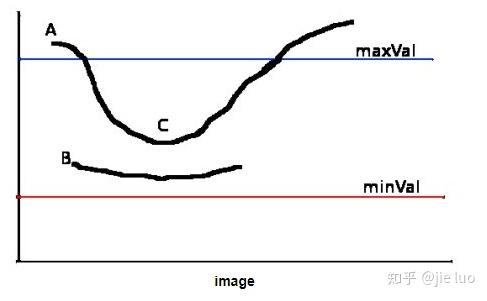
它设置两个阀值(threshold),分别为maxVal和minVal。其中大于maxVal的都被检测为边缘,而低于minval的都被检测为非边缘。对于中间的像素点,如果与确定为边缘的像素点邻接,则判定为边缘;否则为非边缘。
代码实现
import cv2
import numpy as np

# OpenCV 自带的边缘检测方法
# origin_canny_resolution = cv2.imread('source/flower2.jpg')
# edge = cv2.Canny(origin_canny_resolution, 60, 180)
# cv2.imshow('canny', edge)
# cv2.waitKey(0)
#
# cv2.destroyAllWindows()

import cv2
import numpy as np


def Canny(img):
    # sobel filter
    def sobel_filter(img, K_size=3):
        if len(img.shape) == 3:
            H, W, C = img.shape
        else:
            H, W = img.shape

        # Zero padding
        pad = K_size // 2
        out = np.zeros((H + pad * 2, W + pad * 2), dtype=np.float)
        out[pad: pad + H, pad: pad + W] = img.copy().astype(np.float)
        tmp = out.copy()

        out_v = out.copy()
        out_h = out.copy()

        # Sobel vertical
        Kv = [[1., 2., 1.], [0., 0., 0.], [-1., -2., -1.]]
        # Sobel horizontal
        Kh = [[1., 0., -1.], [2., 0., -2.], [1., 0., -1.]]

        # filtering
        for y in range(H):
            for x in range(W):
                out_v[pad + y, pad + x] = np.sum(Kv * (tmp[y: y + K_size, x: x + K_size]))
                out_h[pad + y, pad + x] = np.sum(Kh * (tmp[y: y + K_size, x: x + K_size]))

        out_v = np.clip(out_v, 0, 255)
        out_h = np.clip(out_h, 0, 255)

        out_v = out_v[pad: pad + H, pad: pad + W]
        out_v = out_v.astype(np.uint8)
        out_h = out_h[pad: pad + H, pad: pad + W]
        out_h = out_h.astype(np.uint8)

        return out_v, out_h

    # 获取边缘的宽度和角度
    def get_edge_angle(fx, fy):
        # 获取宽度
        edge = np.sqrt(np.power(fx.astype(np.float32), 2) + np.power(fy.astype(np.float32), 2))
        edge = np.clip(edge, 0, 255)

        # 确认分母不为0
        fx = np.maximum(fx, 1e-10)

        # 使用tan的值计算角度,梯度方向
        angle = np.arctan(fy / fx)

        return edge, angle

    # 根据角度的范围将角度归类到0, 45, 90, 135
    def angle_quantization(angle):
        angle = angle / np.pi * 180
        angle[angle < -22.5] = 180 + angle[angle < -22.5]
        _angle = np.zeros_like(angle, dtype=np.uint8)
        _angle[np.where(angle <= 22.5)] = 0
        _angle[np.where((angle > 22.5) & (angle <= 67.5))] = 45
        _angle[np.where((angle > 67.5) & (angle <= 112.5))] = 90
        _angle[np.where((angle > 112.5) & (angle <= 157.5))] = 135

        return _angle

    # 非极值抑制
    def non_maximum_suppression(angle, edge):
        H, W = angle.shape
        _edge = edge.copy()

        for y in range(H):
            for x in range(W):
                if angle[y, x] == 0:
                    dx1, dy1, dx2, dy2 = -1, 0, 1, 0
                elif angle[y, x] == 45:
                    dx1, dy1, dx2, dy2 = -1, 1, 1, -1
                elif angle[y, x] == 90:
                    dx1, dy1, dx2, dy2 = 0, -1, 0, 1
                elif angle[y, x] == 135:
                    dx1, dy1, dx2, dy2 = -1, -1, 1, 1
                # 边界处理
                if x == 0:
                    dx1 = max(dx1, 0)
                    dx2 = max(dx2, 0)
                if x == W - 1:
                    dx1 = min(dx1, 0)
                    dx2 = min(dx2, 0)
                if y == 0:
                    dy1 = max(dy1, 0)
                    dy2 = max(dy2, 0)
                if y == H - 1:
                    dy1 = min(dy1, 0)
                    dy2 = min(dy2, 0)
                # 如果不是最大值,则将这个位置像素值置为0
                if max(max(edge[y, x], edge[y + dy1, x + dx1]), edge[y + dy2, x + dx2]) != edge[y, x]:
                    _edge[y, x] = 0

        return _edge

    # 滞后阈值处理二值化图像
    # > HT 的设为255,< LT 的设置0,介于它们两个中间的值,使用8邻域判断法
    def hysterisis(edge, HT=100, LT=30):
        H, W = edge.shape

        # Histeresis threshold
        edge[edge >= HT] = 255
        edge[edge <= LT] = 0

        _edge = np.zeros((H + 2, W + 2), dtype=np.float32)
        _edge[1: H + 1, 1: W + 1] = edge

        # 8 临近法
        nn = np.array(((1., 1., 1.), (1., 0., 1.), (1., 1., 1.)), dtype=np.float32)

        for y in range(1, H + 2):
            for x in range(1, W + 2):
                if _edge[y, x] < LT or _edge[y, x] > HT:
                    continue
                if np.max(_edge[y - 1:y + 2, x - 1:x + 2] * nn) >= HT:
                    _edge[y, x] = 255
                else:
                    _edge[y, x] = 0

        edge = _edge[1:H + 1, 1:W + 1]

        return edge

    # 灰度化
    gray = cv2.cvtColor(img, cv2.COLOR_BGR2GRAY)

    # 使用高斯滤波器过滤,去除高频噪声
    # gaussian = gaussian_filter(gray, K_size=3, sigma=1.4)
    gaussian = cv2.GaussianBlur(gray, (3, 3), 1.4)
    # 使用Sobel算子过滤图像
    fy, fx = sobel_filter(gaussian, K_size=3)

    # 获取边缘,宽度以及角度
    edge, angle = get_edge_angle(fx, fy)

    # 角度量化
    angle = angle_quantization(angle)

    # 非极值抑制
    edge = non_maximum_suppression(angle, edge)

    # 上下边缘检测
    out = hysterisis(edge, 50, 10)

    return out


if __name__ == '__main__':
    # Read image
    img = cv2.imread("source/flower2.jpg").astype(np.float32)

    # Canny
    edge = Canny(img)

    out = edge.astype(np.uint8)

    cv2.imshow("result", edge)
    # OpenCV 自带的边缘检测方法

    origin_canny_resolution = cv2.imread('source/flower2.jpg')
    edge = cv2.Canny(origin_canny_resolution, 60, 180)
    cv2.imshow('canny', edge)

    cv2.waitKey(0)
    cv2.destroyAllWindows()
实验效果比较
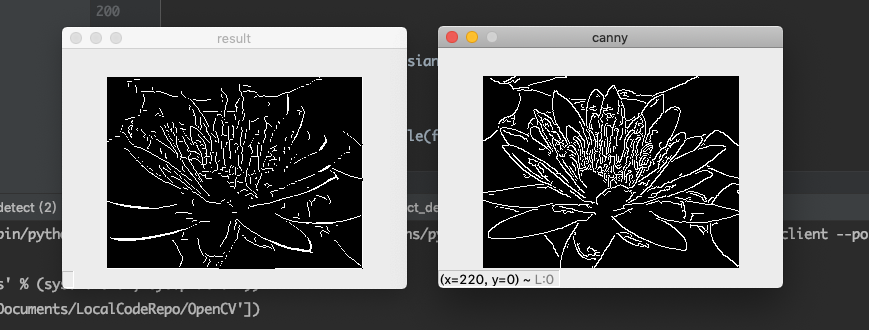
本左侧为自己实现的Canny边缘检测算法,右侧为OpenCV自带的边缘检测算法。
可以看到自己实现的算法相对而言比较离散,噪点较多。

 浙公网安备 33010602011771号