

适配器模式和外观模式有些相似,甚至其实现方式也相似,不同的只是他们的侧重点。
1. 适配器模式
适配器模式,我想用处应该非常广泛,特别是对于环境多变的场合,其定义如下:
将一个类的接口,转换成客户希望的另一个接口。适配器让原本不兼容的类可以合作无间。
这解决了本章开篇的那个需求:“将一个方块放入一个圆洞中!”。
也就是说,适配器通过接口转换解决了兼容性问题。那么他是通过什么方式实现的呢?
在HeadFirst中,作者介绍了两种实现方式:类适配器、对象适配器。
类适配器使用多继承的方式实现,及同时继承客户期望的类和需要被适配的类,并重载客户类中的接口,使其应用被适配类的接口。其UML图如下(来自wikipedia):
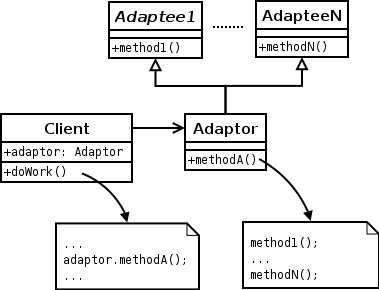
而对象适配器则使用组合的方式应用被适配者的接口,其UML图如下(同样来自wikipedia):

请注意,这种方案中的Adaptor必须与客户类接口一致,我们可以通过继承客户类并重载其方法的方案来实现这个效果。
下面我来举两个例子分别说明这两种实现方案:
这两个例子的场景是这样的:原本我们有一个矩形类:ORect,使用左上角 (topLeft) 和右下角 (bottomRight) 两个点 (OPoint) 来记录,ORect 包含两个方法:setRect(OPoint, OPoint) 和 area(),分别用于设置矩形和获取其面积。
后来,我们需要将这个类移植到一个新的软件中,这个软件的接口使用的是IRect,使用左上角的两个坐标 (left, top) 和宽 (width)、高 (height)。同样有两个方法 setRect(int left, int top, int with, int height) 和 getArea()。那么我们如何处理?看下面的代码:
原始类和接口类:
// 原始类,需要被适配
class ORect {
private:
    int left;
    int top;
    int right;
    int bottom;
public:
    // 使用左上角、右下角的坐标构造矩形
    void setRect(int l, int t, int r, int b) {
        left = l;
        top = t;
        right = r;
        bottom = b;
    }
    // 获取面积
    int area() {
        return (right - left) * (bottom - top);
    }
};
// 接口类,是新的客户代码需要的接口
class IRect {
public:
    // 使用左上角坐标以及宽和高构造矩形
    virtual void setRect(int l, int t, int w, int h) = 0;
    // 获取面积
    virtual int getArea() = 0;
};
类适配器:
// 适配器类,共有继承接口的方法,私有继承原始类的方法
class ClassAdapterRect : public IRect, private ORect {
private:
    int left;
    int top;
    int width;
    int height;
public:
    virtual void setRect(int l, int t, int w, int h) {
        // 为避免歧义,显式调用ORect类的setRect方法。
        // 若不这样,程序在运行时会崩溃(已测试)
        ORect::setRect(l, t, l + w, t + h);
    }
    virtual int getArea() {
        return area();
    }
};
对象适配器:
// 对象适配器,共有继承接口的方法,组合入原始类的方法
class ObjectAdapterRect : public IRect, private ORect {
private:
    int left;
    int top;
    int width;
    int height;

    // 原始类
    ORect originalRect;
public:
    virtual void setRect(int l, int t, int w, int h) {
        // 为避免歧义,显式调用ORect类的setRect方法。
        // 若不这样,程序在运行时会崩溃(已测试)
        originalRect.setRect(l, t, l + w, t + h);
    }
    virtual int getArea() {
        return originalRect.area();
    }
};
测试代码:
int main() {
    const int l= 1, t= 2, r= 4, b= 4, w= r - l, h= b - t;

    // 调用原始类的方法
    std::cout << "--------------Original Rectangle-------------" << std::endl;
    ORect orect;
    std::cout << "left= " << l << ", top= " << t
        << ", right= " << r << ", bottom= " << b << std::endl;
    orect.setRect(l, t, r, b);
    std::cout << "area= " << orect.area() << std::endl;

    // 调用类适配器的方法
    std::cout << "-----------Class Adapter Rectangle-----------" << std::endl;
    ClassAdapterRect ca;
    std::cout << "left= " << l << ", top= " << t
        << ", width= " << w << ", height= " << h << std::endl;
    ca.setRect(l, t, w, h);
    std::cout << "area= " << ca.getArea() << std::endl;

    // 调用对象适配器的方法
    std::cout << "----------Object Adapter Rectangle-----------" << std::endl;
    ObjectAdapterRect oa;
    std::cout << "left= " << l << ", top= " << t
        << ", width= " << w << ", height= " << h << std::endl;
    oa.setRect(l, t, w, h);
    std::cout << "area= " << oa.getArea() << std::endl;
    return 0;
}
运行结果:
--------------Original Rectangle-------------
left= 1, top= 2, right= 4, bottom= 4
area= 6
-----------Class Adapter Rectangle-----------
left= 1, top= 2, width= 3, height= 2
area= 6
----------Object Adapter Rectangle-----------
left= 1, top= 2, width= 3, height= 2
area= 6
效果完全一致。适配器很成功。
在这里我想吐个槽,《Head First》是一本针对Java语言的书,在说到类适配器的时候只是一代而过,也没有示例代码,只说用多继承,又没说清楚怎么用,搞得我非常纠结。查阅网上的多继承资料,也没有突破,最后终于想到了四人帮的《Design Patterns》,他们是用c++为例做的介绍。于是我通过研究他们的示例代码才终于弄明白类适配器要如何使用。其关键在于:
共有继承客户接口,私有继承原始类!
在《Design Patterns》上的原话是这样: "The key to class adapters is to use one inheritance branch to inherit the interface and another branch to inherit the implementation. The usual way to make this distinction in C++ is to inherit the interface publicly and inherit the implementation privately."
这么一弄,豁然开朗。
共有继承客户接口保证了接口是客户所期望的。而私有继承原始类使得原始类的方法隐藏起来,不会被外界代码继续调用。真是奇妙的c++!
2. 外观模式
外观模式实际上实现方法完全与适配器相同。只是侧重点不一样。外观模式的定义如下:
提供了一个统一的接口,用来访问子系统中的一群接口。外观定义了一个高层接口,让子系统更容易使用。
什么意思呢?实际上很简单,就是将复杂的系统操作傻瓜化,提供一个傻瓜接口。
从本质上来说,外观模式难道不是接口转换吗?所以其实现方式是与适配器模式完全相同的。这里我就不再举例。
3. 总结
让我们回想一下,命令模式是不是也能具有外观模式这样的功能?将复杂的命令封装成统一接口,然后使用一个串将这一系列复杂的接口连接起来。一键操作。
乍看起来,似乎的确是这样,但是请注意命令模式的定义,命令模式只是需要保证一个统一的命令接口,以方便组织,而并未强调简化操作或接口。
所以,学习的设计模式多起来以后,会发现他们其实都大同小异,实现方式就那么几种,稍微有些变化就成了一个新的设计模式。
那为什么还要单独写出这么多设计模式呢?我想,针对不同的应用场合,你能根据这些设计模式的侧重点,很快的对应到一个合适的模式,并能很快的实现这个系统,简化开发流程,这就是设计模式的作用了。
打个不太恰当的比方,设计模式就像提供了一个表,你在使用复杂函数的时候,使用查找表的方法肯定比一步步计算要快得多。

 浙公网安备 33010602011771号