部署maven 到intelligent ideal 中
部署maven 到intelligent ideal 中
1.首先打开ideal,点击File>settings>build,Execution,Deployment>Build Tools>maven


这里需要修改的是图片所标注的,这里的
mavenhomepath 是自己本地安装的maven路径
user setting files是修改的配置文件(前面本地部署添加阿里云的镜像)
local repository 是本地建立的仓库
2 在IDEA中新建Maven工程


3.工程创建成功!


4 Maven的仓库【重要】
- 仓库分类
- 本地仓库:为当前计算机提供maven服务
- 远程仓库:为其他计算机也可以提供maven服务
- 私服:架设在当前局域网环境下,为当前局域网范围内的所有Maven工程服务。
- 中央仓库:架设在Internet上,为全世界所有Maven工程服务。
- 中央仓库的镜像:架设在各个大洲,为中央仓库分担流量。减轻中央仓库的压力,同时更快的响应用户请求。
- 仓库中的文件类型【jar包】
- Maven的插件
- 第三方框架或工具的jar包
- 自己研发的项目或模块
5 Maven的坐标【重要】
-
作用:使用坐标引入jar包
-
坐标由g-a-v组成
[1]groupId:公司或组织的域名倒序+当前项目名称
[2]artifactId:当前项目的模块名称
[3]version:当前模块的版本
-
注意
- g-a-v:本地仓库jar包位置
- a-v:jar包全名
-
坐标应用
-
坐标参考网址:http://mvnrepository.com
-
语法,示例
<dependencies>
    <!-- https://mvnrepository.com/artifact/junit/junit -->
    <dependency>
        <groupId>junit</groupId>
        <artifactId>junit</artifactId>
        <version>4.12</version>
	    <scope>test</scope>
    </dependency>

    <!-- https://mvnrepository.com/artifact/mysql/mysql-connector-java -->
	<dependency>
   	 	<groupId>mysql</groupId>
    	<artifactId>mysql-connector-java</artifactId>
    	<version>5.1.49</version>
	</dependency>


    <!-- https://mvnrepository.com/artifact/redis.clients/jedis -->
	<dependency>
    	<groupId>redis.clients</groupId>
    	<artifactId>jedis</artifactId>
    	<version>4.0.1</version>
	</dependency>

</dependencies>
-
6.1 依赖范围
- 依赖语法:<scope>
- compile【默认值】:在main、test、Tomcat【服务器】下均有效。
- test:只能在test目录下有效
- junit
- provided:在main、test下均有效,Tomcat【服务器】无效。
- servlet-api
6.2 依赖传递性

-
路径最短者有先【就近原则】
-
先声明者优先
-
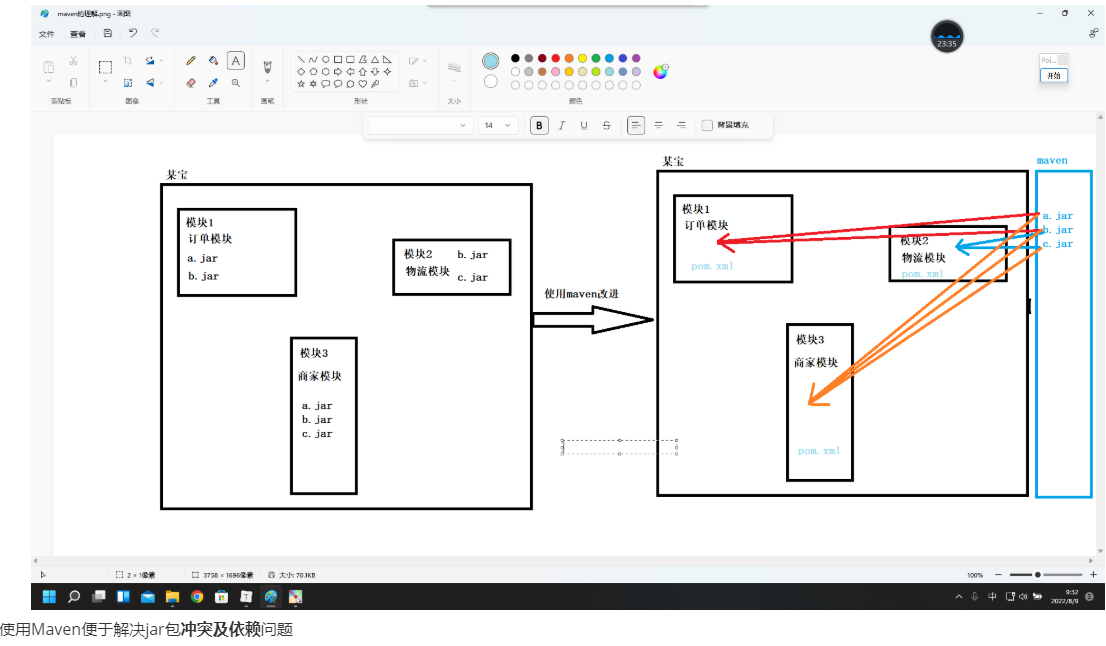
注意:Maven可以自动解决jar包之间的依赖问题
7. Maven中统一管理版本号
-
语法
<properties>
        <junit-version>4.12</junit-version>
</properties>
<dependencies>
        <!-- https://mvnrepository.com/artifact/junit/junit -->
        <dependency>
            <groupId>junit</groupId>
            <artifactId>junit</artifactId>
            <version>${junit-version}</version>
<!--            <scope>test</scope>-->
        </dependency>
</dependencies>
8. Maven的继承
8.1 为什么需要继承
- 如子工程大部分都共同使用jar包,可以提取父工程中,使用【继承原理】在子工程中使用
- 父工程打包方式,必须是pom方式
8.2 Maven继承方式一
-
在父工程中的pom.xml中导入jar包,在子工程中统一使用。【所有子工程强制引入父工程jar包】
-
示例代码
<packaging>pom</packaging>
<dependencies>
        <dependency>
            <groupId>junit</groupId>
            <artifactId>junit</artifactId>
            <version>4.12</version>
            <scope>test</scope>
        </dependency>
    </dependencies>
8.3 Maven继承方式二
-
在父工程中导入jar包【pom.xml】
<packaging>pom</packaging> <dependencyManagement> <dependencies> <dependency> <groupId>junit</groupId> <artifactId>junit</artifactId> <version>4.12</version> <scope>test</scope> </dependency> </dependencies> </dependencyManagement> -
在子工程引入父工程的相关jar包
<parent> <artifactId>maven_demo</artifactId> <groupId>com.atguigu</groupId> <version>1.0-SNAPSHOT</version> <relativePath>../pom.xml</relativePath> </parent> <dependencies> <dependency> <groupId>junit</groupId> <artifactId>junit</artifactId> </dependency> </dependencies> -
注意:在子工程中,不能指定版本号
9. Maven的聚合
-
为什么使用Maven的聚合
- 优势:只要将子工程聚合到父工程中,就可以实现效果:安装或清除父工程时,子工程会进行同步操作。
- 注意:Maven会按照依赖顺序自动安装子工程
-
语法
<modules>
    <module>maven_helloworld</module>
    <module>HelloFriend</module>
    <module>MakeFriend</module>
</modules>

 浙公网安备 33010602011771号