vue - 组件通信
在 Vue 3 中,组件通信方式在 Vue 2 基础上有所扩展和优化,尤其是结合 Composition API 提供了更灵活的方案。以下是 Vue 3 中常用的组件通信方式,结合最新语法和最佳实践讲解:
一、Props / Emits(父子组件通信)
Vue 3 中,props 和自定义事件仍然是父子组件通信的核心方式,但语法上有细微调整(更强调类型约束)。
1. Props(父→子)
父组件通过 props 传递数据,子组件通过 defineProps 声明接收(<script setup> 语法)。
示例:
- 父组件(Parent.vue)
<template>
  <Child :user="currentUser" :age="18" />
</template>

<script setup>
import Child from './Child.vue';
import { ref } from 'vue';

const currentUser = ref({ name: 'Alice' });
</script>
- 子组件(Child.vue)
<template>
  <div>
    {{ user.name }} - {{ age }}
  </div>
</template>

<script setup>
//第一种:数组 const props = defineProps(['user', 'age']);
//第二种: 声明接收的 props 并指定类型(推荐)
const props = defineProps({
  user: {
    type: Object,
    required: true
  },
  age: {
    type: Number,
    default: 0
  }
});

// 使用 props:直接访问 props.user 或解构(需注意响应式)
const { user, age } = props;
</script>
2. Emits(子→父)
子组件通过 emit 触发事件传递数据,父组件监听事件。Vue 3 中推荐用 defineEmits 显式声明事件(增强类型检查)。
示例:
- 子组件(Child.vue)
<template>
    <button @click="handleClick">发送数据</button>
</template>

<script setup>
// 声明可触发的事件(支持类型定义)
const emit = defineEmits(['update:count', 'submit', 'aaaa']);

const handleClick = () => {
    // 触发事件并传递数据
    emit('update:count', 100);
    emit('submit', { username: 'test' });
    emit('aaaa', { b: 'c' });
};
</script>
- 父组件(Parent.vue)
<template>
    <div>{{ count }}</div>
    <Child @update:count="(val) => count = val" @submit="handleSubmit" @aaaa="aaaa" />
</template>

<script setup>
import Child from './Child.vue';
import { ref } from 'vue';

const count = ref(0);
const handleSubmit = (formData) => {
    console.log('接收子组件数据:', formData);
};
const aaaa = (formData) => {
    console.log('接收子组件数据:', formData);
};
</script>
二、mitt(跨组件事件总线)
Vue 3 移除了内置的 $on/$off,跨组件(无层级关系)通信可使用第三方库 mitt(轻量事件总线)。
步骤:
- 安装:
npm install mitt - 创建事件总线:
// eventBus.js
import mitt from 'mitt';
export const emitter = mitt();
1.发送事件组件(ComponentA.vue)
<template>
  <button @click="sendMsg">发送全局事件</button>
</template>

<script setup>
import { emitter } from './eventBus.js';

const sendMsg = () => {
  emitter.emit('global-event', '来自A的消息');
};
</script>
2.接收事件组件(ComponentB.vue)
<script setup>
import { emitter } from './eventBus.js';
import { onMounted, onUnmounted } from 'vue';

onMounted(() => {
  // 监听事件
  emitter.on('global-event', (msg) => {
    console.log('接收消息:', msg);
  });
});

onUnmounted(() => {
  // 移除监听(避免内存泄漏)
  emitter.off('global-event');
});
</script>
三、v-model(双向绑定语法糖)
Vue 3 中 v-model 支持自定义修饰符,且可以在组件上使用多个 v-model(通过参数区分)。
原理:v-model 本质是 :modelValue + @update:modelValue 的语法糖,可自定义参数名。
<Child v-model="money"></Child>
<!--相当于-->
<Child :modelValue="money" @update:modelValue="handler"></Child>
示例:
- 子组件(Child.vue)
<template>
  <input
    :value="modelValue"
    @input="$emit('update:modelValue', $event.target.value)"
  />
  <!-- 第二个 v-model -->
  <input
    :value="age"
    @input="$emit('update:age', $event.target.value)"
  />
</template>

<script setup>
defineProps(['modelValue', 'age']);
defineEmits(['update:modelValue', 'update:age']);
</script>
- 父组件(Parent.vue)
<template>
  <!-- 多个 v-model -->
  <Child
    v-model="username"
    v-model:age="userAge"
  />
</template>

<script setup>
import Child from './Child.vue';
import { ref } from 'vue';

const username = ref('');
const userAge = ref('');
</script>
四 $attrs 透传属性
- 概述:$attrs 用于实现当前组件的父组件,向当前组件的子组件通信(祖→孙)。
- 具体说明:是一个对象,包含所有父组件传入的标签属性。注意:attrs 会自动排除 props 中声明的属性(可以认为声明过的 props 被子组件自己 “消费” 了)
$attrs(选项式 API 中使用)
father.vue
<template>
    父亲:
    <Child :user="currentUser" :age="18" />
</template>

<script setup>
import Child from './Child.vue';
import { ref } from 'vue';

const currentUser = ref({ name: 'Alice' });
</script>
child.vue
<template>
    儿子:
    <GrandChild v-bind="$attrs" />
</template>

<script setup>
import GrandChild from './grandchild.vue';
</script>
grandchild.vue
<template>
    孙子:{{ user.name }} {{ age }}
</template>

<script setup>
defineProps({
    user: {
        type: Object,
        required: true
    },
    age: {
        type: Number,
        default: 0
    }
})
</script>
useAttrs(组合式 API 中使用)
- 用法:在组合式 API(如
<script setup>)中,通过导入useAttrs函数获取属性集合。 - 特点:是一个函数,调用后返回属性集合对象(响应式)。
- 无需通过
this访问,直接在setup或<script setup>中使用。 - 行为与
$attrs一致,同样不包含已声明的props。
- 无需通过
示例:
<!-- 组合式 API 组件(<script setup>) -->
<script setup>
import { useAttrs } from 'vue'

const props = defineProps(['title']) // 声明接收 title 属性
const attrs = useAttrs() // 获取未声明的属性

// 访问属性(注意:attrs 是响应式对象,需通过 .value 访问其属性值吗?不,直接访问)
console.log(attrs.id) // 父组件传递的 id 属性值
console.log(attrs.onClick) // 父组件传递的点击事件

// 透传属性给内部元素
</script>

<template>
  <div v-bind="attrs"></div>
</template>
五、$refs/$parent(直接访问组件实例,谨慎使用)
通过 ref $parent 标识子组件,直接调用其方法或访问数据(谨慎使用,避免强耦合)。
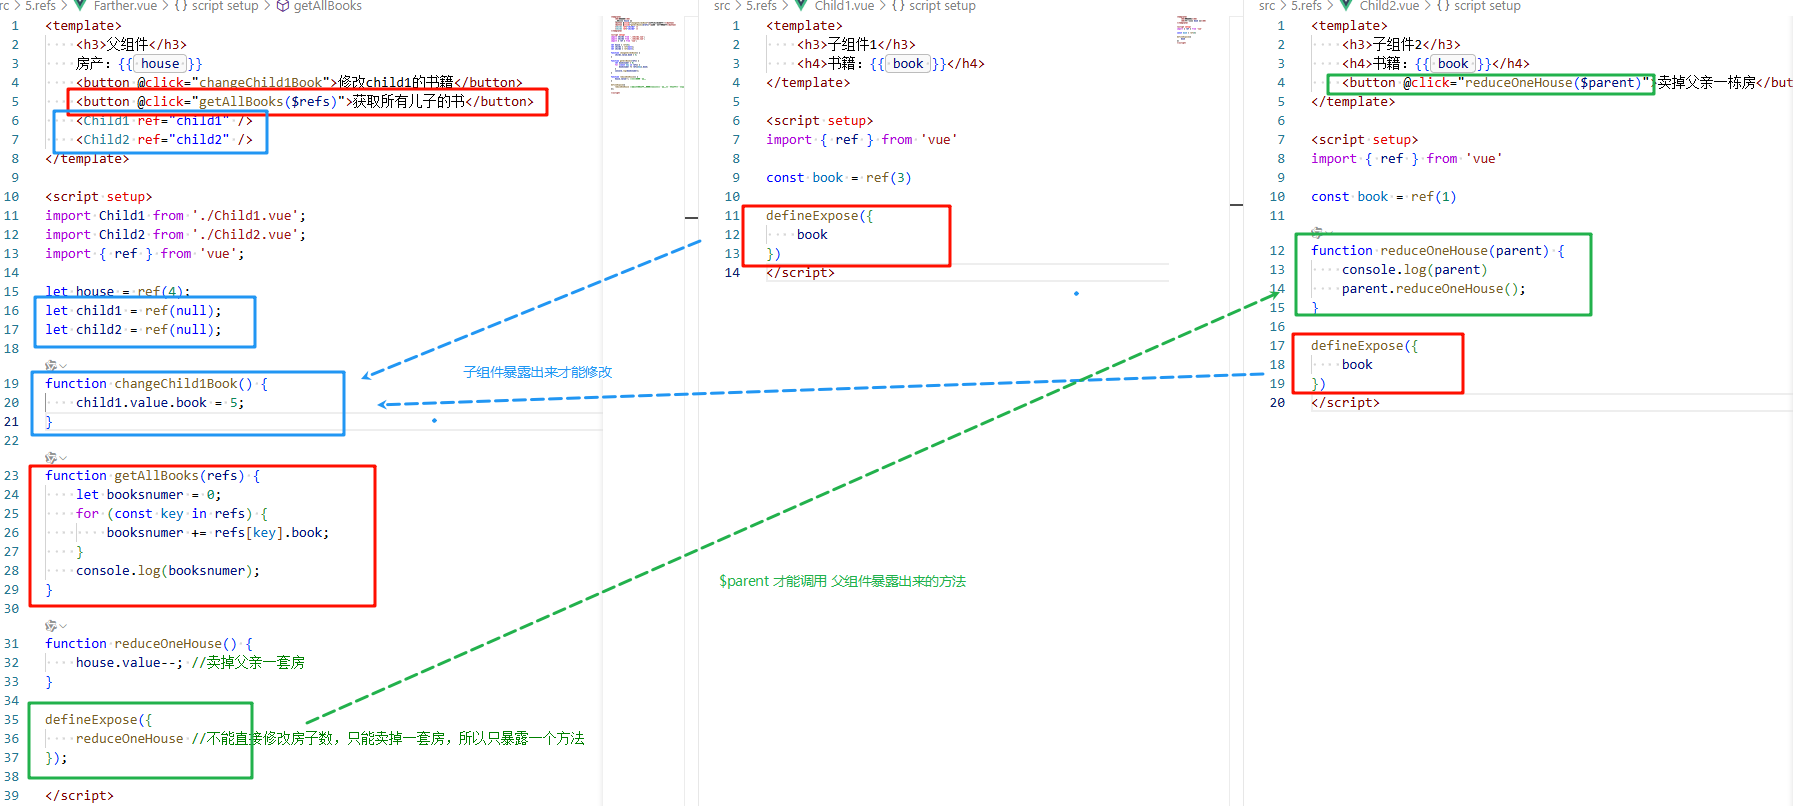
父组件
<template>
    <h3>父组件</h3>
    房产:{{ house }}
    <button @click="changeChild1Book">修改child1的书籍</button>
    <button @click="getAllBooks($refs)">获取所有儿子的书</button>
    <Child1 ref="child1" />
    <Child2 ref="child2" />
</template>

<script setup>
import Child1 from './Child1.vue';
import Child2 from './Child2.vue';
import { ref } from 'vue';

let house = ref(4);
let child1 = ref(null);
let child2 = ref(null);

function changeChild1Book() {
    child1.value.book = 5;
}

function getAllBooks(refs) {
    let booksnumer = 0;
    for (const key in refs) {
        booksnumer += refs[key].book;
    }
    console.log(booksnumer);
}

function reduceOneHouse() {
    house.value--; //卖掉父亲一套房
}

defineExpose({
    reduceOneHouse //不能直接修改房子数,只能卖掉一套房,所以只暴露一个方法
});

</script>
Child1.vue
<template>
    <h3>子组件1</h3>
    <h4>书籍:{{ book }}</h4>
</template>

<script setup>
import { ref } from 'vue'

const book = ref(3)

defineExpose({
    book
})
</script>
Child2.vue
<template>
    <h3>子组件2</h3>
    <h4>书籍:{{ book }}</h4>
    <button @click="reduceOneHouse($parent)">卖掉父亲一栋房</button>
</template>

<script setup>
import { ref } from 'vue'

const book = ref(1)

function reduceOneHouse(parent) {
    console.log(parent)
    parent.reduceOneHouse();
}

defineExpose({
    book
})
</script>
六、Provide / Inject(跨层级通信)
适用于祖孙组件或深层级组件通信,无需手动传递 props,Vue 3 中结合 ref/reactive 支持响应式传递。
原理:父组件通过 provide 提供数据,任意子组件(无论层级)通过 inject 获取数据。
- 顶层组件(Grandpa.vue)
<script setup>
import { provide, ref } from 'vue';

// 提供响应式数据
const theme = ref('light');
provide('theme', theme);

// 提供方法(用于子组件修改数据)
const setTheme = (val) => {
  theme.value = val;
};
provide('setTheme', setTheme);
</script>
- 深层子组件(Grandson.vue)
<template>
  <div>
    当前主题:{{ theme }}
    <button @click="setTheme('dark')">切换深色模式</button>
  </div>
</template>

<script setup>
import { inject } from 'vue';

// 注入数据和方法
const theme = inject('theme');
const setTheme = inject('setTheme');
</script>
注意:provide/inject 推荐配合 TypeScript 使用(需声明类型),且避免过度使用导致数据流混乱。
七 slot 插槽
在 Vue 中,slot(插槽)是一种特殊的组件通信方式,主要用于父组件向子组件传递 “模板内容”(而非单纯的数据),实现组件内容的灵活定制。它允许父组件将 HTML 结构、组件等内容 “插入” 到子组件的指定位置,是组件复用和扩展的重要手段。
一、基本用法:默认插槽(Default Slot)
子组件中用 <slot> 标签定义一个 “插槽出口”,父组件在使用子组件时,嵌套在子组件标签内的内容会自动填充到这个出口。
示例:
- 子组件(Child.vue)
<template>
  <div class="card">
    <!-- 插槽出口:父组件的内容会在这里显示 -->
    <slot></slot>
  </div>
</template>- 父组件(Parent.vue)
<template>
  <Child>
    <!-- 父组件传递的内容,会插入到子组件的 slot 位置 -->
    <h3>这是父组件传入的标题</h3>
    <p>这是父组件传入的段落内容</p>
  </Child>
</template>

<script setup>
import Child from './Child.vue';
</script>效果:子组件的 .card 容器中会显示父组件传入的 <h3> 和 <p> 内容。
二、具名插槽(Named Slots)
当子组件需要多个插槽出口时,可用 name 属性给插槽命名,父组件通过 <template #插槽名> 指定内容对应的插槽。
示例:
- 子组件(Child.vue)
<template>
  <div class="layout">
    <!-- 头部插槽 -->
    <header>
      <slot name="header"></slot>
    </header>

    <!-- 主体插槽(默认插槽,name 默认为 default) -->
    <main>
      <slot></slot>
    </main>

    <!-- 底部插槽 -->
    <footer>
      <slot name="footer"></slot>
    </footer>
  </div>
</template>- 父组件(Parent.vue)
<template>
  <Child>
    <!-- 头部内容:对应 name="header" 的插槽 -->
    <template #header>
      <h1>页面标题</h1>
    </template>

    <!-- 主体内容:对应默认插槽(name="default") -->
    <p>这是页面的主要内容...</p>

    <!-- 底部内容:对应 name="footer" 的插槽 -->
    <template v-slot:footer>
      <p>© 2023 版权信息</p>
    </template>
  </Child>
</template>说明:# 是 v-slot: 的简写(如 #header 等价于 v-slot:header),仅用于 <template> 标签或组件标签上。
三、作用域插槽(Scoped Slots)
子组件可以向插槽传递数据(“作用域”),父组件在填充插槽时可以使用这些数据,实现 “子组件向父组件传递数据供内容渲染使用”。
示例1:具名作用域
- 子组件(Child.vue)
<template>
  <div>
    <!-- 子组件向插槽传递数据(通过 v-bind 绑定),这里 name 是item,父组件就要使用v-slot:item= -->
    <slot
      name="item"
      :user="currentUser"
      :age="18"
    ></slot>
  </div>
</template>

<script setup>
import { ref } from 'vue';
const currentUser = ref({ name: 'Alice' });
</script>- 父组件(Parent.vue)
<template>
  <Child>
    <!-- 父组件接收子组件传递的插槽数据(通过 v-slot:item="slotProps") -->
    <template #item="slotProps">
      <!-- 使用子组件传递的数据渲染内容 -->
      <p>姓名:{{ slotProps.user.name }}</p>
      <p>年龄:{{ slotProps.age }}</p>
    </template>
  </Child>
</template>简化写法:可通过解构直接获取需要的数据:
<template #item="{ user, age }">
  <p>姓名:{{ user.name }}</p>
  <p>年龄:{{ age }}</p>
</template>
这里的 :item="slotProps" 等价于 v-slot:item="slotProps",item是子组件插槽的name, 如果没有name,就使用 v-slot="slotProps"或者 #default="slotProps"。
示例2:解构作用域
子组件
<template>
  <div class="box">
    <h1>作用域插槽</h1>
      <slot :aaaa="aaaa" :dddd="dddd"></slot>
  </div>
</template>

<script setup lang="ts">
import { ref } from 'vue';

let dddd = ref('vvvv');

let aaaa = ref([
  { id: 1, title: "a吃饭", done: true },
  { id: 2, title: "a睡觉", done: false },
  { id: 3, title: "a打豆豆", done: true },
  { id: 4, title: "a打游戏", done: false },
]);
</script>
父组件
<template v-slot="{ aaaa, dddd }">
    <div>{{ aaaa }}</div>
    <div>{{ dddd }}</div>
</template>
四、插槽的本质与适用场景
-
本质:插槽是 “内容分发” 的机制,父组件决定 “插入什么内容”,子组件决定 “内容放在哪里”,同时支持子组件向父组件传递数据(作用域插槽)。
-
适用场景
:
- 组件封装(如卡片、表格、弹窗等通用组件,允许用户自定义内部内容);
- 列表渲染(子组件负责循环逻辑,父组件自定义列表项的展示方式,如
el-table的el-table-column); - 内容占位(子组件提供默认内容,父组件可覆盖,如
<slot>默认内容</slot>)。
总结
- 默认插槽:单一内容出口,适用于简单的内容插入;
- 具名插槽:多出口,区分不同位置的内容;
- 作用域插槽:子组件向父组件传递数据,父组件基于这些数据定制内容。
插槽是 Vue 组件化中实现 “灵活组合” 的核心特性,尤其在 UI 组件库(如 Element Plus、Vuetify)中被广泛使用,让组件既通用又能满足个性化需求。
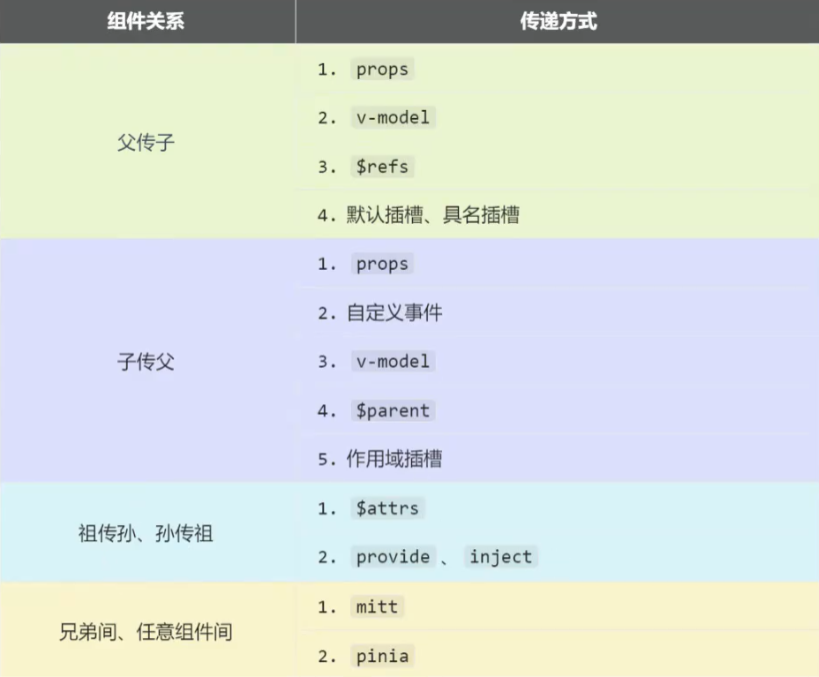
总结
| 场景 | 推荐方式 |
|---|---|
| 父子组件数据传递 | Props / Emits |
| 父子组件双向绑定 | v-model |
| 祖孙 / 深层级组件通信 | Provide / Inject |
| 无层级关系组件通信 | mitt(事件总线) |
| 全局共享状态(多组件) | Pinia(状态管理) |
| 组件封装透传属性 | $attrs |
| 临时直接操作子组件 | $refs(谨慎使用) |

 浙公网安备 33010602011771号