
python学习:python爬虫之Scrapy框架(1):安装Scrapy及使用流程
Scrapy框架
Scrapy是一个爬虫框架,集成包括下载页面,解析页面,多请求并发,深度遍历页面连接等功能。
1Scrapy安装
1、Linux下执行pip install scrapy
2、windows下安装
首先安装wheel模块,因为Scrapy的安装需要用到wheel模块

在网站:https://www.lfd.uci.edu/~gohlke/pythonlibs/
下载对应的Scrapy和Twisted。


下载对应版本的Twisted,cp37表示是python3.7版本的,amd64表示64位
将我们下载的安装包拷贝到D:\develop\Python3.7\Scripts,这是 python的安装目录。在Scripts文件夹下,使用命令:pip install Twisted-19.7.0-cp37-cp37m-win_amd64.whl。
安装完成后,将拷贝的安装包删除掉就可以了。

使用同样的方式安装Scapy的安装包,但是在这之前,需要先安装lxml模块,因为Scapy依赖于lxml模块。

使用命令pip install Scrapy-1.7.3-py2.py3-none-any.whl

使用命令scrapy –h,测试是否安装上
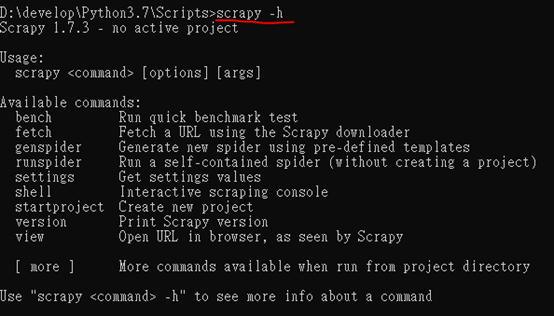
2Scrapy基本使用
1、创建scrapy项目
使用命令scrapy startproject 项目名,在当前目录下创建一个scrapy项目


2、创建一个Spider爬虫
cd到项目目录:cd Pro_scrapy
创建爬虫:scrapy genspider 爬虫名 起始url
示例:scrapy genspider baidu baidu.com
爬虫名和起始url都可以修改,这里可以随意名字

会在spiders目录下生成一个baidu.py文件,创建了一个对应Spider类,类中parse()方法就会返回访问start_urls的结果
# -*- coding: utf-8 -*-

import scrapy

import io

import sys


#windows终端运行设置

# sys.stdout = io.TextIOWrapper(sys.stdout.buffer,encoding="gb18030")


class BaiduSpider(scrapy.Spider):

    name = 'baidu'

    allowed_domains = ['baidu.com']

    start_urls = ['https://www.baidu.com/']


    def parse(self, response):

        print(response)

        #返回url

        print(response.url)

        #返回内容

        print(response.text)

        #window终端显示

        # content = str(response.body,encoding="utf-8")

        # print(content)
3、运行scrapy项目
使用命令:scrapy crawl

使用命令:scrapy crawl baidu –nolog
查看我们parse()输出内容,不打印log
这里我们爬取百度内容,但是返回空白内容。因为百度本身是一个爬虫,遵守robotstxt的协议,所以我们再次使用爬虫,被禁止,没有返回内容。通过访问robots.txt查看站点的robots协议。

在settings.py可以看到遵守相应robotstxt协议。可以设置为False,不遵守robots协议。
示例:
# Obey robots.txt rules

ROBOTSTXT_OBEY = True
重新创建一个新的爬虫,爬取抽屉网内容。
命令:scrapy genspider chouti chouti.com,创建chouti.py文件。
parse()函数获取爬虫爬取内容response,
response.url:爬取的url;
response.text: 返回文本内容;
response.body:返回的body;
response.meta = {‘depth’ :‘深度’}:可以获取遍历深度;
示例:
chouti.py内容:
# -*- coding: utf-8 -*-

import scrapy


class ChoutiSpider(scrapy.Spider):

    name = 'chouti'

    allowed_domains = ['chouti.com']

    start_urls = ['https://dig.chouti.com/']


    def parse(self, response):

        print(response);

        #返回内容

        print(response.text)
3网页内容解析
爬取到网页内容,之前我们使用Beautisoup解析网页内容,scrapy中也提供了其他解析工具。
Scrapy中的Selector选择器,需要导入对应包。
语法:Selector(response=response).xpath(‘//a’)
Selector将返回的response网页信息通过xpath解析。//a查找文档中的所有a标签。返回的也是Selector对象列表。
//:表示在子子孙中查找;
.//:表示在当前Selector对象的对应标签子子孙中查找;
/:当前标签的直属后代,示例:/div表示当前标签下的div标签;
./:当前标签基础上查找
/a[1]:获取列表中第一个a标签
/div[@id=”1”]:查找当前标签下div,id等于1的div标签;
Obj.extract():将对象列表每个值转换成字符串;
Obj.extract_first():将对象列表第一个值转换成字符串;
/text():获取当前标签文本;
@href:获取href,获取属性使用@属性名;
/a[contains(@href,’xxx’)]:判断href包含什么内容;
/a[starts-with(@href,’xxx’)]:判断href以什么开头;
/a[re:test(@href,’\d+’)]:使用正则表达式匹配;
示例:
# -*- coding: utf-8 -*-

import scrapy

from scrapy.selector import Selector


class ChoutiSpider(scrapy.Spider):

    name = 'chouti'

    allowed_domains = ['chouti.com']

    start_urls = ['https://dig.chouti.com/']


    def parse(self, response):

        # print(response);

        # #返回内容

        # print(response.text)

        #//双斜杠在所有后代中查找,/单斜杠只在直属后代查找

        #获取返回网页所有a标签,标签列表

        a_list = Selector(response=response).xpath('//a')

        #获取返回网页所有

        #.extract()将对象列表转换成字符串

        # div_list = Selector(response=response).xpath('//div[@id=" content-list"]/div[@class="item"]');

        # print(div_list)

        #查找新闻列表

        news_list = Selector(response=response).xpath('//div[@class="link-con"]/div/div')

        for news in news_list:

            #使用./a只在本标签下子标签查找所有a

            # a_pic = news.xpath('./a')

            # a_detail = news.xpath('./div/div[@class="link-detail"]/a')

            #获取标签文本text(),extract_first()如果多个列表只返回第一个文本

            a_detail = news.xpath('./div/div[@class="link-detail"]/a/text()').extract_first()

            print(a_detail)
本文来自博客园,作者:渔歌晚唱,转载请注明原文链接:https://www.cnblogs.com/tangToms/articles/14248607.html

 浙公网安备 33010602011771号