进阶使用
SpringMVC支持Ajax
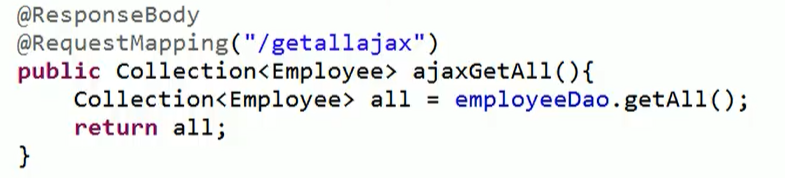
@ResponseBody将返回的数据放在响应体中
如果返回值是对象,jaskson包自动将对象转换为json格式
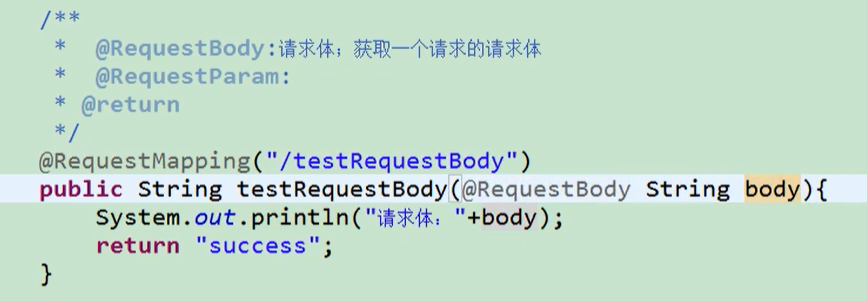
@RequestBody获取请求体
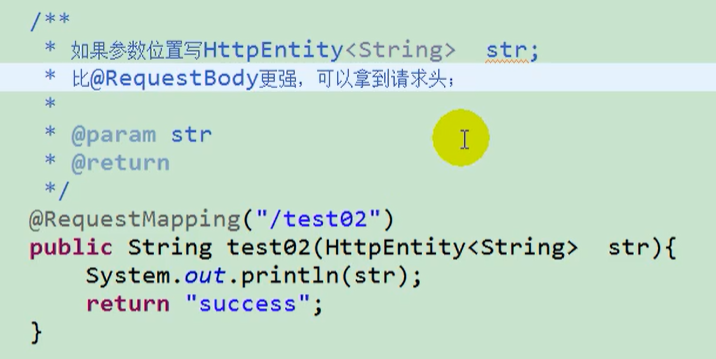
HttpEntity获取请求头
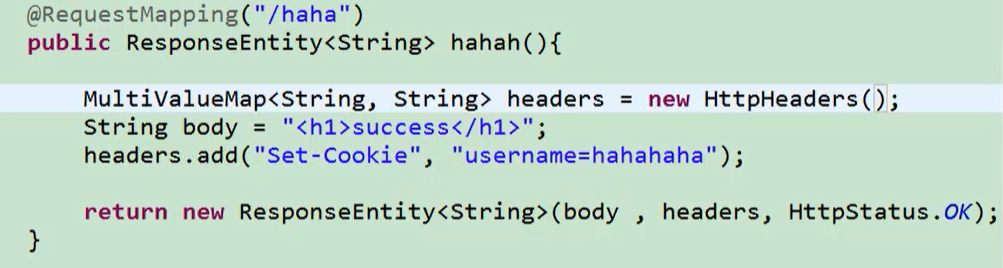
ResponseEntity既能返回响应数据还能定制响应头
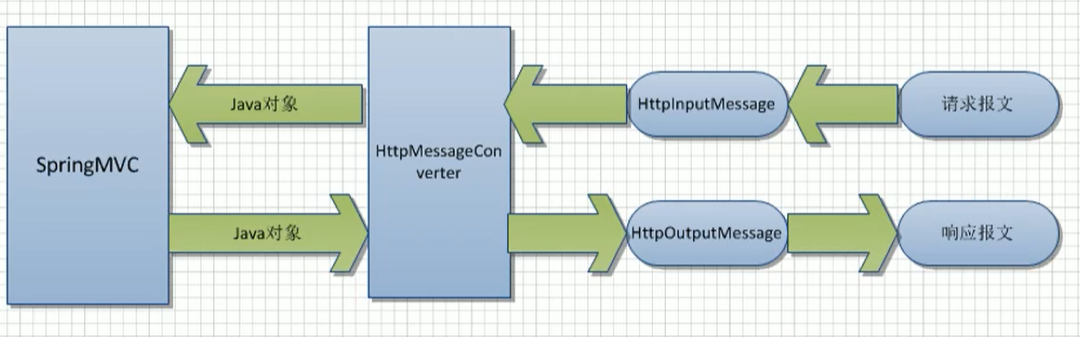
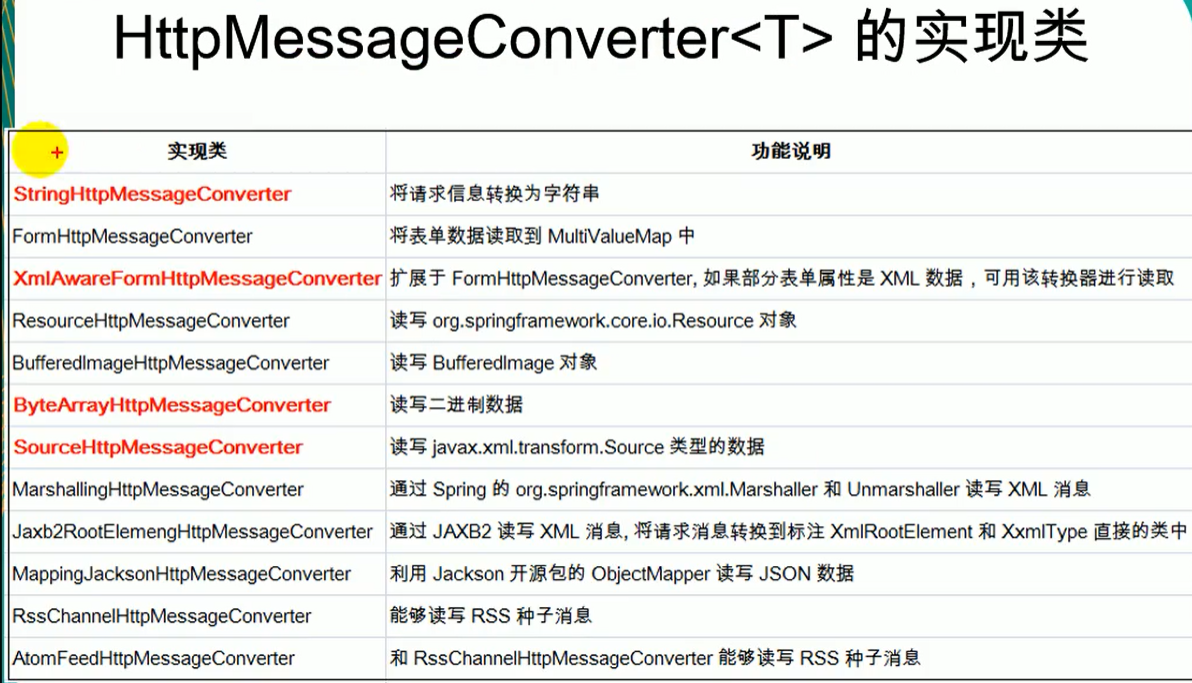
HttpMessageConverter<T>
HttpMessageConverter<T>是一个接口,负责将请求信息转换为一个对象(类型为T),将对象(类型为T)输出为响应信息
HttpMessageConverter<T>接口定义的方法:
Boolean canRead(Class<?> clazz, MediaType mediaType):指定转换器可以读取的对象类型,即转换器是否可将请求信息转换为clazz类型的对象,同时指定支持MINE类型
Boolean canWrite(Class<?> clazz, MediaType mediaType):指定转换器是否可将clazz类型的对象写到响应流中,响应流支持的媒体类型在MediaType中定义
List<MediaType> getSupportMediaType():该转换器支持的媒体类型
T read(Class<? extends T> clazz, HttpInputMessage inputMessage) :将请求信息流转换为T类型的对象
void write(T t, MediaType contentType, HttpOutputMessage outputMessage):将T类型的对象写到响应流中,同时指定相应的媒体类型为contentType
文件上传
文件上传步骤:
- 创建文件上传表单
- 配置文件上传解析器
- 编写处理器
<form method="post" action="upload" enctype="multipart/form-data">
    头像:<input type="file" name="heading">
    用户名:<input type="text" name="username">
    <input type="submit" value="提交">
</form>
    <!--配置文件上传解析器,id必须为multipartResolver -->
    <bean id="multipartResolver" class="org.springframework.web.multipart.commons.CommonsMultipartResolver">
        <property name="maxUploadSize" value="#{1024*1024*20}"></property>
        <property name="defaultEncoding" value="utf-8"></property>
    </bean>
    @RequestMapping("/upload")
    public String upload(Model model,
                         @RequestParam(value = "username", defaultValue = "zhangsan") String username,
                         @RequestParam(value = "heading")MultipartFile file) throws IOException {
        model.addAttribute("msg", "上传成功");
        file.transferTo(new File("C:\\Users\\哪吒\\Desktop\\新建文件夹\\上传图片\\" + file.getOriginalFilename()));
        return "success";
    }
拦截器
Filter是JavaWeb三大组件之一,是由tomcat管理的,不依赖于SpringMVC,相对于拦截器更不容易获取数据,一般用来实现较简单的功能;拦截器一般实现较复杂的功能
拦截器:允许目标方法运行之前进行一些拦截工作,或者目标方法运行之后进行一些其他处理
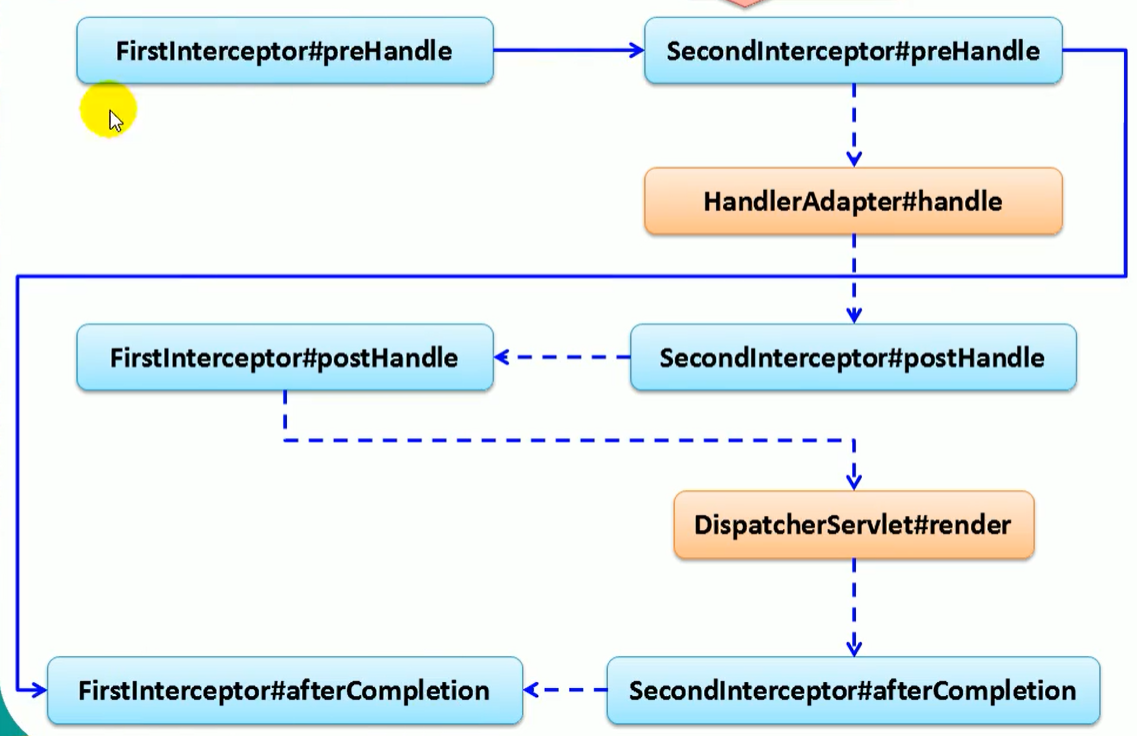
多拦截器运行流程和JavaWeb中Filter差不多
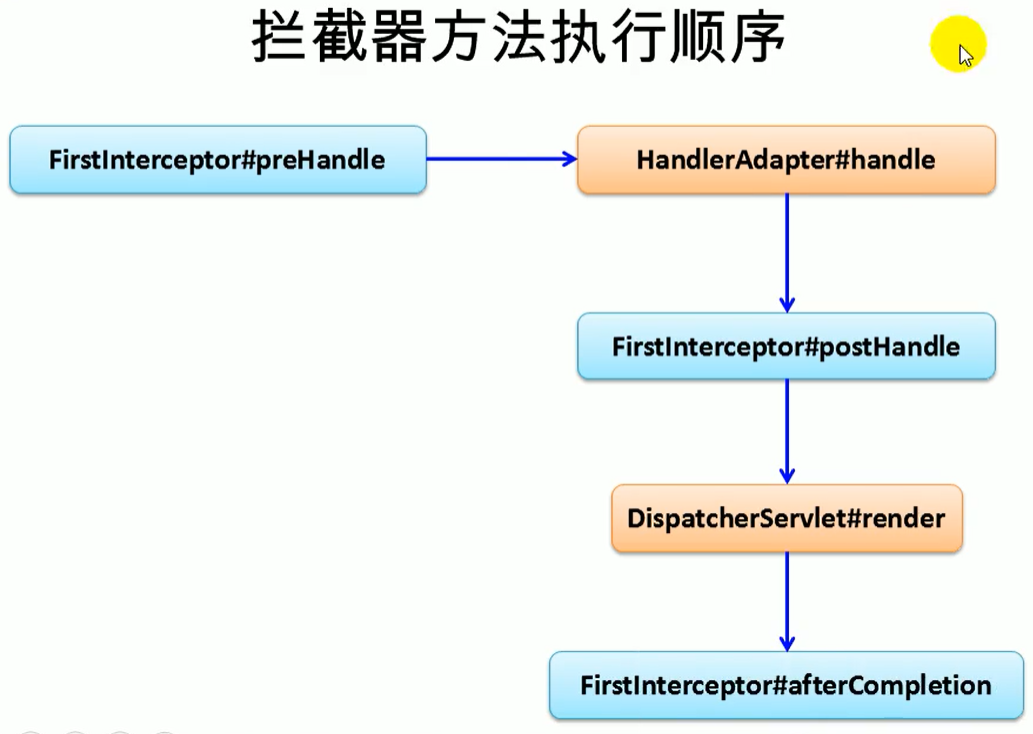
单拦截器运行流程:
- 创建一个类实现HandlerInterceptor接口
- xml文件中配置拦截器
执行顺序:preHandle——执行目标方法——postHandle——页面渲染成功——afterCompletion
package com.tang.controller.interceptor;

import org.springframework.web.servlet.HandlerInterceptor;
import org.springframework.web.servlet.ModelAndView;

import javax.servlet.http.HttpServletRequest;
import javax.servlet.http.HttpServletResponse;

public class MyInterceptor implements HandlerInterceptor {
    @Override
    public boolean preHandle(HttpServletRequest request, HttpServletResponse response, Object handler) throws Exception {
        System.out.println("方法执行之前");
        return true;
    }

    @Override
    public void postHandle(HttpServletRequest request, HttpServletResponse response, Object handler, ModelAndView modelAndView) throws Exception {
        System.out.println("方法执行之后");

    }

    @Override
    public void afterCompletion(HttpServletRequest request, HttpServletResponse response, Object handler, Exception ex) throws Exception {
        System.out.println("页面完成之后");

    }
}
    <!--配置多个拦截器标签-->
    <mvc:interceptors>
        <!--配置单个拦截器标签-->
        <mvc:interceptor>
            <!--只拦截 /hello 请求-->
            <mvc:mapping path="/hello"/>
            <bean class="com.tang.controller.interceptor.MyInterceptor"></bean>
        </mvc:interceptor>
    </mvc:interceptors>
单拦截器
多拦截器
SpringMVC运行流程
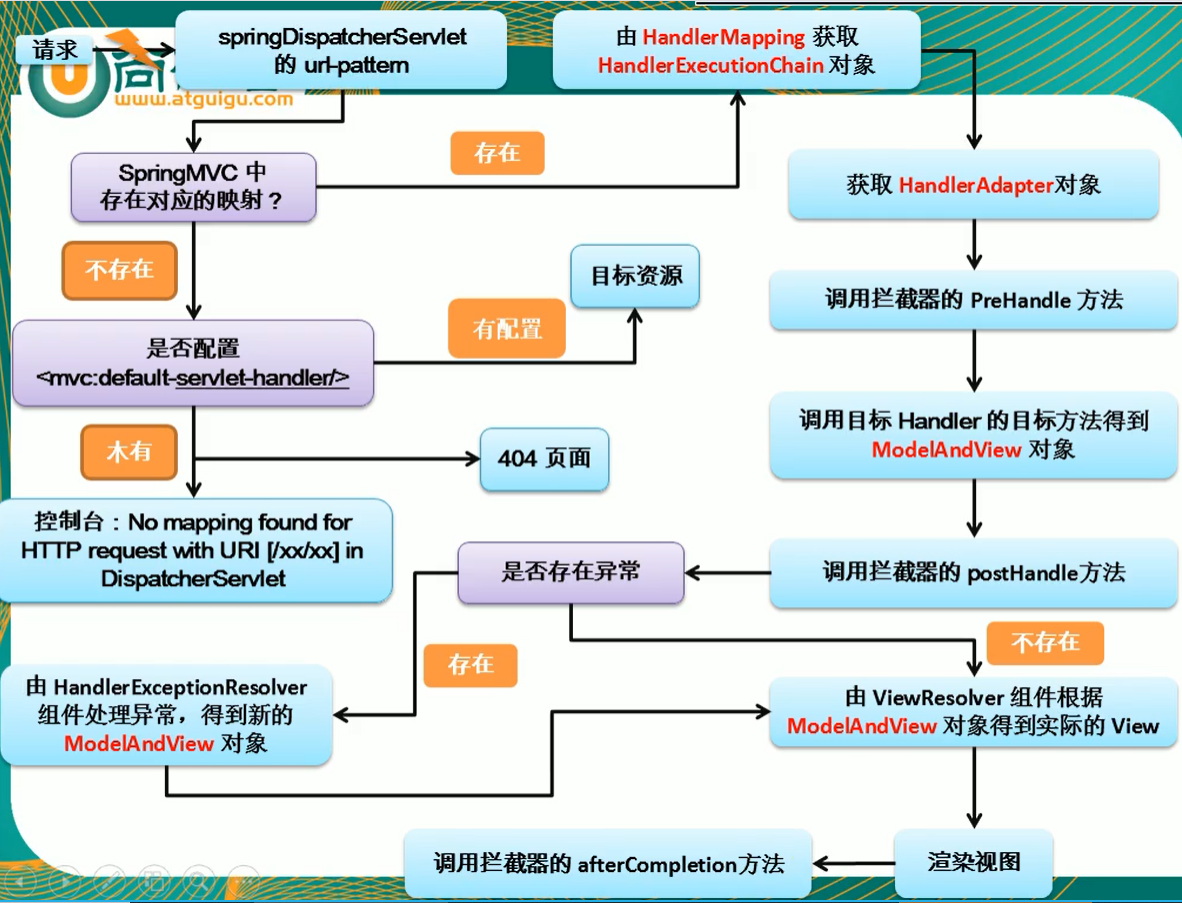
SpringMVC运行流程:
- 前端控制器(DispatcherServlet)收到请求,调用doDispatch进行处理
- 根据HandlerMapping中保存的请求映射信息找到处理当前请求的处理器执行链(包含拦截器)
- 根据当前处理器找到HandlerAdapter(适配器)
- 拦截器preHandle执行
- 适配器执行目标方法,并返回ModelAndView
- ModelAttribute注解标注的方法提前运行
- 执行目标方法
- 拦截器postHandle执行
- 页面渲染
- 如果有异常使用异常解析器处理异常,处理完返回ModelAndView
- 调用render进行页面渲染
- 视图解析器根据视图名得到视图对象
- 视图对象调用render方法
- 执行拦截器afterCompletion
SpringMVC和Spring整合
整合目的:分工明确
SpringMVC的配置文件用来配置和网站转发逻辑以及网站功能相关的(视图解析器,文件上传解析器,支持Ajax等等)
Spring的配置文件来配置和业务有关的(事务控制,数据源等等)
父子容器
Spring为父容器
SpringMVC为子容器
注意:在Spring父容器中注册的Bean对于SpringMVC容器中是可见的,而在SpringMVC容器中注册的Bean对于Spring父容器中是不可见的
web.xml
<?xml version="1.0" encoding="UTF-8"?>
<web-app xmlns="http://xmlns.jcp.org/xml/ns/javaee"
         xmlns:xsi="http://www.w3.org/2001/XMLSchema-instance"
         xsi:schemaLocation="http://xmlns.jcp.org/xml/ns/javaee http://xmlns.jcp.org/xml/ns/javaee/web-app_4_0.xsd"
         version="4.0">
    <context-param>
        <param-name>contextConfigLocation</param-name>
        <param-value>/WEB-INF/applicationContext.xml</param-value>
    </context-param>
    <listener>
        <listener-class>org.springframework.web.context.ContextLoaderListener</listener-class>
    </listener>

    <servlet>
        <servlet-name>dispatcher</servlet-name>
        <servlet-class>org.springframework.web.servlet.DispatcherServlet</servlet-class>
        <init-param>
            <param-name>contextConfigLocation</param-name>
            <param-value>/WEB-INF/dispatcher-servlet.xml</param-value>
        </init-param>
        <load-on-startup>1</load-on-startup>
    </servlet>
    <servlet-mapping>
        <servlet-name>dispatcher</servlet-name>
        <url-pattern>/</url-pattern>
    </servlet-mapping>
</web-app>
在上面的配置中:
(1)ContextLoaderListener会被优先初始化,其会根据<context-param>元素中contextConfigLocation参数指定的配置文件来创建WebApplicationContext实例。并调用ServletContext的setAttribute方法将其设置到ServletContext中,属性的key为"org.springframework.web.context.WebApplicationContext.ROOT"
(2)DispatcherServlet在初始化时,会根据<init-param>元素中contextConfigLocation参数指定的配置文件路径来创建WebApplicationContext实例。并调用ServletContext的getAttribute方法判断是否存在"org.springframework.web.context.WebApplicationContext.ROOT",若存在则将其设置为自己的parent。
applicationContext.xml
<?xml version="1.0" encoding="UTF-8"?>
<beans xmlns="http://www.springframework.org/schema/beans"
       xmlns:xsi="http://www.w3.org/2001/XMLSchema-instance"
       xmlns:context="http://www.springframework.org/schema/context"
       xsi:schemaLocation="http://www.springframework.org/schema/beans http://www.springframework.org/schema/beans/spring-beans.xsd http://www.springframework.org/schema/context https://www.springframework.org/schema/context/spring-context.xsd">

    <context:component-scan base-package="com.tang">
        <context:exclude-filter type="annotation" expression="org.springframework.stereotype.Controller"/>
    </context:component-scan>
</beans>
dispatcher-servlet.xml
<?xml version="1.0" encoding="UTF-8"?>
<beans xmlns="http://www.springframework.org/schema/beans"
       xmlns:xsi="http://www.w3.org/2001/XMLSchema-instance"
       xmlns:context="http://www.springframework.org/schema/context"
       xmlns:mvc="http://www.springframework.org/schema/mvc"
       xsi:schemaLocation="http://www.springframework.org/schema/beans http://www.springframework.org/schema/beans/spring-beans.xsd http://www.springframework.org/schema/context https://www.springframework.org/schema/context/spring-context.xsd http://www.springframework.org/schema/mvc https://www.springframework.org/schema/mvc/spring-mvc.xsd">

    <context:component-scan base-package="com.tang" use-default-filters="false">
        <context:include-filter type="annotation" expression="org.springframework.stereotype.Controller"/>
    </context:component-scan>

</beans>

 浙公网安备 33010602011771号