

redis主从集群 -- Sentinel 哨兵
Redis 的主从集群是一个“一主多从”的读写分离集群。
集群中的 Master 节点负责处理客户端的读写请求,而 Slave 节点仅能处理客户端的读请求。
在采用单线程 IO 模型时,为了提高处理器的利用率,一般会在一个主机中安装多台 Redis,构建一个 Redis 主从伪集群。当然,搭建伪集群的另一个场景是,在学习 Redis,而学习用主机内存不足以创建多个虚拟机。
主从操作步骤及解析
1. 复制 redis.conf
在 redis 安装目录中 mkdir 一个目录,名称随意。这里命名为 cluster。然后将 redis.conf文件复制到 cluster 目录中。该文件后面会被其它配置文件包含,所以该文件中需要设置每个 Redis 节点相同的公共的属性。
cd /usr/local/redis/ && mkdir cluster && cp redis.conf cluster && cd cluster
2. 修改 redis.conf
因为搭建主从集群,且每个主机都有可能会是 Master,所以最好不要设置密码验证属性 requirepass。如果真需要设置,一定要每个主机的密码都设置为相同的。此时每个配置文件中都要设置两个完全相同的属性:requirepass 与 masterauth。其中 requirepass 用于指定当前主机的访问密码,而 masterauth 用于指定当前 slave 访问 master 时向 master 提交的访问密码,用于让 master 验证自己身份是否合法。
如果未设置密码验证,务必将下行配置更改为no,该配置为保护模式,未设置密码时禁止远程登录,如该项默认,配置主从时只能使用127.0.0.1而无法配置其实际IP了:
protected-mode yes
3. 新建 redis6380.conf
新建一个 redis 配置文件 redis6380.conf。
vi redis6380.conf
include redis.conf
pidfile /var/run/redis_6380.pid
port 6380
dbfilename dump6380.rdb
appendfilename "appendonly6380.aof"
replica-priority 90
# logfile access6380.log
配置解析
- include:继承当前目录下的redis.conf主配置文件,然后该子配置文件的其余配置覆盖主配置文件生效。
- pidfile:PID文件。
- port:本redis实例端口。
- dbfilename、appendfilename:持久化文件。
- replica-priority:replicas 节点通过 INFO 接口给出的信息,默认值为 100。 当 master 节点无法正常工作后 Redis Sentinel 通过这个值来决定将哪个 replicas 节点提升为 master 节点。这个数值越小表示越优先进行提升。如有三个 replicas 节点其 priority 值分别为 10,100,25, Sentinel 会选择 priority 为 10 的节点进行提升。这个值为 0 表示 replica 节点永远不能被提升为 master 节点。
- logfile:日志文件,如果需要的话解开注释。
4. 再复制出两个 conf 文件
再使用 redis6380.conf 复制出两个 conf 文件:redis6381.conf 与 redis6382.conf。然后修改其中的内容。
cp redis6380.conf redis6381.conf && cp redis6380.conf redis6382.conf
sed -i s/6380/6381/g redis6381.conf && sed -i s/"replica-priority 90"/"replica-priority 80"/g redis6381.conf
sed -i s/6380/6382/g redis6382.conf && sed -i s/"replica-priority 90"/"replica-priority 70"/g redis6382.conf
5. 启动三台 Redis
分别使用redis6380.conf、redis6381.conf与redis6382.conf 三个配置文件启动三台Redis。
redis-server redis6380.conf
redis-server redis6381.conf
redis-server redis6382.conf
6. 设置主从关系
通过指定不同的端口登录不同的redis实例
redis-cli -p 6380
redis-cli -p 6381
redis-cli -p 6382
查看主从状态信息,使用 info replication 命令
这时候查看3个实例可以看到都是单点状态,role表示身份,都是master,slave数量为 0 。
127.0.0.1:6380> info replication
# Replication
role:master
connected_slaves:0
master_failover_state:no-failover
master_replid:f2999c3414ba07468e7942e3d3d3bb788b9a7bb9
master_replid2:0000000000000000000000000000000000000000
master_repl_offset:0
second_repl_offset:-1
repl_backlog_active:0
repl_backlog_size:1048576
repl_backlog_first_byte_offset:0
repl_backlog_histlen:0
从节点通过 slaveof 命令来指定主节点
slaveof IP PORT
# 使用6381和6382实例作为从节点,分别执行
127.0.0.1:6381> slaveof 192.168.52.130 6380
OK

127.0.0.1:6382> slaveof 192.168.52.130 6380
OK
这时候再使用 info replication 命令分别查看主节点和从节点,就能看到主从关系,6380为master身份,拥有2个从节点,6381、6382为slave身份。
# 主
# redis-cli -p 6380 info replication
# Replication
role:master
connected_slaves:2
slave0:ip=192.168.52.130,port=6381,state=online,offset=42,lag=0
slave1:ip=192.168.52.130,port=6382,state=online,offset=42,lag=0
master_failover_state:no-failover
master_replid:51ee34b2fd0325446026bd0d515d9ff215f5d907
master_replid2:0000000000000000000000000000000000000000
master_repl_offset:42
second_repl_offset:-1
repl_backlog_active:1
repl_backlog_size:1048576
repl_backlog_first_byte_offset:1
repl_backlog_histlen:42


# 从
# redis-cli -p 6381 info replication
# Replication
role:slave
master_host:192.168.52.130
master_port:6380
master_link_status:up
master_last_io_seconds_ago:0
master_sync_in_progress:0
slave_read_repl_offset:40099
slave_repl_offset:40099
slave_priority:80
slave_read_only:1
replica_announced:1
connected_slaves:0
master_failover_state:no-failover
master_replid:51ee34b2fd0325446026bd0d515d9ff215f5d907
master_replid2:0000000000000000000000000000000000000000
master_repl_offset:40099
second_repl_offset:-1
repl_backlog_active:1
repl_backlog_size:1048576
repl_backlog_first_byte_offset:15
repl_backlog_histlen:40085
主从关系建立后,主节点可读写,从节点只能读不能写(写会报错)。
# 主
127.0.0.1:6380> set test hello
OK
127.0.0.1:6380> get test
"hello"

# 从1
127.0.0.1:6381> get test
"hello"

# 从2
127.0.0.1:6382> get test
"hello"
127.0.0.1:6382> set test2 123
(error) READONLY You can't write against a read only replica.
分级管理
若Redis主从集群中的 Slave 较多时,它们的数据同步过程会对 Master 形成较大的性能压力。此时可以对这些 Slave 进行分级管理。
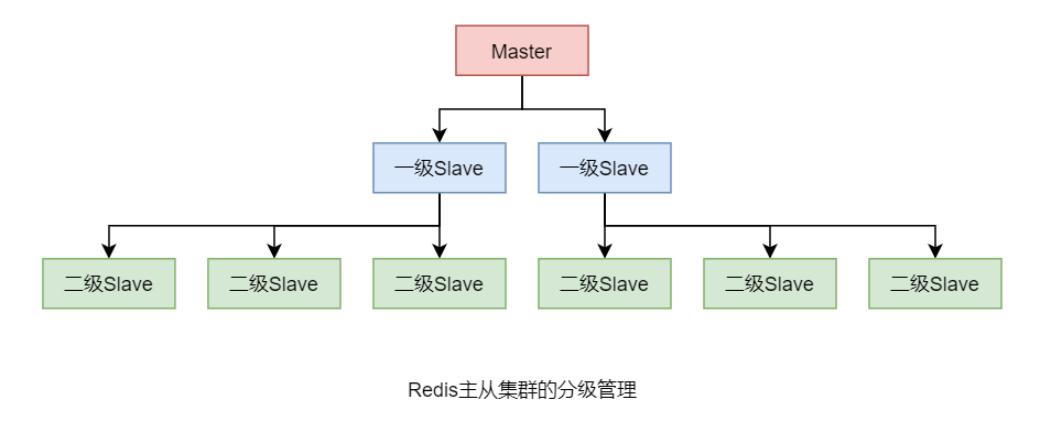
设置方式很简单,只需要让低级别 Slave 指定其 slaveof 的主机为其上一级 Slave 即可。
不过,上一级 Slave 的状态仍为 Slave,只不过,其是更上一级的 Slave。
例如,指定 6382 主机为 6381 主机的 Slave,而 6381 主机仍为真正的 Master 的 Slave。

容灾冷处理
在 Master/Slave 的 Redis 集群中,若 Master 出现宕机有两种处理方式,一种是通过手工角色调整,使 Slave 晋升为 Master 的冷处理;一种是使用哨兵模式,实现 Redis 集群的高可用 HA,即热处理。
无论 Master 是否宕机,Slave 都可通过 slaveof no one 将自己由 Slave 晋升为 Master。如果其原本就有下一级的 Slave,那么,其就直接变为了这些 Slave 的真正的 Master 了。而原来的 Master 也会失去这个原来的 Slave。
# 示例
127.0.0.1:6381> info replication
# Replication
role:slave
master_host:127.0.0.1
master_port:6380
master_link_status:up
......
slave0:ip=127.0.0.1,port=6382,state=online,offset=883,lag=1
......
127.0.0.1:6381>
# 执行 slaveof no one 命令直接将本从节点升级为主节点
127.0.0.1:6381> slaveof no one
OK
127.0.0.1:6381> info replication
# Replication
role:master
connected_slaves:1
......
Sentinel 哨兵机制
简介
对于 Master 宕机后的冷处理方式是无法实现高可用的。Redis 从 2.6 版本开始提供了高可用的解决方案—— Sentinel 哨兵机制。在集群中再引入一个节点,该节点充当 Sentinel 哨兵,用于监视 Master 的运行状态,并在 Master 宕机后自动指定一个 Slave 作为新的 Master。整个过程无需人工参与,完全由哨兵自动完成。
不过,此时的 Sentinel 哨兵又成为了一个单点故障点:若哨兵发生宕机,整个集群将瘫痪。所以为了解决 Sentinel 的单点问题,又要为 Sentinel 创建一个集群,即 Sentinel 哨兵集群。一个哨兵的宕机,将不会影响到 Redis 集群的运行。
工作原理
每个Sentinel都会定时会向Master发送心跳,如果Master在有效时间内向它们都进行了响应,则说明Master是“活着的”。如果Sentinel中有quorum个哨兵没有收到响应,那么就认为Master已经宕机,然后会有一个Sentinel做Failover故障转移。即将原来的某一个Slave晋升为Master。
Redis 高可用集群搭建
可以让 Sentinel 占用独立的主机,即在 Redis 主机上只启动 Redis进程,在 Sentinel 主机上只启动 Sentinel 进程。下面要搭建一个“一主二从三哨兵”的高可用伪集群,即这些角色全部安装运行在一台主机上。“一主二从”使用前面的主从集群,下面仅搭建一个 Sentinel 伪集群。
可以让 Sentinel 占用独立的主机,即在 Redis 主机上只启动 Redis进程,在 Sentinel 主机上只启动 Sentinel 进程。下面要搭建一个“一主二从三哨兵”的高可用伪集群,即这些角色全部安装运行在一台主机上。“一主二从”使用前面的主从集群,下面仅搭建一个 Sentinel 伪集群。
1. 复制 sentinel.conf
将 Redis 安装目录中的 sentinel.conf 文件复制到 cluster 目录中。该配置文件中用于存放一些 sentinel 集群中的一些公共配置。
cd /usr/local/redis/ && cp sentinel.conf cluster/ && cd cluster
2. 修改 sentinel.conf
修改 sentinel.conf 配置文件。
-
sentinel monitor
:Sentinel要监控的master是谁 ;并为master起了一个名字 ,该名字在后面很多配置中都会使用;同时指定Sentinel集群中决定该master“客观下线状态”判断的法定sentinel 数量 ,要求中至少要有(sentinelNum/2+1)个sentinel参与,即5个sentinel就写3,3个sentinel就写2...这里将该配置注释掉,因为要在后面的其它配置文件中设置,如果不注释就会出现配置冲突。 -
sentinel auth-pass:如果 Redis 主从集群中的主机设置了访问密码,那么该属性就需要指定 master 的主机名与访问密码,以方便 sentinel 监控 master(这里需要注意的是前面的redis集群如果设置了密码必须得相同才行,sentinel允许后加入的redis实例无密码,该参数不影响无密码实例的访问,即可以一部分redis实例有密码另一部分无密码)。
-
sentinel down-after-milliseconds:sentinel会向master发送心跳PING来确认master是否存活,如果master在“一定时间范围”内不回应PONG 或者是回复了一个错误消息,那么这个sentinel会主观地(单方面地)认为这个master已经不可用了(subjectively down, 也简称为SDOWN)。而这个down-after-milliseconds就是用来指定这个“一定时间范围”的,单位是毫秒。默认值为30秒。
-
sentinel failover-timeout:failover过期时间,当failover开始后,在此时间内仍然没有触发任何failover操作,当前sentinel将会认为此次failoer失败。默认值为180秒,在同一个 master 上进行第二次故障转移尝试的时间为该failover-timeout 的两倍。
-
sentinel parallel-syncs:在发生failover主备切换时,这个选项指定了最多可以有多少个slave同时对新的master进行同步,这个数字越小,完成failover所需的时间就越长,但是如果这个数字越大,就意味着越多的slave因为replication而不可用。可以通过将这个值设为 1来保证每次只有一个slave处于不能处理命令请求的状态。默认值为 1。
vi sentinel.conf
# 主要将daemonize更改为yes,以守护进程后台运行,以及注释sentinel monitor这行(由子配置文件指定),其余配置根据需求可不改动
daemonize yes
# sentinel monitor mymaster 127.0.0.1 6379 2

# sentinel auth-pass mymaster 123456
sentinel down-after-milliseconds mymaster 30000
sentinel failover-timeout mymaster 180000
3. 新建 sentinel26380.conf
在 Redis 安装目录下的 cluster 目录中新建 sentinel26380.conf 文件作为 Sentinel 的配置文件,并在其中键入如下内容:
其中master主机的IP使用IP不要使用本地回环地址(127.0.0.1),日志文件默认会在 /tmp 目录下。
vi sentinel26380.conf
include sentinel.conf
pidfile /var/run/sentinel_26380.pid
port 26380
sentinel monitor mymaster 192.168.52.130 6380 2

logfile access26380.log
4. 再复制两个 conf 文件并修改
cp sentinel26380.conf sentinel26381.conf && cp sentinel26380.conf sentinel26382.conf
sed -i s/26380/26381/g sentinel26381.conf && sed -i s/26380/26382/g sentinel26382.conf
Redis 高可用集群的启动
1. 启动并关联 Redis 集群
首先要启动三台 Redis,然后再通过 slaveof 关联它们。
注意:如redis实例未设置访问密码务必将redis.conf中的 protected-mode yes 配置项更改为 no,该项为保护模式,未设置密码时禁止远程连接,会造成sentinel无法感知到其它哨兵节点和从节点。
# redis-server redis6380.conf
# redis-server redis6381.conf
# redis-server redis6382.conf

# redis-cli -p 6381 slaveof 192.168.52.130 6380
OK
# redis-cli -p 6382 slaveof 192.168.52.130 6380
OK
2. 启动 Sentinel 集群
启动命令
在/usr/local/bin 目录下有一个命令 redis-sentinel 用于启动 Sentinel。但实际 redis-sentinel 命令是 redis-server 命令的软链接,这两个命令本质上是同一个命令。所以用这两个命令都可以,指定redis.conf 文件就是启动redis实例,指定sentinel.conf 配置文件就是启动sentinel。
启动方式
方式一,使用 redis-sentinel 命令:redis-sentinel sentinel26380.conf
方式二,使用 redis-server 命令:redis-server sentinel26380.conf --sentinel
启动三台 Sentinel
redis-sentinel sentinel26380.conf
redis-sentinel sentinel26381.conf
redis-sentinel sentinel26382.conf
3. 查看 Sentinel 信息
运行中的 Sentinel 就是一个特殊 Redis,其也可以通过客户端连接,然后通过 info sentinel 来查看当前连接的 Sentinel 的信息。
redis-cli -p 26380 info sentinel
以下为3台sentinel节点信息,可以看到masterIP端口为192.168.52.130:6380,slave数量为2个,sentinel数量为3个。

3.1 查看当前master主机是哪个
用于redis新节点上线时确认master主机信息。
SENTINEL get-master-addr-by-name mymaster

# 示例
# redis-cli -p 26380
127.0.0.1:26380> SENTINEL get-master-addr-by-name mymaster
1) "192.168.52.130"
2) "6382"
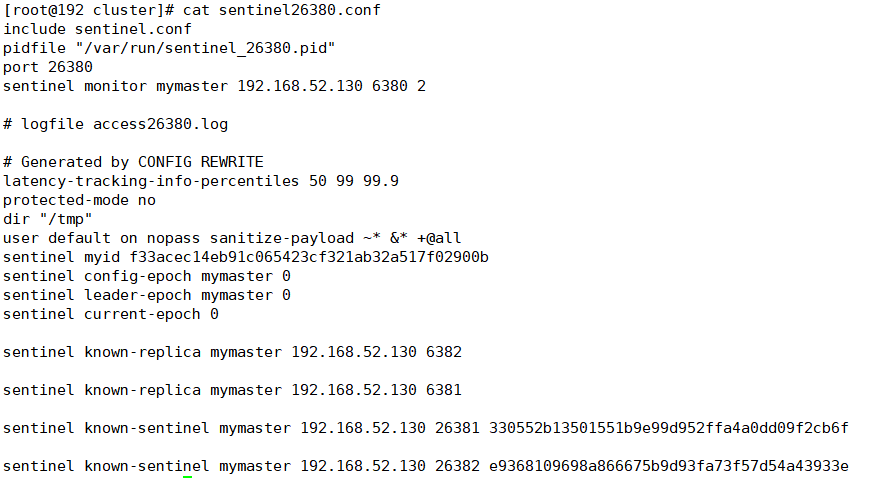
4. 查看 sentinel 配置文件
打开任意 sentinel 的配置文件,发现其配置内容中新增加了很多配置。
sentinel的配置文件会随着启动自行修改,增加上redis的集群信息和sentinel信息。
5. 测试故障转移
首先停掉master
redis-cli -p 6380 shutdown
等10几秒再去查看,6382实例由于 replica-priority 值最低被选举为 master。
[root@192 cluster]# redis-cli -p 26380 info sentinel
# Sentinel
sentinel_masters:1
sentinel_tilt:0
sentinel_tilt_since_seconds:-1
sentinel_running_scripts:0
sentinel_scripts_queue_length:0
sentinel_simulate_failure_flags:0
master0:name=mymaster,status=ok,address=192.168.52.130:6382,slaves=2,sentinels=3

[root@192 cluster]# redis-cli -p 6382 info replication
# Replication
role:master
connected_slaves:1
slave0:ip=192.168.52.130,port=6381,state=online,offset=959405,lag=0
master_failover_state:no-failover
master_replid:6bafd7d1fa4e7011d6937408e5d7d4f26163509b
master_replid2:51ee34b2fd0325446026bd0d515d9ff215f5d907
master_repl_offset:959405
second_repl_offset:935634
repl_backlog_active:1
repl_backlog_size:1048576
repl_backlog_first_byte_offset:29
repl_backlog_histlen:959377

[root@192 cluster]# cat sentinel26380.conf
include sentinel.conf
pidfile "/var/run/sentinel_26380.pid"
port 26380
sentinel monitor mymaster 192.168.52.130 6382 2
...
当原 master节点上线后,Sentinel Leader 会立即先将原 master节点更新为 slave,然后定时查看其是否恢复,如果查看到其已经恢复,则会命其从当前 master 进行数据同步。
如果想让宕机又上线的节点再次成为 master 节点,则在其上线后重新设置下其 replica-priority 的值,让其小于其余slave,这样当现 master 节点宕机后,本节点又将选举为 master。
redis-cli -p 6380 config set replica-priority 69
哨兵机制原理
三个定时任务
Sentinel 维护着三个定时任务以监测 Redis 节点及其它 Sentinel 节点的状态。
1. info 任务
每个 Sentinel 节点每 10 秒就会向 Redis 集群中的每个节点发送 info 命令,以获得最新的 Redis 拓扑结构。
2. 心跳任务
每个Sentinel节点每1秒就会向所有Redis节点及其它Sentinel节点发送一条ping命令,以检测这些节点的存活状态。该任务是判断节点在线状态的重要依据。
3. 发布/订阅任务
每个 Sentinel 节点在启动时都会向所有 Redis 节点订阅__sentinel__:hello 主题的信息,当 Redis 节点中该主题的信息发生了变化,就会立即通知到所有订阅者。
启动后,每个 Sentinel 节点每 2 秒就会向每个 Redis 节点发布一条__sentinel__:hello 主题的信息,该信息是当前 Sentinel 对每个 Redis 节点在线状态的判断结果及当前 Sentinel 节点信息。
当 Sentinel 节点接收到__sentinel__:hello 主题信息后,就会读取并解析这些信息,然后主要完成以下三项工作:
- 如果发现有新的 Sentinel 节点加入,则记录下新加入 Sentinel 节点信息,并与其建立连接。
- 如果发现有 Sentinel Leader 选举的选票信息,则执行 Leader 选举过程。
- 汇总其它 Sentinel 节点对当前 Redis 节点在线状态的判断结果,作为 Redis 节点客观下线的判断依据。
Redis 节点下线判断
对于每个 Redis 节点在线状态的监控是由 Sentinel 完成的。
1. 主观下线
每个 Sentinel 节点每秒就会向每个 Redis 节点发送 ping 心跳检测,如果 Sentinel 在 down-after-milliseconds 时间内没有收到某 Redis 节点的回复,则 Sentinel 节点就会对该 Redis 节点做出“下线状态”的判断。这个判断仅仅是当前 Sentinel 节点的“一家之言”,所以称为主观下线。
2. 客观下线
当 Sentinel 主观下线的节点是 master 时,该 Sentinel 节点会向每个其它 Sentinel 节点发送 sentinel is-master-down-by-addr 命令,以询问其对 master 在线状态的判断结果。这些 Sentinel 节点在收到命令后会向这个发问 Sentinel 节点响应 0(在线)或 1(下线)。当 Sentinel 收到超过 quorum 个下线判断后,就会对 master 做出客观下线判断。
Sentinel Leader 选举
当 Sentinel 节点对 master 做出客观下线判断后会由 Sentinel Leader 来完成后续的故障转移,即 Sentinel 集群中的节点也并非是对等节点,是存在 Leader 与 Follower 的。
Sentinel 集群的 Leader 选举是通过 Raft 算法实现的。
每个选举参与者都具有当选 Leader 的资格,当其完成了“客观下线”判断后,就会立即“毛遂自荐”推选自己做 Leader,然后将自己的提案发送给所有参与者。其它参与者在收到提案后,只要自己手中的选票没有投出去,其就会立即通过该提案并将同意结果反馈给提案者,后续再过来的提案会由于该参与者没有了选票而被拒绝。当提案者收到了同意反馈数量大于等于 max(quorum,sentinelNum/2+1) 时,该提案者当选 Leader。
说明:
- 在网络没有问题的前提下,基本就是谁先做出了“客观下线”判断,谁就会首先发起 Sentinel Leader 的选举,谁就会得到大多数参与者的支持,谁就会当选 Leader。
- Sentinel Leader 选举会在次故障转移发生之前进行。
- 故障转移结束后 Sentinel 不再维护这种 Leader-Follower 关系,即 Leader 不再存在。
master 选择算法
在进行故障转移时,Sentinel Leader 需要从所有 Redis 的 Slave 节点中选择出新的 Master。
其选择算法为:
- 过滤掉所有主观下线的,或心跳没有响应 Sentinel 的,或 replica-priority 值为 0 的 Redis 节点
- 在剩余 Redis 节点中选择出 replica-priority 最小的的节点列表。如果只有一个节点,则直接返回,否则,继续
- 从优先级相同的节点列表中选择复制偏移量最大的节点。如果只有一个节点,则直接返回,否则,继续
- 从复制偏移值量相同的节点列表中选择动态 ID 最小的节点返回
故障转移过程
Sentinel Leader 负责整个故障转移过程,经历了如下步骤:
- Sentinel Leader 根据 master 选择算法选择出一个 slave 节点作为新的 master
- Sentinel Leader 向新 master 节点发送 slaveof no one 指令,使其晋升为 master
- Sentinel Leader 向新 master 发送 info replication 指令,获取到 master 的动态 ID
- Sentinel Leader 向其余 Redis 节点发送消息,以告知它们新 master 的动态 ID
- Sentinel Leader 向其余 Redis 节点发送 slaveof
指令,使它们成为新 master 的 slave - Sentinel Leader 从所有 slave 节点中每次选择出 parallel-syncs 个 slave 从新 master 同步数据,直至所有 slave 全部同步完毕
- 故障转移完毕
节点上线
不同的节点类型,其上线的方式也是不同的。
1. 原 Redis 节点上线
无论是原下线的 master 节点还是原下线的 slave 节点,只要是原 Redis 集群中的节点上线,只需启动 Redis 即可。因为每个 Sentinel 中都保存有原来其监控的所有 Redis 节点列表,Sentinel 会定时查看这些 Redis 节点是否恢复。如果查看到其已经恢复,则会命其从当前 master 进行数据同步。
不过,如果是原 master 上线,在新 master 晋升后 Sentinel Leader 会立即先将原 master 节点更新为 slave,然后才会定时查看其是否恢复。
这里其实会引申出一个问题,那就是当redis集群中的节点下线后不再上线了,哨兵也依旧会定时检查该下线节点的状态,造成一点资源浪费,所以redis集群上线后最好不要随便更换机器。
2. 新 Redis 节点上线
如果需要在 Redis 集群中添加一个新的节点,其未曾出现在 Redis 集群中,则上线操作只能手工完成。即添加者在添加之前必须知道当前 master 是谁,然后在新节点启动后运行 slaveof 命令加入集群。
3. Sentinel 节点上线
如果要添加的是 Sentinel 节点,无论其是否曾经出现在 Sentinel 集群中,都需要手工完成。即添加者在添加之前必须知道当前 master 是谁,然后在配置文件中修改 sentinel monitor 属性,指定要监控的 master。然后启动 Sentinel 即可。

 浙公网安备 33010602011771号