


第五次作业数据采集
作业1
要求:
熟练掌握 Selenium 查找HTML元素、爬取Ajax网页数据、等待HTML元素等内容。
使用Selenium框架爬取京东商城某类商品信息及图片。
候选网站:http://www.jd.com/
关键词:学生自由选择
输出信息:MYSQL的输出信息如下
| mNo | mMark | mPrice | mNote | mFile |
| 000001 | 三星Galaxy | 9199.00 | 三星Galaxy Note20 Ultra 5G... | 000001.jpg |
结果展示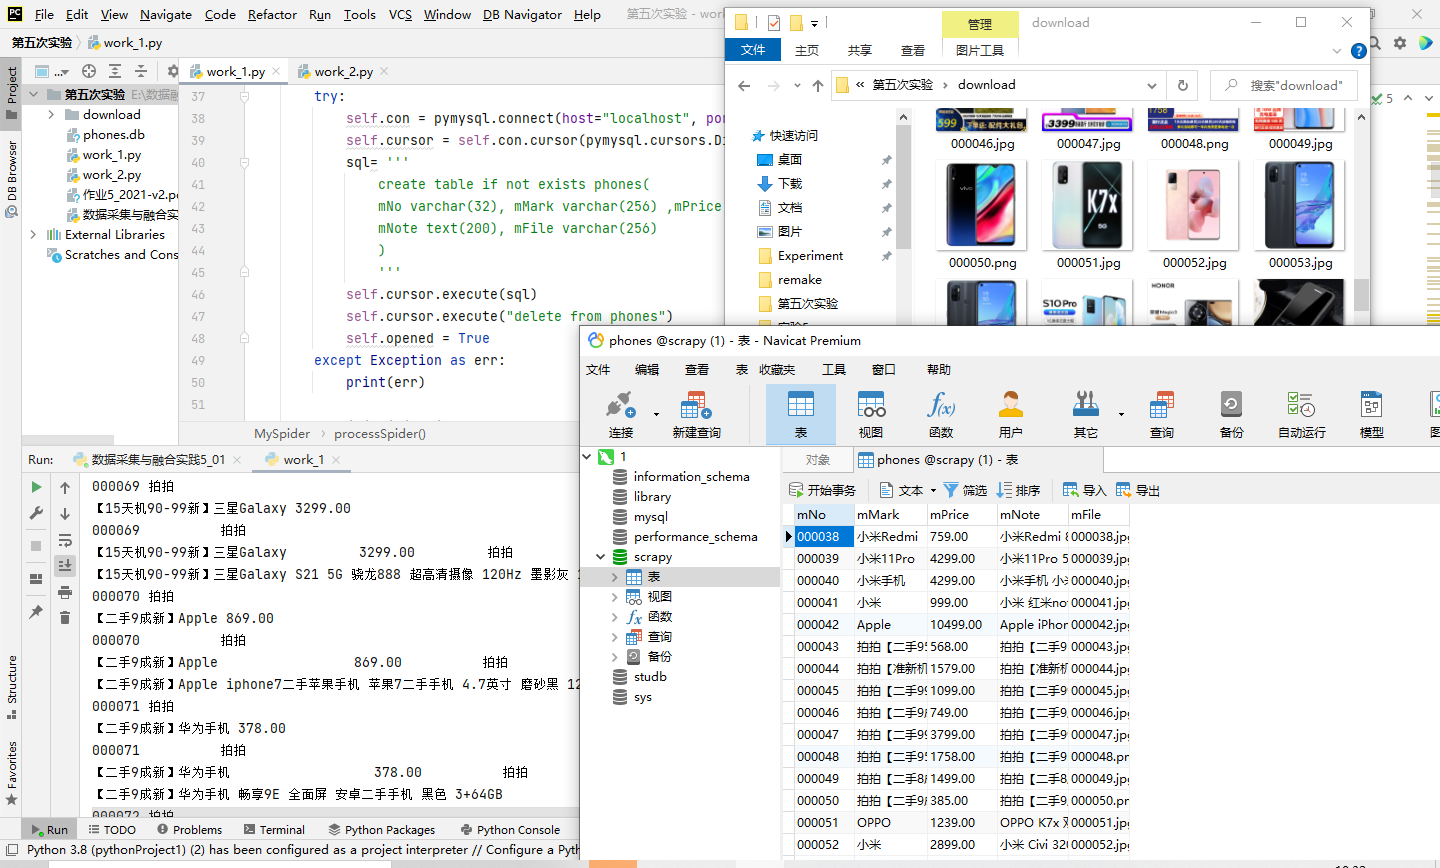
使用selenium框架创建浏览器并配置参数:
    chrome_options = Options()
        chrome_options.add_argument('--headless')#设置浏览器不可见
        chrome_options.add_argument('--disable-gpu')#禁止调用gpu
        self.driver = webdriver.Chrome(options=chrome_options)#启动浏览器
        self.wait = WebDriverWait(self.driver, 10)#设置等待时间10秒
        self.driver.get(url)# 获取url链接
使用xpath元素定位并爬取信息
def processSpider(self):
        time.sleep(1)
        print(self.driver.current_url)#打印当前爬取页面的url
        try:
            lis = self.driver.find_elements_by_xpath("//div[@id='J_goodsList']//li[@class='gl-item']")
            for li in lis:
                self.count += 1#商品数量
                try:#查找图片
                    src1 = li.find_element_by_xpath(".//div[@class='p-img']//a//img").get_attribute("src")
                except:
                    src1 = ""
                try:
                    src2 = li.find_element_by_xpath(".//div[@class='p-img']//a//img").get_attribute("data-lazy-img")
                except:
                    src2 = ""
            try:#价格
                price = li.find_element_by_xpath(".//div[@class='p-price']//i").text
            except:
                price = "0"

            try:#简介
                note = li.find_element_by_xpath(".//div[@class='p-name p-name-type-2']//em").text
                mark = note.split(" ")[0]
                mark = mark.replace("爱心东东\n", "")
                mark = mark.replace(",", "")
                note = note.replace("爱心东东\n", "")
                note = note.replace(",", "")
            except:
                note = ""
                mark = ""

            self.No = self.No + 1
            no = str(self.No)
            while len(no) < 6:
                no = "0" + no
            print(no, mark, price)#先展示序号,名称,价格

            if src1:
                src1 = urllib.request.urljoin(self.driver.current_url, src1)
                p = src1.rfind(".")
                mFile = no + src1[p:]
            elif src2:
                src2 = urllib.request.urljoin(self.driver.current_url, src2)
                p = src2.rfind(".")
                mFile = no + src2[p:]

            if src1 or src2:
                T = threading.Thread(target=self.download, args=(src1, src2, mFile))
                T.setDaemon(False)
                T.start()
                self.threads.append(T)
            else:
                mFile = ""
使用urllib.request下载图片:
 def download(self, src1, src2, mFile):#下载图片
        data = None
        if src1:
            try:
                req = urllib.request.Request(src1, headers=MySpider.headers)
                resp = urllib.request.urlopen(req, timeout=10)
                data = resp.read()
            except:
                pass
        if not data and src2:
            try:
                req = urllib.request.Request(src2, headers=MySpider.headers)
                resp = urllib.request.urlopen(req, timeout=10)
                data = resp.read()
            except:
                pass
        if data:
            print("download begin", mFile)
            fobj = open(MySpider.imagePath + "\\" + mFile, "wb")
            fobj.write(data)
            fobj.close()
            print("download finish", mFile)
翻页处理:找到翻页按钮并点击:
  try:#翻页处理
                    self.driver.find_element_by_xpath("//span[@class='p-num']//a[@class='pn-next disabled']")
                except:
                    nextPage = self.driver.find_element_by_xpath("//span[@class='p-num']//a[@class='pn-next']")
                    time.sleep(10)
                    nextPage.click()
                    self.processSpider()
与数据库连接部分
   try:
            self.con = pymysql.connect(host="localhost", port=3306, user="root",passwd = "******", db = "scrapy", charset = "utf8")
            self.cursor = self.con.cursor(pymysql.cursors.DictCursor)
            sql= '''
                create table if not exists phones(
                mNo varchar(32), mMark varchar(256) ,mPrice varchar(32),
                mNote text(200), mFile varchar(256)
                )
                '''
            self.cursor.execute(sql)
            self.cursor.execute("delete from phones")
            self.opened = True
        except Exception as err:
            print(err)
   if self.opened:# 将结果存入数据库
                    sql ='''insert into phones (mNo,mMark,mPrice,mNote,mFile) values (%s,%s,%s,%s,%s)'''
                    arg =(no,mark,price,note,mFile)
                    self.cursor.execute(sql,arg)#将数据插入数据库
作业2
要求:
熟练掌握 Selenium 查找HTML元素、实现用户模拟登录、爬取Ajax网页数据、等待HTML元素等内容。
使用Selenium框架+MySQL模拟登录慕课网,并获取学生自己账户中已学课程的信息保存到MySQL中(课程号、课程名称、授课单位、教学进度、课程状态,课程图片地址),同时存储图片到本地项目根目录下的imgs文件夹中,图片的名称用课程名来存储。
候选网站:中国mooc网:https://www.icourse163.org
输出信息:MYSQL数据库存储和输出格式
表头应是英文命名例如:课程号ID,课程名称:cCourse……,由同学们自行定义设计表头:
| cid | cCourse | cCollege | cSchedule | cCourseStatus | cImgUrl |
| Python网络爬虫与信息提取 | 北京理工大学 | 已学3/18课时 | 2021年5月18日已结束 | 日已结束 http://edu-image.nosdn.127.net/C0AB6FA791150F0DFC0946B9A01C8CB2.jpg | |

代码
同样是先创建浏览器并配置好参数:
   # Initializing Chrome browser
        chrome_options = Options()
        #chrome_options.add_argument('--headless')#设置浏览器不可见
        chrome_options.add_argument('--disable-gpu')#禁止调用gpu
        self.driver = webdriver.Chrome(options=chrome_options)#启动浏览器
        self.wait = WebDriverWait(self.driver, 30)#设置等待时间30秒
        self.driver.get(url)#获取url链接
再爬取此网站时,需要使用selenium进行模拟登录,此部分较为麻烦,也遇见了不少坑。
首先是xpath的编写,这里直接使用元素路径复制的话,发现每次的路径某些元素的id属性都会发生变化,所以在写xpath路径时,不能无脑复制,需要自己编写,绕开id这个属性。
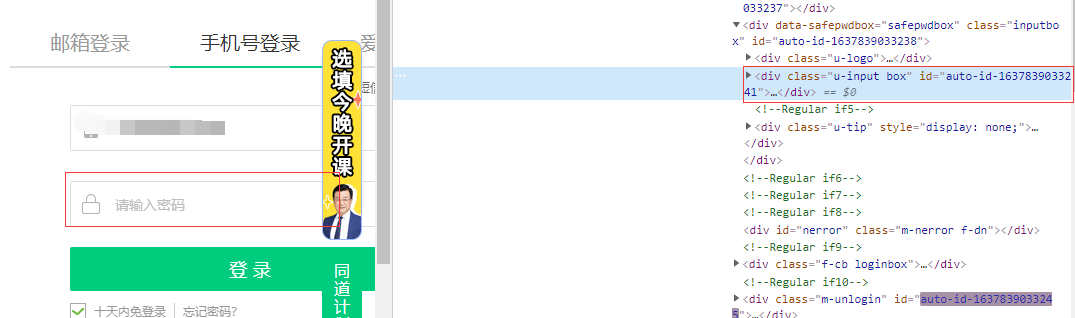
其次是标签的切换,在模拟浏览器点击:其他登录方式后,出现无论怎么写xpath,都无法定位手机号输入框的情况,后得知,需要切使用lelenium换frame,再去重新定位元素。
以下是登录操作的代码:
#找到登录按钮
        time.sleep(2)
        login = self.driver.find_element_by_xpath("//*[@id='app']/div/div/div[1]/div[3]/div[3]/div")
        login.click()
        # 点击选择其他登录方式
        time.sleep(2)
        otherlogin  =  self.driver.find_element_by_xpath('//*[@class="mooc-login-set-wrapper"]/div/div/div[2]/span')
        otherlogin.click()
        # 点击选择手机账号登录
        phonelogin = self.driver.find_element_by_xpath('//div[@class="ux-tabs-underline"]')
        phonelogin.click()
        # 切换到frame,重新去定位元素,不然定位不到
        iframe = self.driver.find_element_by_xpath('//body/div[13]/div[2]/div/div/div/div/div/div[1]/div/div[1]/div[2]/div[2]/div/iframe')
        self.driver.switch_to.frame(iframe)
        #输入账号
        name_input = self.driver.find_element_by_xpath('//div[@class="u-input box"]//input[@type="tel"]')
        username = "*******"
        name_input.clear()
        name_input.send_keys(username)  # 填写账号
        time.sleep(5)  # 休眠一下,模拟人工登录,不然可能被拦截
        #输入密码
        pass_input = self.driver.find_element_by_xpath("//body/div[2]/div[2]/div[2]/form/div/div[4]/div[2]/input[2]")
        password = "*****"
        pass_input.clear()
        pass_input.send_keys(password)  #填写密码
        time.sleep(5)
        #点击登录按钮
        login_button = self.driver.find_element_by_xpath("//*[@id='submitBtn']")
        login_button.click()
        time.sleep(5)
        #这里会有一个同意的弹窗,需要点击同意
        agree = self.driver.find_element_by_xpath('//*[@id="privacy-ok"]')
        agree.click()
        time.sleep(2)
        #进入我的课程,就可以开始爬取了
        mycourse = self.driver.find_element_by_xpath('//*[@id="app"]/div/div/div[1]/div[3]/div[4]/div')
        mycourse.click()
接下来就是常规的网页信息爬取部分了:
    try:
            divs = self.driver.find_elements_by_xpath('//*[@id="j-coursewrap"]/div/div[1]/div')
            for div in divs:
                self.no += 1
                id = self.no
                course = div.find_element_by_xpath('.//div[1]/a/div[2]/div[1]/div[1]/div/span[2]').text
                college = div.find_element_by_xpath('div[1]/a/div[2]/div[1]/div[2]/a').text
                schedule = div.find_element_by_xpath('div[1]/a/div[2]/div[2]/div[1]/div[1]/div[1]/a/span').text
                coursestatus = div.find_element_by_xpath('div[1]/a/div[2]/div[2]/div[2]').text
                imageurl = div.find_element_by_xpath('div[1]/a/div[1]/img').get_attribute("src")
保存图片:
    def download(self,src,mFile):
        req = urllib.request.Request(src, headers=MySpider.headers)
        resp = urllib.request.urlopen(req, timeout=10)
        data = resp.read()
        fobj = open(MySpider.imagePath + "\\" + mFile, "wb")
        fobj.write(data)
        fobj.close()
数据库
  try:
            self.con = pymysql.connect(host="localhost", port=3306, user="root", passwd="*****", db="scrapy",
                                       charset="utf8")
            self.cursor = self.con.cursor(pymysql.cursors.DictCursor)
            sql = '''
                create table if not exists mooc(
                Id varchar(10), cCourse varchar(64) ,cCollege varchar(64),
                cSchedule varchar(128), cCourseStatus varchar(128),
                clmgUrl varchar(255)
                )
                '''
            self.cursor.execute(sql)
            self.cursor.execute("delete from mooc")
            self.opened = True
        except Exception as err:
            print(err)
  if self.opened:# 将结果存入数据库
                    sql ='''insert into mooc (Id,cCourse,cCollege,cSchedule,cCourseStatus,clmgUrl) values (%s,%s,%s,%s,%s,%s)'''
                    arg =(id ,course,college, schedule,coursestatus,imageurl)
                    self.cursor.execute(sql,arg)#将数据插入数据库
作业3
要求:掌握大数据相关服务,熟悉Xshell的使用
完成文档 华为云_大数据实时分析处理实验手册-Flume日志采集实验(部分)v2.docx 中的任务,即为下面5个任务,具体操作见文档。
环境搭建
任务一:开通MapReduce服务
实时分析开发实战:
任务一:Python脚本生成测试数据
任务二:配置Kafka
任务三:安装Flume客户端
任务四:配置Flume采集数据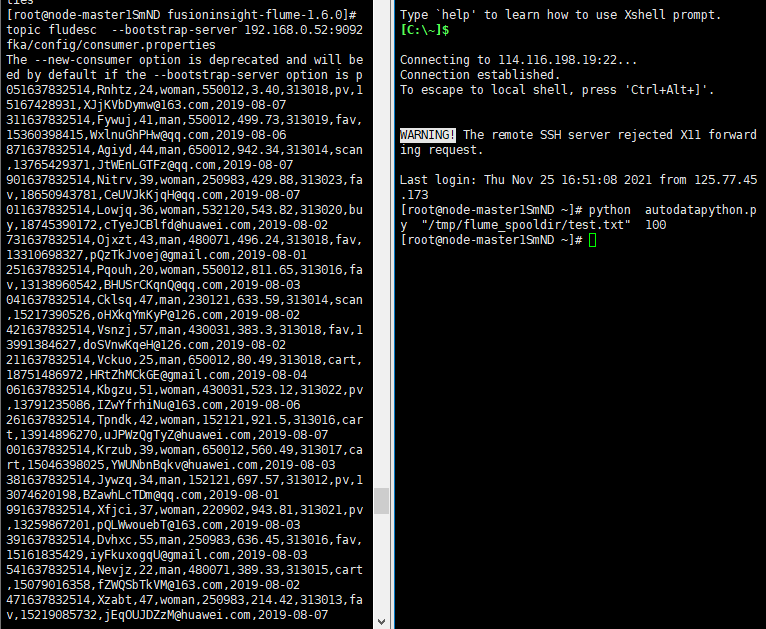

 浙公网安备 33010602011771号