

1. 创建 AWS 账户
2. 启动配备 Amazon EC2 的 Linux 虚拟机 (有12个月免费)
  2.1 参考建立后获得 虚拟机(这里选择ubuntu):
  2.2 配置安全组
  2.3 ssh连接
  2.4 测试
  2.5 安装配置ss
    2.5.1 直接命令启动
    2.5.2 使用配置文件
    2.5.3 优化,开机启动设置
3. aws的一些12个月内免费项目
4. 开启TCP BBR
5. 为archlinux服务器开启google bbr模块
6. 更多参考
  6.1 ssr
  6.2 bbr
  6.3 AWS的1个月免费项目
https://zh.wikipedia.org/zh-tw/亚马逊云计算服务
https://zh.wikipedia.org/wiki/Amazon_EC2
https://szosoft.blogspot.com/2020/02/aws-ss.html
1. 创建 AWS 账户
AWS 账户包含 12 个月的免费套餐访问权限
包括使用 Amazon EC2、Amazon S3 和 Amazon DynamoDB...请访问 aws.amazon.com/free 免费查看完整优惠条款
10 分钟教程
https://amazonaws-china.com/cn/getting-started/tutorials/
2. 启动配备 Amazon EC2 的 Linux 虚拟机 (有12个月免费)
https://amazonaws-china.com/cn/ec2/
AWS > 文档 > Amazon EC2 > 用户指南(适用于 Linux 实例)
https://docs.aws.amazon.com/zh_cn/AWSEC2/latest/UserGuide/concepts.html
https://amazonaws-china.com/cn/getting-started/tutorials/launch-a-virtual-machine/
Amazon Elastic Compute Cloud (EC2) 是用于在云中创建和运行虚拟机的 Amazon Web 服务。AWS 将这些虚拟机称为“实例”。
2.1 参考建立后获得 虚拟机(这里选择ubuntu):
| 实例 ID | i-0c128... |
| 公有 DNS (IPv4) | ec2-18-221-96-69.us-east-2.compute.amazonaws.com |
| 实例状态 | running |
| IPv4 公有 IP | 18.221.96.69 |
| 实例类型 | t2.micro |
| 私有 DNS | ip-172-31-11-86.us-east-2.compute.internal |
| 可用区 | us-east-2a |
| 私有 IP | 172.31.11.86 |
| 安全组 | launch-wizard-1. 查看入站规则. 查看出站规则 |
| 根设备类型 | ebs |
| 块储存设备 | /dev/sda1 |
| 虚拟化 | hvm |
注: 这里的[IPv4 公有 IP] 每次重启后会改变。
2.2 配置安全组
开启必要端口: 22(ssh 默认已开启), 80(http), 443(https), 8000(简单测试用), 1060(自定义的ss转发端口)
| 类型 | 协议 | 端口范围 | 来源 | 描述 |
| HTTP | TCP | 80 | 0.0.0.0/0 | |
| HTTP | TCP | 80 | ::/0 | |
| HTTPS | TCP | 443 | 0.0.0.0/0 | |
| HTTPS | TCP | 443 | ::/0 | |
| SSH | TCP | 22 | 0.0.0.0/0 | |
| SSH | TCP | 22 | ::/0 | |
| 自定义 TCP 规则 | TCP | 1060 | 0.0.0.0/0 | 自定义的ss转发端口 |
| 自定义 TCP 规则 | TCP | 1060 | ::/0 | 自定义的ss转发端口 |
| 自定义 TCP 规则 | TCP | 8000 | 0.0.0.0/0 | 测试 |
| 自定义 TCP 规则 | TCP | 8000 | ::/0 | 测试 |
| 自定义 ICMP 规则 - IPv4 | 回显回复 | 不适用 | 0.0.0.0/0 | |
| 自定义 ICMP 规则 - IPv4 | 回显回复 | 不适用 | ::/0 | |
| 自定义 ICMP 规则 - IPv6 | 全部 | 不适用 | 0.0.0.0/0 | |
| 自定义 ICMP 规则 - IPv6 | 全部 | 不适用 | ::/0 |
2.3 ssh连接
下载ssh连接需要用的pem文件,保存好。
$ ssh -i "awsub01.pem" ubuntu@18.221.96.69
若使用putty,需要将上面下载的pem文件转换为putty使用的ppk
$ puttygen awsub01.pem -O private -o awsub01.ppk
$ putty -i "awsub01.ppk" ubuntu@18.221.96.69
若使用客户端:
Session\Host Name(or IP address): ubuntu@18.221.96.69
Connection\SSH\Auth\Private Key file for authentication: 选择转换好的*.ppk文件
2.4 测试
简单开启web服务测试,默认8000端口
$ nohup python -m SimpleHTTPServer > web.txt 2>&1 &
客户端用上面的公有IPv4地址测试: http://18.221.96.69:8000/web.txt
2.5 安装配置ss
安装(Ubuntu),服务器与客户端安装一样

2.5.1 直接命令启动

2.5.2 使用配置文件


2.5.3 优化,开机启动设置
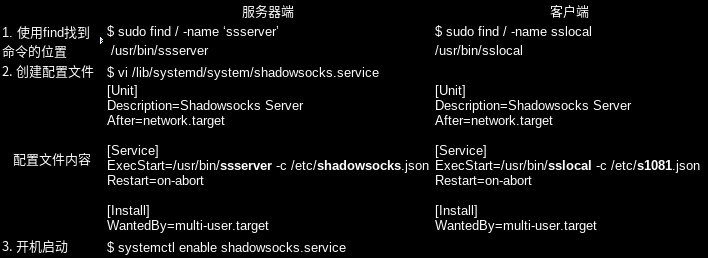
取消开机 $ systemctl disable [ss].service
上述在免费项目上有个小问题,每次重启后,IP地址就会变更,[ss].json配置文件就需要修改。
所以可以不使用配置文件,建立service文件如下:
$ sudo vi /lib/systemd/system/snoip.service
[Unit]
Description=SS Server
After=network.target
[Service]
ExecStart=/usr/bin/ssserver -p 1060 -k f16f52c7d -m aes-256-cfb
Restart=on-abort
[Install]
WantedBy=multi-user.target
开启启动 $ systemctl enable snoip.service
启动 $ systemctl start snoip.service
查看状态 $ systemctl status snoip.service
停止 $ systemctl stop snoip.service
3. aws的一些12个月内免费项目
| 类别 | 计算 | 机器学习 | 机器学习 |
| 名称 | Amazon EC2 | Amazon Polly | Amazon Translate |
| 简述 | 云中可调整大小的计算容量。 | 将文本转换为逼真的语音。 | 快速,高质量且费用低廉的神经网络机器翻译。 |
| 内容 | 每月 750 个小时的 Linux,RHEL 或 SLES t2.micro 实例使用时间 每月 750 个小时的 Windows t2.micro 实例使用时间 |
每月 500 万个字符 | 每月 200 万个字符 |
| 类别 | 数据库 | 数据库 | 存储 |
| 名称 | Amazon RDS | Amazon ElastiCache | Amazon Elastic Block Storage |
| 简述 | 适用于 MySQL,PostgreSQL,MariaDB,Oracle BYOL 或 SQL Server 的托管关系数据库服务。 | 一种可让用户在云中轻松部署,运行和扩展内存中的缓存的 Web 服务。 | 适用于 EC2 实例的持久性低延迟块级存储卷。 |
| 内容 | 每月 750 个小时的 db.t2.micro 数据库使用时间(适用的数据库引擎) 20GB 通用型 (SSD) 数据库存储 20GB 数据库备份和数据库快照存储 |
750 个小时的 cache.t2micro 节点使用时间 | 30GiB 的 Amazon EBS:通用型 (SSD) 或磁性介质存储的任意组合. 2000000 的 I/O(使用 EBS 磁性介质存储); 1GB 快照存储 |
| 类别 | 存储 | 存储 | 存储 |
| 名称 | Amazon S3 | Amazon CloudFront | Amazon EFS |
| 简述 | 安全,持久并且可扩展的对象存储基础设施。 | 一种 Web 服务,以低延迟和高数据传输速度向最终用户分发内容。 | 适用于 Amazon EC2 实例的简单,可扩展的共享文件存储服务。 |
| 内容 | 5GB 标准存储. 20000 个 Get 请求; 2000 个 Put 请求 |
50GB 传出数据. 2000000 个 HTTP 或 HTTPS 请求 |
5GB 的存储 |
4. 开启TCP BBR
https://www.cnblogs.com/devilmaycry812839668/p/10353621.html
1)修改系统变量
echo "net.core.default_qdisc=fq" >> /etc/sysctl.conf
echo "net.ipv4.tcp_congestion_control=bbr" >> /etc/sysctl.conf
2)保存生效,配置内核
sudo sysctl -p
3)查看内核是否已开启BBR
sysctl net.ipv4.tcp_available_congestion_control
sysctl net.ipv4.tcp_congestion_control
4)验证BBR是否已经启动
lsmod |grep bbr
tcp_bbr204809
5. 为archlinux服务器开启google bbr模块
https://beekc.top/2018/08/04/enable-google-bbr-in-archlinux/
Arch Linux 开启 Google BBR
https://marskid.net/2017/12/03/arch-linux-open-google-bbr/
Google BBR是一种服务器端单边TCP加速优化工具,在特定网络情况下可以实现加速效果,特别适合高延迟和丢包的网络。
Linux Kernel 4.9已经包含了BBR算法,在Archlinux下软件包名为linux-lts。
$ uname -r
5.5.5-arch1-1
查看模块信息
$ modinfo tcp_bbr
filename: /lib/modules/5.5.5-arch1-1/kernel/net/ipv4/tcp_bbr.ko.xz
description: TCP BBR (Bottleneck Bandwidth and RTT)
license: Dual BSD/GPL
author: Soheil Hassas Yeganeh <soheil@google.com>
author: Yuchung Cheng <ycheng@google.com>
author: Neal Cardwell <ncardwell@google.com>
author: Van Jacobson <vanj@google.com>
srcversion: DC7F3CFC97132D7BD7FB2FF
depends:
retpoline: Y
intree: Y
name: tcp_bbr
vermagic: 5.5.5-arch1-1 SMP preempt mod_unload
若不存在,使用如下命令安装linux-lts内核:
$ pacman -Syu linux-lts
内核会自动安装,并且会对之前的内核作备份。但是GRUB启动项不会自动更新,需要使用如下命令备份并更新启动项:
$ cp /boot/grub/grub.cfg /boot/grub/grub.cfg.back
$ grub-mkconfig -o /boot/grub/grub.cfg
然后重启,查看内核版本号:$ uname -r
$ modprobe tcp_bbr
手动加载模块
$ lsmod |grep tcp
tcp_bbr 20480 0
$ sysctl net.ipv4.tcp_congestion_control
net.ipv4.tcp_congestion_control = cubic
$ sudo sysctl net.ipv4.tcp_congestion_control=bbr
net.ipv4.tcp_congestion_control = bbr
$ sysctl net.ipv4.tcp_congestion_control
net.ipv4.tcp_congestion_control = bbr
$ lsmod |grep tcp
tcp_bbr 20480 52
$ sysctl net.ipv4.tcp_available_congestion_control
net.ipv4.tcp_available_congestion_control = reno cubic
https://wiki.archlinux.org/index.php/Kernel_parameters
https://www.archlinux.org/packages/core/x86_64/linux-lts/
6. 更多参考
6.1 ssr
https://cndaqiang.github.io/2017/09/27/ubuntu-ss/
pip uninstall [ss]
https://cndaqiang.github.io/2017/09/28/ubuntu1604-ssr/
$ wget https://github.com/cndaqiang/[ss]r/archive/manyuser.zip
$ unzip manyuser.zip
$ cd [ss]r-manyuser/
$ vi [ss]r-manyuser/config.json
$ python ./[ss]/server.py -c config.json
$ sudo python ./[ss]/server.py -c config.json -d start
$ sudo python ./[ss]/server.py -c config.json -d stop
$ python ./[ss]/server.py -h
客户端
$ sudo python ./[ss]/local.py -c config.json -d start|stop
6.2 bbr
https://github.com/icjq/icjq.github.io/wiki/用Vultr服务器搭建ss,遨游Google、Youtube、Facebook(小白教程)
https://raw.githubusercontent.com/teddysun/across/master/bbr.sh
一键安装最新内核并开启 BBR 脚本
https://teddysun.com/489.html
$ wget --no-check-certificate https://github.com/teddysun/across/raw/master/bbr.sh && chmod +x bbr.sh && ./bbr.sh
$ sysctl net.ipv4.tcp_available_congestion_control //bbr cubic reno | reno cubic bbr
$ sysctl net.ipv4.tcp_congestion_control //bbr
$ sysctl net.core.default_qdisc //fq
$ lsmod | grep bbr
https://github.com/google/bbr/blob/master/Documentation/bbr-quick-start.md
https://kernel.ubuntu.com/~kernel-ppa/mainline/
https://elrepo.org/tiki/tiki-index.php
6.3 AWS的1个月免费项目
Amazon Lightsail 快速启动虚拟机 (1个月免费)
AWS 让 Linux 虚拟专用服务器的启动变得更加简单。用 Amazon Lightsail 快速启动虚拟机 >>
https://lightsail.aws.amazon.com/ls/webapp/home/resources
Lightsail 是较简单的工作负载、快速部署和 AWS 入门的理想选择。它旨在帮助您从小规模开始,然后随着您的发展而扩展。
AWS上部署BBR+SSR 24.10月.2018
https://wmdpd.com/awsshang-bu-shu-ssr/
不怕折腾的学生可以尝试。每个月重做一遍...
开启EC2免费服务器
https://blog.csdn.net/huanglin6/article/details/83544719
用站长工具检测一下,网址: http://ping.chinaz.com/

 浙公网安备 33010602011771号