

CPropertySheet(属性单) CPropertyPage(属性页)
2014-12-19 00:48 sylar_liang 阅读(3408) 评论(1) 收藏 举报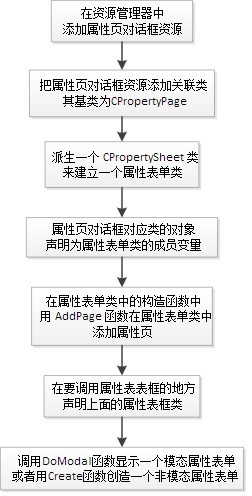
1.添加对话框资源,为对话框创建类,继承于CPropertyPage
class CFirstPage : public CPropertyPage
// FirstPage.cpp
CFirstPage::CFirstPage()
    : CPropertyPage(CFirstPage::IDD)
{
    m_psp.dwFlags |= PSP_DEFAULT|PSP_HIDEHEADER;
}

class CSecondPage : public CPropertyPage
// SecondPage.cpp
CSecondPage::CSecondPage()
: CPropertyPage(CSecondPage::IDD)
{
    m_psp.dwFlags |= PSP_DEFAULT|PSP_USEHEADERTITLE|PSP_USEHEADERSUBTITLE;
    m_psp.pszHeaderTitle = _T("Title");
    m_psp.pszHeaderSubTitle = _T("And subtitle");
}
建立这类对话框资源模板时有几点要注意
设置对话框属性页属性
在编写时要注意把对话框资源以下属性设置为对应值
属性名 值
System Menu False
Style Child
Title Bar False
Border None
// 如果想要去掉“应用”和“帮助”按钮
mms.m_psh.dwFlags |= PSH_NOAPPLYNOW;
mms.m_psh.dwFlags &= ~PSH_HASHELP;
mp1.m_psp.dwFlags &= ~PSP_HASHELP; // mp1 为FirstPage变量
隐藏属性页默认按钮propsheet.m_psh.dwFlags |= PSH_NOAPPLYNOW;
或隐藏掉Cancel取消按钮:
CWnd *pWnd = GetDlgItem( IDCANCEL );
pWnd->ShowWindow( FALSE );
class CMySheet: public CPropertySheet
{
    DECLARE_DYNAMIC(CMySheet)

public:
    CMySheet(UINT nIDCaption, CWnd* pParentWnd = NULL, UINT iSelectPage = 0);
    CMySheet(LPCTSTR pszCaption, CWnd* pParentWnd = NULL, UINT iSelectPage = 0);
    virtual ~CMySheet();

protected:
    DECLARE_MESSAGE_MAP()
    CFirstPage m_pgFirst;
    CSecondPage m_pgSecond;
    void Init(void);
};

// .cpp
CMySheet::CMySheet(UINT nIDCaption, CWnd* pParentWnd, UINT iSelectPage)
    :CPropertySheet(nIDCaption, pParentWnd, iSelectPage)
{
    Init();
}

CMySheet::CMySheet(LPCTSTR pszCaption, CWnd* pParentWnd, UINT iSelectPage)
    :CPropertySheet(pszCaption, pParentWnd, iSelectPage)
{
    Init();
}

// init函数
void CMySheet::Init(void)
{
    //SetWizardMode();

    AddPage(&m_pgFirst);
    AddPage(&m_pgSecond);

    m_psh.dwFlags |= PSH_WIZARD97|PSH_WATERMARK|PSH_HEADER;
    m_psh.pszbmWatermark = MAKEINTRESOURCE(IDB_WATERMARK);
    m_psh.pszbmHeader = MAKEINTRESOURCE(IDB_BANNER_ICON);
    // Step 2: Fix the problem to show images
    m_psh.hInstance = AfxGetInstanceHandle();
}
3.主对话框添加按钮,点击弹出属性页
//创建表单类对象
CMySheet pro(L"表单样例");
pro.SetWizardMode(); // 设置向导对话框模式
//显示模态表单对话框
if(ID_WIZFINISH == pro.DoModal())
{

}// do something
4.向导模式相关函数
相关函数:
- CPropertySheet::SetWizardButtons
- CPropertySheet::SetWizardMode
- CPropertyPage::OnWizardBack
- CPropertyPage::OnWizardFinish
- CPropertyPage::OnWizardNext
激活时OnSetActive
按钮ID:
ID_APPLY_NOW
ID_WIZBACK
ID_WIZNEXT
ID_WIZFINISH
5.其他扩充(转载)
一、为了最大限度的发挥属性页的效用,首先让我们先从 CPropertySheet 继承一个新类,取名为 CMyPropSheet.
接着便可以进行下面的各种操作:
一、隐藏属性页默认按钮
隐藏掉Apply应用按钮:
propsheet.m_psh.dwFlags |= PSH_NOAPPLYNOW;
或隐藏掉Cancel取消按钮:
CWnd *pWnd = GetDlgItem( IDCANCEL );
pWnd->ShowWindow( FALSE );
二、移动属性页按钮
首先,要获取按钮的句柄,然后就可以象对待窗体一样处理它们了. 下面代码先隐藏掉Apply和Help铵钮,再把OK和Cancel按移动到右侧。
    BOOL CMyPropSheet::OnInitDialog ()
    {
        BOOL bResult = CPropertySheet::OnInitDialog();
        int ids [] = {IDOK, IDCANCEL};//, ID_APPLY_NOW, IDHELP };

        // Hide Apply and Help buttons
        CWnd *pWnd = GetDlgItem (ID_APPLY_NOW);
        pWnd->ShowWindow (FALSE);
        pWnd = GetDlgItem (IDHELP);
        pWnd->ShowWindow (FALSE);

        CRect rectBtn;
        int nSpacing = 6;        // space between two buttons...
        for( int i =0; i < sizeof(ids)/sizeof(int); i++)
        {
            GetDlgItem (ids [i])->GetWindowRect (rectBtn);
            ScreenToClient (&rectBtn);

            int btnWidth = rectBtn.Width();
            rectBtn.left = rectBtn.left + (btnWidth + nSpacing)* 2;
            rectBtn.right = rectBtn.right + (btnWidth + nSpacing)* 2;

            GetDlgItem (ids [i])->MoveWindow(rectBtn);
        }
        return bResult;
    }
下面代码移动所有按钮到右侧,并且重新置属性页为合适的大小.
BOOL CMyPropSheet::OnInitDialog ()
{
BOOL bResult = CPropertySheet::OnInitDialog();
int ids[] = { IDOK, IDCANCEL, ID_APPLY_NOW };

CRect rectWnd;
CRect rectBtn;
GetWindowRect (rectWnd);

GetDlgItem (IDOK)->GetWindowRect (rectBtn);

int btnWidth = rectBtn.Width();
int btnHeight = rectBtn.Height();
int btnOffset = rectWnd.bottom - rectBtn.bottom;
int btnLeft = rectWnd.right - rectWnd.left;

rectWnd.bottom = rectBtn.top;
rectWnd.right = rectWnd.right + btnWidth + btnOffset;
MoveWindow(rectWnd);

rectBtn.left = btnLeft;
rectBtn.right = btnLeft + btnWidth;

for (int i = 0; i < sizeof (ids) / sizeof (int); i++)
{
rectBtn.top = (i + 1) * btnOffset + btnHeight * i;
rectBtn.bottom = rectBtn.top + btnHeight;
GetDlgItem (ids [i])->MoveWindow (rectBtn);
}

return bResult;
}
三、改变属性页上的标签文字
首先修改TC_ITEM结构,然后用 SetItem 来修改标签文字,如下代码:
TC_ITEM item;
item.mask = TCIF_TEXT;
item.pszText = "New Label";

//Change the label of the first tab (0 is the index of the first tab)...
GetTabControl ()->SetItem (0, &item);
四、改变属性页标签文字的字体属性
代码如下
m_NewFont.CreateFont (14, 0, 0, 0, 800, TRUE, 0, 0, 1, 0, 0, 0, 0, _T("Arial") );
GetTabControl()->SetFont (&m_NewFont);
五、在属性页标签上显示位图
可以用 CImageList 建立图像. 用 SetItem 来设置,如下代码所示:
BOOL CMyPropSheet::OnInitDialog ()
{
  BOOL bResult = CPropertySheet::OnInitDialog();
  m_imageList.Create (IDB_MYIMAGES, 13, 1, RGB(255,255,255));

  CTabCtrl *pTabCtrl = GetTabControl ();
  pTabCtrl->SetImageList (&m_imageList);

  TC_ITEM item;
  item.mask = TCIF_IMAGE;
  for (int i = 0; i < NUMBER_OF_TABS; i++)
  {
    item.iImage = i;
    pTabCtrl->SetItem (i, &item );
  }

  return bResult;
}
六、在属性页左下角显示位图
如下代码所示:
    void CMyPropSheet::OnPaint ()
    {
        CPaintDC dc(this); // device context for painting

        int nOffset = 6;
        // load IDB_BITMAP1 from our resources
        CBitmap bmp;
        if (bmp.LoadBitmap (IDB_BITMAP1))
        {
            // Get the size of the bitmap

            BITMAP bmpInfo;
            bmp.GetBitmap (&bmpInfo);
            // Create an in-memory DC compatible with the
            // display DC we''re using to paint
            CDC dcMemory;
            dcMemory.CreateCompatibleDC (&dc);
            // Select the bitmap into the in-memory DC
            CBitmap* pOldBitmap = dcMemory.SelectObject (&bmp);
            // Find a bottom-left point for the bitmap in the client area
            CRect rect;
            GetClientRect (&rect);

            int nX = rect.left + nOffset;
            int nY = rect.top + (rect.Height () - bmpInfo.bmHeight) - nOffset;

            // Copy the bits from the in-memory DC into the on-
            // screen DC to actually do the painting. Use the centerpoint
            // we computed for the target offset.
            dc.BitBlt (nX, nY, bmpInfo.bmWidth, bmpInfo.bmHeight, &dcMemory,0, 0, SRCCOPY);
            dcMemory.SelectObject (pOldBitmap);
        }
        // Do not call CPropertySheet::OnPaint() for painting messages
    }
七、在属性页右下角显示3D文字Logo
代码如下:
void CMyPropSheet::OnPaint ()
{
        /////////////////////////////////////////////////////////////////
    //在TAB按钮旁边显示3D文字提示,jingzhou xu
    Cstring m_LogoName = “属性页”;
    //  if(m_LogoName == "")
    //      return;

    GetWindowRect(rect);

    ScreenToClient(rect);

    LOGFONT logFont;

    ZeroMemory((void*)&logFont,sizeof(logFont));
    strcpy(logFont.lfFaceName,"宋体");
    logFont.lfHeight = -12;
    logFont.lfWeight = 400;
    logFont.lfCharSet = GB2312_CHARSET;
    logFont.lfOutPrecision = 3;
    logFont.lfClipPrecision = 2;
    logFont.lfQuality = 1;
    logFont.lfPitchAndFamily = 2;
    m_font.CreateFontIndirect(&logFont);
    SetFont(&m_font);

    CFont   *pOldFont = pDC->SelectObject(&m_font);

    rect.left += 6;
    rect.right -= 6;
    rect.bottom -= 1;
    rect.top = rect.bottom - ITEMBUTTON_HEIGHT + 1;

    CFont m_LogoFont;
    CString sLogoString;
    m_LogoFont.CreateFont(rect.Height()*4/5, 0, 0, 0, FW_BOLD, 1, FALSE, FALSE,
        DEFAULT_CHARSET, OUT_DEFAULT_PRECIS, CLIP_DEFAULT_PRECIS, DEFAULT_QUALITY,
        FIXED_PITCH | FF_ROMAN, "楷体_GB2312");
    sLogoString = m_LogoName;

    RECT m_rDataBox;
    CopyRect(&m_rDataBox,&rect);

    TEXTMETRIC tm;
    pDC->GetTextMetrics(&tm);
    CFont* oldFont = pDC->SelectObject(&m_LogoFont);
    CSize sz = pDC->GetTextExtent(sLogoString, sLogoString.GetLength());
    //用GetTextExtent来计算字体logo大小,依靠于设备环境,使用logo位于右下角
    m_rDataBox.left = m_rDataBox.right  - sz.cx - tm.tmAveCharWidth/2;
    m_rDataBox.top  = m_rDataBox.bottom - sz.cy - tm.tmHeight/5;
    pDC->SetBkMode(TRANSPARENT);
    //用3D字体显示,先黑后白,最后再用默认色
    COLORREF oldColor = pDC->SetTextColor(GetSysColor(COLOR_3DDKSHADOW));
    pDC->DrawText(sLogoString, sLogoString.GetLength(), &m_rDataBox, DT_VCENTER | DT_SINGLELINE | DT_CENTER);
    m_rDataBox.left -= tm.tmAveCharWidth;
    pDC->SetTextColor(GetSysColor(COLOR_3DHILIGHT));
    pDC->DrawText(sLogoString, sLogoString.GetLength(), &m_rDataBox, DT_VCENTER | DT_SINGLELINE | DT_CENTER);
    m_rDataBox.left += 3*tm.tmAveCharWidth/5;
    pDC->SetTextColor(RGB(0,0,255));
    pDC->DrawText(sLogoString, sLogoString.GetLength(), &m_rDataBox, DT_VCENTER | DT_SINGLELINE | DT_CENTER);

    //释放资源

    pDC->SelectObject(oldFont);
    pDC->SetTextColor(oldColor);
    m_LogoFont.DeleteObject();
    //////////////////////////////////////////////////////////////////
}
八、在属性页中动态加入其它控件
下面演示如何在左下角加入一Edit控件:
MyPropSheet.h中:
public:
CEdit m_edit;
MyPropSheet.cpp中:
BOOL CMyPropSheet::OnInitDialog ()
{
  BOOL bResult = CPropertySheet::OnInitDialog ();
  CRect rect;
  int nHeight = 24;
  int nWidth = 120;
  int nOffset = 6;
  GetClientRect (&rect);
  // Find a bottom-left point for the edit control in the client area
  int nX = rect.left + nOffset;
  int nY = rect.top + (rect.Height() - nHeight) - nOffset;

  // finally create the edit control
  m_Edit.CreateEx (WS_EX_CLIENTEDGE, _T("EDIT"), NULL,
  WS_CHILD | WS_VISIBLE | WS_TABSTOP | WS_BORDER,
  nX, nY, nWidth, nHeight, m_hWnd, 0, 0 );

  return bResult;
}
相关链接:
http://blog.csdn.net/rackyye/article/details/2147172
// 深入浅出CPropertySheet
http://www.vckbase.com/index.php/wv/237.html

 浙公网安备 33010602011771号