winform程序打包发布
记录一下讲winform程序打包发布的经历吧,过程中也是遇到不少问题,不过关关难过慢慢过呗,最后能顺利做完也不错。
主要遇到的问题有如下几点:
1.安装包生成过程中报错,虽然教程上步骤很清晰,但自己操作的过程中还是会遇到各种各样的问题,所以接收的知识还是最好实践一下,得到的经验才是自己的。
2.修改目标机器的注册表,将安装程序的路径写入注册表中。
3.目标机器不带C++ runtime。
4.目标机器如果是win7,不支持TLS1.2及以上版本的协议。
--打包工具:通过NuGet安装,下载完毕后要关闭VS。
2.打包过程
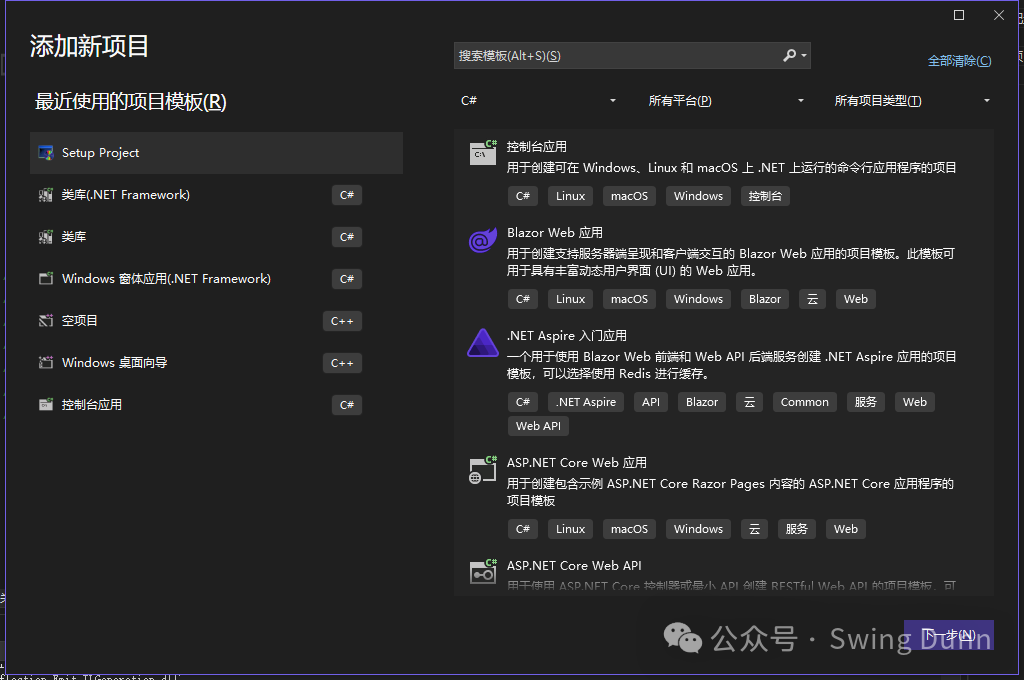
--首先建立setup的工程,建好工程后右键->view->文件系统
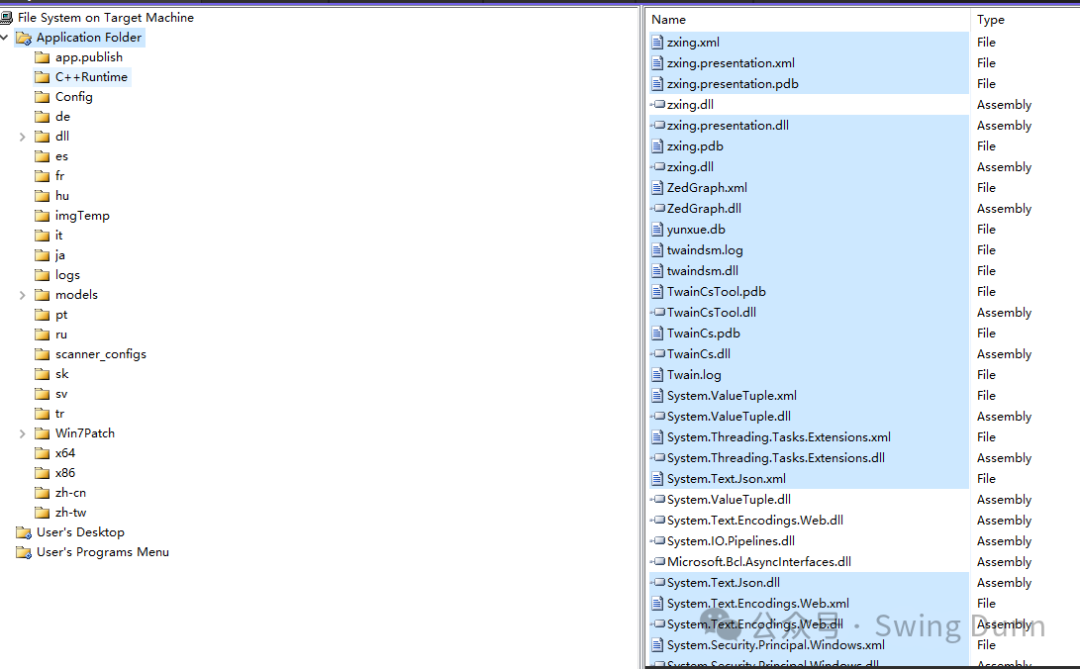
--Application Folder就是安装程序在目标机器的文件夹下写入的文件内容。
--User's Desktop就是目标机器的桌面文件夹,这里主要会放一个应用程序的快捷方式。
-- Application Folder右键添加文件,把需要的文件放进来(不过我是直接拷贝了在它上右键粘贴的,通过添加文件总是缺几个,还得去找了一个个添加),主要保证项目主输出(一般发布都是release下)的文件是全的,然后加进来,最好提前把测试生成的日志等没必要的文件清理删除。
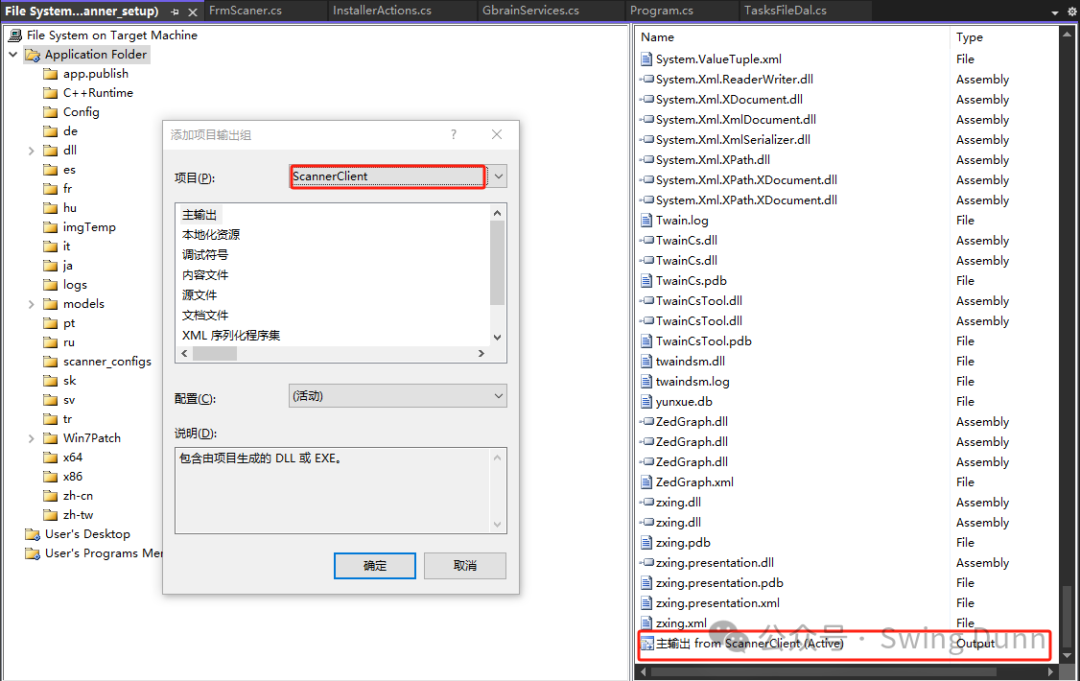
--Application Folder右键项目输出,把启动项设置为主输出,会在文件系统中多出一个主输出项。
--在上述的主输出项上右键,创建快捷方式(Create short cut),将创建的快捷方式项拉到User's Desktop文件夹,这样就会在目标机器桌面生成快捷方式。重命名成自己定义的名称,icon选择一个心仪的将来应用程序和快捷方式的桌面图标。
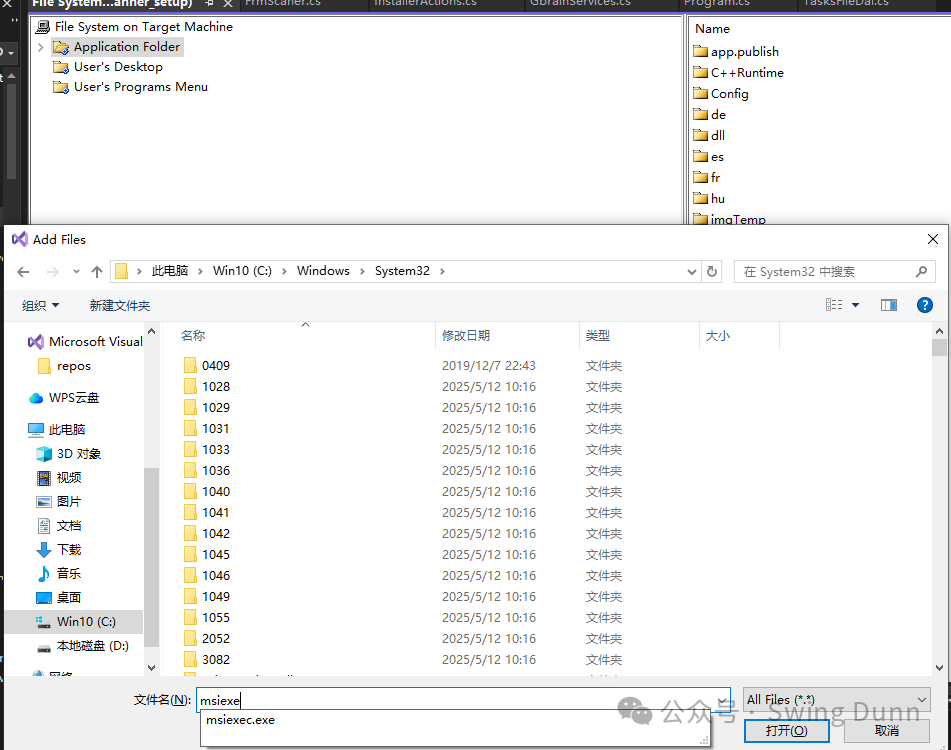
--从C盘的windows/system32文件夹下,找到msiexe.exe加入到Application Folder文件夹,并为它创建Short cut(主要用于卸载该程序),为卸载的应用程序命名(此处命名为Uninstaller.exe)
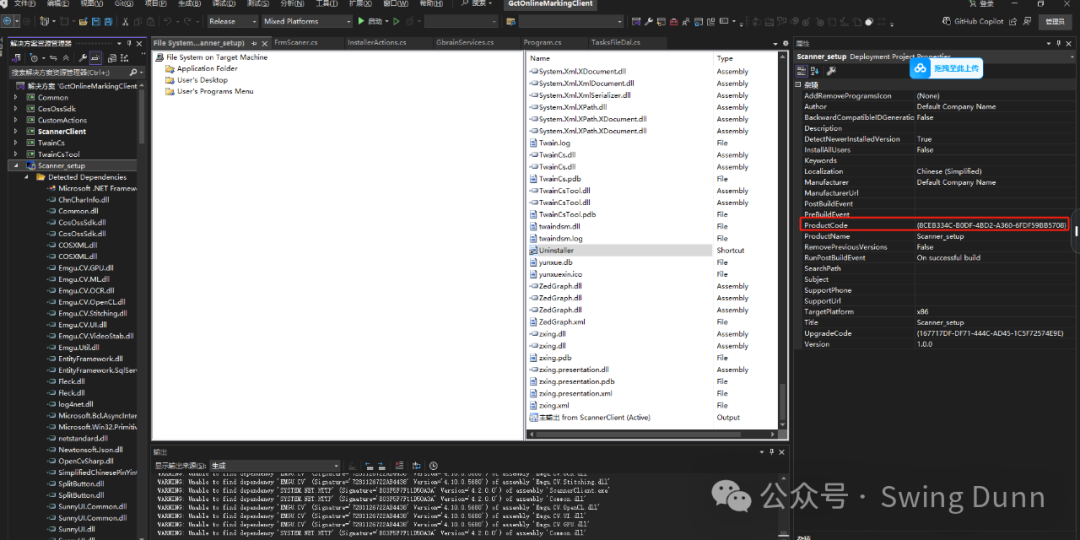
--点击setup工程,在它的属性中找到 ProductCode,拷贝出来,放到Uninstaller属性Arguments下 ,格式为/x {ProductCode},这样卸载程序就配置好了。
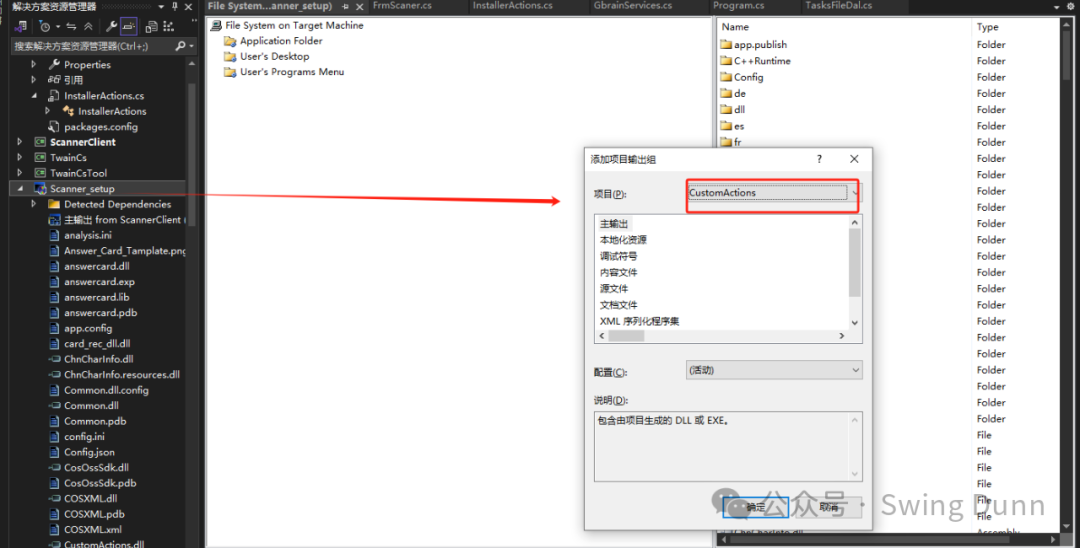
--为了执行一些安装过程中的步骤,比如修改目标机器注册表等,创建了一个CustomActions的项目,现在将该项目也在setup项目右键->add->项目输出中添加进来,此时会在Application Folder中多一个主输出项。
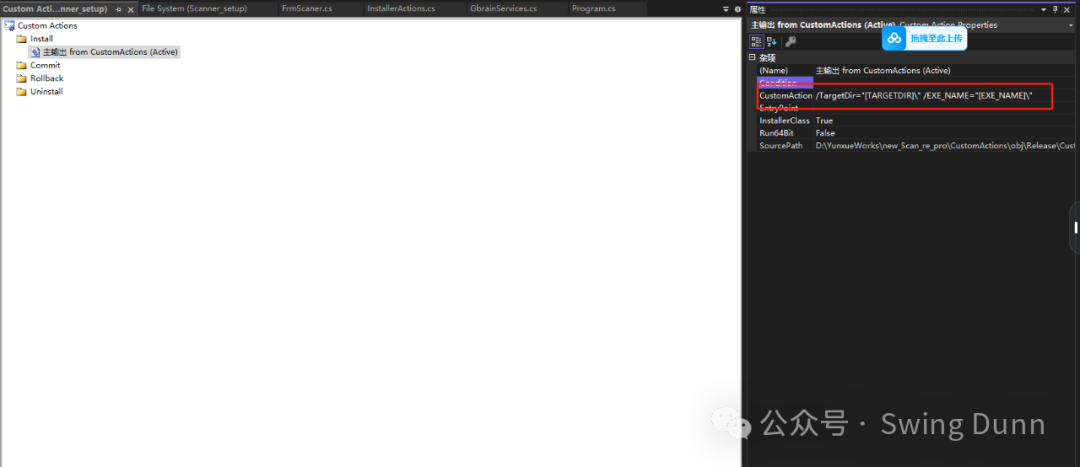
--setup项目右键->view->自定义操作打开,在installer(安装)右键->自定义操作将上述的主输出CustomActions加进来。将它的属性项CustomActionData 中输入一些自定义的参数,此处为/TargetDir="[TARGETDIR]\",这样在CustomeActions项目中通过
Context.Parameters["TargetDir"]即可获取用户安装项目的路径。
--setup项目右键->view也可以看到注册表和启动条件,但是不一定能满足项目要求,所以可以自定义一些操作。
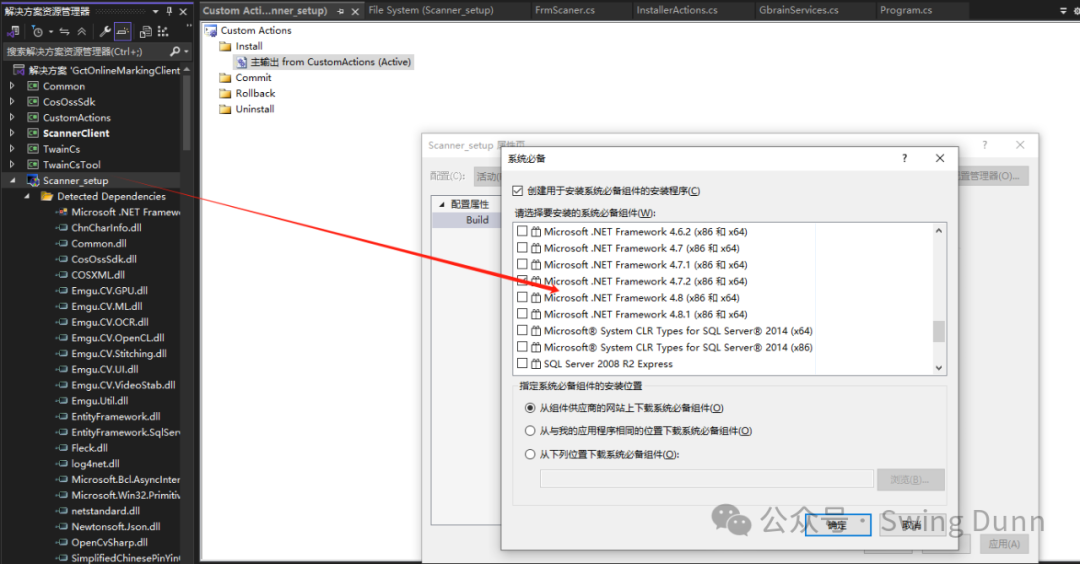
--setup项目右键属性->Prerequisites,点击打开,检测一下安装必备组件是否勾选上,此处为Microsoft .net framework 4.7.2(x64) ,因为打包的项目是这个框架。
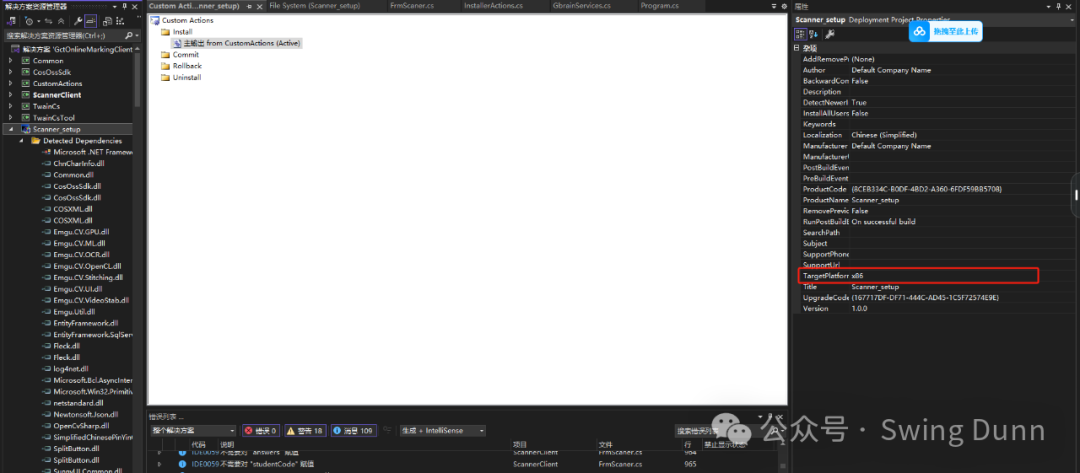
--最后检查seup项目->属性中的TargetPlatform项,和自己的发布程序还有目标机器一致(很重要,很多安装包生成过程中的错误就是因为这个),此处目标平台是x64机器,发布程序编译也是release x64。
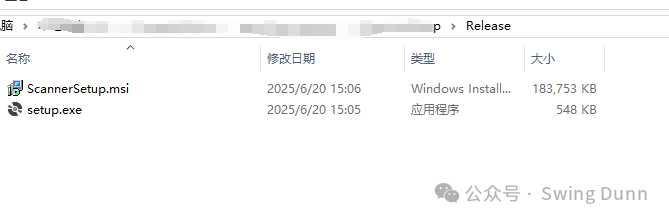
--setup项目,右键重新生成。成功生成后在setup项目的生成路径中找到安装程序的msi和exe。
--自行安装测试。
--CustomActions代码如下,主要是安装时将安装信息写入注册表,卸载时清理注册表。然后测试阶段因为是动态编译,会检测一下目标机器是否有C++ runtime,没有会通知让用户点击确认自动安装一个。静态编译的话,应该就不用了。
public partial class InstallerActions : System.Configuration.Install.Installer
   {
       public InstallerActions()
       {
           //InitializeComponent();
           this.AfterInstall += new InstallEventHandler(InstallerDemo_AfterInstall);
           this.AfterUninstall += new InstallEventHandler(InstallerDemo_AfterUnInstall);
       }
       public void InstallerDemo_AfterInstall(object sender, InstallEventArgs e)
       {
           //修改注册表
           try
           {
               // 获取安装路径
               string installPath = Context.Parameters["TargetDir"];
               string exeName = "ScannerClient.exe";
               string fullPath = System.IO.Path.Combine(installPath, exeName);

               // 写入注册表ClassRoot
               using (RegistryKey key = Registry.ClassesRoot.CreateSubKey(@"GctAnalyseScanClient"))
               {
                   key.SetValue("", fullPath);
                   key.SetValue("URL Protocol", "");

                   RegistryKey defaulticon = key.CreateSubKey("DefaultIcon");
                   defaulticon.SetValue("", $"{fullPath},1");

                   RegistryKey shell = key.CreateSubKey("shell");
                   RegistryKey open = shell.CreateSubKey("open");
                   RegistryKey command = open.CreateSubKey("command");
                   command.SetValue("", $"\"{fullPath}\" \"%1\"");
               }
               // 写入注册表bendiji
               using (RegistryKey key = Registry.LocalMachine.CreateSubKey(@"SOFTWARE"))
               {
                   RegistryKey Wow6432Node = key.CreateSubKey("Wow6432Node");
                   RegistryKey Microsoft = Wow6432Node.CreateSubKey("Microsoft");
                   RegistryKey Windows = Microsoft.CreateSubKey("Windows");
                   RegistryKey CurrentVersion = Windows.CreateSubKey("CurrentVersion");
                   RegistryKey InternetSettings = CurrentVersion.CreateSubKey("Internet Settings");
                   RegistryKey WinHttp = InternetSettings.CreateSubKey("WinHttp");
                   WinHttp.SetValue("URL DefaultSecureProtocols", 0x00000800, RegistryValueKind.DWord);
               }
           }
           catch (Exception ex)
           {
               // 捕获并处理异常
               Console.WriteLine($"发生错误:{ex.Message}");
           }

           //
           OnInstallComplete();
       }

       private void InstallerDemo_AfterUnInstall(object sender, InstallEventArgs e)
       {
           //清理注册表
           try
           {
               using (RegistryKey rootKey = Registry.ClassesRoot)
               {
                   if (rootKey.OpenSubKey("GctAnalyseScanClient") != null)
                   {
                       // 删除GctAnalyseScanClient键及其所有子项
                       rootKey.DeleteSubKeyTree("GctAnalyseScanClient");
                       Console.WriteLine("GctAnalyseScanClient键及其所有子项已被成功删除。");
                   }
                   else
                   {
                       Console.WriteLine("GctAnalyseScanClient键不存在。");
                   }
               }
           }
           catch (Exception ex)
           {
               // 捕获并处理异常
               Console.WriteLine($"发生错误:{ex.Message}");
           }
       }
       private void OnInstallComplete()
       {
           bool install = IsVCRedist2015_2022Installed();
           if (install)
           {
               string installPath = Context.Parameters["TargetDir"];
               string exeName = "C++Runtime\\VC_redist.x64.exe";
               string fullPath = System.IO.Path.Combine(installPath, exeName);
               MsgBoxResult result = Interaction.MsgBox("Visual C++ 2015-2022运行时未安装,是否现在安装?", MsgBoxStyle.Question | MsgBoxStyle.YesNo, "安装Visual C++运行时");
               if (result == MsgBoxResult.Yes)
               {
                   InstallVCRedist(fullPath);
               }

           }
       }

       public static bool IsVCRedist2015_2022Installed()
       {
           string[] registryPaths = new string[]
           {
           @"SOFTWARE\Microsoft\VisualStudio\14.0\VC",
           @"SOFTWARE\Microsoft\VisualStudio\15.0\VC           ",
@"SOFTWARE\Microsoft\VisualStudio\16.0\VC",
           @"SOFTWARE\Microsoft\VisualStudio\17.0\VC"
           };

           foreach (string path in registryPaths)
           {
               using (RegistryKey baseKey = Registry.LocalMachine)
               {
                   using (RegistryKey key = baseKey.OpenSubKey(path))
                   {
                       if (key != null)
                       {
                           return true;
                       }
                   }
               }
           }

           return false;
       }

       public static void InstallVCRedist(string installerPath)
       {
           try
           {
               // 创建一个ProcessStartInfo对象
               ProcessStartInfo startInfo = new ProcessStartInfo
               {
                   FileName = installerPath,
                   Arguments = "/install /quiet /norestart", // 安装参数,静默安装
                   UseShellExecute = false,
                   RedirectStandardOutput = true,
                   RedirectStandardError = true,
                   CreateNoWindow = true
               };

               // 启动安装程序
               using (Process process = Process.Start(startInfo))
               {
                   process.WaitForExit(); // 等待安装完成
                   int exitCode = process.ExitCode;

                   if (exitCode == 0)
                   {
                       Console.WriteLine("Visual C++ 2015-2022运行时安装成功。");
                   }
                   else
                   {
                       Console.WriteLine($"Visual C++ 2015-2022运行时安装失败,退出代码:{exitCode}");
                   }
               }
           }
           catch (Exception ex)
           {
               Console.WriteLine($"发生错误:{ex.Message}");
           }
       }
   }
--最后说一下目标机器如果是win7,不支持TLS1.2及以上版本的协议的问题,本来通过代码尝试让目标机器兼容TLS1.0,1.1,1.2的协议,测试发现没什么变化,可能.net通过代码没法实现。最后就是尝试在目标的win7系统上安装微软发布的补丁包,让它能够支持TLS1.2协议,这样就可以通过http请求去访问服务器上的一些资源。

 浙公网安备 33010602011771号