qt实现头像上传功能
想必大家都使用过qt的自定义头像功能吧,那么图1应该不会陌生,本片文章我就是要模拟一个这样的功能,虽然没有这么强大的效果,但是能够满足一定的需求。
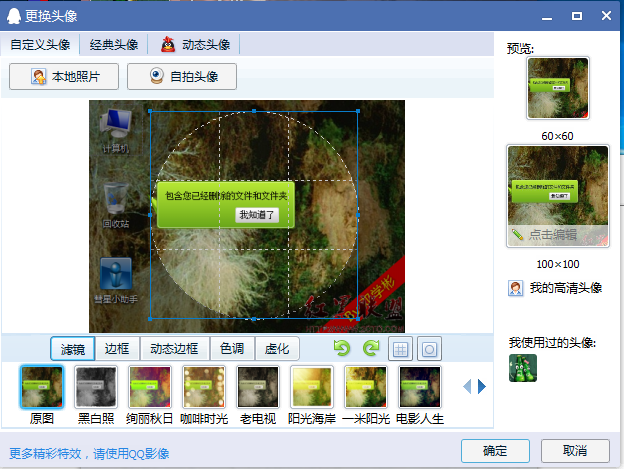
图1 qq上传图片
首先在讲解功能之前,我先给出一片文章,QT实现的类似QQ的头像选择框,这篇文章也是讲解头像上传功能的,而我自己的代码是从这个demo中优化而来,不仅对代码进行了重构,而且处理了快速拖动时,边框消失的问题。使用事件和双缓冲来尽量减少重新绘制的几率。接下里我会一步一步进行讲解,怎么实现图片自定义截取功能。
一、概要
首选,我给出4个类,并给出他们的解释
1、PicturePreviewPanel:图标展示框,控件基类
2、BackgroundWidget:阴影窗口,是PicturePreviewPanel子类
3、CutShape:交互图形基类,实现了拖拽和放大缩小功能
4、CutRound:圆形剪贴,父类为CutShape,实现父类的paintInit接口重绘
5、CutRectangle:矩形剪贴,父类为CutShape,实现父类的paintInit接口重绘
二、详情
理解了上述5个类之后,接下来我分别讲解下类的头文件和重要的实现接口,其中自定义图形类也可以自己在扩充
头文件代码如下,有部分注释,代码应该不难理解,开发过程中只需要声明PicturePreviewPanel类,并调用期LoadPicture接口就可以加载图片,并进行图片剪切


  1 #include <QWidget>
  2
  3 class QLabel;
  4
  5 enum ShapeType
  6 {
  7     Rect,//矩形
  8     Round,//圆形
  9 };
 10
 11 //剪贴图基类 实现了基本的交互功能,并绘制了部分图案,主要的团绘制在子类实现,通过实现paintInit接口
 12 class CutShape : public QWidget
 13 {
 14 public:
 15     CutShape(QWidget * parent = nullptr);
 16     ~CutShape();
 17
 18 public:
 19     QPainterPath CutRegion();
 20
 21 protected:
 22     //QWidget
 23     virtual void mousePressEvent(QMouseEvent *) Q_DECL_OVERRIDE;
 24     virtual void mouseMoveEvent(QMouseEvent *) Q_DECL_OVERRIDE;
 25     virtual void mouseReleaseEvent(QMouseEvent *) Q_DECL_OVERRIDE;
 26     virtual void resizeEvent(QResizeEvent *) Q_DECL_OVERRIDE;
 27     virtual void paintEvent(QPaintEvent *) Q_DECL_OVERRIDE;
 28
 29     virtual bool paintInit(QPaintEvent *, QPaintDevice *) = 0;
 30     virtual QPainterPath Region(){ return QPainterPath(); };
 31
 32 protected:
 33     ShapeType m_Type;
 34     bool m_MouseDown = false;
 35     bool m_IsMoving = false;
 36     bool m_IsFirst = true;
 37     int border = 5;
 38
 39 private:
 40     QRect getResizeGem(QRect oldgeo, QPoint mousePoint, bool & ignore);
 41
 42 private:
 43     bool m_EnableRepaint = true;
 44     bool m_Left = false;
 45     bool m_Right = false;
 46     bool m_Bottom = false;
 47     bool m_Top = false;
 48     QPoint m_startPoint;
 49     QPoint m_old_pos;
 50     QLabel * m_Label;
 51     QPixmap m_BufferPix;
 52 };
 53
 54 class CutRectangle : public CutShape
 55 {
 56 public:
 57     CutRectangle(QWidget * parent = nullptr);
 58     ~CutRectangle();
 59
 60 protected:
 61     //CutShape
 62     virtual bool paintInit(QPaintEvent *, QPaintDevice *) Q_DECL_OVERRIDE;
 63     virtual QPainterPath Region() Q_DECL_OVERRIDE;
 64 };
 65
 66 class CutRound : public CutShape
 67 {
 68 public:
 69     CutRound(QWidget * parent = nullptr);
 70     ~CutRound();
 71
 72 protected:
 73     //CutShape
 74     virtual bool paintInit(QPaintEvent *, QPaintDevice *) Q_DECL_OVERRIDE;
 75     virtual QPainterPath Region() Q_DECL_OVERRIDE;
 76
 77 private:
 78 };
 79
 80 class BackgroundWidget : public QWidget
 81 {
 82 public:
 83     BackgroundWidget(QWidget * parent = nullptr, ShapeType type = Round);
 84     ~BackgroundWidget();
 85
 86 public:
 87     void PictureLoadFinished();
 88
 89 protected:
 90     virtual void paintEvent(QPaintEvent *) Q_DECL_OVERRIDE;
 91
 92 private:
 93     ShapeType m_Type;
 94     CutShape * m_CutShape = nullptr;
 95 };
 96
 97 class PicturePreviewPanel : public QWidget
 98 {
 99     Q_OBJECT
100
101 public:
102     PicturePreviewPanel(QWidget * parent = nullptr);
103     ~PicturePreviewPanel();
104
105 public:
106     void LoadPicture(const QString & filepath);//加载图片
107
108 protected:
109     virtual bool eventFilter(QObject *, QEvent *) Q_DECL_OVERRIDE;
110
111 private:
112     void InitializeUI();
113     void LoadPicture_p();
114
115 private:
116     QString m_PicturePath;
117     QLabel * m_PictureContainer = nullptr;
118     BackgroundWidget * m_BgWidget = nullptr;
119 };
上述头文件,如果觉得麻烦了也可以不具体细看接口,只要理解了标题1下边的5个类的作用就可以了。下边我分别说下交互图形类、背景色类和显示图片类(即控件基类)这三者直接的一些关系,具体如下:
1、CutShape剪贴图基类 实现了基本的交互功能,并绘制了部分图案,主要的绘制在子类实现,通过实现paintInit接口,该接口在剪切图街基类重新绘制时调用,代码如下:
 1 void CutShape::paintEvent(QPaintEvent * event)
 2 {
 3     QPainter paint;
 4     if (m_EnableRepaint && paintInit(event, &m_BufferPix))
 5     {
 6         m_EnableRepaint = false;
 7         qDebug() << "event->type()" << event->type();
 8         m_BufferPix = QPixmap(size());
 9         m_BufferPix.fill(Qt::transparent);
10
11         paint.begin(&m_BufferPix);
12         QPen pen0;
13         pen0.setColor(QColor(54, 158, 254, 120));
14         pen0.setWidth(2);
15         paint.setPen(pen0);
16         paint.drawRect(border, border, width() - border * 2, width() - border * 2);
17
18         QPen pen;
19         QVector<qreal> dashes;
20         qreal space = 3;
21         dashes << 5 << space << 5 << space;
22         pen.setDashPattern(dashes);
23         pen.setColor(Qt::white);
24
25         paint.setPen(pen);
26         int x_pos = (int)width() / 3.0;
27         int y_pos = (int)height() / 3.0;
28         paint.drawLine(x_pos, border, x_pos, height() - 2 * border);
29         paint.drawLine(2 * x_pos, border, 2 * x_pos, height() - 2 * border);
30         paint.drawLine(border, y_pos, width() - 2 * border, y_pos);
31         paint.drawLine(border, 2 * y_pos, width() - 2 * border, 2 * y_pos);
32         paint.end();
33     }
34     paint.begin(this);
35     paint.drawPixmap(rect(), m_BufferPix);
36     paint.end();
37 }
上边是主要的绘制过程,关于剪切图形的交互功能,我给出具体的大姨妈,就不仔细讲解功能了,代码有些长,如下:
  1 void CutShape::mousePressEvent(QMouseEvent * event)
  2 {
  3     m_startPoint = event->pos();
  4     m_MouseDown = event->button() == Qt::LeftButton;
  5 }
  6
  7 void CutShape::mouseMoveEvent(QMouseEvent * event)
  8 {
  9     QPoint dragPoint = event->pos();
 10     if (!parentWidget()->rect().contains(mapToParent(dragPoint)))
 11     {
 12         return;
 13     }
 14     int x = event->x();
 15     int y = event->y();
 16     if (m_MouseDown)
 17     {
 18         if (m_Left == false && m_Right == false
 19             && m_Bottom == false && m_Top == false)
 20         {
 21             QPoint p = QPoint((pos().x() + dragPoint.x() - m_startPoint.x()), (pos().y() + dragPoint.y() - m_startPoint.y()));
 22             QPoint dragEndge = p;
 23             dragEndge.setX(dragEndge.x() + rect().width());
 24             dragEndge.setY(dragEndge.y() + rect().height());
 25             p.setX(p.x() < 0 ? 0 : p.x());
 26             p.setX(dragEndge.x() > parentWidget()->width() ? parentWidget()->width() - rect().width() : p.x());
 27             p.setY(p.y() < 0 ? 0 : p.y());
 28             p.setY(dragEndge.y() > parentWidget()->height() ? parentWidget()->height() - rect().height() : p.y());
 29             move(p);
 30         }
 31         else
 32         {
 33             bool ignore = false;
 34             QRect g = getResizeGem(geometry(), dragPoint, ignore);
 35             if (parentWidget()->rect().contains(g))
 36                 setGeometry(g);
 37             if (ignore == false)
 38             {
 39                 m_startPoint = QPoint(!m_Right ? m_startPoint.x() : event->x(), !m_Bottom ? m_startPoint.y() : event->y());
 40             }
 41         }
 42     }
 43     else
 44     {
 45         QRect r = rect();
 46         m_Left = qAbs(x - r.left()) < 5;
 47         m_Right = qAbs(x - r.right()) < 5;
 48         m_Bottom = qAbs(y - r.bottom()) < 5;
 49         m_Top = qAbs(y - r.top()) < 5;
 50         bool lorr = m_Left | m_Right;
 51         bool torb = m_Top | m_Bottom;
 52         if (lorr && torb)
 53         {
 54             if ((m_Left && m_Top) || (m_Right && m_Bottom))
 55             {
 56                 setCursor(Qt::SizeFDiagCursor);
 57             }
 58             else
 59                 setCursor(Qt::SizeBDiagCursor);
 60         }
 61         else if (lorr)
 62             setCursor(Qt::SizeHorCursor);
 63         else if (torb)
 64             setCursor(Qt::SizeVerCursor);
 65         else
 66         {
 67             setCursor(Qt::SizeAllCursor);
 68             m_Bottom = m_Left = m_Right = m_Top = false;
 69         }
 70     }
 71 }
 72
 73 void CutShape::mouseReleaseEvent(QMouseEvent * event)
 74 {
 75     m_MouseDown = false;
 76 }
 77
 78 void CutShape::resizeEvent(QResizeEvent *event)
 79 {
 80     m_EnableRepaint = true;
 81     update();
 82
 83     QWidget::resizeEvent(event);
 84 }
 85
 86 QRect CutShape::getResizeGem(QRect oldgeo, QPoint mousePoint, bool & ignore)
 87 {
 88     QRect g = oldgeo;
 89     bool lorr = m_Left | m_Right;
 90     bool torb = m_Top | m_Bottom;
 91     int dx = mousePoint.x() - m_startPoint.x();
 92     int dy = mousePoint.y() - m_startPoint.y();
 93     ignore = false;
 94     if (lorr && torb)
 95     {
 96         int maxLen = qMax(qAbs(dx), qAbs(dy));
 97         if (m_Left && m_Top && dx*dy > 0)
 98         {
 99             g.setLeft(dx > 0 ? g.left() + maxLen : g.left() - maxLen);
100             g.setTop(dy > 0 ? g.top() + maxLen : g.top() - maxLen);
101         }
102         else if (m_Right && m_Top && dx * dy < 0)
103         {
104             g.setRight(dx > 0 ? g.right() + maxLen : g.right() - maxLen);
105             g.setTop(dy > 0 ? g.top() + maxLen : g.top() - maxLen);
106         }
107         else if (m_Right && m_Bottom)
108         {
109             if (dx * dy > 0)
110             {
111                 g.setRight(dx > 0 ? g.right() + maxLen : g.right() - maxLen);
112                 g.setBottom(dy > 0 ? g.bottom() + maxLen : g.bottom() - maxLen);
113             }
114             else if (dx == 0 && dy != 0
115                 /*|| dx != 0 && dy == 0*/)
116             {
117                 ignore = true;
118             }
119         }
120         else if (m_Left && m_Bottom && dx*dy < 0)
121         {
122             g.setLeft(dx > 0 ? g.left() + maxLen : g.left() - maxLen);
123             g.setBottom(dy > 0 ? g.bottom() + maxLen : g.bottom() - maxLen);
124         }
125
126         return g;
127     }
128     else if (lorr)
129     {
130         if (m_Left)
131             g.setLeft(g.left() + dx);
132         if (m_Right)
133             g.setRight(g.right() + dx);
134         int len = g.width() - oldgeo.width();
135         int intHight = (int)len / 2.0;
136
137         g.setTop(g.top() - intHight);
138         g.setBottom(g.bottom() + len - intHight);
139     }
140     else if (torb)
141     {
142         if (m_Bottom)
143             g.setBottom(g.bottom() + dy);
144         if (m_Top)
145             g.setTop(g.top() + dy);
146         int dheigt = g.height() - oldgeo.height();
147         int intWidth = (int)dheigt / 2.0;
148
149         g.setLeft(g.left() - intWidth);
150         g.setRight(g.right() + dheigt - intWidth);
151     }
152     else
153     {
154         ignore = true;
155     }
156     return g;
157 }
2、BackgroundWidget背景色窗口,该窗口作为剪切窗口的父类窗口,但是没有布局,目的就是可以让剪切窗口自由的移动,并保持在背景色窗口之上,当背景色窗口重新绘制的时候,只绘制除剪切窗口以外的部分。这样就实现了剪切窗口是透明的但是其余部分都是半透明的,代码如下:
 1 void BackgroundWidget::paintEvent(QPaintEvent *)
 2 {
 3     QPainterPath painterPath;
 4     QPainterPath p;
 5     p.addRect(x(), y(), rect().width(), rect().height());
 6     if (m_CutShape)
 7     {
 8         painterPath.addPath(m_CutShape->CutRegion().translated(m_CutShape->pos()));
 9     }
10     QPainterPath drawPath = p.subtracted(painterPath);
11
12     QPainter paint(this);
13     paint.setOpacity(0.5);
14     paint.fillPath(drawPath, QBrush(Qt::black));
15 }
3、PicturePreviewPanel图片上传控件基类,当图片加载后,需要重置背景色窗口的大小,以便覆盖到图片之上,代码如下:
 1 bool PicturePreviewPanel::eventFilter(QObject * watched, QEvent * event)
 2 {
 3     if (watched == m_PictureContainer)
 4     {
 5         if (event->type() == QEvent::Resize)
 6         {
 7             LoadPicture_p();
 8             if (m_BgWidget)
 9             {
10                 m_BgWidget->resize(m_PictureContainer->size());
11             }
12         }
13     }
14     return QWidget::eventFilter(watched, event);
15 }
之所以需要重新加载图片是,放置图片因为拖拉而失真,图片的加载的加载代码如下:
 1 void PicturePreviewPanel::LoadPicture_p()
 2 {
 3     QPixmap picture;
 4     picture.load(m_PicturePath);
 5     if (!picture.isNull())
 6     {
 7         picture = picture.scaled(m_PictureContainer->width(), m_PictureContainer->height());
 8         m_PictureContainer->setPixmap(picture);
 9         m_BgWidget->PictureLoadFinished();
10     }
11 }
好了,有了上边的代码之后,这个图片上传空间的基本交互功能就完成了,点击保存截取图片,可以使用剪贴图基类的CutRegion方法获取剪贴的路径,并保存成指定图片格式。效果如图2所示
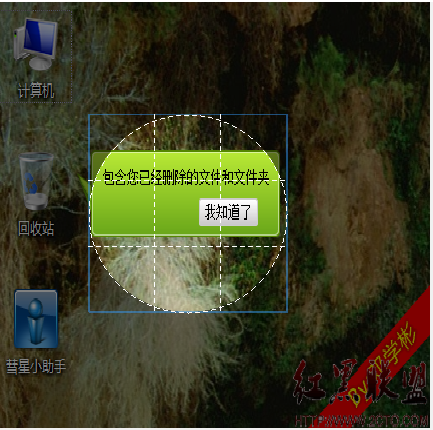
图2 效果展示
实例代码下载:http://download.csdn.net/detail/qq_30392343/9581238


 浙公网安备 33010602011771号