curl 8.14.1版本的修复内容 是一个用于从命令行进行 URL 数据传输的工具,它也自 Windows 10 版本 1803 起作为系统自带工具提供。wget 是一个常用于从网络下载文件的工具,它在较早的 Windows 版本中并不自带。自 Windows 10 版本 1809(October 2018 Update)开始,Windows 10 系统自带了 wget 命令。

官方版本

命令 curl --help all 输出的中文翻译:
--abstract-unix-socket <path> 通过抽象的 Unix 域套接字连接
--alt-svc <filename> 启用 alt-svc 并使用此缓存文件
--anyauth 选择任何身份验证方法
-a, --append 上传时追加到目标文件
--aws-sigv4 <provider1[:prvdr2[:reg[:srv]]]> AWS V4 签名认证
--basic HTTP 基本认证
--ca-native 从操作系统加载 CA 证书
--cacert <file> 用于验证对等体的 CA 证书
--capath <dir> 用于验证对等体的 CA 目录
-E, --cert <certificate[:password]> 客户端证书文件和密码
--cert-status 验证服务器证书状态 OCSP-staple
--cert-type <type> 证书类型(DER/PEM/ENG/PROV/P12)
--ciphers <list> 使用的 TLS 1.2(1.1,1.0)密码套件
--compressed 请求压缩的响应
--compressed-ssh 启用 SSH 压缩
-K, --config <file> 从文件读取配置
--connect-timeout <seconds> 允许的最大连接时间
--connect-to <HOST1:PORT1:HOST2:PORT2> 连接到 host2 而不是 host1
-C, --continue-at <offset> 从指定偏移量继续传输
-b, --cookie <data|filename> 从字符串发送 cookies / 从文件加载 cookies
-c, --cookie-jar <filename> 操作后将 cookies 保存到 <filename>
--create-dirs 创建必要的本地目录层级
--create-file-mode <mode> 创建文件时使用的文件模式
--crlf 将 LF 转换为 CRLF 在上传时
--crlfile <file> 证书吊销列表
--curves <list> 请求的 (EC) TLS 密钥交换算法
-d, --data <data> HTTP POST 数据
--data-ascii <data> HTTP POST ASCII 数据
--data-binary <data> HTTP POST 二进制数据
--data-raw <data> HTTP POST 数据,允许使用 '@'
--data-urlencode <data> HTTP POST 数据 URL 编码
--delegation <LEVEL> GSS-API 委托权限
--digest HTTP 摘要认证
-q, --disable 禁用 .curlrc
--disable-eprt 禁用使用 EPRT 或 LPRT
--disable-epsv 禁用使用 EPSV
--disallow-username-in-url 禁止在 URL 中使用用户名
--dns-interface <interface> 用于 DNS 请求的接口
--dns-ipv4-addr <address> 用于 DNS 请求的 IPv4 地址
--dns-ipv6-addr <address> 用于 DNS 请求的 IPv6 地址
--dns-servers <addresses> 使用的 DNS 服务器地址
--doh-cert-status 验证 DoH 服务器证书状态 OCSP-staple
--doh-insecure 允许不安全的 DoH 服务器连接
--doh-url <URL> 通过 DoH 解析主机名
--dump-ca-embed 将嵌入的 CA 包写入标准输出
-D, --dump-header <filename> 将接收到的头部写入 <filename>
--ech <config> 配置 ECH
--egd-file <file> 用于随机数据的 EGD 套接字路径
--engine <name> 使用的加密引擎
--etag-compare <file> 从文件加载 ETag
--etag-save <file> 解析传入的 ETag 并保存到文件
--expect100-timeout <seconds> 等待 100-continue 的最大时间
-f, --fail 在 HTTP 错误时快速失败并不输出
--fail-early 在第一次传输错误时失败
--fail-with-body 在 HTTP 错误时失败但保存主体
--false-start 启用 TLS False Start
-F, --form <name=content> 指定多部分 MIME 数据
--form-escape 使用反斜杠转义表单字段
--form-string <name=string> 指定多部分 MIME 数据
--ftp-account <data> FTP 账户数据字符串
--ftp-alternative-to-user <command> 替换 USER [name] 的命令字符串
--ftp-create-dirs 如果远程目录不存在,则创建
--ftp-method <method> 控制 CWD 的使用
--ftp-pasv 发送 PASV/EPSV 而不是 PORT
-P, --ftp-port <地址> 发送PORT而不是PASV
--ftp-pret 在PASV之前发送PRET
--ftp-skip-pasv-ip 跳过PASV的IP地址
--ftp-ssl-ccc 认证后发送CCC
--ftp-ssl-ccc-mode <active/passive> 设置CCC模式
--ftp-ssl-control 登录时要求TLS,传输时使用明文
-G, --get 将POST数据放入URL并使用GET方法
-g, --globoff 禁用URL的{ }和[ ]模式
--happy-eyeballs-timeout-ms <毫秒> 在IPv4之前等待IPv6的时间
--haproxy-clientip <ip> 在HAProxy的PROXY中设置地址
--haproxy-protocol 发送HAProxy PROXY协议v1头
-I, --head 仅显示文档信息
-H, --header <header/@文件> 向服务器传递自定义头部
-h, --help <主题> 获取命令帮助
--hostpubmd5 <md5> 接受主机公钥的可接受MD5哈希
--hostpubsha256 <sha256> 接受主机公钥的可接受SHA256哈希
--hsts <文件名> 启用HSTS并使用此缓存文件
--http0.9 允许HTTP 0.9响应
-0, --http1.0 使用HTTP 1.0
--http1.1 使用HTTP 1.1
--http2 使用HTTP/2
--http2-prior-knowledge 使用HTTP 2而不通过HTTP/1.1升级
--http3 使用HTTP v3
--http3-only 仅使用HTTP v3
--ignore-content-length 忽略远程资源的大小
-k, --insecure 允许不安全的服务器连接
--interface <名称> 使用网络接口
--ip-tos <字符串> 设置IP服务类型或流量类别
--ipfs-gateway <URL> IPFS的网关
-4, --ipv4 解析为IPv4地址
-6, --ipv6 解析为IPv6地址
--json <数据> HTTP POST JSON数据
-j, --junk-session-cookies 忽略从文件中读取的会话Cookie
--keepalive-cnt <整数> 最大保持活动探测次数
--keepalive-time <秒> 保持活动探测的间隔时间
--key <密钥> 私钥文件名
--key-type <类型> 私钥文件类型(DER/PEM/ENG)
--krb <级别> 启用Kerberos并设置安全级别
--libcurl <文件> 为此命令行生成libcurl代码
--limit-rate <速度> 限制传输速率为RATE
-l, --list-only 仅列出模式
--local-port <范围> 使用范围内的本地端口号
-L, --location 跟随重定向
--location-trusted 与--location相同,但将机密信息发送到其他主机
--login-options <选项> 服务器登录选项
--mail-auth <地址> 原始邮件的发件人地址
--mail-from <地址> 以此地址发送邮件
--mail-rcpt <地址> 将邮件发送到此地址
--mail-rcpt-allowfails 允许RCPT TO命令失败
-M, --manual 显示完整的手册
--max-filesize <字节> 最大下载文件大小
--max-redirs <数量> 允许的最大重定向次数
-m, --max-time <秒> 最大传输时间
--metalink 将给定URL作为metalink XML文件处理
--mptcp 启用多路径TCP
--negotiate 使用HTTP Negotiate (SPNEGO)身份验证
-n, --netrc 必须读取.netrc文件以获取用户名和密码
--netrc-file <文件名> 指定.netrc文件
--netrc-optional 使用.netrc或URL
-:, --next 下一URL使用独立选项
--no-alpn 禁用ALPN TLS扩展
-N, --no-buffer 禁用输出流缓冲
--no-clobber 不覆盖已存在的文件
--no-keepalive 禁用TCP连接上的保持活动
--no-npn 禁用NPN TLS扩展
--no-progress-meter 不显示进度条
--no-sessionid 禁用SSL会话ID重用
--noproxy <无代理列表> 不使用代理的主机列表
--ntlm HTTP NTLM身份验证
--ntlm-wb 使用winbind的HTTP NTLM身份验证
--oauth2-bearer <令牌> OAuth 2 Bearer令牌
-o, --output <file> 将输出写入文件,而非标准输出
--output-dir <dir> 指定保存文件的目录
-Z, --parallel 执行并行传输
--parallel-immediate 不等待多路复用立即开始
--parallel-max <num> 设置并行传输的最大并发数
--pass <phrase> 私钥的密码短语
--path-as-is 不压缩 URL 路径中的 .. 序列
--pinnedpubkey <hashes> 用于验证对端的公钥
--post301 遇到 301 重定向时不切换到 GET 方法
--post302 遇到 302 重定向时不切换到 GET 方法
--post303 遇到 303 重定向时不切换到 GET 方法
--preproxy [protocol://]host[:port] 首先使用此代理
-#, --progress-bar 显示传输进度条
--proto <protocols> 启用/禁用协议
--proto-default <protocol> 对缺少协议的 URL 使用该协议
--proto-redir <protocols> 在重定向时启用/禁用协议
-x, --proxy [protocol://]host[:port] 使用此代理
--proxy-anyauth 选择任意代理认证方法
--proxy-basic 使用基本认证通过代理
--proxy-ca-native 从操作系统加载 CA 证书以验证代理
--proxy-cacert <file> 用于验证代理的 CA 证书文件
--proxy-capath <dir> 用于验证代理的 CA 目录
--proxy-cert <cert[:passwd]> 设置代理的客户端证书
--proxy-cert-type <type> 代理 HTTPS 客户端证书的类型
--proxy-ciphers <list> 用于代理的 TLS 1.2(1.1, 1.0)密码套件
--proxy-crlfile <file> 设置代理的 CRL 列表
--proxy-digest 使用摘要认证通过代理
--proxy-header <header/@file> 向代理传递自定义头部
--proxy-http2 使用 HTTP/2 协议通过 HTTPS 代理
--proxy-insecure 跳过对 HTTPS 代理证书的验证
--proxy-key <key> HTTPS 代理的私钥
--proxy-key-type <type> 代理的私钥文件类型
--proxy-negotiate 使用 HTTP Negotiate(SPNEGO)认证通过代理
--proxy-ntlm 使用 NTLM 认证通过代理
--proxy-pass <phrase> HTTPS 代理的私钥密码短语
--proxy-pinnedpubkey <hashes> 用于验证代理的公钥(文件/哈希)
--proxy-service-name <name> SPNEGO 代理服务名称
--proxy-ssl-allow-beast 允许 HTTPS 代理存在的这个安全漏洞
--proxy-ssl-auto-client-cert 自动为代理选择客户端证书
--proxy-tls13-ciphers <list> TLS 1.3 代理的密码套件
--proxy-tlsauthtype <type> HTTPS 代理的 TLS 认证类型
--proxy-tlspassword <string> HTTPS 代理的 TLS 密码
--proxy-tlsuser <name> HTTPS 代理的 TLS 用户名
--proxy-tlsv1 使用 TLSv1 协议通过 HTTPS 代理
-U, --proxy-user <user:password> 代理的用户名和密码
--proxy1.0 <host[:port]> 使用 HTTP/1.0 代理和给定端口
-p, --proxytunnel 使用 HTTP 代理隧道(通过 CONNECT)
--pubkey <key> SSH 公钥文件名
-Q, --quote <command> 在传输之前发送命令到服务器
--random-file <file> 从文件中读取随机数据
-r, --range <range> 仅获取 RANGE 范围内的字节
--rate <max request rate> 串行传输的请求速率
--raw 使用 HTTP 原始传输;不进行传输解码
-e, --referer <URL> 引用网址
-J, --remote-header-name 使用头部中提供的文件名
-O, --remote-name 将输出写入与远程文件同名的文件
--remote-name-all 对所有 URL 使用远程文件名
-R, --remote-time 设置远程文件的时间戳为本地输出文件的时间
--remove-on-error 错误发生时删除输出文件
-X, --request <method> 指定请求方法
--request-target <path> 指定请求目标路径
--resolve <[+]host:port:addr[,addr]...> 将主机+端口解析为地址
--retry <num> 如果遇到暂时性问题,重试请求
--retry-all-errors 重试所有错误(使用 --retry)
--retry-connrefused 连接被拒绝时重试(使用 --retry)
--retry-delay <seconds> 重试之间的等待时间
--retry-max-time <seconds> 仅在此时间段内进行重试
--sasl-authzid <identity> SASL PLAIN 认证的身份
--sasl-ir 在 SASL 认证中发送初始响应
--service-name <name> SPNEGO 服务名称
-S, --show-error 即使使用 -s 也显示错误
-i, --show-headers 在输出中显示响应头
-s, --silent 静默模式
--skip-existing 如果本地文件已存在,则跳过下载
--socks4 <host[:port]> 在给定的主机和端口上使用 SOCKS4 代理
--socks4a <host[:port]> 在给定的主机和端口上使用 SOCKS4a 代理
--socks5 <host[:port]> 在给定的主机和端口上使用 SOCKS5 代理
--socks5-basic SOCKS5 代理的用户名/密码认证
--socks5-gssapi 启用 SOCKS5 代理的 GSS-API 认证
--socks5-gssapi-nec 与 NEC SOCKS5 服务器的兼容性
--socks5-gssapi-service <name> SOCKS5 代理的 GSS-API 服务名称
--socks5-hostname <host[:port]> SOCKS5 代理,传递主机名给代理
-Y, --speed-limit <speed> 停止速度低于此值的传输
-y, --speed-time <seconds> 在此时间后触发 'speed-limit' 中止
--ssl 尝试启用 TLS
--ssl-allow-beast 允许安全漏洞以改善互操作性
--ssl-auto-client-cert 使用自动客户端证书(Schannel)
--ssl-no-revoke 禁用证书吊销检查(Schannel)
--ssl-reqd 强制使用 SSL/TLS
--ssl-revoke-best-effort 忽略缺失的证书 CRL 分发点
--ssl-sessions <filename> 从/保存到此文件加载/保存 SSL 会话票证
-2, --sslv2 使用 SSLv2
-3, --sslv3 使用 SSLv3
--stderr <file> 将 stderr 重定向到文件
--styled-output 启用 HTTP 头的样式化输出
--suppress-connect-headers 抑制代理 CONNECT 响应头
--tcp-fastopen 使用 TCP 快速打开
--tcp-nodelay 设置 TCP_NODELAY
-t, --telnet-option <opt=val> 设置 Telnet 选项
--tftp-blksize <value> 设置 TFTP BLKSIZE 选项
--tftp-no-options 不发送任何 TFTP 选项
-z, --time-cond <time> 根据时间条件进行传输
--tls-earlydata 允许使用 TLSv1.3 的早期数据(0RTT)
--tls-max <VERSION> 最大允许的 TLS 版本
--tls13-ciphers <list> 使用的 TLS 1.3 加密套件
--tlsauthtype <type> TLS 认证类型
--tlspassword <string> TLS 密码
--tlsuser <name> TLS 用户名
-1, --tlsv1 使用 TLSv1.0 或更高版本
--tlsv1.0 使用 TLSv1.0 或更高版本
--tlsv1.1 使用 TLSv1.1 或更高版本
--tlsv1.2 使用 TLSv1.2 或更高版本
--tlsv1.3 使用 TLSv1.3 或更高版本
--tr-encoding 请求压缩的传输编码
--trace <file> 将调试跟踪写入文件
--trace-ascii <file> 类似于 --trace,但不显示十六进制输出
--trace-config <string> 记录的跟踪/详细输出内容
--trace-ids 在详细输出中添加传输和连接 ID
--trace-time 在跟踪/详细输出中添加时间戳
--unix-socket <path> 通过此 Unix 域套接字连接
-T, --upload-file <file> 上传本地文件 FILE 到目标
--url <url> 要使用的 URL
--url-query <data> 添加 URL 查询部分
-B, --use-ascii 使用 ASCII/text 传输
-u, --user <user:password> 服务器用户名和密码
-A, --user-agent <name> 向服务器发送 User-Agent <name>
--variable <[%]name=text/@file> 设置变量
-v, --verbose 使操作更加详细
-V, --version 显示版本号并退出
--vlan-priority <priority> 设置 VLAN 优先级
-w, --write-out <format> 完成后输出格式
--xattr 将元数据存储在扩展文件属性中
curl --help all
--abstract-unix-socket <path> Connect via abstract Unix domain socket
--alt-svc <filename> Enable alt-svc with this cache file
--anyauth Pick any authentication method
-a, --append Append to target file when uploading
--aws-sigv4 <provider1[:prvdr2[:reg[:srv]]]> AWS V4 signature auth
--basic HTTP Basic Authentication
--ca-native Load CA certs from the OS
--cacert <file> CA certificate to verify peer against
--capath <dir> CA directory to verify peer against
-E, --cert <certificate[:password]> Client certificate file and password
--cert-status Verify server cert status OCSP-staple
--cert-type <type> Certificate type (DER/PEM/ENG/PROV/P12)
--ciphers <list> TLS 1.2 (1.1, 1.0) ciphers to use
--compressed Request compressed response
--compressed-ssh Enable SSH compression
-K, --config <file> Read config from a file
--connect-timeout <seconds> Maximum time allowed to connect
--connect-to <HOST1:PORT1:HOST2:PORT2> Connect to host2 instead of host1
-C, --continue-at <offset> Resumed transfer offset
-b, --cookie <data|filename> Send cookies from string/load from file
-c, --cookie-jar <filename> Save cookies to <filename> after operation
--create-dirs Create necessary local directory hierarchy
--create-file-mode <mode> File mode for created files
--crlf Convert LF to CRLF in upload
--crlfile <file> Certificate Revocation list
--curves <list> (EC) TLS key exchange algorithms to request
-d, --data <data> HTTP POST data
--data-ascii <data> HTTP POST ASCII data
--data-binary <data> HTTP POST binary data
--data-raw <data> HTTP POST data, '@' allowed
--data-urlencode <data> HTTP POST data URL encoded
--delegation <LEVEL> GSS-API delegation permission
--digest HTTP Digest Authentication
-q, --disable Disable .curlrc
--disable-eprt Inhibit using EPRT or LPRT
--disable-epsv Inhibit using EPSV
--disallow-username-in-url Disallow username in URL
--dns-interface <interface> Interface to use for DNS requests
--dns-ipv4-addr <address> IPv4 address to use for DNS requests
--dns-ipv6-addr <address> IPv6 address to use for DNS requests
--dns-servers <addresses> DNS server addrs to use
--doh-cert-status Verify DoH server cert status OCSP-staple
--doh-insecure Allow insecure DoH server connections
--doh-url <URL> Resolve hostnames over DoH
--dump-ca-embed Write the embedded CA bundle to standard output
-D, --dump-header <filename> Write the received headers to <filename>
--ech <config> Configure ECH
--egd-file <file> EGD socket path for random data
--engine <name> Crypto engine to use
--etag-compare <file> Load ETag from file
--etag-save <file> Parse incoming ETag and save to a file
--expect100-timeout <seconds> How long to wait for 100-continue
-f, --fail Fail fast with no output on HTTP errors
--fail-early Fail on first transfer error
--fail-with-body Fail on HTTP errors but save the body
--false-start Enable TLS False Start
-F, --form <name=content> Specify multipart MIME data
--form-escape Escape form fields using backslash
--form-string <name=string> Specify multipart MIME data
--ftp-account <data> Account data string
--ftp-alternative-to-user <command> String to replace USER [name]
--ftp-create-dirs Create the remote dirs if not present
--ftp-method <method> Control CWD usage
--ftp-pasv Send PASV/EPSV instead of PORT
-P, --ftp-port <address> Send PORT instead of PASV
--ftp-pret Send PRET before PASV
--ftp-skip-pasv-ip Skip the IP address for PASV
--ftp-ssl-ccc Send CCC after authenticating
--ftp-ssl-ccc-mode <active/passive> Set CCC mode
--ftp-ssl-control Require TLS for login, clear for transfer
-G, --get Put the post data in the URL and use GET
-g, --globoff Disable URL globbing with {} and []
--happy-eyeballs-timeout-ms <ms> Time for IPv6 before IPv4
--haproxy-clientip <ip> Set address in HAProxy PROXY
--haproxy-protocol Send HAProxy PROXY protocol v1 header
-I, --head Show document info only
-H, --header <header/@file> Pass custom header(s) to server
-h, --help <subject> Get help for commands
--hostpubmd5 <md5> Acceptable MD5 hash of host public key
--hostpubsha256 <sha256> Acceptable SHA256 hash of host public key
--hsts <filename> Enable HSTS with this cache file
--http0.9 Allow HTTP 0.9 responses
-0, --http1.0 Use HTTP 1.0
--http1.1 Use HTTP 1.1
--http2 Use HTTP/2
--http2-prior-knowledge Use HTTP 2 without HTTP/1.1 Upgrade
--http3 Use HTTP v3
--http3-only Use HTTP v3 only
--ignore-content-length Ignore the size of the remote resource
-k, --insecure Allow insecure server connections
--interface <name> Use network interface
--ip-tos <string> Set IP Type of Service or Traffic Class
--ipfs-gateway <URL> Gateway for IPFS
-4, --ipv4 Resolve names to IPv4 addresses
-6, --ipv6 Resolve names to IPv6 addresses
--json <data> HTTP POST JSON
-j, --junk-session-cookies Ignore session cookies read from file
--keepalive-cnt <integer> Maximum number of keepalive probes
--keepalive-time <seconds> Interval time for keepalive probes
--key <key> Private key filename
--key-type <type> Private key file type (DER/PEM/ENG)
--krb <level> Enable Kerberos with security <level>
--libcurl <file> Generate libcurl code for this command line
--limit-rate <speed> Limit transfer speed to RATE
-l, --list-only List only mode
--local-port <range> Use a local port number within RANGE
-L, --location Follow redirects
--location-trusted As --location, but send secrets to other hosts
--login-options <options> Server login options
--mail-auth <address> Originator address of the original email
--mail-from <address> Mail from this address
--mail-rcpt <address> Mail to this address
--mail-rcpt-allowfails Allow RCPT TO command to fail
-M, --manual Display the full manual
--max-filesize <bytes> Maximum file size to download
--max-redirs <num> Maximum number of redirects allowed
-m, --max-time <seconds> Maximum time allowed for transfer
--metalink Process given URLs as metalink XML file
--mptcp Enable Multipath TCP
--negotiate Use HTTP Negotiate (SPNEGO) authentication
-n, --netrc Must read .netrc for username and password
--netrc-file <filename> Specify FILE for netrc
--netrc-optional Use either .netrc or URL
-:, --next Make next URL use separate options
--no-alpn Disable the ALPN TLS extension
-N, --no-buffer Disable buffering of the output stream
--no-clobber Do not overwrite files that already exist
--no-keepalive Disable TCP keepalive on the connection
--no-npn Disable the NPN TLS extension
--no-progress-meter Do not show the progress meter
--no-sessionid Disable SSL session-ID reusing
--noproxy <no-proxy-list> List of hosts which do not use proxy
--ntlm HTTP NTLM authentication
--ntlm-wb HTTP NTLM authentication with winbind
--oauth2-bearer <token> OAuth 2 Bearer Token
-o, --output <file> Write to file instead of stdout
--output-dir <dir> Directory to save files in
-Z, --parallel Perform transfers in parallel
--parallel-immediate Do not wait for multiplexing
--parallel-max <num> Maximum concurrency for parallel transfers
--pass <phrase> Passphrase for the private key
--path-as-is Do not squash .. sequences in URL path
--pinnedpubkey <hashes> Public key to verify peer against
--post301 Do not switch to GET after a 301 redirect
--post302 Do not switch to GET after a 302 redirect
--post303 Do not switch to GET after a 303 redirect
--preproxy [protocol://]host[:port] Use this proxy first
-#, --progress-bar Display transfer progress as a bar
--proto <protocols> Enable/disable PROTOCOLS
--proto-default <protocol> Use PROTOCOL for any URL missing a scheme
--proto-redir <protocols> Enable/disable PROTOCOLS on redirect
-x, --proxy [protocol://]host[:port] Use this proxy
--proxy-anyauth Pick any proxy authentication method
--proxy-basic Use Basic authentication on the proxy
--proxy-ca-native Load CA certs from the OS to verify proxy
--proxy-cacert <file> CA certificates to verify proxy against
--proxy-capath <dir> CA directory to verify proxy against
--proxy-cert <cert[:passwd]> Set client certificate for proxy
--proxy-cert-type <type> Client certificate type for HTTPS proxy
--proxy-ciphers <list> TLS 1.2 (1.1, 1.0) ciphers to use for proxy
--proxy-crlfile <file> Set a CRL list for proxy
--proxy-digest Digest auth with the proxy
--proxy-header <header/@file> Pass custom header(s) to proxy
--proxy-http2 Use HTTP/2 with HTTPS proxy
--proxy-insecure Skip HTTPS proxy cert verification
--proxy-key <key> Private key for HTTPS proxy
--proxy-key-type <type> Private key file type for proxy
--proxy-negotiate HTTP Negotiate (SPNEGO) auth with the proxy
--proxy-ntlm NTLM authentication with the proxy
--proxy-pass <phrase> Passphrase for private key for HTTPS proxy
--proxy-pinnedpubkey <hashes> FILE/HASHES public key to verify proxy with
--proxy-service-name <name> SPNEGO proxy service name
--proxy-ssl-allow-beast Allow this security flaw for HTTPS proxy
--proxy-ssl-auto-client-cert Auto client certificate for proxy
--proxy-tls13-ciphers <list> TLS 1.3 proxy cipher suites
--proxy-tlsauthtype <type> TLS authentication type for HTTPS proxy
--proxy-tlspassword <string> TLS password for HTTPS proxy
--proxy-tlsuser <name> TLS username for HTTPS proxy
--proxy-tlsv1 TLSv1 for HTTPS proxy
-U, --proxy-user <user:password> Proxy user and password
--proxy1.0 <host[:port]> Use HTTP/1.0 proxy on given port
-p, --proxytunnel HTTP proxy tunnel (using CONNECT)
--pubkey <key> SSH Public key filename
-Q, --quote <command> Send command(s) to server before transfer
--random-file <file> File for reading random data from
-r, --range <range> Retrieve only the bytes within RANGE
--rate <max request rate> Request rate for serial transfers
--raw Do HTTP raw; no transfer decoding
-e, --referer <URL> Referrer URL
-J, --remote-header-name Use the header-provided filename
-O, --remote-name Write output to file named as remote file
--remote-name-all Use the remote filename for all URLs
-R, --remote-time Set remote file's time on local output
--remove-on-error Remove output file on errors
-X, --request <method> Specify request method to use
--request-target <path> Specify the target for this request
--resolve <[+]host:port:addr[,addr]...> Resolve host+port to address
--retry <num> Retry request if transient problems occur
--retry-all-errors Retry all errors (with --retry)
--retry-connrefused Retry on connection refused (with --retry)
--retry-delay <seconds> Wait time between retries
--retry-max-time <seconds> Retry only within this period
--sasl-authzid <identity> Identity for SASL PLAIN authentication
--sasl-ir Initial response in SASL authentication
--service-name <name> SPNEGO service name
-S, --show-error Show error even when -s is used
-i, --show-headers Show response headers in output
-s, --silent Silent mode
--skip-existing Skip download if local file already exists
--socks4 <host[:port]> SOCKS4 proxy on given host + port
--socks4a <host[:port]> SOCKS4a proxy on given host + port
--socks5 <host[:port]> SOCKS5 proxy on given host + port
--socks5-basic Username/password auth for SOCKS5 proxies
--socks5-gssapi Enable GSS-API auth for SOCKS5 proxies
--socks5-gssapi-nec Compatibility with NEC SOCKS5 server
--socks5-gssapi-service <name> SOCKS5 proxy service name for GSS-API
--socks5-hostname <host[:port]> SOCKS5 proxy, pass hostname to proxy
-Y, --speed-limit <speed> Stop transfers slower than this
-y, --speed-time <seconds> Trigger 'speed-limit' abort after this time
--ssl Try enabling TLS
--ssl-allow-beast Allow security flaw to improve interop
--ssl-auto-client-cert Use auto client certificate (Schannel)
--ssl-no-revoke Disable cert revocation checks (Schannel)
--ssl-reqd Require SSL/TLS
--ssl-revoke-best-effort Ignore missing cert CRL dist points
--ssl-sessions <filename> Load/save SSL session tickets from/to this file
-2, --sslv2 SSLv2
-3, --sslv3 SSLv3
--stderr <file> Where to redirect stderr
--styled-output Enable styled output for HTTP headers
--suppress-connect-headers Suppress proxy CONNECT response headers
--tcp-fastopen Use TCP Fast Open
--tcp-nodelay Set TCP_NODELAY
-t, --telnet-option <opt=val> Set telnet option
--tftp-blksize <value> Set TFTP BLKSIZE option
--tftp-no-options Do not send any TFTP options
-z, --time-cond <time> Transfer based on a time condition
--tls-earlydata Allow use of TLSv1.3 early data (0RTT)
--tls-max <VERSION> Maximum allowed TLS version
--tls13-ciphers <list> TLS 1.3 cipher suites to use
--tlsauthtype <type> TLS authentication type
--tlspassword <string> TLS password
--tlsuser <name> TLS username
-1, --tlsv1 TLSv1.0 or greater
--tlsv1.0 TLSv1.0 or greater
--tlsv1.1 TLSv1.1 or greater
--tlsv1.2 TLSv1.2 or greater
--tlsv1.3 TLSv1.3 or greater
--tr-encoding Request compressed transfer encoding
--trace <file> Write a debug trace to FILE
--trace-ascii <file> Like --trace, but without hex output
--trace-config <string> Details to log in trace/verbose output
--trace-ids Transfer + connection ids in verbose output
--trace-time Add time stamps to trace/verbose output
--unix-socket <path> Connect through this Unix domain socket
-T, --upload-file <file> Transfer local FILE to destination
--url <url> URL to work with
--url-query <data> Add a URL query part
-B, --use-ascii Use ASCII/text transfer
-u, --user <user:password> Server user and password
-A, --user-agent <name> Send User-Agent <name> to server
--variable <[%]name=text/@file> Set variable
-v, --verbose Make the operation more talkative
-V, --version Show version number and quit
--vlan-priority <priority> Set VLAN priority
-w, --write-out <format> Output FORMAT after completion
--xattr Store metadata in extended file attributes
8.14.1 版本更新 - 2025年6月4日
更新内容:
Bug修复:
- asyn-thrdd: 修复当RR因内存不足(OOM)失败时的清理问题
- autotools: 在设置
-D_GNU_SOURCE时,识别更多的Linux目标 - BUG-BOUNTY.md: 提到2025年的中等赏金金额
- cmake: 修复在多包配置检测中遗漏的版本号
- cmdline-docs: 提到HTTP恢复上传时可能不稳定
- curl: 正确处理
-N参数 - curl: 修复从当前目录(
.)上传的问题 - dllmain: 从Cygwin构建中排除
- docs/tests: 删除提及hyper的内容
- docs: 修正拼写错误
- ftp: 修复在完成时对数据连接的拆除
- http: 当回退输入失败并且在跟随重定向时尽早失败
- license: 更新部分版权链接到curl.se
- memanalyze.pl: 修复
getaddrinfo/freeaddrinfo检查 - misc: 修复拼写错误
- misc: 表示写入的是 an IPv6 地址
- multi: 修复
add_handle调整大小的问题 - spelling: 修正 'a' 和 'an' 的使用
- spelling: 一致地称之为 null-terminate
- test1510: 修复预期值
- tests: 等待 portfile 完成
- tests: 修复https-mtls协议的检查
- tests: 提高服务器启动可靠性
- tests: 将测试文档移入
/docs目录 - tests: 重新启用1510,记录 heimdal 内存泄漏
- tests: 测试 mtls,并仅使用客户端认证EKU
- tests: 测试 mtls 配合
--insecure参数 - tls BIOs: 正确处理
BIO_CTRL_EOF - tool_getparam: 不再接受
--no-anyauth参数 - tool_getparam: 重构,简化代码
- tool_getparam: 移除两个
nextarg NULL检查 - VULN-DISCLOSURE-POLICY.md: 发布的发行版本列表要求 <= 7天的保密期
- wolfssl: 修复发送早期数据的问题
- ws: 更好地处理阻塞的发送
- ws: 测试和修复
进一步更新:
- 上一个版本是 8.14.0
8.12.1 版本更新 - 2025年2月13日
Bug修复:
- 通用: 移除 FIXME 和 TODO 注释
- asyn-thread: 修复在
CURL_DISABLE_SOCKETPAIR下的构建问题 - asyn-thread: 修复 HTTPS RR 崩溃问题
- asyn-thread: 修复从 Curl_resolver_getsock 返回的位掩码问题
- asyn-thread: 处理 c-ares 通道设置为 NULL 的情况
- 构建: 将 tool_hugehelp.c 添加到 IBMi 构建中
- checksrc.pl: 在 FIXME/TODO 注释时发出警告
- cmake/Find: 在通过
pkg-config查找时,设置<Modulename>_FOUND以兼容 - cmake: 添加集成测试,并在 CI 中运行
- cmake: 始终通过导入的目标引用 OpenSSL 和 ZLIB
- cmake: 避免不必要的
-L用于隐式链接目录 - cmake: 删除
LDAP_DEPRECATED=1宏,以与 autotools 同步 - cmake: 修复
HAVE_GETHOSTBYNAME_R_*检测,配合CURL_WERROR=ON使用 - cmake: 修复 MSVC UWP 构建中
HAVE_OPENSSL_SRP的检测 - cmake: 修复/添加 Windows/MS-DOS 的缺失特性检测
- cmake: 初始化缺失的变量
- cmake: 为挑剔的链接器(如 binutils
ld)修复库顺序问题 - cmake: 在匹配路径时规范化符号路径
- cmake: 尊重通过
pkg-config检测到的GNUTLS_CFLAGS - cmake: 尊重
libcurl.pc和curl-config中的GNUTLS_LIBRARY_DIRS - cmake: 通过排除
CMAKE_C_IMPLICIT_LINK_DIRECTORIES来节省一行 - cmake: 整理字符串附加和列表前置语法
- configure/cmake: 检查 realpath
- configure/cmake: 仅在启用 httpsrr 时将 asyn-rr 设置为特性
- content_encoding: 对过旧的 zlib 版本发出错误
- curl_global_sslset.md: 添加 SSL 后端名称
- CURLOPT_SSH_KNOWNHOSTS.md: 强烈建议使用此选项
- CURLSHOPT_SHARE.md: 调整 SSL 会话缓存的新变化
- 文档: 更好地解释多部分字节范围的行为
- 文档: 使用有效的示例域名
- generate.bat: 从 curlx 文件列表中移除 curl_get_line.c
- header.md: 提到
Authorization:和Cookie:特殊处理 - imap: 修复 TLS 升级问题
- INTERNALS: 修复 c-ares,实际支持版本 1.6.0 或更高
- ldap: 删除对旧版 Novell LDAP SDK 的支持
- lib: 为
inet_ntop/inet_pton包含必要的头文件 - lib: 在非 MSVC Windows 上静默 LibreSSL 碰撞警告
- libssh2: 比较总是为真,因为 rc <= -1
- libssh2: 将最低支持版本提高到 1.2.8
- libssh: 删除对版本低于 0.9.0 的 libssh 的支持
- libssh: 使用类型转换静默
-Wconversion警告(Windows 32 位) - netrc: 清理返回代码,修复缺少文件错误
- openssl-quic: 忽略 h3 的加密套件
- openssl: 修复 goto 中超出作用域的变量
- pop3: 修复 TLS 升级问题
- runtests: 修复内存跟踪禁用问题
- runtests: 引号命令以支持路径中的空格
- scache: 添加魔法检查
- smb: 静默
-Warray-bounds警告(gcc 13+) - smtp: 修复 TLS 升级问题
- SPONSORS.md: 澄清我们不承诺提供商品或服务
- test1516: 避免由于路径中的空格导致的失败
- test2080: 简化,避免空字节问题
- tests: 修复 MSVC 上的 test 558、1330,允许在 cmake 中使用 MSVC 进行 TrackMemory
- tidy-up: 将每个文件的
ARRAYSIZE宏变为全局的CURL_ARRAYSIZE - tool_cfgable: 按大小排序结构体字段,使用位字段处理布尔值
- tool_getparam: 为每个需要 TLS 的选项添加 "TLS required" 标志
- tool_progress: 修复大并行传输的百分比输出
- tool_ssls: 切换到工具特定的 get_line 函数
- verbose.md: 提到如何在标头中发生回车符
- vquic: 使“禁用 GSO”使用 infof,而不是 failf
- vtls: 修复 multissl-init
- vtsl: 消除 'data->state.ssl_scache'
- wakeup_write: 确保 eventfd 写入发送八个字节
- wolfssl: 静默编译器警告(MSVC 2019),简化现有代码
系统集成的版本
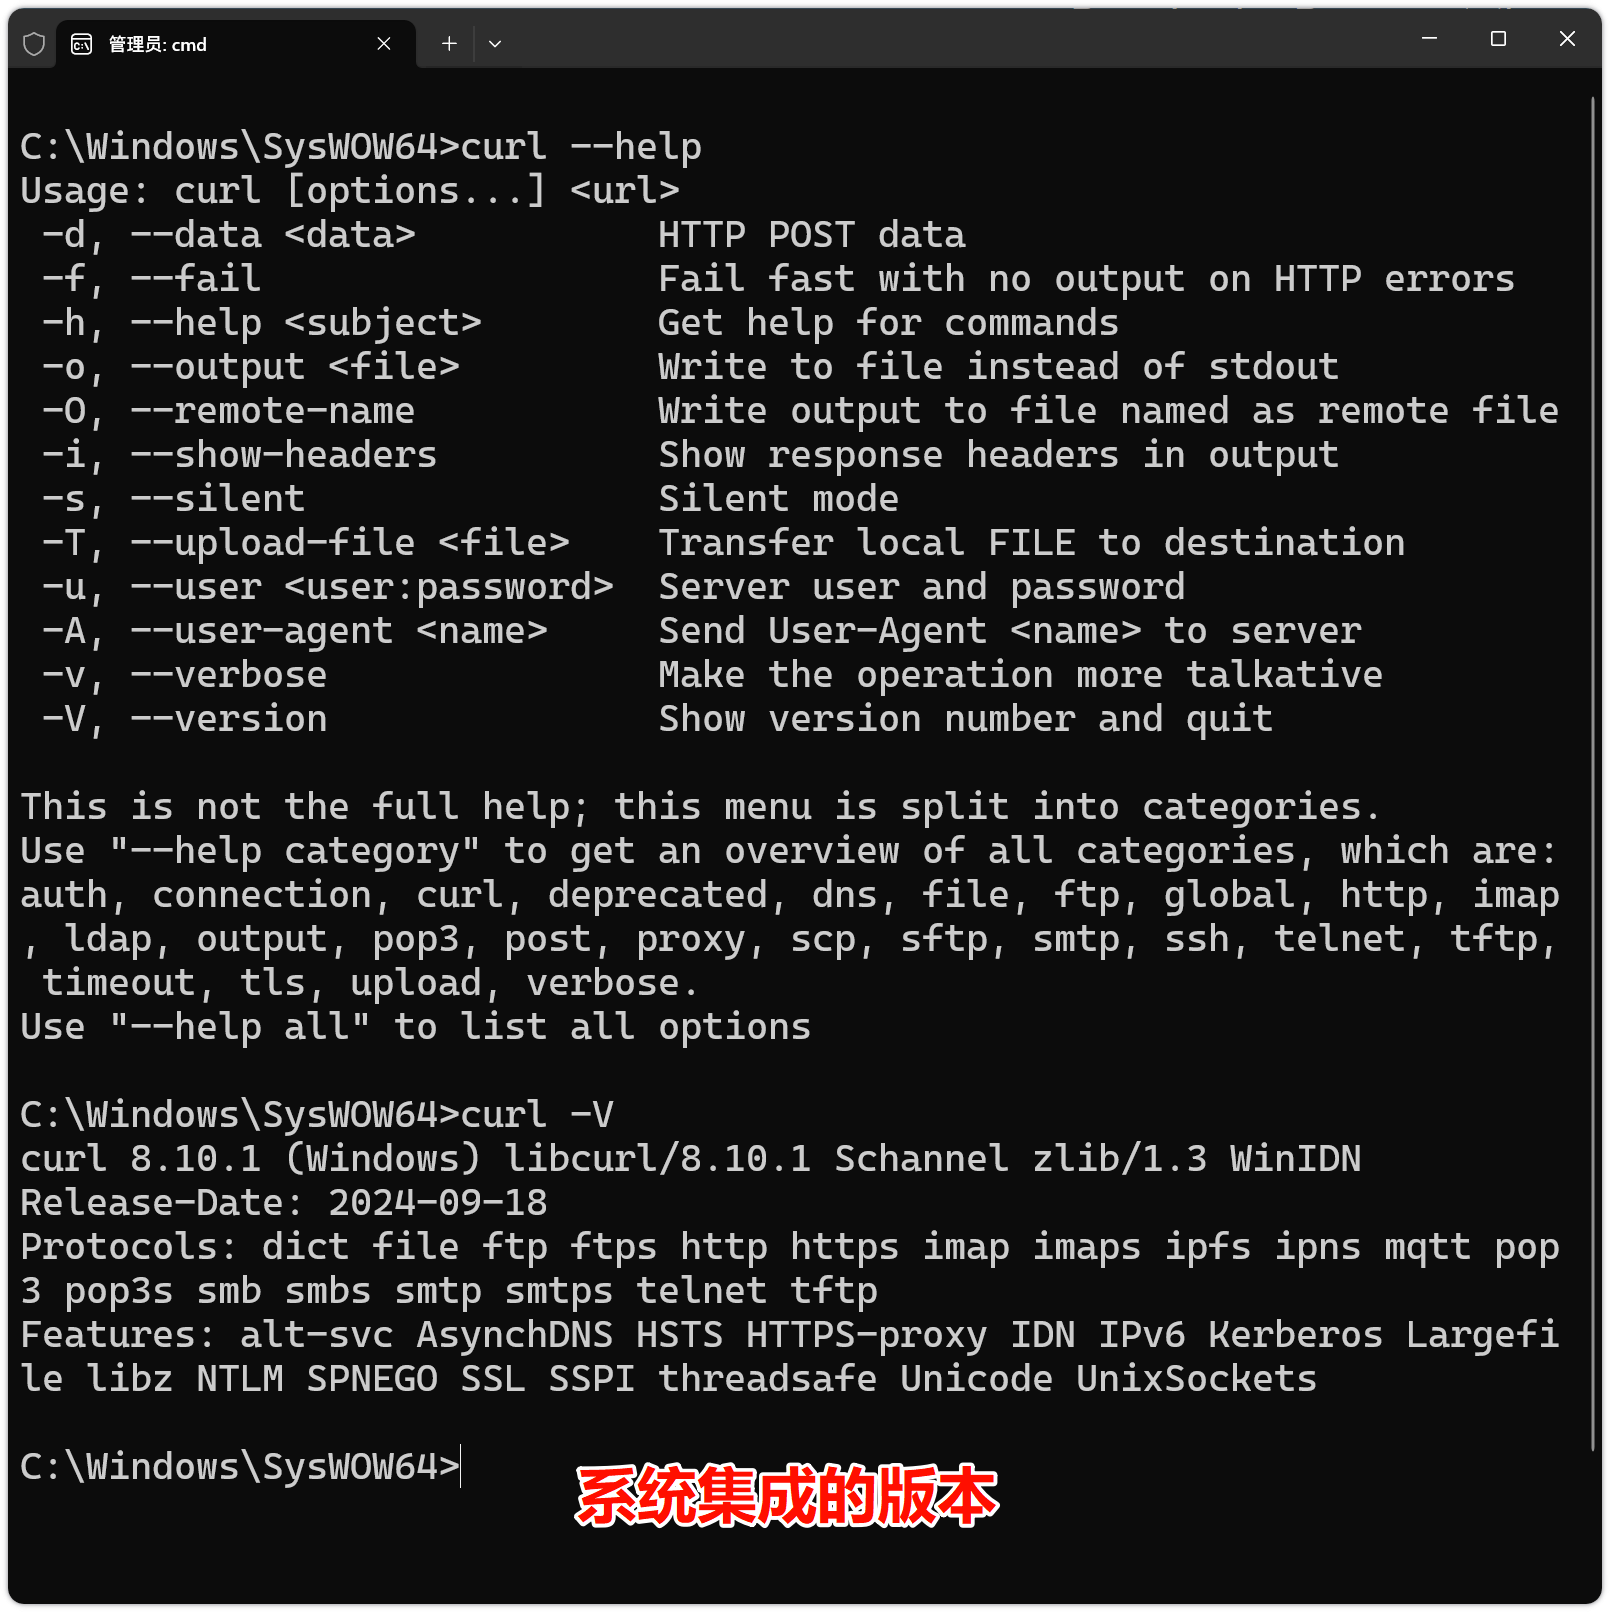
用法:curl [选项...] <url>
-d, --data <data> HTTP POST 数据
-f, --fail 在 HTTP 错误时快速失败并不输出
-h, --help <subject> 获取命令帮助
-o, --output <file> 将输出写入文件而不是标准输出
-O, --remote-name 将输出写入与远程文件同名的文件
-i, --show-headers 在输出中显示响应头
-s, --silent 静默模式
-T, --upload-file <file> 将本地 FILE 上传到目标
-u, --user <user:password> 服务器用户名和密码
-A, --user-agent <name> 向服务器发送 User-Agent <name>
-v, --verbose 使操作更加详细
-V, --version 显示版本号并退出
这不是完整的帮助;此菜单被分为多个类别。
使用 "--help category" 获取所有类别的概览,类别包括:
auth, connection, curl, deprecated, dns, file, ftp, global, http, imap, ldap, output, pop3, post, proxy, scp, sftp, smtp, ssh, telnet, tftp, timeout, tls, upload, verbose。
使用 "--help all" 查看所有选项
使用 "--help [option]" 查看特定选项的文档
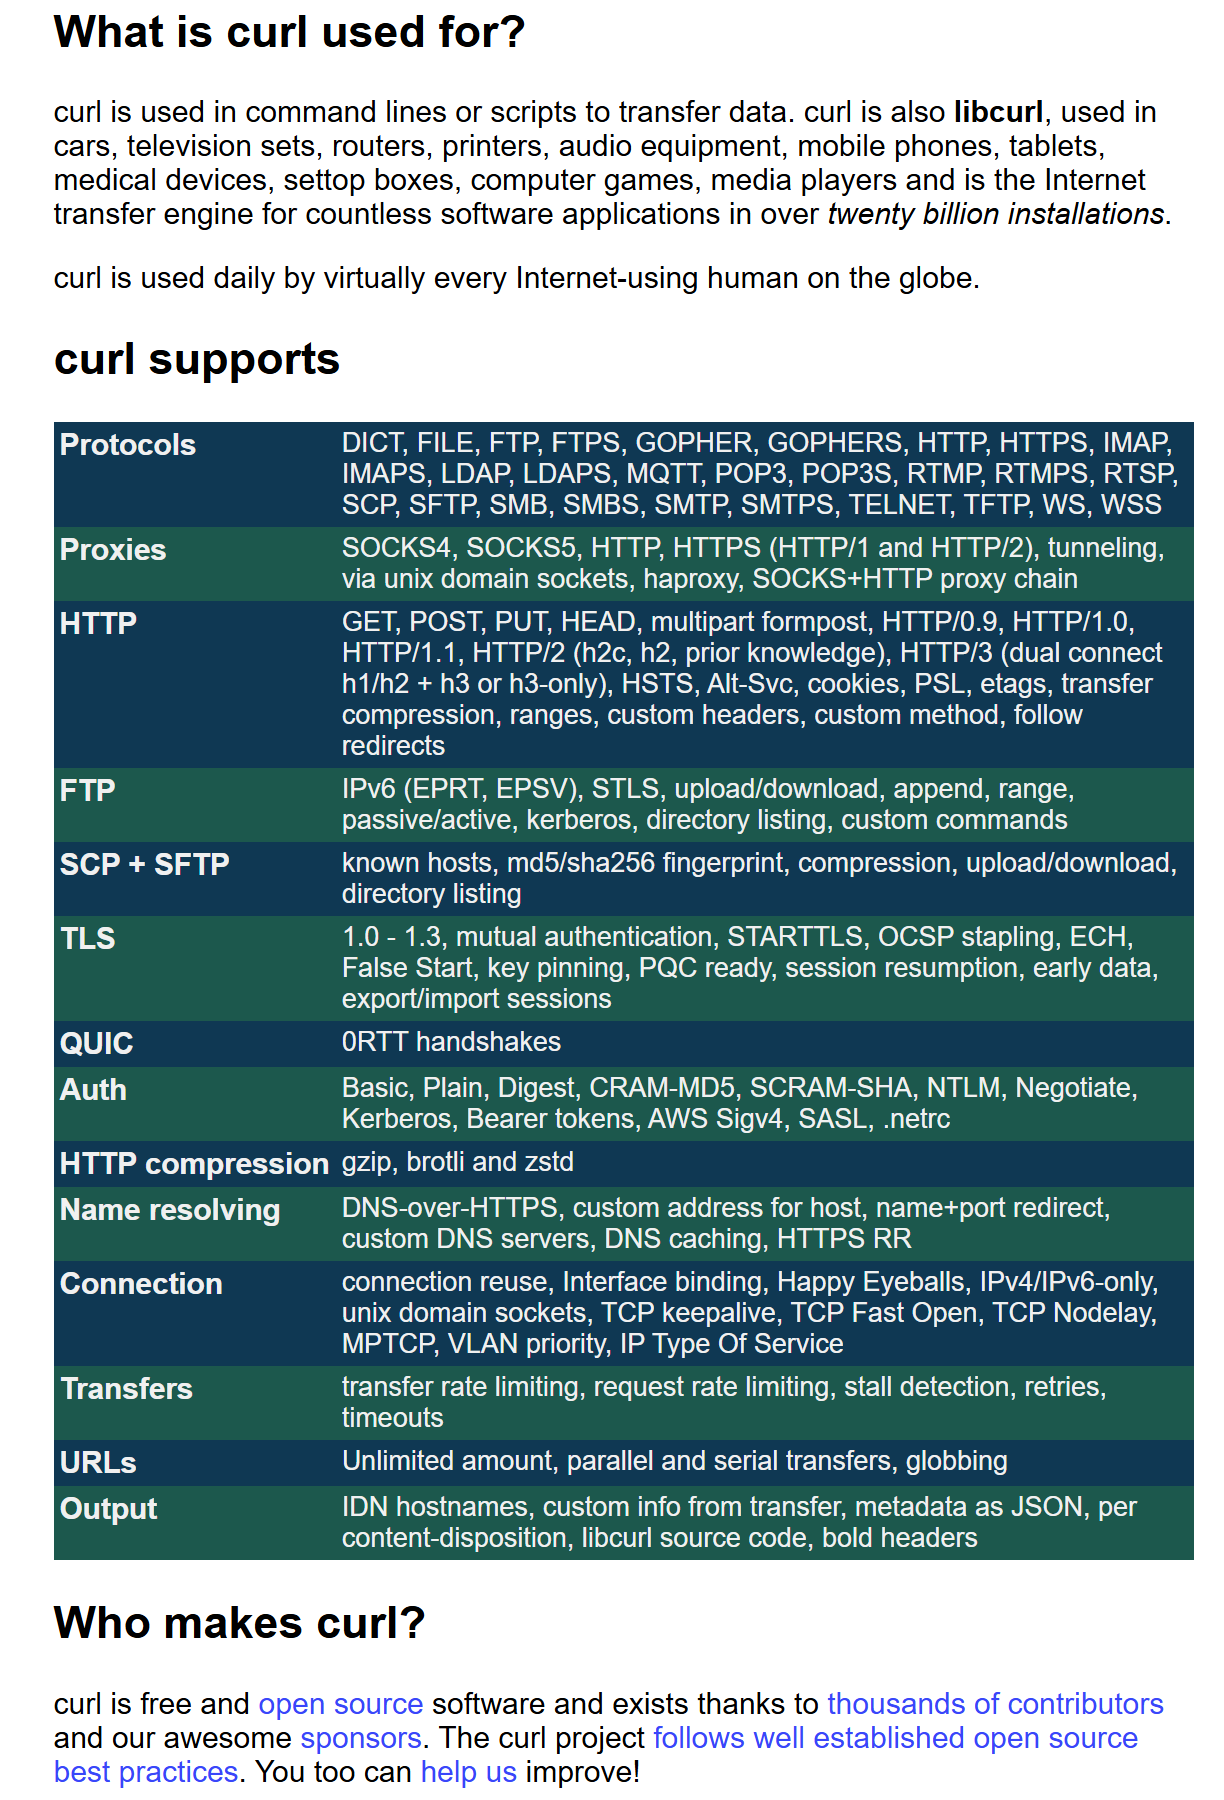
curl 是一个常用的命令行工具,主要用于与服务器进行数据交换(包括发送和接收 HTTP 请求)。它支持多种协议,如 HTTP、HTTPS、FTP、SFTP、SMTP 等。以下是 curl 命令按功能分类的表格化概述,帮助用户理解不同选项和命令的用途。
curl 命令功能分类表格
| 功能类别 | 命令及参数 | 描述 |
|---|---|---|
| 基础请求 | curl <URL> |
发送 GET 请求到指定的 URL。 |
| 指定请求方法 | curl -X <HTTP方法> <URL> |
指定 HTTP 请求方法(如 GET, POST, PUT, DELETE)。 |
| 发送数据 | curl -d <数据> <URL> |
使用 POST 方法发送数据(可以使用 -d 选项发送表单数据或 JSON)。 |
| 指定请求头 | curl -H "Header: Value" <URL> |
向请求中添加自定义 HTTP 头部。 |
| 设置请求超时 | curl --max-time <秒数> <URL> |
设置请求的最大超时时间。 |
| 指定请求参数 | curl -G -d "param=value" <URL> |
使用 GET 请求发送 URL 参数。 |
| 保存响应到文件 | curl -o <文件名> <URL> |
将响应内容保存到指定的文件。 |
| 输出响应到文件 | curl -O <URL> |
将响应内容保存到 URL 中的文件名(与服务器上文件名相同)。 |
| 显示响应头 | curl -i <URL> |
显示 HTTP 响应头以及响应体。 |
| 显示请求和响应 | curl -v <URL> |
打印详细的请求和响应头信息,用于调试。 |
| 模拟浏览器请求 | curl -A "User-Agent" <URL> |
模拟浏览器的 User-Agent 头部。 |
| 指定认证信息 | curl -u <用户名>:<密码> <URL> |
发送 HTTP 基本认证(Basic Authentication)。 |
| 使用 Cookie | curl -b <cookie文件> <URL> |
使用指定的 cookie 文件发送请求。 |
| 保存响应的 Cookie | curl -c <cookie文件> <URL> |
将响应中的 Cookie 保存到指定文件中。 |
| 上传文件 | curl -F "file=@<文件名>" <URL> |
使用 POST 方法上传文件。 |
| 下载文件 | curl -O <URL> |
下载指定 URL 的文件并保存为原始文件名。 |
| 支持 HTTPS | curl -k <URL> |
跳过 SSL 证书验证(用于测试环境或自签名证书)。 |
| 设置代理服务器 | curl -x <代理服务器> <URL> |
使用指定的代理服务器发送请求。 |
| 处理重定向 | curl -L <URL> |
跟随 HTTP 重定向。 |
| 限制下载速度 | curl --limit-rate <速率> <URL> |
限制下载的速度(例如:100k、1M)。 |
| 显示进度条 | curl -# <URL> |
显示一个简洁的进度条。 |
常用命令示例
| 命令 | 用途 |
|---|---|
curl https://example.com |
发送一个 GET 请求到 https://example.com,获取网页内容。 |
curl -X POST -d "username=admin&password=1234" https://example.com/login |
发送一个 POST 请求,提交用户名和密码。 |
curl -G -d "q=curl" https://api.example.com/search |
使用 GET 请求并添加查询参数 q=curl。 |
curl -H "Authorization: Bearer token" https://example.com |
发送带有 Bearer Token 认证的请求。 |
curl -i https://example.com |
显示响应头以及响应体。 |
curl -v https://example.com |
显示详细的请求和响应过程,用于调试。 |
curl -o output.txt https://example.com |
将响应内容保存到 output.txt 文件中。 |
curl -u user:pass https://example.com |
使用基本认证(用户名:user,密码:pass)发送请求。 |
curl -b cookies.txt https://example.com |
使用 cookies.txt 文件中的 cookies 发送请求。 |
curl -c cookies.txt https://example.com |
将响应中的 cookies 保存到 cookies.txt 文件中。 |
curl -F "file=@/path/to/file" https://example.com/upload |
上传文件到指定的 URL。 |
curl -O https://example.com/file.zip |
下载文件并保存为 file.zip。 |
curl --max-time 30 https://example.com |
设置请求最大超时时间为 30 秒。 |
curl -L https://example.com/redirect |
跟随 HTTP 重定向。 |
curl -x http://proxy.example.com:8080 https://example.com |
通过代理服务器发送请求。 |
命令参数说明
| 参数 | 说明 |
|---|---|
-X <HTTP方法> |
指定 HTTP 请求方法(如 GET, POST, PUT, DELETE)。 |
-d <数据> |
发送数据(通常用于 POST 或 PUT 请求)。 |
-H <头部> |
添加自定义请求头。 |
-G |
将数据作为查询参数附加到 URL(用于 GET 请求)。 |
-o <文件名> |
将响应内容保存到指定的文件。 |
-O |
将响应内容保存为 URL 中的文件名。 |
-i |
显示响应头和响应体。 |
-v |
显示请求和响应的详细信息(用于调试)。 |
-A <User-Agent> |
设置自定义的 User-Agent 请求头。 |
-u <用户名>:<密码> |
设置 HTTP 基本认证的用户名和密码。 |
-b <cookie文件> |
使用指定的 cookie 文件发送请求。 |
-c <cookie文件> |
将响应中的 cookie 保存到指定的文件中。 |
-F |
使用 POST 请求上传文件。 |
-k |
跳过 SSL 证书验证(适用于自签名证书)。 |
-x <代理> |
使用指定的代理服务器发送请求。 |
--limit-rate <速率> |
限制下载速度(如 100k, 1M)。 |
--max-time <秒数> |
设置请求的最大超时时间。 |
-L |
跟随重定向请求。 |
curl 是一个功能强大的工具,支持各种 HTTP 和其他协议的请求。它支持多种常用的操作,如获取数据、发送数据、文件上传与下载、处理认证、使用代理等。通过灵活的参数配置,用户可以定制请求头、处理 cookies、控制请求和响应的行为,进行调试,或与 API 进行交互等。
cURL 选项分类,添加了每个分类的命令、选项、参数以及示例:
1. 通用 (General)
- 命令:用于获取帮助、显示版本等基础信息。
| 选项 | 参数 | 描述 | 示例 |
|---|---|---|---|
-h, --help <subject> |
<subject> |
获取命令的帮助 | curl -h 或 curl --help 显示所有帮助 |
-V, --version |
无参数 | 显示 cURL 版本号并退出 | curl -V 显示 cURL 版本信息 |
2. 数据 (Data)
- 命令:用于处理传输的数据,包括 POST 数据和文件上传。
| 选项 | 参数 | 描述 | 示例 |
|---|---|---|---|
-d, --data <data> |
<data> |
发送 HTTP POST 数据 | curl -d "name=John&age=30" http://example.com |
-T, --upload-file <file> |
<file> |
上传本地文件 | curl -T file.txt ftp://ftp.example.com |
3. 输出 (Output)
- 命令:用于控制输出的存储位置、格式等。
| 选项 | 参数 | 描述 | 示例 |
|---|---|---|---|
-o, --output <file> |
<file> |
将输出写入指定文件 | curl -o output.html http://example.com |
-O, --remote-name |
无参数 | 将输出写入与远程文件同名的文件 | curl -O http://example.com/file.txt |
-i, --show-headers |
无参数 | 显示响应头 | curl -i http://example.com |
4. 错误处理 (Error Handling)
- 命令:用于配置错误处理的行为。
| 选项 | 参数 | 描述 | 示例 |
|---|---|---|---|
-f, --fail |
无参数 | 在 HTTP 错误时快速失败,且没有输出 | curl -f http://example.com/notfound(失败时无输出) |
5. 用户认证 (User Authentication)
- 命令:用于指定用户认证信息。
| 选项 | 参数 | 描述 | 示例 |
|---|---|---|---|
-u, --user <user:password> |
<user:password> |
服务器的用户名和密码 | curl -u user:pass http://example.com |
6. 用户代理 (User-Agent)
- 命令:用于自定义 HTTP 请求的
User-Agent。
| 选项 | 参数 | 描述 | 示例 |
|---|---|---|---|
-A, --user-agent <name> |
<name> |
向服务器发送 User-Agent 信息 | curl -A "Mozilla/5.0" http://example.com |
7. 模式 (Mode)
- 命令:用于控制 cURL 的输出和交互模式。
| 选项 | 参数 | 描述 | 示例 |
|---|---|---|---|
-s, --silent |
无参数 | 静默模式(不显示进度或错误信息) | curl -s http://example.com |
-v, --verbose |
无参数 | 显示详细的操作过程(用于调试) | curl -v http://example.com |
8. 网络 (Network)
- 命令:用于提供 cURL 各类网络设置的帮助。
| 选项 | 参数 | 描述 | 示例 |
|---|---|---|---|
--help category |
<category> |
获取特定类别的帮助 | curl --help auth 显示与认证相关的帮助 |
--help all |
无参数 | 列出所有选项和类别 | curl --help all |
通过这些命令和选项,你可以更高效地使用 cURL 来处理 HTTP 请求、文件上传、错误处理等。
对cURL选项的进一步细化分类,包括每个类别的命令、选项、参数和示例。此版本增加了更具体的参数,便于在不同使用场景中灵活应用。
1. 通用 (General)
- 命令:获取帮助、显示版本等基础信息。
| 选项 | 参数 | 描述 | 示例 |
|---|---|---|---|
-h, --help <subject> |
<subject> |
获取特定子命令或类别的帮助信息 | curl -h 显示帮助信息<br>curl --help <category> 显示特定类别的帮助 |
-V, --version |
无参数 | 显示 cURL 版本号并退出 | curl -V 显示 cURL 版本信息 |
--manual |
无参数 | 显示完整的手册 | curl --manual |
2. 数据 (Data)
- 命令:用于发送数据,适用于不同的 HTTP 请求类型。
| 选项 | 参数 | 描述 | 示例 |
|---|---|---|---|
-d, --data <data> |
<data> |
发送 HTTP POST 数据 | curl -d "name=John&age=30" http://example.com |
-d, --data-binary <data> |
<data> |
发送二进制数据 | curl -d-binary @file.bin http://example.com |
-F, --form <name=content> |
<name=content> |
上传表单数据,支持文件上传 | curl -F "file=@image.jpg" http://example.com/upload |
--data-urlencode <data> |
<data> |
发送 URL 编码的数据 | curl --data-urlencode "name=John Doe" http://example.com |
-X, --request <command> |
<command> |
指定请求方法 | curl -X PUT -d "data=value" http://example.com |
3. 输出 (Output)
- 命令:用于控制输出位置、格式等。
| 选项 | 参数 | 描述 | 示例 |
|---|---|---|---|
-o, --output <file> |
<file> |
将输出保存至指定文件 | curl -o output.html http://example.com |
-O, --remote-name |
无参数 | 将远程文件保存为本地文件 | curl -O http://example.com/file.txt |
-i, --include |
无参数 | 显示响应头和响应体 | curl -i http://example.com |
-I, --head |
无参数 | 仅请求 HTTP 头信息 | curl -I http://example.com |
-w, --write-out <format> |
<format> |
格式化输出内容,包括状态码、时间等 | curl -w "%{http_code}\n" -o /dev/null -s http://example.com |
4. 错误处理 (Error Handling)
- 命令:设置错误处理行为,处理失败或超时情况。
| 选项 | 参数 | 描述 | 示例 |
|---|---|---|---|
-f, --fail |
无参数 | 请求失败时不输出内容并返回非零状态 | curl -f http://example.com/notfound(失败时无输出) |
-s, --silent |
无参数 | 静默模式,不显示进度或错误信息 | curl -s http://example.com |
--max-time <seconds> |
<seconds> |
设置最大请求时间(秒) | curl --max-time 10 http://example.com |
--retry <num> |
<num> |
设置请求失败时的重试次数 | curl --retry 5 http://example.com |
5. 认证 (Authentication)
- 命令:用于提供认证信息。
| 选项 | 参数 | 描述 | 示例 |
|---|---|---|---|
-u, --user <user:password> |
<user:password> |
设置 HTTP 基本认证的用户名和密码 | curl -u user:pass http://example.com |
--proxy-user <user:password> |
<user:password> |
设置代理服务器的认证信息 | curl --proxy-user user:pass http://example.com |
--cert <certificate> |
<certificate> |
提供客户端证书 | curl --cert client.crt https://example.com |
--key <key> |
<key> |
提供客户端证书的私钥 | curl --key client.key https://example.com |
6. 用户代理 (User-Agent)
- 命令:控制请求中的
User-Agent信息。
| 选项 | 参数 | 描述 | 示例 |
|---|---|---|---|
-A, --user-agent <name> |
<name> |
设置自定义的 User-Agent 字段 |
curl -A "Mozilla/5.0" http://example.com |
--referer <URL> |
<URL> |
设置请求的 Referer 头 |
curl --referer "http://example.com" http://example.com |
7. 代理设置 (Proxy Settings)
- 命令:配置代理服务器信息。
| 选项 | 参数 | 描述 | 示例 |
|---|---|---|---|
-x, --proxy <proxy> |
<proxy> |
设置代理服务器的 URL | curl -x http://proxy.example.com:8080 http://example.com |
--proxy-digest |
无参数 | 使用 Digest 认证的代理认证方式 | curl --proxy-digest -x http://proxy.example.com http://example.com |
--proxy-ntlm |
无参数 | 使用 NTLM 认证的代理认证方式 | curl --proxy-ntlm -x http://proxy.example.com http://example.com |
8. 网络 (Network)
- 命令:用于控制请求的网络层行为,如 TCP 连接、带宽限制等。
| 选项 | 参数 | 描述 | 示例 |
|---|---|---|---|
--limit-rate <rate> |
<rate> |
限制数据传输的速率 | curl --limit-rate 100K http://example.com |
--ipv6 |
无参数 | 强制使用 IPv6 协议进行连接 | curl --ipv6 http://example.com |
--connect-timeout <seconds> |
<seconds> |
设置连接超时时间 | curl --connect-timeout 10 http://example.com |
--resolve <hostname:port:IP> |
<hostname:port:IP> |
强制指定 IP 地址进行解析 | curl --resolve example.com:80:192.168.0.1 http://example.com |
9. 调试 (Debugging)
- 命令:用于调试和查看详细信息。
| 选项 | 参数 | 描述 | 示例 |
|---|---|---|---|
-v, --verbose |
无参数 | 显示请求的详细信息(包括头和数据) | curl -v http://example.com |
--trace <file> |
<file> |
将调试信息输出到文件 | curl --trace trace.txt http://example.com |
--trace-ascii <file> |
<file> |
以 ASCII 格式输出调试信息 | curl --trace-ascii trace.txt http://example.com |
通过更加细化的分类与选项,用户可以根据需要灵活调整 cURL 命令。这个改进版本考虑了更多细节,能够满足不同环境下的多种需求,比如错误处理、文件上传、认证、网络配置等。
进一步改进和细化 cURL 参数的分类,我们将每个类别中的参数进一步拆分并附上更详细的示例,以便更好地满足不同使用场景的需求。
1. 通用选项 (General Options)
用于显示帮助、版本信息以及退出设置。
| 选项 | 参数 | 描述 | 示例 |
|---|---|---|---|
-h, --help <subject> |
<subject> |
获取特定类别或命令的帮助信息 | curl --help 显示所有命令帮助信息<br>curl --help <category> 获取特定类别帮助 |
-V, --version |
无参数 | 显示 cURL 版本号并退出 | curl -V 显示版本信息 |
--manual |
无参数 | 显示 cURL 完整手册 | curl --manual 显示完整手册 |
-L, --location |
无参数 | 允许 cURL 跟随重定向 (301, 302 等) | curl -L http://example.com |
2. 数据传输选项 (Data Transfer Options)
用于发送数据或控制请求数据的传输方式。
| 选项 | 参数 | 描述 | 示例 |
|---|---|---|---|
-d, --data <data> |
<data> |
发送 HTTP POST 数据 | curl -d "name=John&age=30" http://example.com |
-d, --data-binary <data> |
<data> |
发送二进制数据 | curl -d-binary @file.bin http://example.com |
-F, --form <name=content> |
<name=content> |
上传表单数据,支持文件上传 | curl -F "file=@image.jpg" http://example.com/upload |
--data-urlencode <data> |
<data> |
发送 URL 编码的数据 | curl --data-urlencode "name=John Doe" http://example.com |
-X, --request <command> |
<command> |
指定请求方法(GET、POST、PUT 等) | curl -X PUT -d "data=value" http://example.com |
--form-string <name=value> |
<name=value> |
发送表单数据,值不进行编码处理 | curl -F "name=value" http://example.com/form |
--data-ascii <data> |
<data> |
发送 ASCII 数据 | curl --data-ascii "ascii_string" http://example.com |
3. 输出与文件处理选项 (Output and File Handling)
控制输出内容、格式以及保存方式。
| 选项 | 参数 | 描述 | 示例 |
|---|---|---|---|
-o, --output <file> |
<file> |
将输出内容保存到指定文件 | curl -o output.html http://example.com |
-O, --remote-name |
无参数 | 将远程文件保存为本地文件名 | curl -O http://example.com/file.txt |
-i, --include |
无参数 | 显示响应头和响应体 | curl -i http://example.com |
-I, --head |
无参数 | 仅获取响应头,不下载正文 | curl -I http://example.com |
-w, --write-out <format> |
<format> |
格式化输出信息,显示状态码、时间等 | curl -w "%{http_code}\n" -o /dev/null -s http://example.com |
--silent |
无参数 | 静默模式,隐藏所有进度与错误信息 | curl --silent http://example.com |
4. 错误处理选项 (Error Handling Options)
设置 cURL 的错误处理与失败恢复机制。
| 选项 | 参数 | 描述 | 示例 |
|---|---|---|---|
-f, --fail |
无参数 | 请求失败时不显示内容并返回非零状态 | curl -f http://example.com/notfound(失败时不显示内容) |
-s, --silent |
无参数 | 静默模式,不显示进度或错误信息 | curl -s http://example.com |
--max-time <seconds> |
<seconds> |
设置最大请求时间(单位秒) | curl --max-time 10 http://example.com |
--retry <num> |
<num> |
设置请求失败时的重试次数 | curl --retry 5 http://example.com |
--retry-delay <seconds> |
<seconds> |
设置每次重试的间隔时间 | curl --retry 3 --retry-delay 5 http://example.com |
--retry-max-time <seconds> |
<seconds> |
设置最大重试总时长 | curl --retry-max-time 30 http://example.com |
5. 认证与身份验证 (Authentication and Authorization)
用于 HTTP 请求的身份验证,支持基本认证、OAuth 等。
| 选项 | 参数 | 描述 | 示例 |
|---|---|---|---|
-u, --user <user:password> |
<user:password> |
设置 HTTP 基本认证的用户名和密码 | curl -u user:pass http://example.com |
--proxy-user <user:password> |
<user:password> |
设置代理服务器的认证信息 | curl --proxy-user user:pass http://example.com |
--cert <certificate> |
<certificate> |
提供客户端证书,支持 PEM 格式 | curl --cert client.crt https://example.com |
--key <key> |
<key> |
提供客户端证书的私钥 | curl --key client.key https://example.com |
--header "Authorization: Bearer <token>" |
<token> |
使用 Bearer Token 认证方式 | curl --header "Authorization: Bearer token123" http://example.com |
6. 用户代理与请求头 (User-Agent and Headers)
设置请求的 User-Agent 以及自定义请求头。
| 选项 | 参数 | 描述 | 示例 |
|---|---|---|---|
-A, --user-agent <name> |
<name> |
设置自定义的 User-Agent 头 |
curl -A "Mozilla/5.0" http://example.com |
--referer <URL> |
<URL> |
设置请求的 Referer 头 |
curl --referer "http://example.com" http://example.com |
-H, --header <header> |
<header> |
添加自定义请求头 | curl -H "Authorization: Bearer token123" http://example.com |
--proxy-header <header> |
<header> |
设置代理服务器请求头 | curl --proxy-header "Authorization: Bearer token123" http://example.com |
7. 代理服务器设置 (Proxy Settings)
配置 HTTP 或 SOCKS 代理服务器设置。
| 选项 | 参数 | 描述 | 示例 |
|---|---|---|---|
-x, --proxy <proxy> |
<proxy> |
设置代理服务器 URL | curl -x http://proxy.example.com:8080 http://example.com |
--proxy-digest |
无参数 | 使用 Digest 认证的代理认证方式 | curl --proxy-digest -x http://proxy.example.com http://example.com |
--proxy-ntlm |
无参数 | 使用 NTLM 认证的代理认证方式 | curl --proxy-ntlm -x http://proxy.example.com http://example.com |
--proxy-tlsv1 |
无参数 | 强制使用 TLSv1 协议进行代理连接 | curl --proxy-tlsv1 -x http://proxy.example.com http://example.com |
8. 网络与连接控制选项 (Network and Connection Control)
控制连接、网络配置和带宽等行为。
| 选项 | 参数 | 描述 | 示例 |
|---|---|---|---|
--limit-rate <rate> |
<rate> |
限制数据传输速率 | curl --limit-rate 100K http://example.com |
--ipv6 |
无参数 | 强制使用 IPv6 协议进行连接 | curl --ipv6 http://example.com |
--connect-timeout <seconds> |
<seconds> |
设置连接超时时间(单位秒) | curl --connect-timeout 10 http://example.com |
--resolve <hostname:port:IP> |
<hostname:port:IP> |
强制指定 IP 地址进行解析 | curl --resolve example.com:80:192.168.0.1 http://example.com |
--tcp-nodelay |
无参数 | 禁用 Nagle 算法,减少延迟 | curl --tcp-nodelay http://example.com |
9. 调试与日志选项 (Debug and Logging Options)
显示 cURL 的调试信息和详细日志。
| 选项 | 参数 | 描述 | 示例 |
|---|---|---|---|
-v, --verbose |
无参数 | 显示详细的请求和响应信息 | curl -v http://example.com |
--trace <file> |
<file> |
将调试信息输出到文件 | curl --trace trace.txt http://example.com |
--trace-ascii <file> |
<file> |
以 ASCII 格式输出调试信息 | curl --trace-ascii trace.txt http://example.com |
通过这些更细化的分类和参数,cURL 可以适应更复杂的应用场景,如多种认证方式、详细的调试信息、对网络连接的精细控制等。提供了更加丰富的示例和选项,帮助用户根据具体需求灵活定制 cURL 命令。
在 Windows 10 和 Windows 11 中,微软在不同版本的更新中引入了一些有用的命令行工具和功能,包括 wget 等工具。下面将简要说明 Windows 10 和 Windows 11 中新增的一些重要功能,特别是与命令行相关的内容。
1. Windows 10 中的新增命令行工具
在 Windows 10 中,微软引入了一些新的工具和功能,主要包括:
1.1 wget 命令
wget是一个常用于从网络下载文件的工具,它在较早的 Windows 版本中并不自带。自 Windows 10 版本 1809(October 2018 Update)开始,Windows 10 系统自带了wget命令。- 功能:
wget可以用于从 Web 服务器下载文件,支持 HTTP、HTTPS、FTP 等协议。 - 使用示例:
bashCopy Code
wget https://example.com/file.zip
1.2 curl 命令
curl是一个用于从命令行进行 URL 数据传输的工具,它也自 Windows 10 版本 1803 起作为系统自带工具提供。- 功能:
curl支持更多的协议,功能更强大,支持 HTTP、HTTPS、FTP、SFTP 等,常用于 API 请求或下载文件。 - 使用示例:
bashCopy Code
curl -O https://example.com/file.zip
1.3 Windows Subsystem for Linux (WSL)
- WSL 是一个重要的功能,它允许你在 Windows 系统中运行 Linux 发行版,包括 Ubuntu、Debian、Kali 等。
- 功能:通过 WSL,用户可以在 Windows 上运行大部分 Linux 命令行工具,甚至是完整的 Linux 环境。
- Windows 10 中的支持:从 Windows 10 版本 1607 开始,WSL 逐渐被引入,后来在版本 1903(2019年5月更新)中得到了较大的改进,并且支持安装 WSL 2。
1.4 PowerShell Core
- PowerShell Core 是基于 .NET Core 的跨平台 PowerShell 版本,可以在 Windows 10 上运行,并且可以通过包管理器(如
winget)或直接下载进行安装。 - 功能:PowerShell Core 不仅限于 Windows,它还支持 macOS 和 Linux 系统,并且提供了更多现代化的命令行脚本功能。
2. Windows 11 中的新增命令行工具
Windows 11 在 Windows 10 的基础上引入了一些新的功能和工具。以下是一些与命令行相关的显著新增功能:
2.1 Windows Terminal
- Windows Terminal 是一个现代化的终端应用程序,允许用户同时运行 PowerShell、CMD、WSL、Azure Cloud Shell 等多种命令行工具。
- 功能:它支持多标签、Unicode 字符、颜色主题、丰富的自定义选项等。
- Windows 11 更新:Windows 11 默认将 Windows Terminal 设置为默认终端应用,它支持更好地管理多个命令行窗口,并且可以自定义外观和快捷键。
2.2 改进的 Windows Subsystem for Linux (WSL)
- WSL 2:在 Windows 11 中,WSL 2 进一步得到了优化,并且现在 WSL 可以更好地集成 Linux 文件系统,支持运行 Docker 等容器技术。
- 功能:Windows 11 支持通过 WSL 安装多个 Linux 发行版,并且支持完整的 Linux 内核,提供与原生 Linux 相似的体验。
- 改进:Windows 11 中的 WSL 更加稳定,性能提升,支持通过 Windows Store 安装更多的 Linux 发行版。
2.3 winget 包管理器
winget(Windows Package Manager)是一个用于安装、更新和管理 Windows 应用程序的命令行工具。它在 Windows 10 版本 1809 中首次发布,并在 Windows 11 中得到了进一步的推广。- 功能:可以方便地通过命令行安装各种应用程序,如:
bashCopy Code
winget install vscode
winget install googlechrome
2.4 scoop 和 choco(第三方包管理器)
- 虽然这些工具并不是 Windows 11 特有的,但它们在 Windows 11 上得到了更广泛的使用和支持:
- Scoop:一个轻量级的 Windows 包管理器,可以通过简单的命令行安装应用。
- Chocolatey (choco):另一个流行的 Windows 包管理器,支持管理系统中安装的许多应用程序。
2.5 改进的 Task Manager 和 System Monitor
- Windows 11 对系统监视和任务管理工具进行了现代化升级。虽然这不直接影响命令行,但它使得用户可以更容易地通过任务管理器或 PowerShell 脚本来控制和监视系统。
2.6 Get-Help 和改进的 PowerShell 支持
- Windows 11 中的 PowerShell 改进了帮助命令 (
Get-Help) 和模块支持,让用户能够更容易地找到和使用更多的命令和脚本。 - 功能:Windows 11 提供了更加丰富的 PowerShell 命令库,帮助用户进行系统管理、自动化脚本编写、网络配置等。
3. 总结
- Windows 10 在命令行工具方面引入了
wget、curl和 WSL,使得开发者和系统管理员能够更加高效地工作。 - Windows 11 则进一步扩展了这些功能,尤其是通过 Windows Terminal、WSL 2 和
winget包管理器,提供了更加灵活、现代化的命令行体验。
这些工具和功能极大地提高了 Windows 系统的命令行使用体验,为开发者、管理员以及高级用户提供了更多的选择和能力。
curl 8.11.1 版本的修复内容:
构建修复:
- 修复 ECH,确保始终启用 HTTPS RR。
- 修复 MSVC UWP 构建。
- 在
libcurl.pc中,除非通过pkg-config查找到,否则省略某些依赖项。 - 在 Windows 上使用
_fseeki64(),删除检测。
CMake 修复:
- 不输出大多数继承自
LDFLAGS的配置到配置文件中。 - 删除
buildinfo.txt中的 CMake 参数列表。 - 优先包含
wolfssl/options.h。 - 移除遗留的未使用
IMMEDIATE关键字。 - 恢复
buildinfo.txt中的 CMake 参数列表。 - 当
SHARE_LIB_OBJECT=OFF时,为静态库设置CURL_STATICLIB。 - 与其他依赖项同步 GSS 配置代码。
- 注释中的拼写错误修正。
- 解决
ios.toolchain.cmake导致的特性检测问题。 cmakelint修复,检查根目录的CMakeLists.txt。
配置修复:
- 添加 FIXMEs 以处理禁用的 pkg-config 引用。
- 不输出大多数继承自
LDFLAGS的配置到配置文件中。 - 替换
$#shell 语法。
功能修复:
- Cookie 名称区分大小写。
- 保留现有的
CPPFLAGS/LDFLAGS,当检测到时。 - 标记 curl.h 中的两个错误代码为过时。
--continue-at选项与--no-clobber、--range和--remove-on-error互斥。- 在调试构建中,
--test-duphandle会执行“duphandled”操作。 - 在子函数中进行更多的命令行解析。
- 重命名结构体变量以修复 AIX 构建问题。
- 在跟踪时间戳中使用实时时间。
- 软化
curl_multi_socket_all.md中的弃用警告。 - 在
CURLOPT_PREREQFUNCTION.md中添加失败时的结果代码。 - 在 Digest 头部生成更短的 cnonce。
其他修复:
- 更新 Alt Linux 链接。
- 使用
--no-cache构建 Docker 镜像。 - 恢复 ALTSVC.md 和 HSTS.md 文档。
- 记录默认的
User-Agent。 - 建议使用
--ssl-reqd替代--ftp-ssl。 - 处理 netrc 的初始化。
- 支持 AWS-LC 后端的 ECH 支持。
- 在
hostip中,不使用解析器处理 FQDN localhost。 - 在
http_negotiate中,允许一个字节更大的通道绑定缓冲区。 - 移动
dynhds_add_custom到http_proxy。
其他具体修复:
- 修复了多项与库、协议和操作系统相关的问题,如 wolfSSL、libssh、OpenSSL、krb5 等。
- 修复了测试、网络协议、内存管理等多方面的问题。
本次更新涉及了大量的构建、配置、功能以及库的修复,提升了性能与兼容性。
curl --help all 输出的中文翻译、命令参数示例及应用场景,以表格形式呈现:
| 选项 | 说明 | 命令参数示例 | 应用场景 |
|---|---|---|---|
--abstract-unix-socket <path> |
通过抽象 Unix 域套接字连接 | curl --abstract-unix-socket /tmp/socket http://example.com |
用于通过 Unix 域套接字进行通信,适合不需要使用文件路径的情况。 |
--alt-svc <filename> |
启用 alt-svc 并使用该缓存文件 | curl --alt-svc alt-cache.json http://example.com |
启用 HTTP/2 或其他协议的替代服务缓存,提高后续连接的效率。 |
--anyauth |
选择任何认证方法 | curl --anyauth -u user:password http://example.com |
在不确定认证方法时,curl 自动选择一种支持的认证方式。 |
| 选项 | 说明 | 命令参数示例 | 应用场景 |
|---|---|---|---|
-a, --append |
上传时附加内容到目标文件 | curl -a --data @file.txt http://example.com/upload |
当上传文件时,不覆盖目标文件内容,而是将内容追加到文件末尾。 |
--aws-sigv4 <provider1[:prvdr2[:reg[:srv]]]> |
使用 AWS V4 签名认证 | curl --aws-sigv4 myaws:myregion:myservice http://example.com |
用于使用 AWS 签名认证访问 Amazon Web Services 资源。 |
--basic |
使用 HTTP 基本认证 | curl --basic -u username:password http://example.com |
在请求中使用 HTTP 基本认证(最简单的用户名和密码认证)。 |
--ca-native |
从操作系统加载 CA 证书 | curl --ca-native http://example.com |
从操作系统的证书存储中加载根证书,用于验证 SSL/TLS 证书。 |
--cacert <file> |
使用指定的 CA 证书验证对方证书 | curl --cacert /path/to/ca.pem https://example.com |
使用指定的 CA 证书文件来验证服务器的 SSL/TLS 证书。 |
--capath <dir> |
使用指定目录中的 CA 证书来验证对方证书 | curl --capath /path/to/certs https://example.com |
使用目录中的 CA 证书来验证 SSL/TLS 证书,适用于多个证书的场景。 |
| 选项 | 说明 | 命令参数示例 | 应用场景 |
|---|---|---|---|
-E, --cert <certificate[:password]> |
客户端证书文件及密码 | curl -E client_cert.pem:password https://example.com |
使用客户端证书进行身份验证,通常用于 SSL/TLS 双向认证。 |
--cert-status |
验证服务器证书状态,支持 OCSP stapling | curl --cert-status https://example.com |
验证服务器证书的有效性,确保证书未被吊销。 |
--cert-type <type> |
证书类型(DER/PEM/ENG/PROV/P12) | curl --cert-type PEM --cert client_cert.pem https://example.com |
指定证书文件的类型,适用于不同格式的证书。 |
--ciphers <list> |
指定使用的 TLS 1.2(1.1, 1.0)加密套件 | curl --ciphers ECDHE-RSA-AES128-GCM-SHA256 https://example.com |
用于指定支持的 TLS 加密套件,增强传输安全性。 |
--compressed |
请求压缩响应内容 | curl --compressed https://example.com |
请求服务器返回压缩的响应,减少带宽消耗。 |
--compressed-ssh |
启用 SSH 压缩 | curl --compressed-ssh -u username:password sftp://example.com |
在 SSH 连接中启用压缩,提高传输速度,减少延迟。 |
| 选项 | 说明 | 命令参数示例 | 应用场景 |
|---|---|---|---|
-K, --config <file> |
从文件中读取配置 | curl -K config.txt https://example.com |
从指定的配置文件中读取多个命令参数,适用于批量配置的场景。 |
--connect-timeout <seconds> |
连接超时的最大时间(秒) | curl --connect-timeout 30 https://example.com |
设置连接超时,防止在网络状况不佳时长时间等待连接建立。 |
--connect-to <HOST1:PORT1:HOST2:PORT2> |
将连接指向 host2:port2,而不是默认的 host1:port1 | curl --connect-to example.com:80:backup.com:8080 https://example.com |
将请求从一个主机和端口重定向到另一个主机和端口,常用于负载均衡或测试。 |

 浙公网安备 33010602011771号