


参考blog
1,Create an analytical model based on ABAP CDS views
https://blogs.sap.com/2018/03/18/create-an-analytical-model-based-on-abap-cds-views/
2,Create a Multi-Dimensional Report from an Analytical Query
https://developers.sap.com/tutorials/s4hana-kut-create-multi-dimensional-report.html
3,Define the Analytical Query CDS View
https://blogs.sap.com/2017/02/26/step-2-define-the-analytical-query-cds-view/
4,How to create custom Fiori Multidimensional Reporting Application in S/4HANA on-premise
https://blogs.sap.com/2018/07/11/how-to-create-custom-fiori-multidimensional-reporting-application-in-s4hana-on-premise/
数据处理大致可以分成两大类:联机事务处理OLTP(on-line transaction processing)、联机分析处理OLAP(On-Line Analytical Processing)。
OLTP是传统的关系型数据库的主要应用,主要是基本的、日常的事务处理,例如银行交易。OLAP是数据仓库系统的主要应用,支持复杂的分析操作,侧重决策支持,并且提供直观易懂的查询结果。
https://www.cnblogs.com/beyondstorm/archive/2006/08/12/475011.html
SAP HANA将OLAP和OLTP处理结合在一个内存数据库中,事务和分析可以同时存在,这意味着可以实时访问所需的准确信息。因为我们将事务和分析世界合并在一个数据库中,所以在基于ABAP CDS(核心数据服务)构建的数据模型时,开发的方式会有一些不同。
当您需要利用聚合的优势跨不同区域(例如按时间、按位置、按负责人)公开结果时,建议使用分析模型进行报告。这些模型建立在事实(Facts )和维度(Dimensions )之上,这些视图包含用于进行详细分析和获得业务价值的基本数据。
以销售报告为例,它提供基于客户、产品、日期和销售人员的结果。事实(Fact )就是销售本身,它包含我们可以测量的价值(例如销售额和总销售额),根据客户、产品、时间和销售人员的过滤器是维度(Dimensions ),这些维度可以附加属性(Attributes )或文本(Texts )(例如客户名称、地址和产品描述),当我们将所有这些维度连接起来时,我们就有了一个多维数据集(Cube ),从而准备了一个分析模型用于消费。
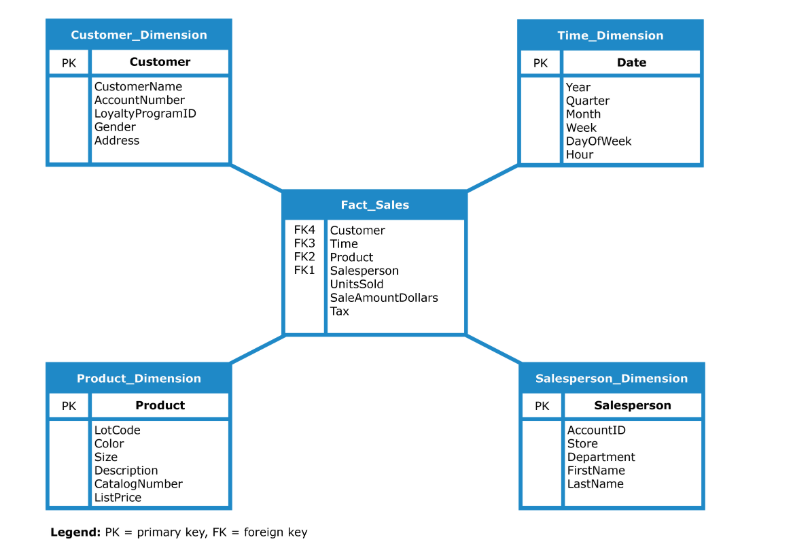
在这个分析模型的基础上,我们需要构造一个查询(Query ),以我们希望向用户公开的方式调整数据。多维数据集必须能够被一些不同的查询重用和使用。
例如,使用上面的销售模型,我们可以在不同的查询中生成以下指标:
- Sales by year quarter;
- Sales by products with cost above $100;
- Sales by customer located in a specific city;
- Average of sales amount per number of sales;
- Uplift on sales from prior year.
每个查询将实现特定的目的,并且可以针对不同的应用程序(例如报告、kpi等)进行设计。
CDS的主要目的之一是允许创建语义丰富的数据模型,而注释是支持这项任务的主要组件。
有许多不同领域的注解,可以通过下面的link进行查看。(注解太难了。资料太少了。)
https://help.sap.com/viewer/cc0c305d2fab47bd808adcad3ca7ee9d/7.5.9/en-US/630ce9b386b84e80bfade96779fbaeec.html
使用abap cds view来创建分析模型,需要使用到cds view的注解:Analytics、AnalyticsDetails。
Analytics 提供了对ABAP CDS视图的支持,并支持利用数据聚合来使用多维数据。
AnalyticsDetails支持通过更改聚合行为、计划或公式来计算度量,从而调整分析查询布局。只能在@Analytics.query : true的情况下使用。
如果想要声明维度、事实、聚合级别或多维数据集,必须在CDS视图的头部包含以下注释:
@Analytics.dataCategory: #VALUE
可以将 #VALUE 替换成下面的项目
- #CUBE
- #AGGREGATIONLEVEL
- #DIMENSION
- #FACT
因为Cubes必须包含至少一个可度量的属性,要将字段定义为可度量的,需要将此注释放在字段的顶部:
@DefaultAggregation: #SUM
也可以更改默认聚合,最常见的组合是使用 #SUM 进行聚合
另外需要使用以下注解
@Analytics.query: true
因为定义了聚合模式,查询必须从多维数据集中(cubes)选择数据,否则会返回错误。
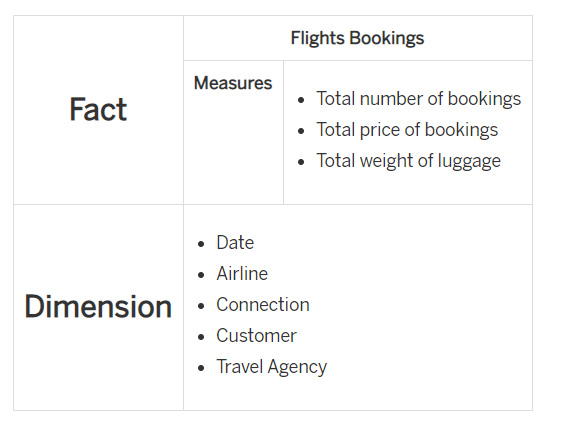
我们以下面的数据模型,进行开发。
创建各个维度的cds view。
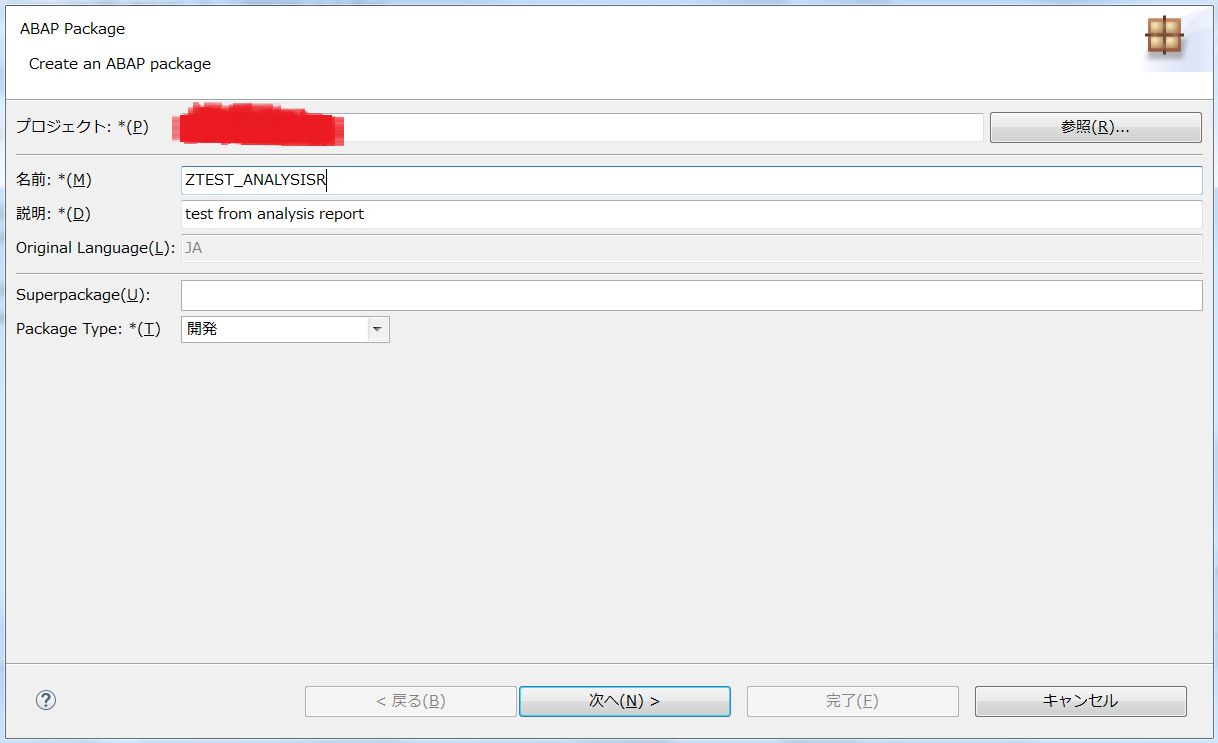
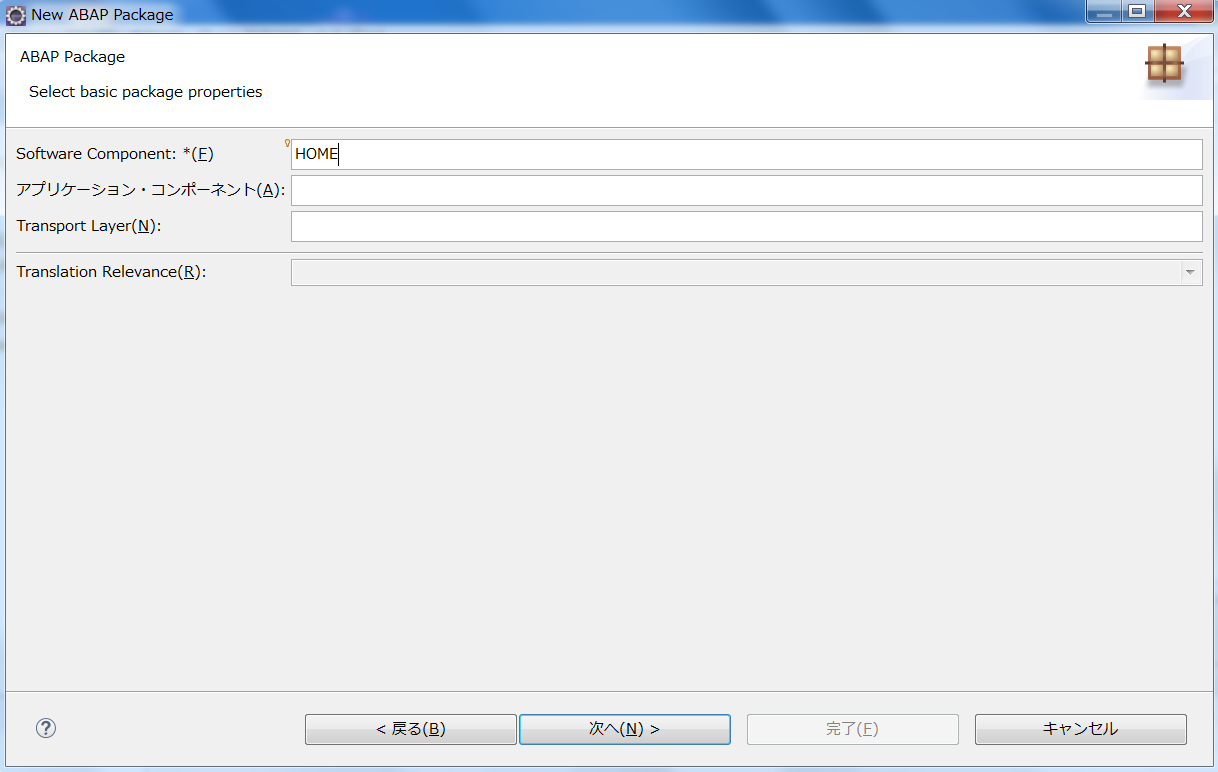
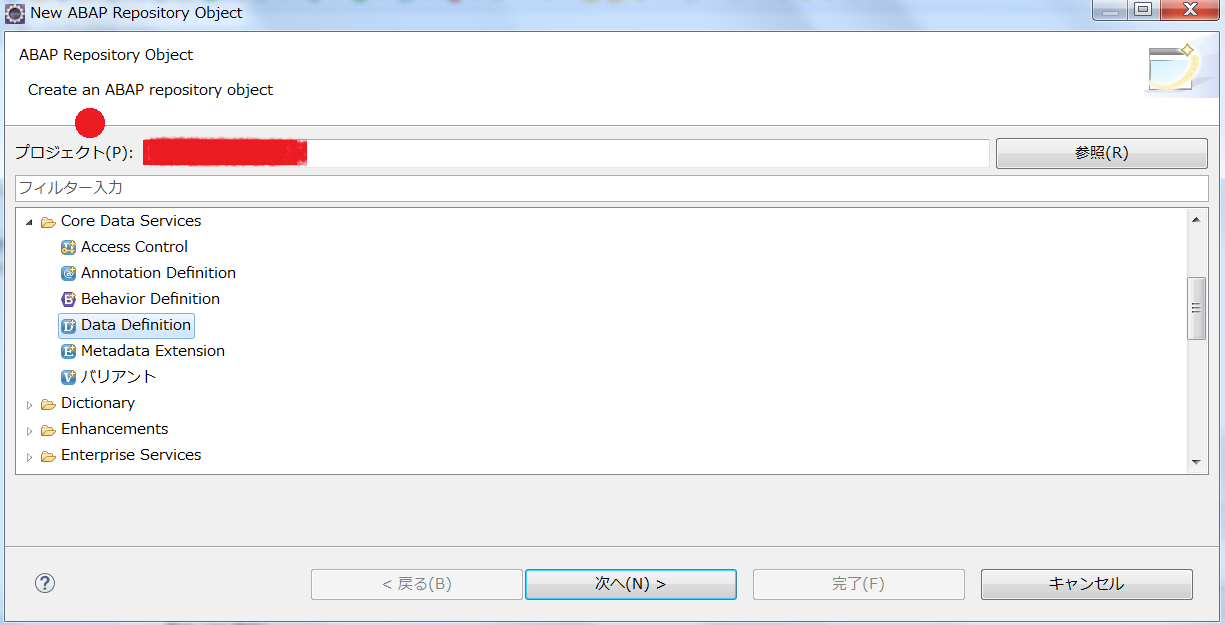
1,创建package
2,创建cdsview
DIMENSION: Airline
@AbapCatalog.sqlViewName: 'ZDIMEAIRLINE'
@AbapCatalog.compiler.compareFilter: true
@AccessControl.authorizationCheck: #CHECK
@EndUserText.label: 'Airline'

@Analytics.dataCategory: #DIMENSION

define view Z_Dimension_Airline
  as select from scarr
{
      @ObjectModel.text.element: [ 'AirlineName' ]
  key carrid   as Airline,

      @Semantics.text: true
      carrname as AirlineName,

      @Semantics.currencyCode: true
      currcode as Currency
}
DIMENSION: Connection
@AbapCatalog.sqlViewName: 'ZDIMECONNECT'
@AbapCatalog.compiler.compareFilter: true
@AccessControl.authorizationCheck: #CHECK
@EndUserText.label: 'Flight Connection'

@Analytics.dataCategory: #DIMENSION

@ObjectModel.representativeKey: 'FlightConnection'

define view Z_Dimension_Connection
  as select from spfli
  association [0..1] to Z_Dimension_Airline as _Airline on $projection.Airline = _Airline.Airline
{
      @ObjectModel.foreignKey.association: '_Airline'
  key carrid                    as Airline,

      @ObjectModel.text.element: [ 'Destination' ]
  key connid                    as FlightConnection,

      @Semantics.text: true
      concat(cityfrom,
        concat(' -> ', cityto)) as Destination,

      _Airline
}
DIMENSION: Customer
@AbapCatalog.sqlViewName: 'ZDIMECUSTOMER'
@AbapCatalog.compiler.compareFilter: true
@AccessControl.authorizationCheck: #CHECK
@EndUserText.label: 'Flight Customer'

@Analytics.dataCategory: #DIMENSION

define view Z_Dimension_Customer
  as select from scustom
  association [0..1] to I_Country as _Country on $projection.Country = _Country.Country
{
      @ObjectModel.text.element: [ 'CustomerName' ]
  key id      as Customer,

      @Semantics.text: true
      name    as CustomerName,

      @ObjectModel.foreignKey.association: '_Country'
      @Semantics.address.country: true
      country as Country,

      @Semantics.address.city: true
      city    as City,

      _Country
}
DIMENSION: Travel Agency
@AbapCatalog.sqlViewName: 'ZDIMETRVAGENCY'
@AbapCatalog.compiler.compareFilter: true
@AccessControl.authorizationCheck: #CHECK
@EndUserText.label: 'Travel Agency'

@Analytics.dataCategory: #DIMENSION

define view Z_Dimension_TravelAgency
  as select from stravelag
  association [0..1] to I_Country as _Country on $projection.Country = _Country.Country
{
      @ObjectModel.text.element: [ 'TravelAgencyName' ]
  key agencynum as TravelAgency,

      @Semantics.text: true
      name      as TravelAgencyName,

      @ObjectModel.foreignKey.association: '_Country'
      @Semantics.address.country: true
      country   as Country,

      @Semantics.address.city: true
      city      as City,

      _Country
}
1. @AbapCatalog.sqlViewName:指定sqlview的名称,可以在se11中查询到。
2.@AbapCatalog.compiler.compareFilter:在cdsview的路径表达式中定义筛选条件的计算。
3.@AccessControl.authorizationCheck:使用DCL进行权限的检查。
4. @EndUserText.label:元素的短文本。
5. @Analytics.dataCategory: #DIMENSION:所有的维度有需要有该分类。
6. @ObjectModel.text.element:与文本名称进行关联。
7. @ObjectModel.foreignKey.association:外部属性关联,使用该注解。
8. @ObjectModel.representativeKey:组合主键,定义一个代表键。
9. @Semantics:帮助定义字段类型。
准备好所有的维度之后,创建cube。
CUBE: Flight Bookings
@AbapCatalog.sqlViewName: 'ZCUBEFLIGHTBOOK'
@AbapCatalog.compiler.compareFilter: true
@AccessControl.authorizationCheck: #CHECK
@EndUserText.label: 'Flight Bookings'

@Analytics.dataCategory: #CUBE

define view Z_Cube_FlightBookings
  as select from sbook
  association [0..1] to I_CalendarDate           as _CalendarDate on  $projection.FlightDate = _CalendarDate.CalendarDate
  association [0..1] to Z_Dimension_Airline      as _Airline      on  $projection.Airline = _Airline.Airline
  association [0..1] to Z_Dimension_Connection   as _Connection   on  $projection.Airline          = _Connection.Airline
                                                                  and $projection.FlightConnection = _Connection.FlightConnection
  association [0..1] to Z_Dimension_Customer     as _Customer     on  $projection.Customer = _Customer.Customer
  association [0..1] to Z_Dimension_TravelAgency as _TravelAgency on  $projection.TravelAgency = _TravelAgency.TravelAgency
{
  /** DIMENSIONS **/

  @EndUserText.label: 'Airline'
  @ObjectModel.foreignKey.association: '_Airline'
  carrid                 as Airline,

  @EndUserText.label: 'Connection'
  @ObjectModel.foreignKey.association: '_Connection'
  connid                 as FlightConnection,

  @EndUserText.label: 'Flight Date'
  @ObjectModel.foreignKey.association: '_CalendarDate'
  fldate                 as FlightDate,

  @EndUserText.label: 'Book No.'
  bookid                 as BookNumber,

  @EndUserText.label: 'Customer'
  @ObjectModel.foreignKey.association: '_Customer'
  customid               as Customer,

  @EndUserText.label: 'Travel Agency'
  @ObjectModel.foreignKey.association: '_TravelAgency'
  agencynum              as TravelAgency,

  @EndUserText.label: 'Flight Year'
  _CalendarDate.CalendarYear,

  @EndUserText.label: 'Flight Month'
  _CalendarDate.CalendarMonth,

  @EndUserText.label: 'Customer Country'
  @ObjectModel.foreignKey.association: '_CustomerCountry'
  _Customer.Country      as CustomerCountry,

  @EndUserText.label: 'Customer City'
  _Customer.City         as CustomerCity,

  @EndUserText.label: 'Travel Agency Country'
  @ObjectModel.foreignKey.association: '_TravelAgencyCountry'
  _TravelAgency.Country  as TravelAgencyCountry,

  @EndUserText.label: 'Travel Agency Customer City'
  _TravelAgency.City     as TravelAgencyCity,

  /** MEASURES **/

  @EndUserText.label: 'Total of Bookings'
  @DefaultAggregation: #SUM
  1                      as TotalOfBookings,

  @EndUserText.label: 'Weight of Luggage'
  @DefaultAggregation: #SUM
  @Semantics.quantity.unitOfMeasure: 'WeightUOM'
  luggweight             as WeightOfLuggage,

  @EndUserText.label: 'Weight Unit'
  @Semantics.unitOfMeasure: true
  wunit                  as WeightUOM,

  @EndUserText.label: 'Booking Price'
  @DefaultAggregation: #SUM
  @Semantics.amount.currencyCode: 'Currency'
  forcuram               as BookingPrice,

  @EndUserText.label: 'Currency'
  @Semantics.currencyCode: true
  forcurkey              as Currency,

  // Associations
  _Airline,
  _CalendarDate,
  _CalendarDate._CalendarMonth,
  _CalendarDate._CalendarYear,
  _Connection,
  _Customer,
  _Customer._Country     as _CustomerCountry,
  _TravelAgency,
  _TravelAgency._Country as _TravelAgencyCountry
}
1. 不用必须使用cube去构造fact数据集,可以直接公开在cube中定义的表,来避免使用过多的层级。fact视图不能有连接或者关联,只包含可度量的值,如果要连接维度,要使用cube而不是fact。
2. @Analytics.dataCategory: #CUBE:所有的cube需要使用该分类。
3. @DefaultAggregation:该字段用来进行度量。
4. 所有关联都暴露在视图的底部,以便在查询使用期间提供对属性和文本的访问。
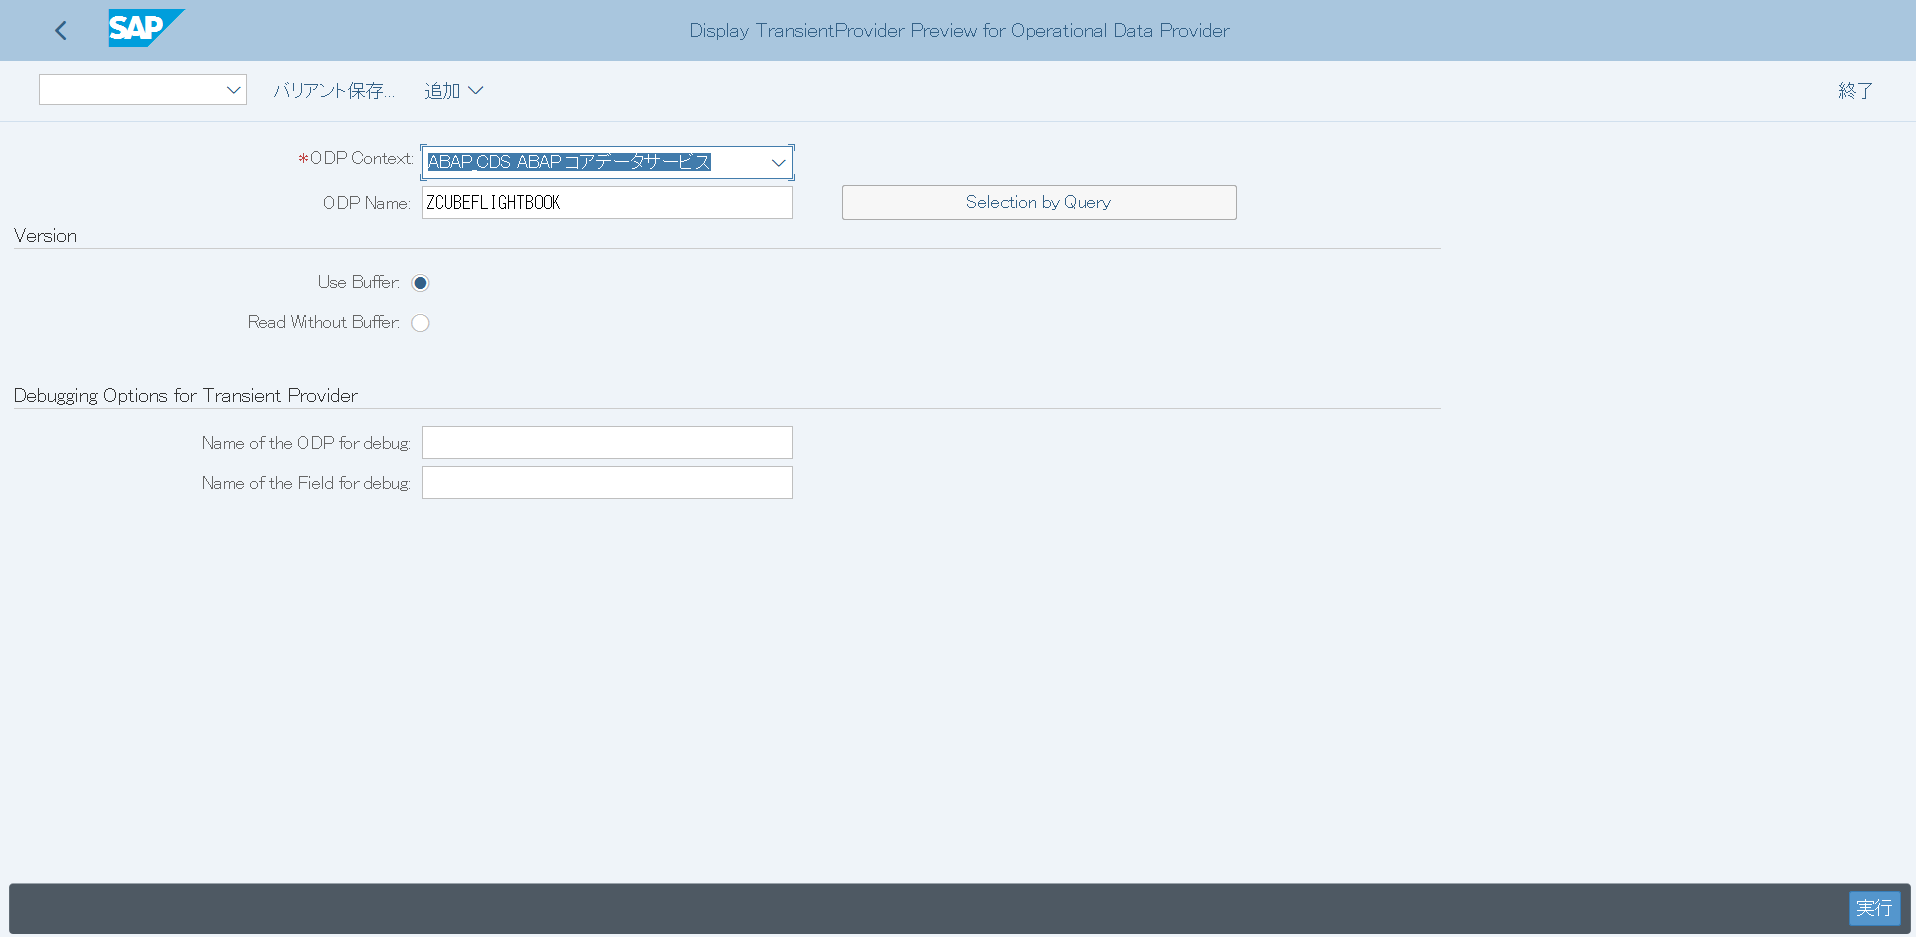
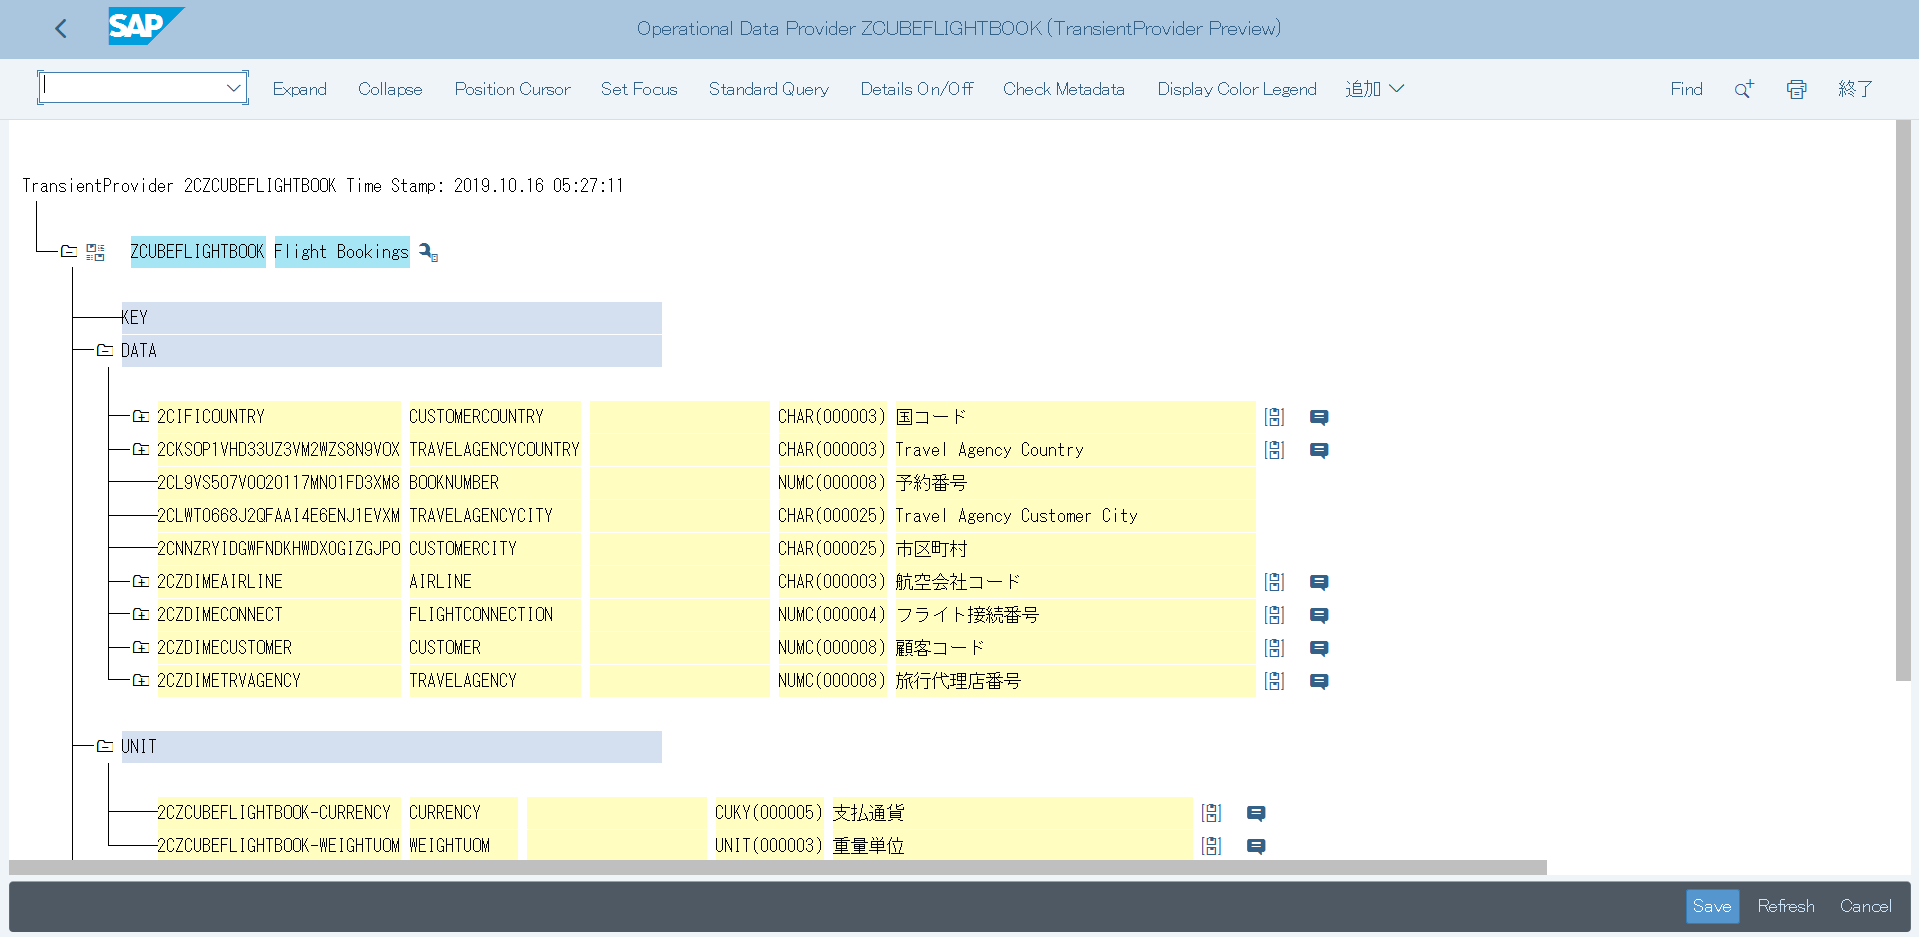
使用tcode(RSRTS_ODP_DIS)。该事务用于检查放置在分析数据模型中的关联、文本和层次结构,为每个属性提供详细的分析。
将创建的sqlviewname放入odp name中,点击执行。
消费view,进行query
QUERY: Flight Bookings
@AbapCatalog.sqlViewName: 'ZQUERYFLIGHTBOOK'
@AbapCatalog.compiler.compareFilter: true
@AccessControl.authorizationCheck: #CHECK
@EndUserText.label: 'Flight Bookings'

@Analytics.query: true
@VDM.viewType: #CONSUMPTION

define view Z_Query_FlightBookings
  as select from Z_Cube_FlightBookings
{
    /** DIMENSIONS **/

    @AnalyticsDetails.query.display: #KEY_TEXT
    @AnalyticsDetails.query.axis: #FREE
    Airline,
    @AnalyticsDetails.query.display: #KEY_TEXT
    @AnalyticsDetails.query.axis: #FREE
    FlightConnection,
    @AnalyticsDetails.query.display: #KEY
    @AnalyticsDetails.query.axis: #FREE
    FlightDate,
    @AnalyticsDetails.query.display: #KEY_TEXT
    @AnalyticsDetails.query.axis: #FREE
    Customer,
    @AnalyticsDetails.query.display: #KEY_TEXT
    @AnalyticsDetails.query.axis: #FREE
    TravelAgency,
    @AnalyticsDetails.query.display: #KEY
    @AnalyticsDetails.query.axis: #FREE
    CalendarYear,
    @AnalyticsDetails.query.display: #TEXT
    @AnalyticsDetails.query.axis: #FREE
    CalendarMonth,
    @AnalyticsDetails.query.display: #TEXT
    @AnalyticsDetails.query.axis: #FREE
    CustomerCountry,
    @AnalyticsDetails.query.display: #KEY
    @AnalyticsDetails.query.axis: #FREE
    CustomerCity,
    @AnalyticsDetails.query.display: #TEXT
    @AnalyticsDetails.query.axis: #FREE
    TravelAgencyCountry,
    @AnalyticsDetails.query.display: #KEY
    @AnalyticsDetails.query.axis: #FREE
    TravelAgencyCity,
    @AnalyticsDetails.query.display: #KEY
    @AnalyticsDetails.query.axis: #FREE
    Currency,
    @AnalyticsDetails.query.display: #KEY
    @AnalyticsDetails.query.axis: #FREE
    WeightUOM,

    /** MEASURES **/

    TotalOfBookings,
    WeightOfLuggage,
    BookingPrice,

    @EndUserText.label: 'Average Weight Per Flight'
    @AnalyticsDetails.exceptionAggregationSteps.exceptionAggregationBehavior: #AVG
    @AnalyticsDetails.exceptionAggregationSteps.exceptionAggregationElements: [ 'Airline', 'FlightConnection', 'FlightDate' ]
    @AnalyticsDetails.query.formula: '$projection.WeightOfLuggage'
    @AnalyticsDetails.query.decimals: 0
    0 as AverageWeightPerFlight
}
可以用一般的sql语句对view进行查询。
SELECT SUM("Quantity") FROM "MyProducts" WHERE "Product_Name" IN ('Jackets', 'Coats');
1. 所有的query需要设置@Analytics.query: true
2. @AnalyticsDetails用于进行查询,提供以下功能:
@AnalyticsDetails.query.display: #KEY_TEXT:设置显示key还是text。i.e EmployeeName for Employee.
@AnalyticsDetails.query.axis:定位元素的轴
@AnalyticsDetails.exceptionAggregationSteps.exceptionAggregationBehavior:进行例外聚合运算
@AnalyticsDetails.exceptionAggregationSteps.exceptionAggregationElements:进行例外聚合运算时,使用的列
@AnalyticsDetails.query.formula:计算公式
@AnalyticsDetails.query.decimals:小数点位数
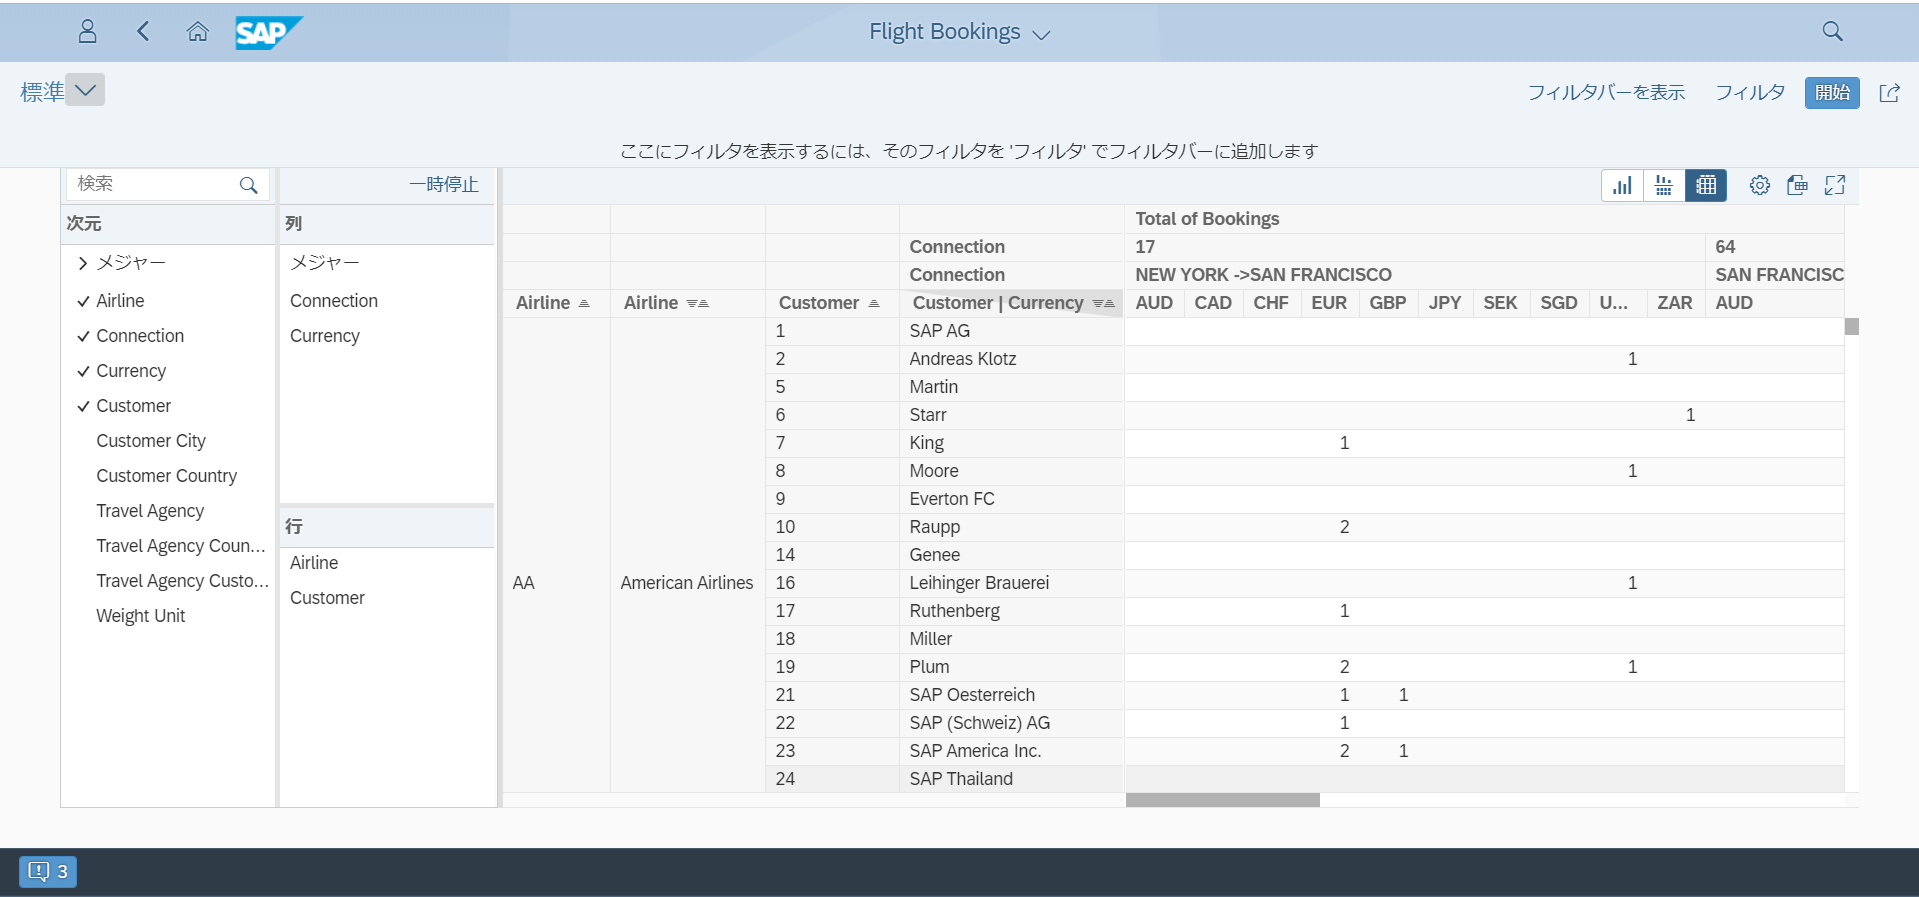
3,测试查询结果
登陆friori管理页面,建立tile与对应的target
tile
target
Semantic Object、action要与tile的值设置为一致。
URL、ID需要指定为固定的值。
参数中的,XQUERY,需要设置为上面实现的sqlviewname加前缀2C。XSYSTEM需要设置为LOCAL,我感觉是需要与segw中的service maintenance中设置的一致。
其他的一些参数可以参照最上面的blog。
之后登陆fiori launchpad点击tile进入。

 浙公网安备 33010602011771号