
实时同步备份sersync
实时同步备份sersync
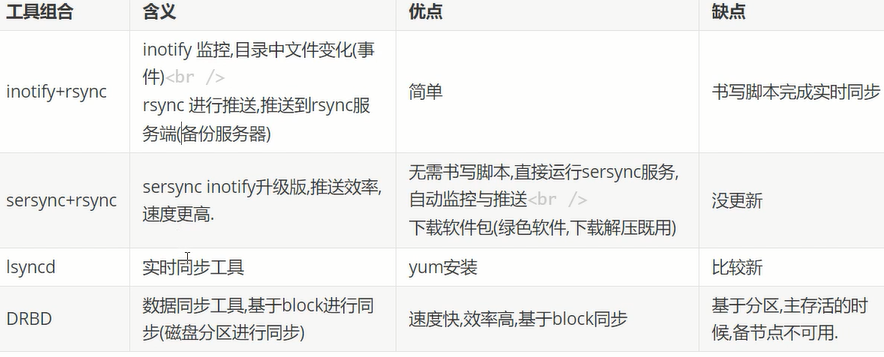
Rsync+Inotify-tools与Rsync+sersync这两种架构有什么区别
1.Rsync+Inotify-tools
(1):Inotify-tools只能记录下被监听的目录发生了变化(包括增加、删除、修改),并没有把具体是哪个文件或者哪个目录发生了变化记录下来;
(2):rsync在同步的时候,并不知道具体是哪个文件或者哪个目录发生了变化,每次都是对整个目录进行同步,当数据量很大时,整个目录同步非常耗时(rsync要对整个目录遍历查找对比文件),因此,效率很低。
2.Rsync+sersync
(1)sersync可以记录下被监听目录中发生变化的(包括增加、删除、修改)具体某一个文件或某一个目录的名字;
(2)rsync在同步的时候,只同步发生变化的这个文件或者这个目录(每次发生变化的数据相对整个同步目录数据来说是很小的,rsync在遍历查找比对文件时,速度很快),因此,效率很高。
同步过程:
1. 在同步服务器上开启sersync服务,sersync负责监控配置路径中的文件系统事件变化;
2. 调用rsync命令把更新的文件同步到目标服务器;
3. 需要在主服务器配置sersync,在同步目标服务器配置rsync server(注意:是rsync服务)
同步过程和原理:
1. 用户实时的往sersync服务器上写入更新文件数据;
2. 此时需要在同步主服务器上配置sersync服务;
3. 在另一台服务器开启rsync守护进程服务,以同步拉取来自sersync服务器上的数据;
通过rsync的守护进程服务后可以发现,实际上sersync就是监控本地的数据写入或更新事件;然后,在调用rsync客户端的命令,将写入或更新事件对应的文件通过rsync推送到目标服务器
小结:当同步的目录数据量不大时,建议使用Rsync+Inotify-tools;当数据量很大(几百G甚至1T以上)、文件很多时,建议使用Rsync+sersync。
-----------------------------------
实时同步工具选择
sersync工作原理
- 内置inotify用于监控目录中的变化
- sync推送

sersync应用
环境:

[root@master ~]# mkdir /usr/local/sersync/
[root@master ~]# mkdir /usr/local/sersync/bin
[root@master ~]# mkdir /usr/local/sersync/conf
[root@master ~]# mkdir /usr/local/sersync/logs
[root@master sersync]# wget https://raw.githubusercontent.com/orangle/sersync/master/release/sersync2.5.4_64bit_binary_stable_final.tar.gz
[root@master sersync]# tar xvf sersync2.5.4_64bit_binary_stable_final.tar.gz
[root@master sersync]# mv GNU-Linux-x86/ /usr/local/sersync
[root@serv-test soft]# tree GNU-Linux-x86/
GNU-Linux-x86/
├── confxml.xml
└── sersync2
0 directories, 2 files
[root@serv-test soft]#cd /usr/local
[root@serv-test soft]#cd sersync
[root@serv-test soft]# mv confxml.xml conf
[root@serv-test soft]# mv sersync2 ./bin/
[root@serv-test soft]# ln -s /usr/local/sersync/bin/sersync2 /sbin/sersync
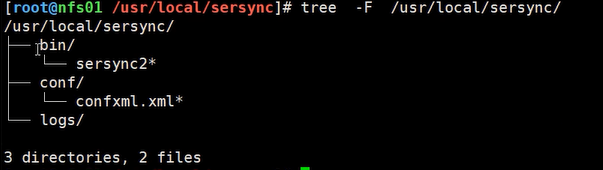
ln -s /usr/local/sersync/bin/sersync2 /sbin/sersync
配置文件说明:
更改优化sersync配置文件:
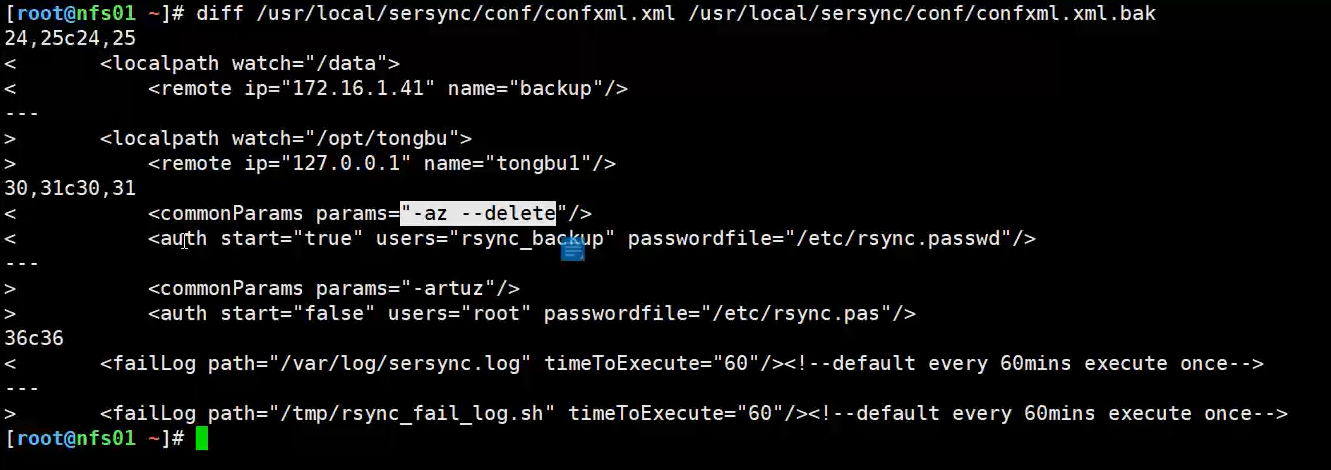
 <localpathwatch="/opt/tongbu">     # 定义本地要同步的目录
         <remote ip="127.0.0.1"name="tongbu1"/> #远端IP与模块名称
         <!--<remote ip="192.168.8.39" name="tongbu"/>-->        # 同步到哪台机器上 tongbu模块 ;  rsync端模块名字
         <!--<remote ip="192.168.8.40" name="tongbu"/>-->        # 同步到哪台机器上 tongbu模块
 </localpath>
认证部分【rsync密码认证】配置rsync客户端命令
<rsync>
<commonParamsparams="-artuz"/> <!-- rsync命令行选项-az --delete -->
<auth start="false"users="root" passwordfile="/etc/rsync.pas"/> auth start是否开启免密码模式 ;true users=rsync虚拟用户
<userDefinedPortstart="false" port="874"/><!-- port=874 --> rsync服务端口默认873
<timeoutstart="false" time="100"/><!-- timeout=100 -->
<sshstart="false"/>
</rsync>
# ***修改内容为 rsync的密码文件以及 同步所使用的账号类似:
rsync -avzP /data/www/rsync_backup@172.16.1.25::www/ --password-file=/etc/rsync.password
日志文件:
3、修改36-37行

<failLog path="/tmp/rsync_fail_log.sh" timeToExecute="60"/>   <!--default every 60mins execute once-->

修改成我们刚刚创建好的logs目录

<failLog path="/usr/local/sersync/logs/rsync_fail_log.sh" timeToExecute="60"/>   <!--default every 60mins execute once-->
修改后的配置文件
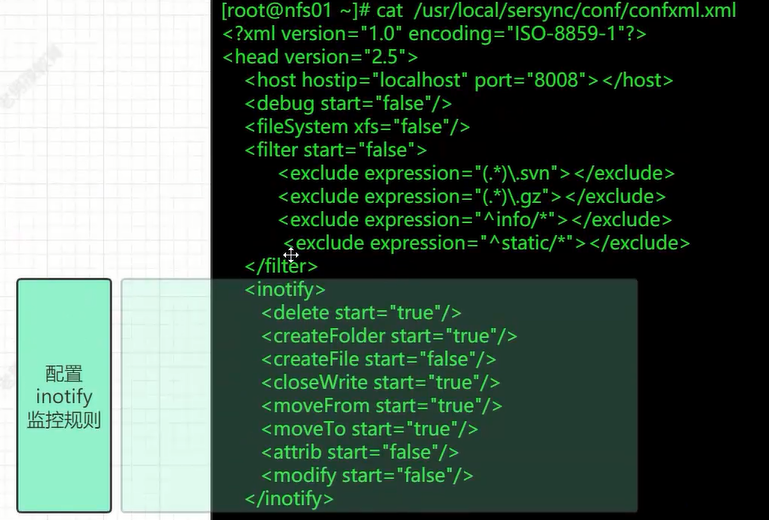
[root@Master conf]# cat /usr/local/sersync/conf/confxml.xml

<?xml version="1.0" encoding="ISO-8859-1"?>

<head version="2.5">

    <host hostip="localhost" port="8008"></host>

    <debug start="false"/>

    <fileSystem xfs="false"/>

    <filter start="false">

        <exclude expression="(.*)\.svn"></exclude>

        <exclude expression="(.*)\.gz"></exclude>

        <exclude expression="^info/*"></exclude>

        <exclude expression="^static/*"></exclude>

    </filter>

    <inotify>

        <delete start="true"/>

        <createFolder start="true"/>

        <createFile start="false"/>

        <closeWrite start="true"/>

        <moveFrom start="true"/>

        <moveTo start="true"/>

        <attrib start="false"/>

        <modify start="false"/>

    </inotify>

    <sersync>

        <localpath watch="/opt/backup">

            <remote ip="192.168.1.3" name="rsync"/>

        </localpath>

            <!#################################### -->

        <rsync>

            <commonParams params="-aruz"/>

            <auth start="true" users="rsync_backup" passwordfile="/etc/rsync.password"/>

            <userDefinedPort start="false" port="874"/><!-- port=874 -->

            <timeout start="true" time="100"/><!-- timeout=100 -->

            <ssh start="false"/>

        </rsync>

        <failLog path="/usr/local/sersync/logs/rsync_fail_log.sh" timeToExecute="60"/><!--default every 60mins execute once-->

        <crontab start="false" schedule="600"><!--600mins-->

            <crontabfilter start="false">

                <exclude expression="*.php"></exclude>

                <exclude expression="info/*"></exclude>

            </crontabfilter>

        </crontab>

        <plugin start="false" name="command"/>

    </sersync>

    <plugin name="command">

        <param prefix="/bin/sh" suffix="" ignoreError="true"/>  <!--prefix /opt/tongbu/mmm.sh suffix-->

        <filter start="false">

            <include expression="(.*)\.php"/>

            <include expression="(.*)\.sh"/>

        </filter>

    </plugin>

    <plugin name="socket">

        <localpath watch="/opt/tongbu">

            <deshost ip="192.168.138.20" port="8009"/>

        </localpath>

    </plugin>

    <plugin name="refreshCDN">

        <localpath watch="/data0/htdocs/cms.xoyo.com/site/">

            <cdninfo domainname="ccms.chinacache.com" port="80" username="xxxx" passwd="xxxx"/>

            <sendurl base="http://pic.xoyo.com/cms"/>

            <regexurl regex="false" match="cms.xoyo.com/site([/a-zA-Z0-9]*).xoyo.com/images"/>

        </localpath>

    </plugin>

</head>
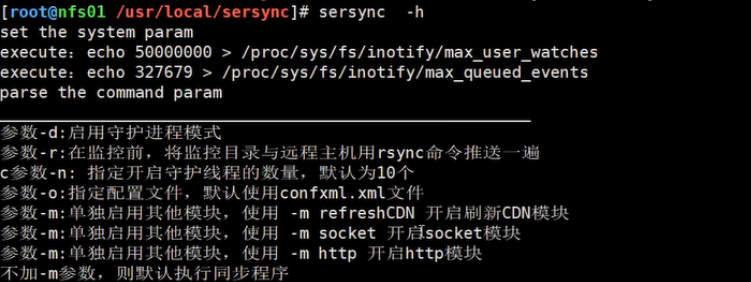
-------------------启动服务------------------
serync -r -d -o /usr/local/sersync/conf/confxml.xml
- -r初始化数据
- -d后台启动
- -o指定路径
如果需要将命令开启动,只需将命令去掉参数-r定入/etc/rc.local
启动后结果如下
[root@Master backup]# sersync -r -d -o /usr/local/sersync/conf/confxml.xml

set the system param

execute:echo 50000000 > /proc/sys/fs/inotify/max_user_watches

execute:echo 327679 > /proc/sys/fs/inotify/max_queued_events

parse the command param

option: -r rsync all the local files to the remote servers before the sersync work

option: -d    run as a daemon

option: -o    config xml name:  /usr/local/sersync/conf/confxml.xml

daemon thread num: 10

parse xml config file

host ip : localhost     host port: 8008

daemon start,sersync run behind the console

use rsync password-file :

user is rsync_backup

passwordfile is         /etc/rsync.password

config xml parse success

please set /etc/rsyncd.conf max connections=0 Manually

sersync working thread 12  = 1(primary thread) + 1(fail retry thread) + 10(daemon sub threads)

Max threads numbers is: 22 = 12(Thread pool nums) + 10(Sub threads)

please according your cpu ,use -n param to adjust the cpu rate

------------------------------------------

rsync the directory recursivly to the remote servers once

working please wait...

execute command: cd /opt/backup && rsync -aruz -R --delete ./  --timeout=100 rsync_backup@192.168.1.3::rsync --password-file=/etc/rsync.password >/dev/null 2>&1

run the sersync:

watch path is: /opt/backup
监控多个目录
。使用多个配置文件启动服务
添加脚本监控sersync是否正常
cd /root
touch check_sersync.sh
chmod 755 check.sersync.sh
vim check_sersync.sh


#!/bin/sh
sersync="/usr/local/sersync/sersync2"
confxml="/usr/local/sersync/confxml.xml"
status=$(ps aux |grep 'sersync2'|grep -v 'grep'|wc -l)
if [ $status -eq 0 ];
then
$sersync -d -r -o $confxml &
else
exit 0;
fi

check_sersync.sh
#vi /etc/crontab

*/5 * * * * root /root/check_sersync.sh >/dev/null 2>&1  #每隔5分钟执行一次脚本
技术摘要:
本文来自博客园,作者:孙龙-程序员,转载请注明原文链接:https://www.cnblogs.com/sunlong88/p/16725937.html

 浙公网安备 33010602011771号