Android Studio 笔记
1 Configure build 时 jar 包下载过慢,或无法下载
解决方案:
(1) FQ。(还是无法下载?)
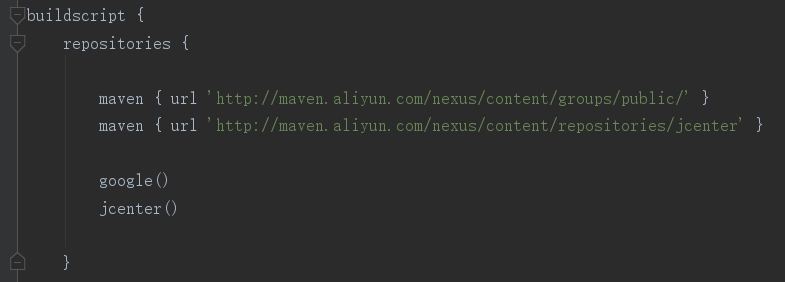
(2) 使用阿里云。在该文件中添加链接:

maven { url 'http://maven.aliyun.com/nexus/content/groups/public/' }
maven { url 'http://maven.aliyun.com/nexus/content/repositories/jcenter' }
添加后:

2 常见按钮

3 安卓版本设置
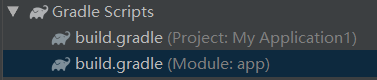
打开该文件:
可以看到 minSdkVersion ,下图中为15,表示目标设备的 api 版本不得低于15,即安卓的第15个版本。

4 各文件的内容

Java文件都放在java的文件下;
布局文件全部放在res/layout下,layout下的文件都是xml文件,res下的文件不允许有大写字母;
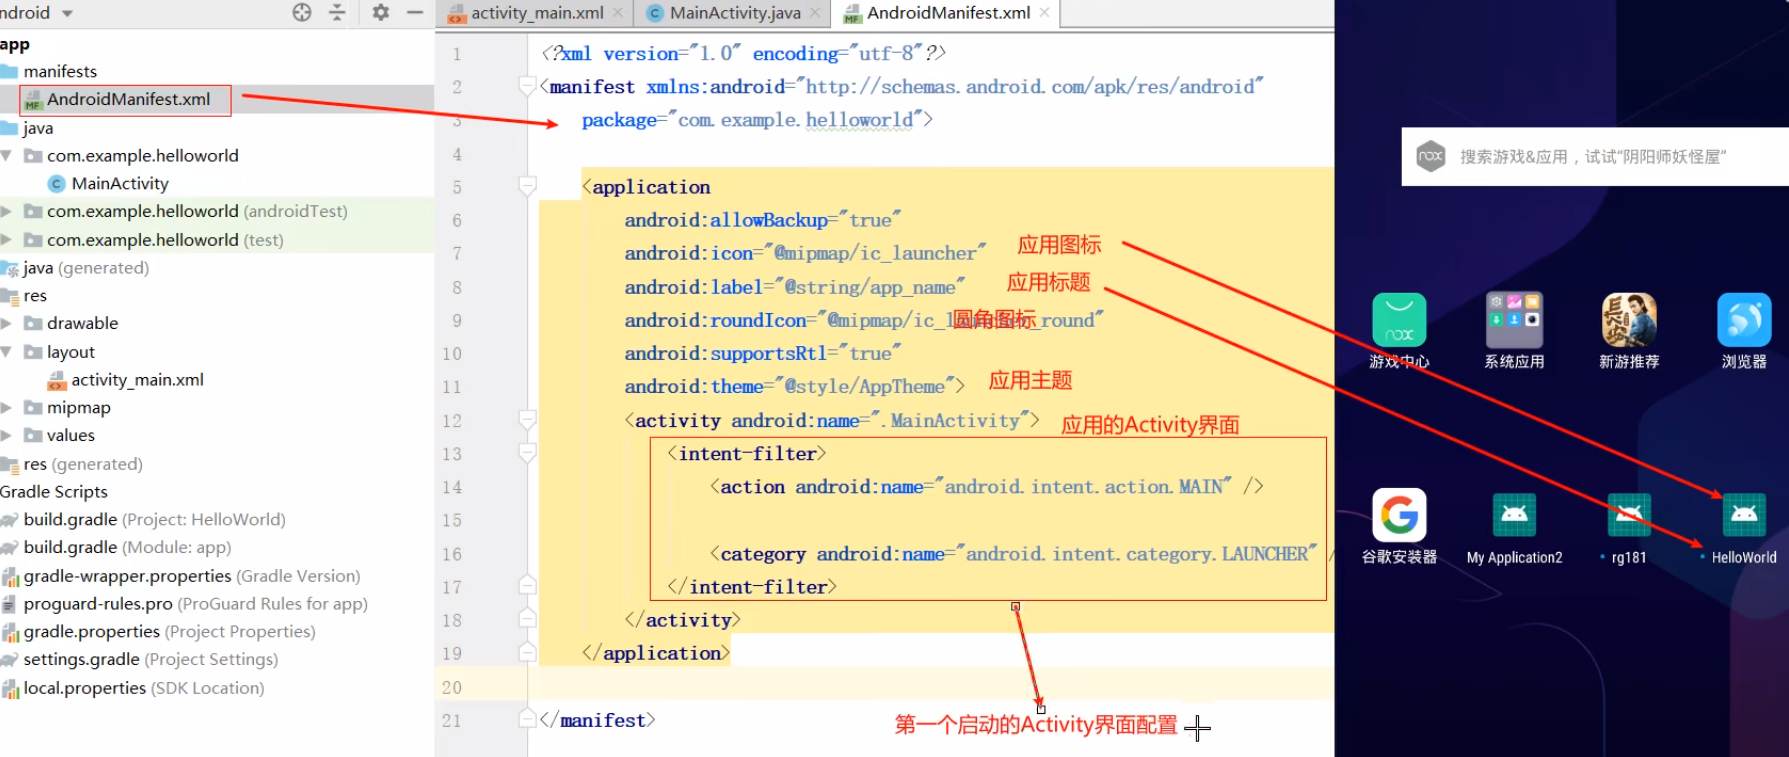
AndroidManifest.xml:清单文件,可以配置应用的第一个启动的Activity,注册Activity,修改应用图标及名字。
5 布局
View:表示为android视图
Java文件编写的view;xml文件编写的view。
不管是Java还是xml文件最后都会变成Java文件。
ViewGroup:表示为布局
布局控件可以放其他控件。
常用布局:LinearLayout(线性布局)、RelativeLayout(相对布局)、ConstraintLayout(约束布局)
常用控件:Button(按钮)、TextView(文本)、EditText(输入框)
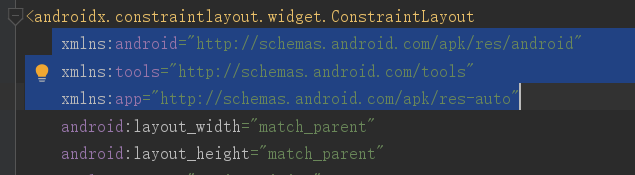
6 xml布局文件
下面选中的三行代码只有根布局需要写
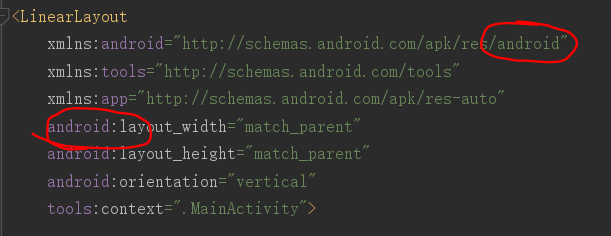
7 线性布局LinearLayout
如果只有一个子空间,则不需要写orientation属性,有多个则必须要写,新版本不一定,默认水平。
eg:
<?xml version="1.0" encoding="utf-8"?>
<LinearLayout
    xmlns:android="http://schemas.android.com/apk/res/android"
    xmlns:tools="http://schemas.android.com/tools"
    xmlns:app="http://schemas.android.com/apk/res-auto"
    android:layout_width="match_parent"
    android:layout_height="match_parent"
    android:orientation="vertical"
    tools:context=".MainActivity">

    <TextView
    android:layout_width="wrap_content"
    android:layout_height="wrap_content"
    android:text="second" />

    <TextView
        android:layout_width="wrap_content"
        android:layout_height="wrap_content"
        android:text="second" />

    <LinearLayout
        android:layout_width="match_parent"
        android:layout_height="match_parent"
        android:orientation="horizontal">

        <TextView
            android:layout_width="wrap_content"
            android:layout_height="wrap_content"
            android:text="second" />

        <TextView
            android:layout_width="wrap_content"
            android:layout_height="wrap_content"
            android:text="second" />

    </LinearLayout>

</LinearLayout>
android:layout_width 是通用属性,"match_parent" 和 "fill_parent" 取值是相同的。
在线性布局中,match_parent 只会占满剩余的空间,根据不同方向。
layout_width 和 layout_height 可以写固定的数值,单位是dp或dip,不能使用px像素。
gravity 是对齐方式。center(水平垂直居中)、left、right、bottom、多个布局方式以“|”分隔
8 相对布局RelativeLayout
没有方向性,但是有Z轴,代码在后的Z轴值越大,即可以悬浮。
P38属性
必须要参照物,参照物必须要有唯一性:1.布局本身。centerInparent、centerVertical、centerHorizontal、alingParentTop、alingParentBottom、alingParentLeft、alingParentRight;2.通过id来指定参照物。
eg:
<?xml version="1.0" encoding="utf-8"?>
<RelativeLayout
    xmlns:android="http://schemas.android.com/apk/res/android"
    xmlns:tools="http://schemas.android.com/tools"
    android:layout_width="match_parent"
    android:layout_height="match_parent"
    tools:context=".MainActivity">

    <TextView
        android:layout_width="match_parent"
        android:layout_height="match_parent"
        android:background="#bac" />

    <TextView
        android:id="@+id/tv_center"
        android:layout_width="wrap_content"
        android:layout_height="wrap_content"
        android:layout_centerInParent="true"
        android:text="布局相对居中" />

    <TextView
        android:layout_width="wrap_content"
        android:layout_height="wrap_content"
        android:layout_alignParentBottom="true"
        android:layout_alignParentRight="true"
        android:text="右下角" />

    <TextView
        android:layout_width="wrap_content"
        android:layout_height="wrap_content"
        android:layout_alignParentRight="true"
        android:text="右上角" />

    <TextView
        android:layout_width="wrap_content"
        android:layout_height="wrap_content"
        android:layout_alignParentBottom="true"
        android:text="左上角" />

    <TextView
        android:layout_width="wrap_content"
        android:layout_height="wrap_content"
        android:text="左上角" />

    <TextView
        android:layout_width="wrap_content"
        android:layout_height="wrap_content"
        android:layout_above="@id/tv_center"
        android:text="center_左上角" />

    <TextView
        android:layout_width="wrap_content"
        android:layout_height="wrap_content"
        android:layout_above="@id/tv_center"
        android:layout_centerHorizontal="true"
        android:text="center_上" />

    <TextView
        android:layout_width="wrap_content"
        android:layout_height="wrap_content"
        android:layout_below="@id/tv_center"
        android:layout_centerHorizontal="true"
        android:text="center_下" />

    <TextView
        android:layout_width="wrap_content"
        android:layout_height="wrap_content"
        android:layout_toRightOf="@id/tv_center"
        android:layout_centerVertical="true"
        android:text="center_右" />

    <TextView
        android:layout_width="wrap_content"
        android:layout_height="wrap_content"
        android:layout_toLeftOf="@id/tv_center"
        android:layout_centerVertical="true"
        android:text="center_左" />

</RelativeLayout>
9 帧布局FrameLayout
只有Z轴,没有方向性,只有相对布局的部分功能。可以通过layout_gravity控制布局位置
可以通过 layout_gravity 控制布局位置,属性值与 gravity 一样,但是 gravity 是用在布局上,而 layout_gravity 是用在控件上,告诉布局我要在哪个位置。
<?xml version="1.0" encoding="utf-8"?>
<FrameLayout
    xmlns:android="http://schemas.android.com/apk/res/android"
    xmlns:tools="http://schemas.android.com/tools"
    android:layout_width="match_parent"
    android:layout_height="match_parent"
    tools:context=".MainActivity">

    <TextView
        android:layout_width="match_parent"
        android:layout_height="match_parent"
        android:background="#bac" />

    <TextView
        android:id="@+id/tv_center"
        android:layout_width="wrap_content"
        android:layout_height="wrap_content"
        android:layout_gravity="center"
        android:text="布局相对居中" />

    <TextView
        android:layout_width="wrap_content"
        android:layout_height="wrap_content"
        android:layout_gravity="bottom|right"
        android:text="右下角" />

    <TextView
        android:layout_width="wrap_content"
        android:layout_height="wrap_content"
        android:layout_gravity="right"
        android:text="右上角" />

    <TextView
        android:layout_width="wrap_content"
        android:layout_height="wrap_content"
        android:layout_gravity="bottom"
        android:text="左上角" />

    <TextView
        android:layout_width="wrap_content"
        android:layout_height="wrap_content"
        android:text="左上角" />
</FrameLayout>
10 TextView
//P44 2.3.6
P48 TextView常用属性
P37 通用属性
textColor:颜色码、@android定义的颜色值。(android:textColor="#cc0000"、"@android:color/holo_red_dark"、"@color/colorPrimary")
textSize:设置字体大小,单位为sp,用dp也可以,不会报错但不推荐。(android:textSize="40sp")
gravity:调整文字的布局
padding:内边距
margin:外边距
lines:限制行数。(android:lines="2")
ellipsize:超出文本省略号显示。(android:ellipsize="end")
drawable:显示图片。(android:drawableTop="@mipmap/ic_launcher")
11 Button
P50
TextView 属性基本都支持
点击事件只可以写在.java文件中 P50,实现方式:
(1)
android:onClick="login"

public void login(View V){
    Log.i("MainActivity","按钮被点击");
}
(2)匿名内部类方式
android:id="@+id/btn2"

private Button btn2:
@Override
protected void onCreate(Bundle savedInstanceState) {
    super.onCreate(savedInstanceState);
    Log.v("SecondActivity","MainActivity启动");
    setContentView(R.layout.activity_btn);

    btn2 = findViewById(R.id.btn2);
    btn2.setOnClickListener(new View.OnClickListener() {
        @Override
        public void onClick(View v) {
            Log.i("MainActivity","按钮被点击");
        }
    });
}
12 EditText输入框
hint:提示内容。(android:hint="提示内容")
textColorHint:hint文字颜色。(android:textColorHint="@android:color/holo_red_dark")
text:输入的内容。(android:text="输入的内容")
inputType:输入的类型,number(数字)、numberPassword(数字密码)、text(默认,文本)、password(文本密码)、phone、email、date
获取输入框中的内容:
btn2 = findViewById(R.id.btn2);
final EditText et_01 = findViewById(R.id.et_01);

btn2.setOnClickListener(new View.OnClickListener() {
    @Override
    public void onClick(View v) {
        Log.i("MainActivity","按钮被点击");
        Log.i("et_01",et_01.getText().toString());
    }
});
final修饰:变量(一般叫做常量,即不可修改)、类(不能被继承)、方法(不能被重写)
13 ImageView
background:图片背景。(android:background="@mipmap/ic_launcher")
宽或高可以被单独缩放。
src:图片。(android:src="@mipmap/ic_launcher")
宽或高必须同时缩放,以最小的缩放为准。
14 RadioButton 与 RadioGroup
<RadioGroup
android:id="@+id/rg_gender"
android:layout_width="match_parent"
android:layout_height="wrap_content"
android:orientation="horizontal"
    >
<RadioButton
    android:id="@+id/rb_male"
    android:layout_width="wrap_content"
    android:layout_height="wrap_content"
    android:text="男"
    />
<RadioButton
    android:id="@+id/rb_female"
    android:layout_width="wrap_content"
    android:layout_height="wrap_content"
    android:text="女"
    />
</RadioGroup>
添加切换事件:
RadioGroup rg_gender = findViewById(R.id.rg_gender);
//添加切换事件,也可以添加点击事件
rg_gender.setOnCheckedChangeListener(new RadioGroup.OnCheckedChangeListener() {
    @Override
    public void onCheckedChanged(RadioGroup group, int checkedId) {

    }
});
另一种方法:
public class MainActivity extends AppCompatActivity implements RadioGroup.OnCheckedChangeListener
RadioGroup rg_gender = findViewById(R.id.rg_gender);
//添加切换事件,也可以添加点击事件
rg_gender.setOnCheckedChangeListener(this);
//实现抽象方法
@Override
public void onCheckedChanged(RadioGroup group, int checkedId) {
  switch (checkedId){
      case R.id.rb_male:
          Log.i("onCheckedChanged","男");
          break;
      case R.id.rb_female:
          Log.i("onCheckedChanged","女");
          break;
  }
}
15 CheckBox
P57 Buttom的子类
    <CheckBox
        android:id="@+id/cb_1"
        android:layout_width="wrap_content"
        android:layout_height="wrap_content"
        android:text="1"
        />

    <CheckBox
        android:id="@+id/cb_2"
        android:layout_width="wrap_content"
        android:layout_height="wrap_content"
        android:text="2"
        />
final CheckBox cb_1 = findViewById(R.id.cb_1);
cb_1.setOnCheckedChangeListener(new CompoundButton.OnCheckedChangeListener() {
@Override
public void onCheckedChanged(CompoundButton buttonView, boolean isChecked) {
    /*
       buttonView:被点击的控件
       isChecked:复选框是否被选中
    */
    Log.i("OnCheckChanged",cb_1.getText().toString() + (isChecked ? "被选中":"取消选中"));

}
});
16 Toast
/*
Toast.makeText(context, text, duration) 上下文、显示的内容、显示时间 创建提示框
Toast.LENGTH_SHORT 1s 实际值0
Toast.LENGTH_LONG 2s 实际值1
show() 显示提示框
*/
Toast.makeText(MainActivity.this,"",Toast.LENGTH_SHORT).show();
17 AlertDialog
P60 P61图3.10
    @Override
    public void onClick(View v) {
        AlertDialog.Builder builder = new  AlertDialog.Builder(this);
        builder.setTitle("对话框").setIcon(R.mipmap.ic_launcher).setMessage("今晚一起喝酒?")
                //设置确定按钮
                .setPositiveButton("OK", new DialogInterface.OnClickListener() {
                    @Override
                    public void onClick(DialogInterface dialog, int which) {
                        Toast.makeText(LayoutActivity.this,"好的,你请客就行",Toast.LENGTH_SHORT).show();
                    }
                })
                //设置取消按钮
                .setNegativeButton("不好", new DialogInterface.OnClickListener() {
                    @Override
                    public void onClick(DialogInterface dialog, int which) {
                        Toast.makeText(LayoutActivity.this,"不行,我今晚要回家",Toast.LENGTH_SHORT).show();
                    }
                });
        AlertDialog ad = builder.create();
        ad.show(); //显示对话框
    }
P62 第二种使用方式
    @Override
    public void onClick(View v) {
        AlertDialog.Builder builder = new  AlertDialog.Builder(this);
        switch (v.getId()){
            case R.id.btn_alert:
                builder.setTitle("对话框").setIcon(R.mipmap.ic_launcher).setMessage("今晚一起喝酒?")
                        //设置确定按钮
                        .setPositiveButton("OK", new DialogInterface.OnClickListener() {
                            @Override
                            public void onClick(DialogInterface dialog, int which) {
                                Toast.makeText(LayoutActivity.this,"好的,你请客就行",Toast.LENGTH_SHORT).show();
                            }
                        })
                        //设置取消按钮
                        .setNegativeButton("不好", new DialogInterface.OnClickListener() {
                            @Override
                            public void onClick(DialogInterface dialog, int which) {
                                Toast.makeText(LayoutActivity.this,"不行,我今晚要回家",Toast.LENGTH_SHORT).show();
                            }
                        });
                break;
            case R.id.btn_single:
                builder.setTitle("单选对话框").setIcon(R.mipmap.ic_launcher).setSingleChoiceItems(new String[]{"小号","默认","中号"}, 0, new DialogInterface.OnClickListener() {
                    @Override
                    public void onClick(DialogInterface dialog, int which) {
                        Toast.makeText(LayoutActivity.this,"选中的" + which,Toast.LENGTH_SHORT).show();
                    }
                });
                break;
            case R.id.btn_alert_customer:
                builder.setTitle("自定义界面").setIcon(R.mipmap.ic_launcher).setView(R.layout.activity_btn);
                break;
        }

        AlertDialog ad = builder.create();
        ad.show(); //显示对话框
    }
18 ListView与SimpleAdapter

    <ListView
        android:id="@+id/lv_demo"
        android:layout_width="match_parent"
        android:layout_height="wrap_content"
        />
        //获取ListView
        ListView lv_demo = findViewById(R.id.lv_demo);
        //定义数据源
        //String[] names = {"haha","张三","李四"};
        List<Map<String, String>> names = new ArrayList<>();
        Map<String, String> map = new HashMap<String, String>();
        map.put("name", "haha");
        names.add(map);
        map = new HashMap<String, String>();
        map.put("name", "张三");
        names.add(map);
        map = new HashMap<String, String>();
        map.put("name", "李四");
        names.add(map);

        //单元格布局,可以自定义,也可以使用android自带的
        //使用SimpleAdapter
        SimpleAdapter simpleAdapter = new SimpleAdapter(LayoutActivity.this,names,android.R.layout.simple_list_item_1, new String[]{"name"},new int[]{android.R.id.text1});
        //将适配器指定给ListView对象
        lv_demo.setAdapter(simpleAdapter);
19 ListView 与 ArrayAdapter
        //获取ListView
        ListView lv_demo = findViewById(R.id.lv_demo);
        //定义数据源
        String[] names = {"haha","张三","李四"};
        //ArrayAdapter不支持多属性数据
        //SimpleAdapter支持复杂数据
        ArrayAdapter<String> adapter = new ArrayAdapter<String>(LayoutActivity.this,android.R.layout.simple_list_item_1,android.R.id.text1,names);
        //将适配器指定给ListView对象
        lv_demo.setAdapter(adapter);
20 ListView 与 BaseAdapter
        //获取ListView
        ListView lv_demo = findViewById(R.id.lv_demo);
        //定义数据源
        //String[] names = {"haha","张三","李四"};
        List<Map<String, String>> names = new ArrayList<>();
        Map<String, String> map = new HashMap<String, String>();
        map.put("name", "haha");
        map.put("phone","11111111111");
        names.add(map);
        map = new HashMap<String, String>();
        map.put("name", "张三");
        map.put("phone","11111111112");
        names.add(map);
        map = new HashMap<String, String>();
        map.put("name", "李四");
        map.put("phone","11111111113");
        names.add(map);

        PhoneAdapter adapter = new PhoneAdapter(LayoutActivity.this, names);
        lv_demo.setAdapter(adapter);
package com.example.myapplication1;

import android.content.Context;
import android.view.LayoutInflater;
import android.view.View;
import android.view.ViewGroup;
import android.widget.BaseAdapter;
import android.widget.TextView;

import java.util.List;
import java.util.Map;

public class PhoneAdapter extends BaseAdapter {
    private List<Map<String, String>> names;
    private Context context;

    public PhoneAdapter(Context context,List<Map<String, String>> names){
        this.names = names;
        this.context = context;
    }

    @Override
    //数据源的数据大小
    public int getCount() {
        return names.size();
    }

    @Override
    public Object getItem(int position) {
        return null;
    }

    @Override
    public long getItemId(int position) {
        return 0;
    }

    @Override
    public View getView(int position, View convertView, ViewGroup parent) {
        /*
            position:当前数据索引
            convertView:指定的单元格布局
         */
        if (convertView == null){
            convertView = LayoutInflater.from(context).inflate(R.layout.item_list_view,null);
        }
        //从单元格布局中绑定所有控件
        TextView tv_name = convertView.findViewById(R.id.tv_name);
        TextView tv_phone = convertView.findViewById(R.id.tv_phone);
        TextView btn_call = convertView.findViewById(R.id.btn_call);
        //获取当前需要显示的记录数据
        Map<String, String> item = names.get(position);
        //将数据显示在指定的控件上
        tv_name.setText(item.get("name").toString());
        tv_phone.setText(item.get("phone").toString());
        return convertView;
    }
}
21 RecyclerView
    implementation 'com.android.support:appcompat-v7:30.1.1'
    implementation 'com.android.support:recyclerview-v7:30.1.1'
<?xml version="1.0" encoding="utf-8"?>
<LinearLayout xmlns:android="http://schemas.android.com/apk/res/android"
    android:layout_width="match_parent"
    android:layout_height="match_parent"
    android:orientation="vertical">

    <androidx.recyclerview.widget.RecyclerView
        android:id="@+id/rec"
        android:layout_width="match_parent"
        android:layout_height="match_parent"/>
</LinearLayout>
<?xml version="1.0" encoding="utf-8"?>
<LinearLayout xmlns:android="http://schemas.android.com/apk/res/android"
    android:layout_width="match_parent"
    android:layout_height="wrap_content"
    android:gravity="center"
    android:orientation="horizontal">

    <ImageView
        android:id="@+id/iv_icon"
        android:layout_width="wrap_content"
        android:layout_height="wrap_content"
        android:src="@mipmap/ic_launcher"/>
    <LinearLayout
        android:layout_width="0dp"
        android:layout_height="wrap_content"
        android:layout_marginLeft="10dp"
        android:layout_weight="1"
        android:orientation="vertical">

        <TextView
            android:id="@+id/tv_name"
            android:layout_width="wrap_content"
            android:layout_height="wrap_content"
            android:textSize="30sp"
            android:text="姓名"
            android:textColor="@android:color/holo_red_dark"
            />

        <TextView
            android:id="@+id/tv_introduce"
            android:layout_width="wrap_content"
            android:layout_height="wrap_content"
            android:text="手机"
            android:textColor="@android:color/holo_red_dark"
            />

    </LinearLayout>

</LinearLayout>
package com.example.myapplication1;

import android.os.Bundle;
import android.view.LayoutInflater;
import android.view.View;
import android.view.ViewGroup;
import android.widget.ImageView;
import android.widget.TextView;

import androidx.annotation.NonNull;
import androidx.annotation.Nullable;
import androidx.appcompat.app.AppCompatActivity;
import androidx.recyclerview.widget.LinearLayoutManager;
import androidx.recyclerview.widget.RecyclerView;

public class RecyclerViewActivity extends AppCompatActivity {

    private RecyclerView mRecyclerView;
    private HomeAdapter mAdapter;
    private String[] names = {"haha","张三","李四"};
    private int[] icons = {R.mipmap.ic_launcher, R.mipmap.ic_launcher,R.mipmap.ic_launcher};
    private String[] instrduces = {"1111111111111111111111111", "2222222222222222222222222", "3333333333333333333333333333"};

    @Override
    protected void onCreate(@Nullable Bundle savedInstanceState) {
        super.onCreate(savedInstanceState);
        setContentView(R.layout.activity_recycler);
        mRecyclerView = findViewById(R.id.rec);
        //设置布局方式
        mRecyclerView.setLayoutManager(new LinearLayoutManager(this));
        mAdapter = new HomeAdapter();
        mRecyclerView.setAdapter(mAdapter);

    }

    class HomeAdapter extends RecyclerView.Adapter<HomeAdapter.MyViewHolder>{


        @NonNull
        @Override
        public HomeAdapter.MyViewHolder onCreateViewHolder(@NonNull ViewGroup parent, int viewType) {
            MyViewHolder holder = new MyViewHolder(LayoutInflater.from(RecyclerViewActivity.this).inflate(R.layout.item_recycler_view,parent,false));
            return holder;
        }

        @Override
        //绑定数据到单元格布局的控件上
        public void onBindViewHolder(@NonNull HomeAdapter.MyViewHolder holder, int position) {
            holder.tv_name.setText(names[position]);
            holder.tv_introduce.setText(instrduces[position]);
            holder.iv_icon.setImageResource(icons[position]);
        }

        @Override
        public int getItemCount() {
            return names.length;
        }

        class MyViewHolder extends RecyclerView.ViewHolder{
            TextView tv_name;
            TextView tv_introduce;
            ImageView iv_icon;

            public MyViewHolder(@NonNull View itemView) {
                super(itemView);
                tv_name = itemView.findViewById(R.id.tv_name);
                tv_introduce = itemView.findViewById(R.id.tv_introduce);
                iv_icon = itemView.findViewById(R.id.iv_icon);
            }
        }
    }
}
22 Activity跳转
    public void tiaozhuan(View v){
        Intent intent = new Intent();
        intent.setClass(LiftCycleActiivity.this,RecyclerViewActivity.class);
        intent.putExtra("name","haha");
        intent.putExtra("age",20);
        intent.putExtra("aihao",new String[]{"111","222"});
        //使用Bundle
        Bundle bundle = new Bundle();
        bundle.putInt("score",100);
        bundle.putString("info","这是bundle传递的数据");
        intent.putExtras(bundle);
        //传自定义数据
        User user = new User("haha","123",20);
        intent.putExtra("user",user);
        startActivity(intent);
    }
        //接受LifeCycleActivity传过来的值
        Intent intent = getIntent();
        int age = intent.getIntExtra("age",0);
        int score = intent.getIntExtra("score", 0);
        String name = intent.getStringExtra("name");
        String[] aihao = intent.getStringArrayExtra("aihao");
        Serializable user = (User)intent.getSerializableExtra("user");
        Log.i("RecyclerViewActivity", age+"");
        Log.i("RecyclerViewActivity", score+"");
        Log.i("RecyclerViewActivity", name+"");
        Log.i("RecyclerViewActivity", Arrays.toString(aihao) +"");
        Log.i("RecyclerViewActivity", user.toString());

 浙公网安备 33010602011771号