一分钟学会JavaMail(假)__手动滑稽
因为公司内部办公系统(OA)需要增加一个发送邮件的功能,所以学习了这个感觉比较冷门的JavaMail
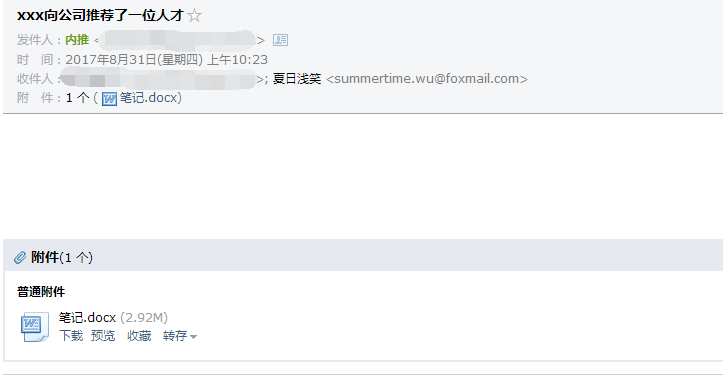
1、先上成功截图 :
2、准备事项:Java Mail虽然是官方写的,但是没有集成到jdk里面,所以需要自己下jar包
首先去官网下载,或者去CSDN 下(http://download.csdn.net/download/itsonglin/8632453)
ps:老版本的api似乎不支持开启加密,建议去官网下最新jar包
3、这里贴一个封装好了的工具类代码,可以直接copy不用看,使用这个就能很方便的使用 javamail 而不用了解什么是javamail
ps:以前在学校学东西都是一步步的稳打稳扎,现在工作就是会用就行,赶快把功能做出来 , 唉,希望能有时间补起来
import com.sun.mail.util.MailSSLSocketFactory;

import java.io.*;
import java.security.GeneralSecurityException;
import java.util.*;

import javax.activation.*;
import javax.mail.*;
import javax.mail.internet.*;

public class SendMail {

    private String username = null;
    private String password = null;
    private Authenticator auth = null;
    private MimeMessage mimeMessage =null;
    private Properties pros = null;
    private Multipart multipart = null;
    private BodyPart bodypart= null;
    /**
     * 初始化账号密码并验证
     * 创建MimeMessage对象
     * 发送邮件必须的步骤:1
     * @param username
     * @param password
     */
    public SendMail(String username,String password){
        this.username = username;
        this.password = password;
    }
    /**
     * 设置email系统参数
     * 接收一个map集合key为string类型,值为String
     * 发送邮件必须的步骤:2
     * @param map
     */
    public void setPros(Map<String,String> map){
        pros = new Properties();
        for(Map.Entry<String,String> entry:map.entrySet()){
            pros.setProperty(entry.getKey(), entry.getValue());
        }
    }
    /**
     * 初始化MimeMessage对象
     * 发送邮件必须的步骤:3
     */
    public void initMessage(){
        this.auth = new Email_Autherticator();
        Session session = Session.getDefaultInstance(pros,auth);
        mimeMessage = new MimeMessage(session);
    }
    /**
     * 验证账号密码
     * 发送邮件必须的步骤
     * @author Administrator
     *
     */
    public class Email_Autherticator extends Authenticator
    {
        public PasswordAuthentication getPasswordAuthentication()
        {
            return new PasswordAuthentication(username, password);
        }
    }
    /**
     * 设置发送邮件的基本参数(去除繁琐的邮件设置)
     * @param sub 设置邮件主题
     * @param text 设置邮件文本内容
     * @param rec 设置邮件接收人
     * @throws MessagingException
     * @throws UnsupportedEncodingException
     */
    public void setDefaultMessagePros(String sub,String text,String rec) throws MessagingException, UnsupportedEncodingException{
        mimeMessage.setSubject(sub);
        mimeMessage.setText(text);
        mimeMessage.setRecipient(Message.RecipientType.TO, new InternetAddress(rec));
        mimeMessage.setSentDate(new Date());
        mimeMessage.setFrom(new InternetAddress(username,username));
    }
    /**
     * 设置主题
     * @param subject
     * @throws MessagingException
     */
    public void  setSubject(String subject) throws MessagingException{
        mimeMessage.setSubject(subject);
    }
    /**
     * 设置日期
     * @param date
     * @throws MessagingException
     */
    public void  setDate(Date date) throws MessagingException{
        mimeMessage.setSentDate(new Date());
    }
    /**
     * 设置邮件文本内容
     * @param text
     * @throws MessagingException
     */
    public void setText(String text) throws MessagingException{
        mimeMessage.setText(text);
    }
    /**
     * 设置邮件头部
     * @param arg0
     * @param arg1
     * @throws MessagingException
     */
    public void setHeader(String arg0,String arg1) throws MessagingException{
        mimeMessage.setHeader(arg0, arg1);
    }
    /**
     * 设置邮件接收人地址 <单人发送>
     * @param recipient
     * @throws MessagingException
     */
    public void setRecipient(String recipient) throws MessagingException{
        mimeMessage.setRecipient(Message.RecipientType.TO, new InternetAddress(recipient));
    }
    /**
     * 设置邮件接收人地址 <多人发送>
     * @param list
     * @throws MessagingException
     * @throws AddressException
     */
    public String setRecipients(List<String> recs) throws AddressException, MessagingException{
        if(recs.isEmpty()){
            return "接收人地址为空!";
        }
        for(String str:recs){
            mimeMessage.addRecipient(Message.RecipientType.TO, new InternetAddress(str));
        }
        return "加入接收人地址成功!";
    }
    /**
     * 设置邮件接收人地址 <多人发送>
     * @param StringBuffer<parms,parms2,parms.....>
     * @throws MessagingException
     * @throws AddressException
     */
    @SuppressWarnings("static-access")
    public String setRecipients(StringBuffer sb) throws AddressException, MessagingException{
        if(sb==null||"".equals(sb)){
            return "字符串数据为空!";
        }
        Address []address = new InternetAddress().parse(sb.toString());
        mimeMessage.addRecipients(Message.RecipientType.TO, address);
        return "收件人加入成功";
    }
    /**
     * 设置邮件发送人的名字
     * @param from
     * @throws UnsupportedEncodingException
     * @throws MessagingException
     */
    public void setFrom(String from) throws UnsupportedEncodingException, MessagingException{
        mimeMessage.setFrom(new InternetAddress(username,from));
    }
    /**
     * 发送邮件<单人发送>
     * return 是否发送成功
     * @throws MessagingException
     */
    public String sendMessage() throws MessagingException{
        Transport.send(mimeMessage);
        return "success";
    }
    /**
     * 设置附件
     * @param file 发送文件的路径
     */
    public void setMultipart(String file) throws MessagingException, IOException{
        if(multipart==null){
            multipart = new MimeMultipart();
        }
        multipart.addBodyPart(writeFiles(file));
        mimeMessage.setContent(multipart);
    }
    /**
     * 设置附件<添加多附件>
     * @param fileList<接收List集合>
     * @throws MessagingException
     * @throws IOException
     */
    public void setMultiparts(List<String> fileList) throws MessagingException, IOException{
        if(multipart==null){
            multipart = new MimeMultipart();
        }
        for(String s:fileList){
            multipart.addBodyPart(writeFiles(s));
        }
        mimeMessage.setContent(multipart);
    }
    /**
     * 发送文本内容,设置编码方式
     * <方法与发送附件配套使用>
     * <发送普通的文本内容请使用setText()方法>
     * @param s
     * @param type
     * @throws MessagingException
     */
    public void setContent(String s,String type) throws MessagingException{
        if(multipart==null){
            multipart = new MimeMultipart();
        }
        bodypart = new MimeBodyPart();
        bodypart.setContent(s, type);
        multipart.addBodyPart(bodypart);
        mimeMessage.setContent(multipart);
        mimeMessage.saveChanges();
    }
    /**
     * 读取附件
     * @param filePath
     * @return
     * @throws IOException
     * @throws MessagingException
     */
    public BodyPart writeFiles(String filePath)throws IOException, MessagingException{
        File file = new File(filePath);
        if(!file.exists()){
            throw new IOException("文件不存在!请确定文件路径是否正确");
        }
        bodypart = new MimeBodyPart();
        DataSource dataSource = new FileDataSource(file);
        bodypart.setDataHandler(new DataHandler(dataSource));
        //文件名要加入编码,不然出现乱码
        bodypart.setFileName(MimeUtility.encodeText(file.getName()));
        return bodypart;
    }

    /**
     *  使用SSL登录
     * @throws GeneralSecurityException
     */
    public void openSSL() throws GeneralSecurityException {
        MailSSLSocketFactory sf =new MailSSLSocketFactory();
        sf.setTrustAllHosts(true);
        pros.put("mail.smtp.ssl.enable", "true");
        pros.put("mail.smtp.ssl.socketFactory", sf);
    }
}
ps:代码来自http://blog.csdn.net/Coding_One/article/details/51354456
4、把代码copy到位后(记得加你的包名),直接可以使用这个工具类了,下面就贴我写的demo了
 public void sendMailTest() throws IOException, MessagingException {
        //首先创建一个sendMail对象,它是把发送邮件这件事情封装成对象,当然需要先告诉它你的用户名和密码
        SendMail sendMail=new SendMail("你的邮箱地址","你的邮箱密码");

        //这个是告诉它一些配置信息,就像框架的配置文件
        Map<String,String> map=new HashMap<String, String>();
        map.put("mail.host","smtp.qq.com");//设置邮箱服务器的地址 我这里填的是qq邮箱的,假如你不知道你使用邮箱的服务器地址,百度下就好了,一般都是这样格式的,比如163就是smtp.163.com
        map.put("mail.smtp.auth", "true");//开启验证,不确认怎么发呢,对吧
        sendMail.setPros(map);//然后把你写好的信息告诉它

        //初始化并验证下你密码对不对
        sendMail.initMessage();

        sendMail.setSubject("这里填邮件的标题");
        sendMail.setText("这里填正文");
        sendMail.setRecipient("这个填你要发给谁");
        sendMail.setFrom("这个填你的昵称,告诉人家你是谁");
        //填了一堆乱七八糟的东西,终于可以发送拉
        sendMail.sendMessage();
    }
这只是一个简单的demo,更多的群发,添加附件,添加多个附件等等, 工具类里面都有支持
---------------------------------------------一个 我还没完 的分割线---------------------------------------------
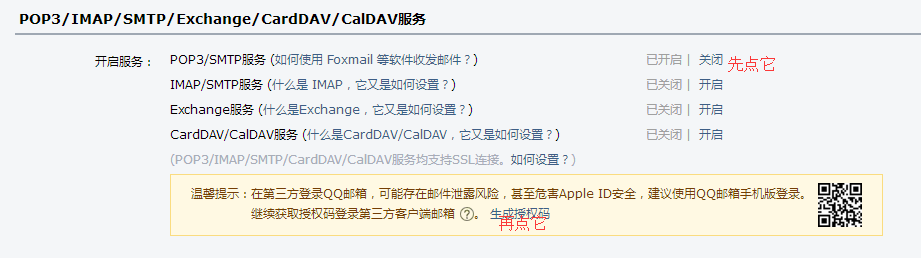
有个重要的事情就是,如果使用qq邮箱,密码不填你的qq密码,而是填所谓的授权码(需要在qq邮箱里面申请,设置-账户-开启SMTP服务)
然后还要开启ssl ,代码如下:
//使用ssl登录
sendMail.openSSL();
这个加哪都可以(除了发送之后。。),最好放在:

然后就可以用循环骚扰你的基友了 嘿嘿嘿
本demo只要加上开启ssl和使用授权码就可以使用,非常简单!
本文禁止一切形式转载!

 浙公网安备 33010602011771号