Angular知识点概括
Angular脚手架中的命令
- 创建项目:
ng new projectName - 启动项目:
ng serve --open - 创建组件:
ng g c 目录/componentName - 创建模块:
ng g m 目录/moduleName - 创建服务:
ng g s 目录/serveName
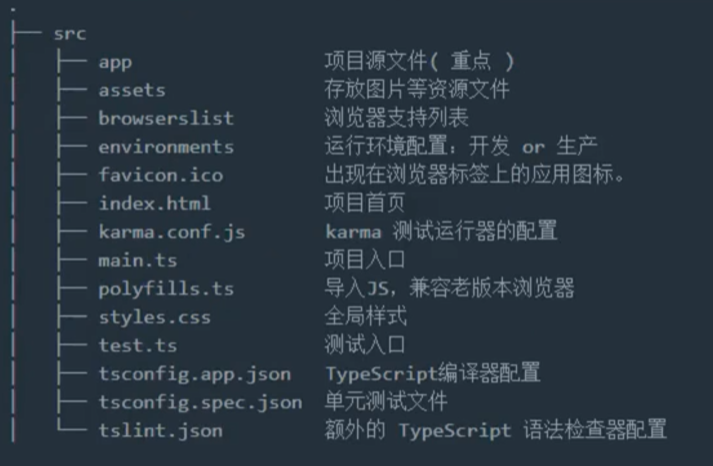
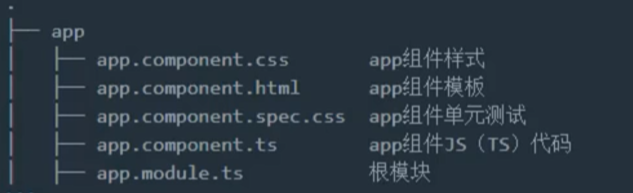
1. Angular项目目录分析

2. 初始Angular中的模块
2.1 模块中应包含的内容:
- 组件
- 服务
- 指令
- 注意:上面三个必须在模块中配置后才能使用!
2.2 例子说明
- 用
ng g m todo-list命令创建了 todo-list 模块
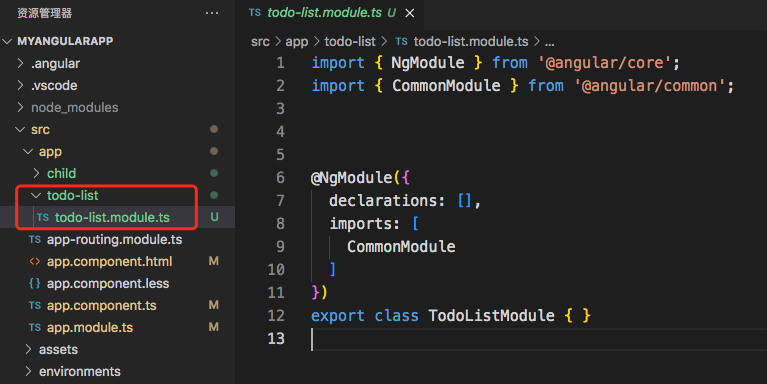
- 用
ng g c todo-list/componentName在该目录下创建了两个组件

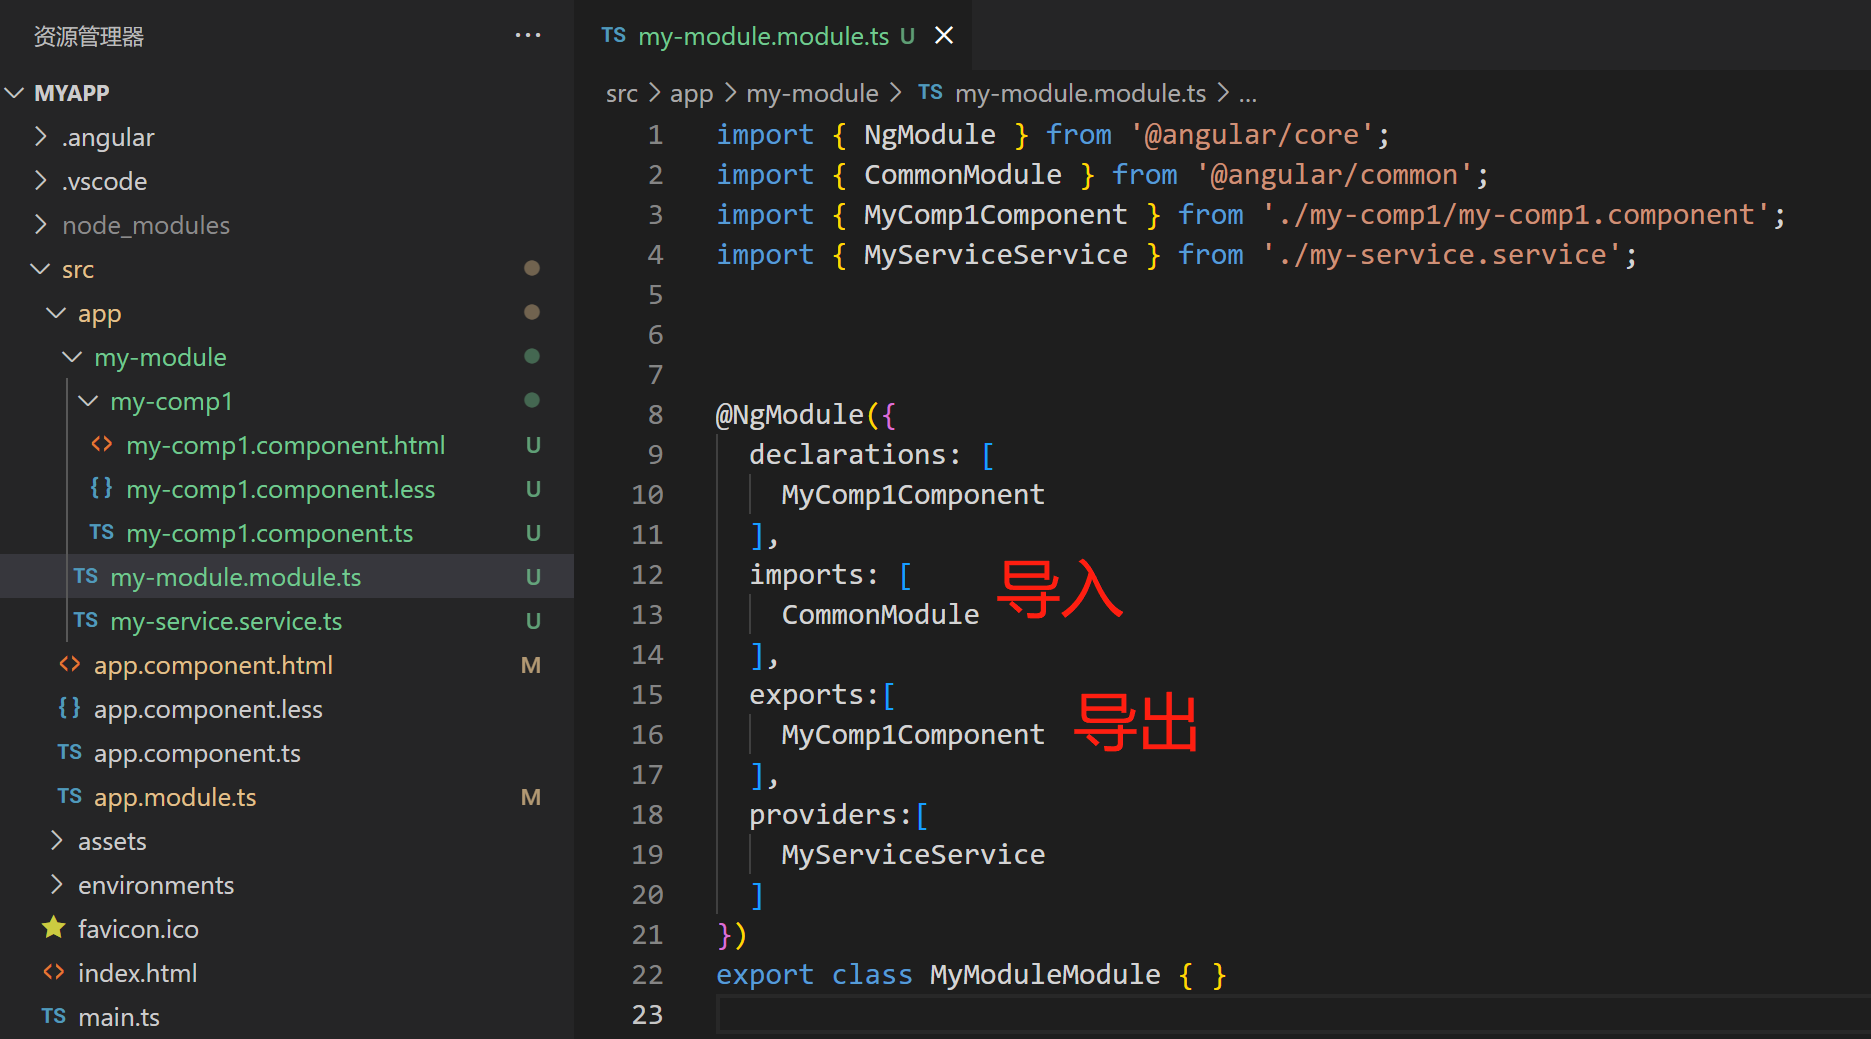
2.3 模块导出和导入
3. 指令
3.1 插值表达式 {{ }}
3.2 属性绑定
[propertyName] = "data"或propertyName = "{{ data }}"或propertyName = "string"
- 带 [ ] ,或不带 [ ],而用 {{ }},表示 data 是变量
- 不带 [ ],表示 string 是字符串
3.3 事件绑定
- 普通事件绑定:
(click) = "handleClick()" - 带事件对象的事件绑定:
(click) = "handleClick($event)", 模板中使用如下:
handleClick(e){
    console.log(e)
    e.preventDefault()//阻止默认行为
}
3.4 双向数据绑定
[(ngModel)] = "modelData"- 注意:[(ngModel)] 指令是在angular的FormsModule模块中的,使用时需先在模块中导入该模块

3.5 [ngClass]
- 操作一个类名
//html
<p [class.redColor] = "isRed">111</p>

//ts
isRed = true;

//css
.redColor{
    color:red;
}- 操作多个类名
//html
<p [ngClass] = "classObj">ceshi</p>

//ts
classObj = {
    redColor: true,
    myFontSize: false
}

css
.color{
    color:red;
}

.myFontSize{
    font-size:12px;
}
3.6 [ngStyle]
- 操作 一个样式
//html
<p [style.color] = "colorName">111</P>

//ts
colorName = 'red';- 操作多个样式
//html
<p [ngStyle] = "styleObj">111</P>

//ts
styleObj = {
    color: 'red',
    fontSize:'12px'
}
3.7 *ngIf
- HTML:
<h1 *ngIf = "isShow">111</h1> - TS:
isShow = false;
3.8 *ngFor
- 遍历普通数组:
<i *ngFor = "let item of Arrys; let i = index; let isOdd = odd"> {{ item }}--{{ i }}--{{ isOdd ? 奇 : 偶 }} </i> - 遍历对象数组:好处,提升渲染性能。
//html 加上 trackBy 意为跟踪自,这样当对象列表的局部数据改变的时候只重新渲染改变的数据
<i *ngFor="let item of nameList; trackBy: trackById"></i>

//ts
nameList = [
    { id: 1, name: 'xiaoming' },
    { id: 2, name: 'xiaohuang' },
    { id: 3, name: 'xiaolan' }
]

//加上这个方法
trackById(i:number,item:any){
    return item.id
}
4. 组件嵌套
//父组件使用子组件,需要在父组件的module.ts文件中导入,并声明:
import { NgModule } from '@angular/core';
import { BrowserModule } from '@angular/platform-browser';

import { AppRoutingModule } from './app-routing.module';
import { AppComponent } from './app.component';
import { ChildComponent } from './child/child.component'; //导入

@NgModule({
  declarations: [
    AppComponent,
    ChildComponent //声明
  ],
  imports: [
    BrowserModule,
    AppRoutingModule
  ],
  providers: [],
  bootstrap: [AppComponent]
})
export class AppModule { }
5. 组件间通信
5.1 父传子
//父组件

//html
<!-- 父组件使用子组件,并传数据给子组件 -->
<app-child [myProp] = 'prop'></app-child>

//ts
import { Component } from '@angular/core';

@Component({
  selector: 'app-root',
  templateUrl: './app.component.html',
  styleUrls: ['./app.component.less']
})
export class AppComponent {
  prop = 'fatherData'
}
//子组件
//ts
import { Component, Input, OnInit } from '@angular/core';
@Component({
selector: 'app-child',
templateUrl: './child.component.html',
styleUrls: ['./child.component.less']
})
export class ChildComponent implements OnInit {
constructor() { }
// 接收父组件传过来的数据
// 需用 Input 来声明接收,注意上面需导入Input
@Input()
myProp:any
ngOnInit(): void {
}
}5.2 子传父
//子组件

import { Component, Output,EventEmitter, OnInit } from '@angular/core';

@Component({
  selector: 'app-child',
  templateUrl: './child.component.html',
  styleUrls: ['./child.component.less']
})
export class ChildComponent implements OnInit {

  constructor() { }

  // 要传输的数据
  childData = 'someData'

  // 1. 子组件 new 一个自定义 EventEmitter 事件
  @Output()
  put = new EventEmitter()

  // 3. 子组件触发自定义事件,从而触发父组件的接收事件
  handleClick(){
    this.put.emit(this.childData) //参数是要传输的数据
  }

  ngOnInit(): void {
  }
}
//父组件
import { Component } from '@angular/core';
@Component({
selector: 'app-root',
// 2. 在父组件中使用子组件的自定义事件,并绑定接收函数
template: `<app-child (put)="get($event)"></app-child>`,
styleUrls: ['./app.component.less']
})
export class AppComponent {
mydata:any
// 4. 接收数据处理函数
get(data:any){
this.mydata = data
}
}
6. 服务
6.1 服务的作用说明
- 组件应该只提供用于数据 绑定的属性和方法
- 组件不应该定义任何诸如请求数据、验证用户验证等操作
- 应该把各种处理任务定义在可注入的服务中
- 服务的作用:处理业务逻辑,供组件使用
6.2 服务的说明
- 通过 @Injectable()装饰器 来表示一个服务
- 服务需要注册提供商才可使用
- Angular通过依赖注入(DI)来为组件提供服务,即在组件中注入服务依赖,不需手动创建
- 推荐在 constructor 中注册组件中用到的服务
6.3 注册服务提供商的三种方式
(1)在服务文件中,通过 @Injectable() 的 providedIn: 'root', 将该服务注册为跟级提供商,提供给该项目中所有组件使用
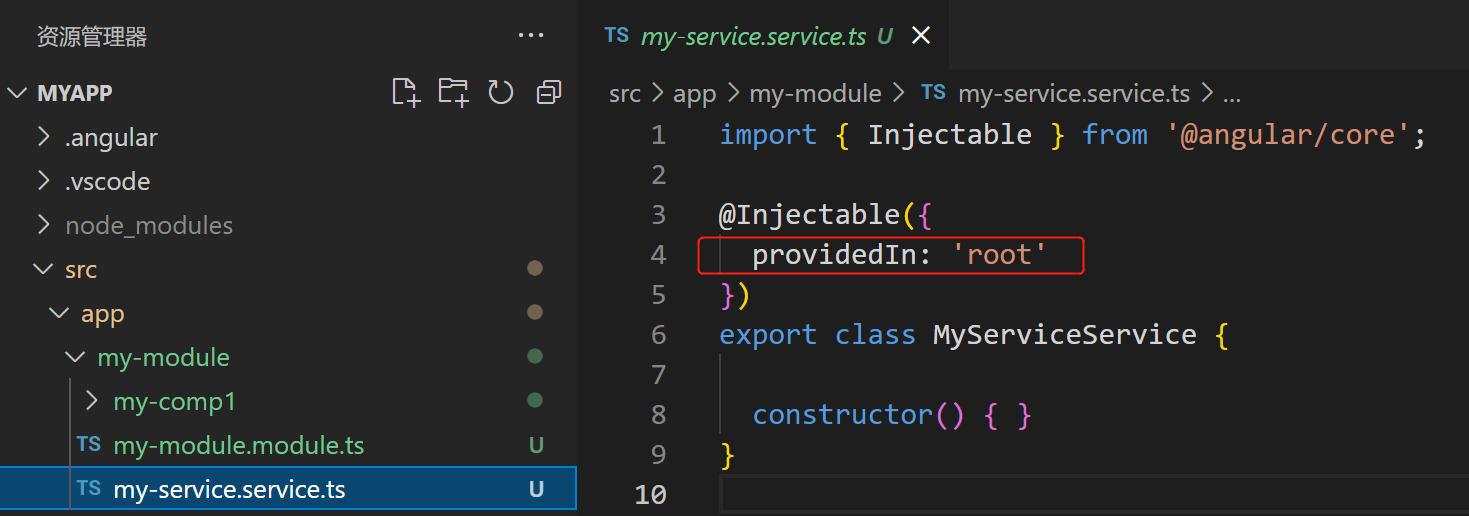
- 组件中注入并注册需要用到的服务,如下图:
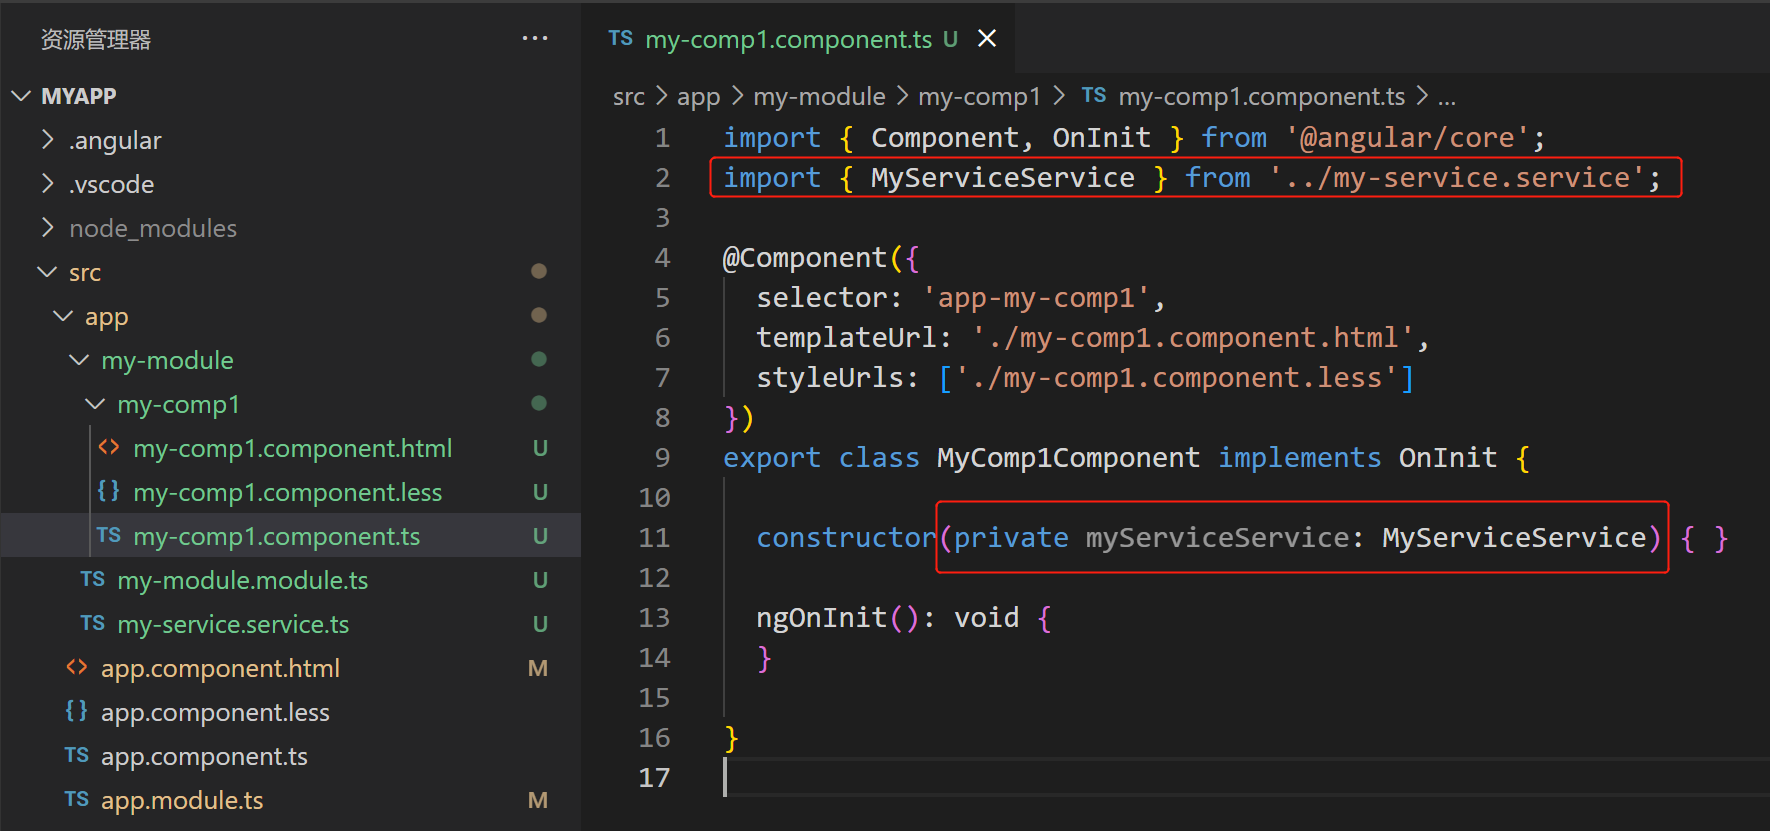
(2)在模块文件中,通过 @NgModule() 的providers:[], 注册为该模块内可用的提供商,仅提供给该模块内组件使用

- 组件中注入并注册需要用到的服务,如下图:
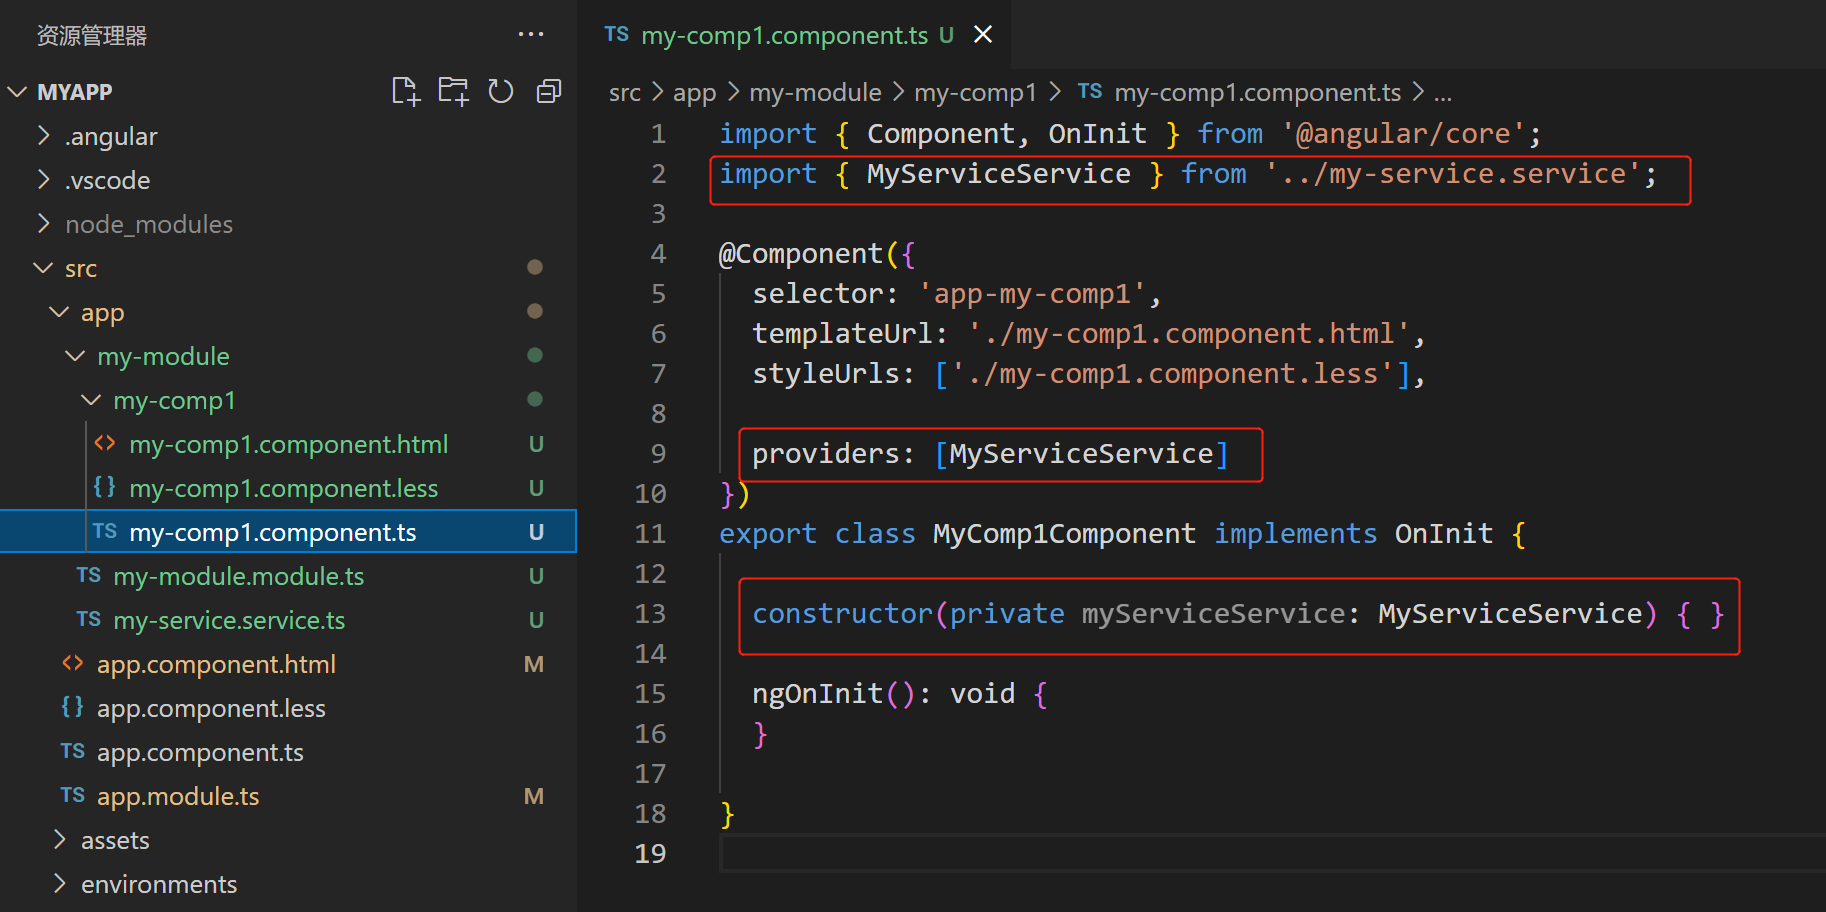
(3)在组件文件中,通过 @Component 的 providers:[], 注册为仅该组件以及其子组件可用的服务提供商
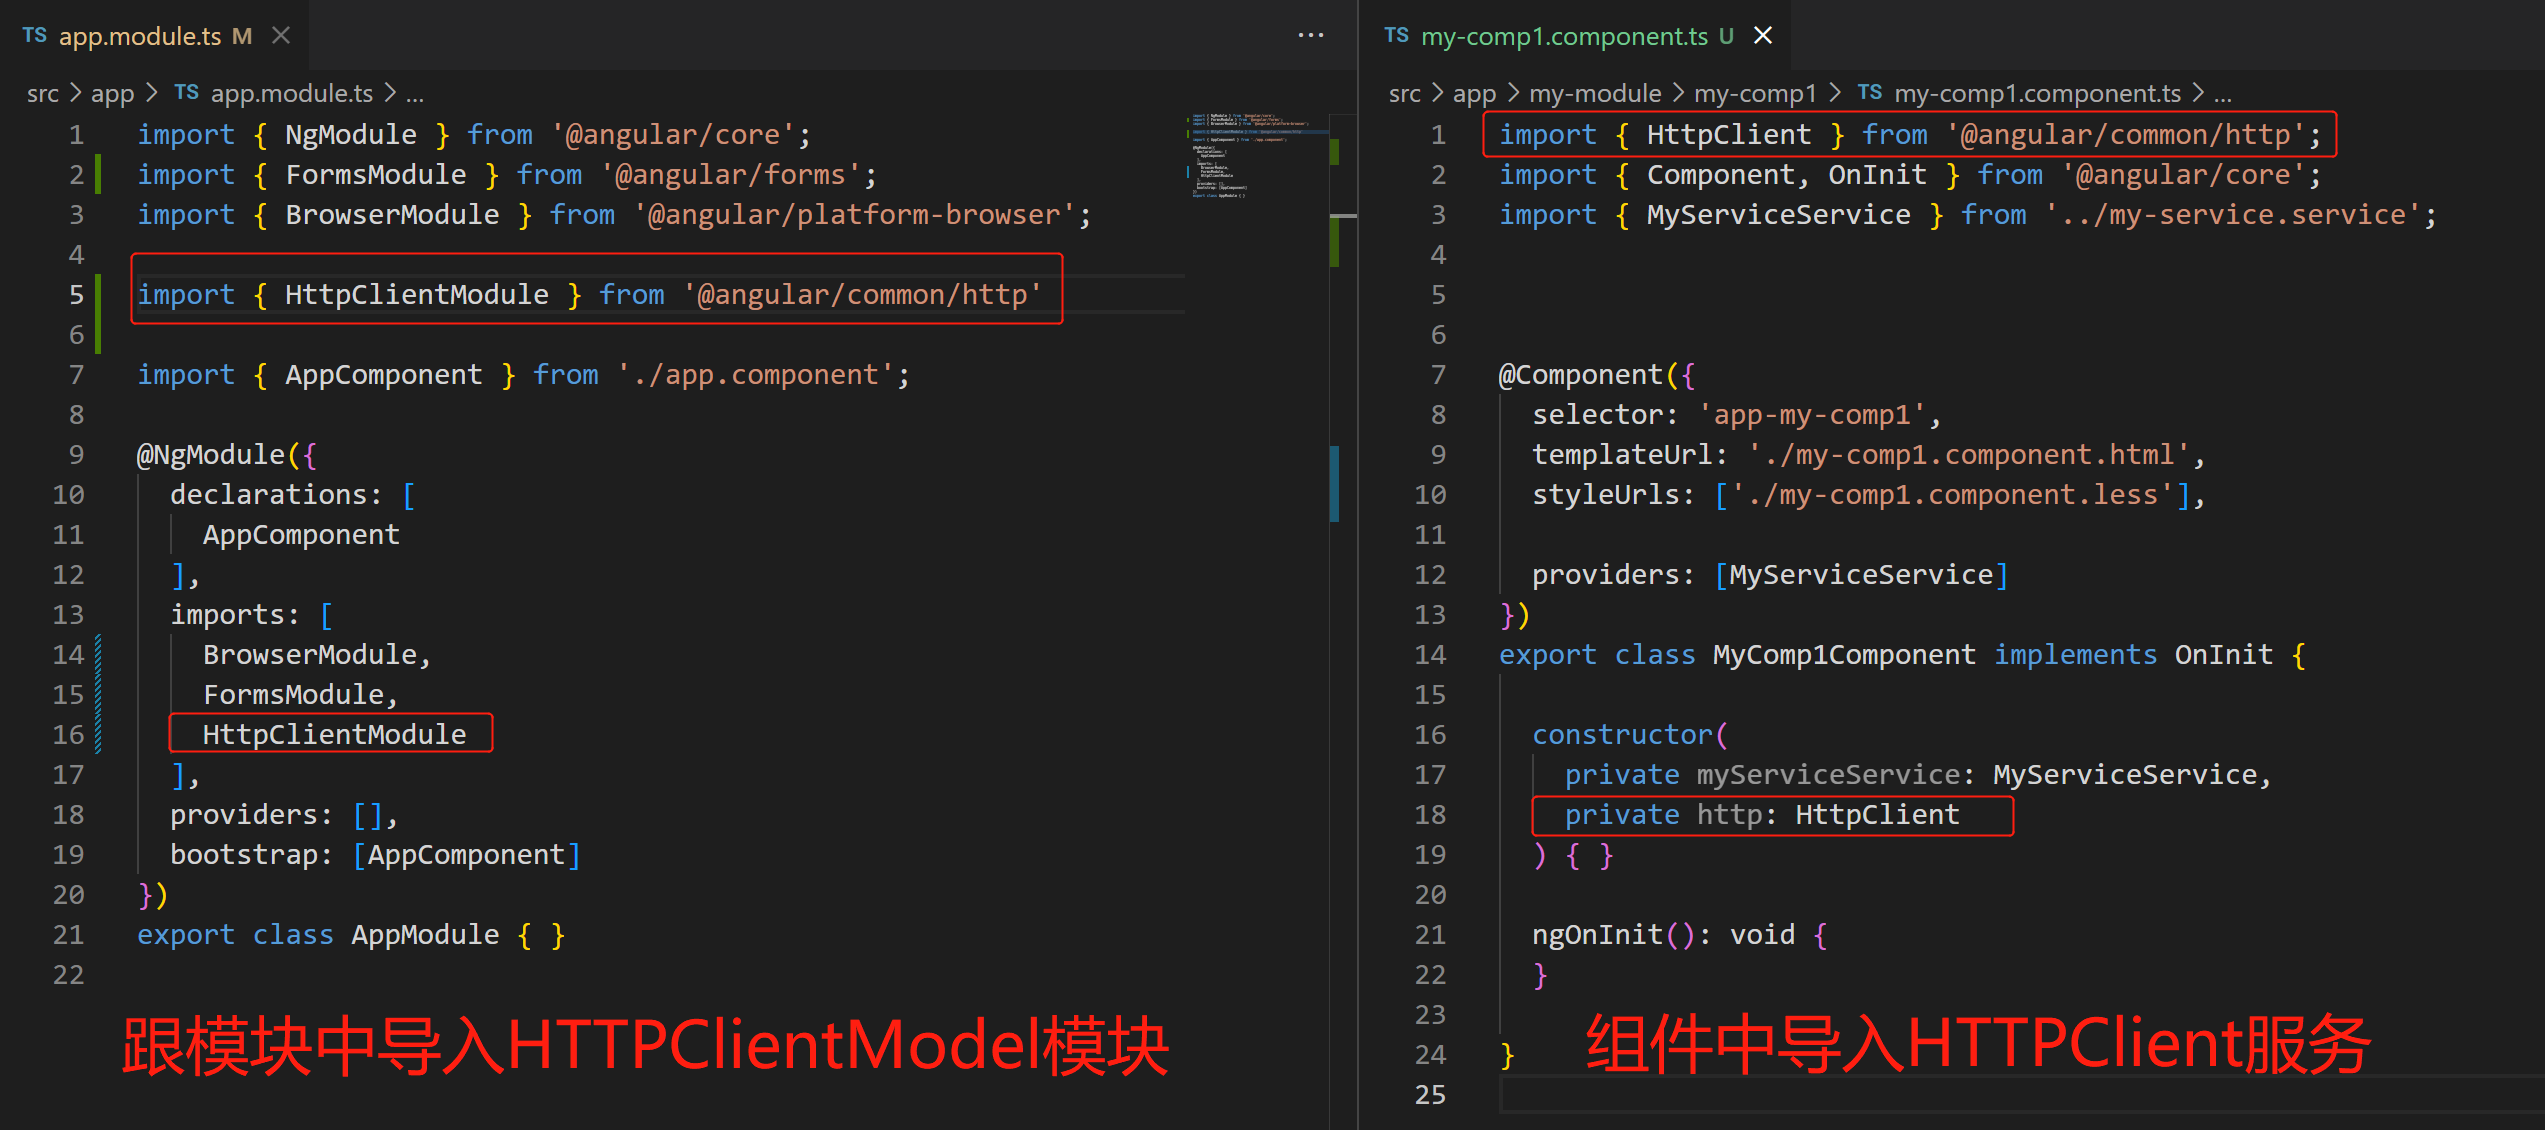
7. HttpClient说明
作用:发送Http请求
- 封装了浏览器提供的XMLHttpRequest接口
- 使用基于可观察(Observable)对象的API
- 提供了请求和响应拦截器流式错误处理机制
7.1 HttpClient的使用
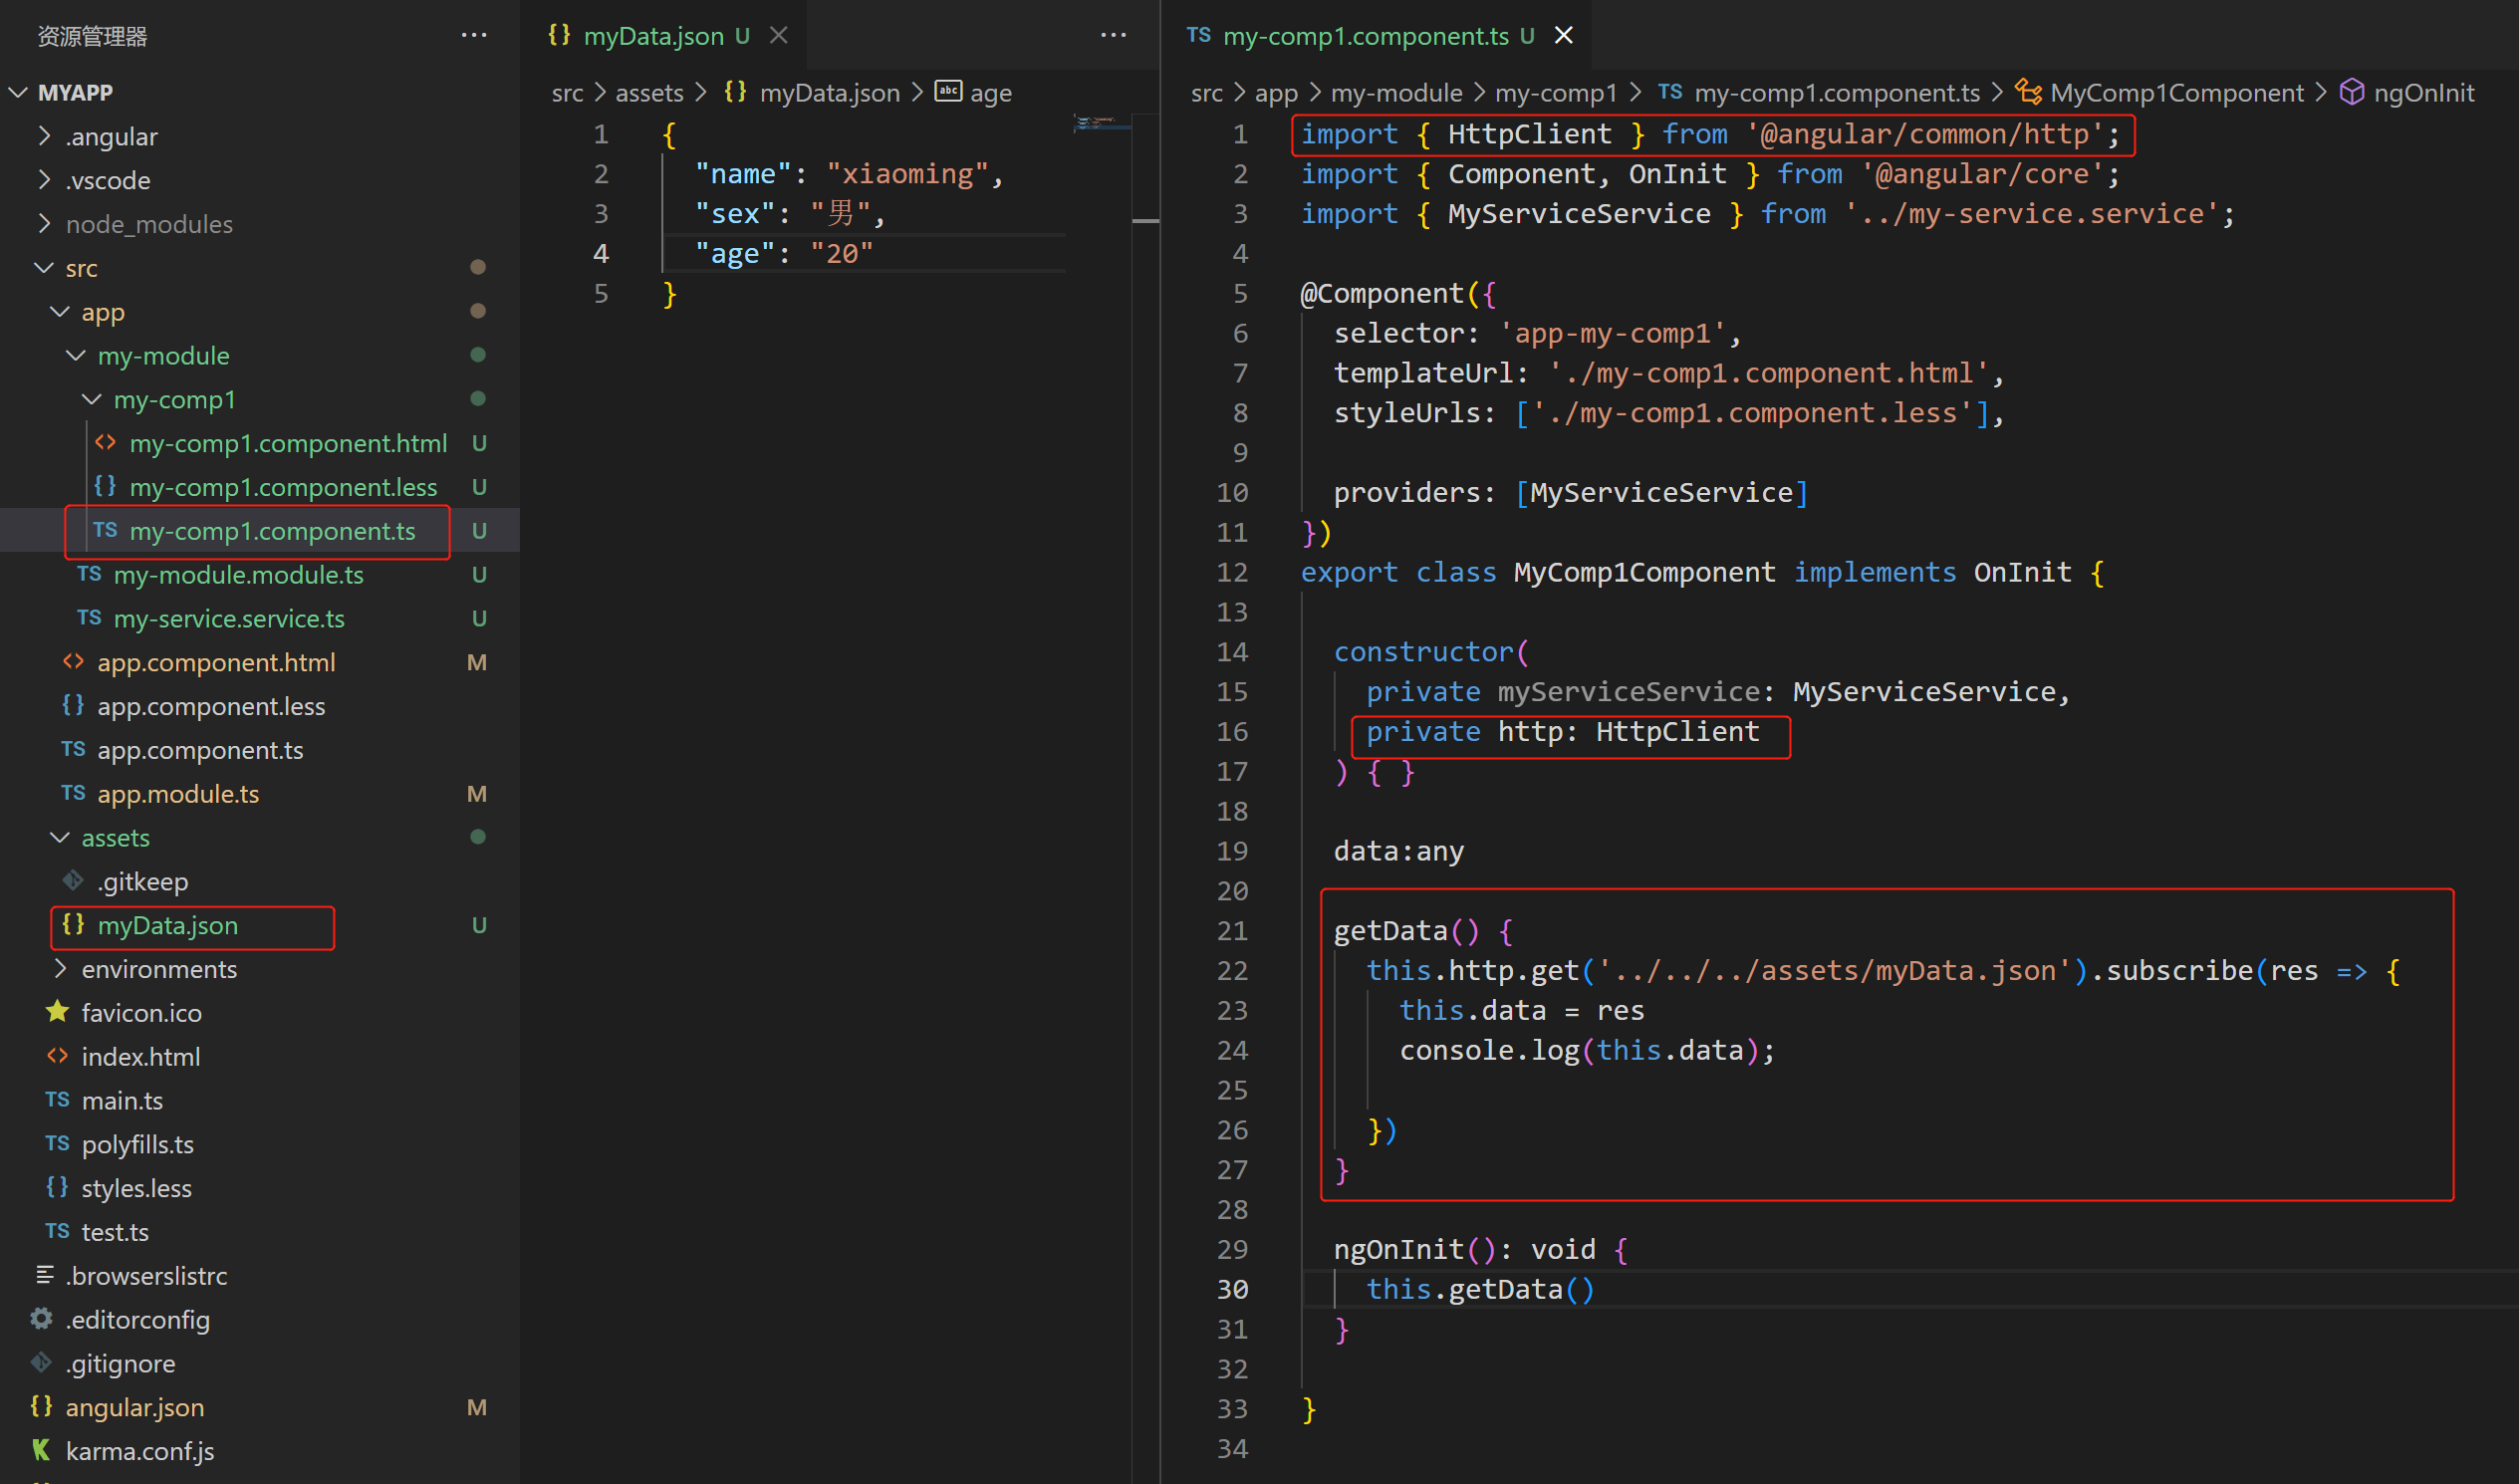
7.2 获取 完整的HTTP相应内容
// 在请求地址后加上 { observe: 'response' }
getData() {
  this.http
     .get('../../../assets/myData.json', { observe: 'response' })
     .subscribe((res) => {
       console.log(res); // 所有响应内容
       console.log(res.body); // 响应body
       console.log(res.headers); // 响应头
       console.log(res.headers.get('content-type')); //响应数据类型
       console.log('等等');
  });
}
7.3 使用TS语法对响应数据做约束
- 对 get 请求和响应的 res 进行双重约束:

7.4 请求失败回调
getData() {
  this.http.get<resInterface>('../../../assets/myData.json1').subscribe(
    (res: resInterface) => {
      console.log(res); // 所有响应内容
    },
    (err) => {  // 失败回调
      console.log(err);
    }
  );
}
7.5 使用 json-server 插件来模拟提供后台接口
- 1. 安装:
npm i -g json-server - 2. 新建一个 json 文件,如 db.json
- 3. 运行 json-server :
json-server db.json - 4. 请求如下:
get('url地址')
post('url地址',{参数:'参数值'})
delete(`{$this.url}/id值`)
patch(`{$this.url}/id值`,{参数:'新值'})
8. 路由
8.1 配置路由的基本步骤
- 模块module文件内:
import { MyComp1Component } from "./my-module/my-comp1/my-comp1.component";//导入组件
// 1. 导入路由模块
import { RouterModule, Routes } from "@angular/router";
// 2. 配置路由规则,并用 Routes 约束路由格式
const appRouters: Routes = [
  {
    path: 'mycomp1',
    component: MyComp1Component
  }
]
@NgModule({
  declarations: [
    AppComponent,
    MyComp1Component,//导入使用路由显示的组件
  ],
  imports: [
    // 3. 配置路由模块,forRoot() 的作用是保证路由服务的单例行,防止路由多个服务错乱
    RouterModule.forRoot(appRouters)
  ],
  providers: [],
  bootstrap: [AppComponent]
})
export class AppModule { }- HTML文件路由出口
<!-- 4. 配置路由跳转导航 -->
<button routerLink="/mycomp1">显示myComp1组件</button>
<!-- 5. 配置路由出口 -->
<router-outlet></router-outlet>
8.2 默认路由、重定向、通配符路由
const appRouters: Routes = [
  {
    // 默认路由、重定向
    path: '',
    redirectTo: '/mycomp1',
    pathMatch: 'full'
  },
  {
    // 通配符路由,当访问不存在的路由的时候跳转到404页面
    path: '**',
    component: NotFoundError
  },
  {
    path: 'mycomp1',
    component: MyComp1Component
  }
]
8.3 路由参数
// 一、配置路由文件:
const appRouters: Routes = [
  {
    // 路由参数
    // 可匹配:/perName/1  /perName/2 ...
    // 不可匹配: /perName  /perName/1/1 ...
    path: 'perName/:id',
    component: PerNameComponent
  }
]

// 二、导航HTML
<button routerLink="/perName/1">点击1</button>
<button routerLink="/perName/2">点击2</button>

// 三、路由组件TS文件
// 1. 导入路由服务
import { ActivatedRoute } from '@angular/router'

export class PerNameComponent implements OnInit {
  constructor(
    // 2. 声明
    private route: ActivatedRoute
  )

  selectObj = [
      { id:1, name: 'xiaoming' },
      { id:2, name: 'xiaolan' }
  ]

  activeName:any

  ngOnInit(){
      this.route.paramMap.subscribe(param => {
          console.log(param)
          const id = param.get('id')//得到路由参数
          this.activeName = this.selectObj.find(item => item.id === +id) // 将字符串类型的 id 转换成 数字类型的
}

// 四、路由组件HTML
<div>{{ activeName }}</div>
8.4 路由嵌套
// 路由配置文件
const appRouters: Routes = [
  {
    path: 'father',
    component: MyComp1Component,
    // 子路由
    children: [
        path: 'child1',
        component: Child1Component
    ]
  }
]

// HTML
<a routerLink = "/father/child1">点击</a>
<router-outlet></router-outlet>
8.5 路由高亮
// HTML
<a routerLink="/mycomp1" routerLinkActive="actived">点击1</a>
<a routerLink="/mycomp2" routerLinkActive="actived">点击1</a>
// 表示路由精确匹配
<a routerLink="/mycomp3" routerLinkActive="actived" [routerLinkActiveOptions]="{exact: true}"></a>

// css
.actived {
    color:red
}
9. 编程式导航
// 1. 导入 Router
import { Router } from '@angular/router'

export class MyComp1Component implements OnInit {
  constructor(
    // 2. 声明
    private router: Router
  ) {}
  // 3. 使用
  goTo() {
    this.router.navigate(['/mycomp1'])
  }
  ngOnInit(): void {

  }
}
10. 响应式表单
- 响应式表单(重点)
- 模板驱动表单(基于模板语法,及双向数据绑定指令,如Angular中的 [ngModel]、Vue中的 v-model
基本使用步骤:
// 一、模块文件:
// 1. 导入
import { ReactiveFormsModule } from '@angular/forms';

@NgModule({
  declarations: [
  ],
  imports: [
    // 2. 声明
    ReactiveFormsModule
  ],
  providers: [],
  bootstrap: [AppComponent]
})

// 二、TS文件
import { Component } from '@angular/core';
// 3. 导入
import { FormControl } from '@angular/forms'

@Component({
  selector: 'app-root',
  templateUrl: './app.component.html',
  styleUrls: ['./app.component.less']
})
export class AppComponent {
  // 4. new
  username = new FormControl('zrh')
  password = new FormControl('123456')

  // 取值
  console.log(this.username.value)
  // 更新值
  setUsername() {
      this.username.setValue('newName')
  }
}

// 三、HTML
<label>
  用户名:
  <input type="text" [formControl]="username">
</label>
<p>{{username.value}}</p>
<label>
  密码:
  <input type="password" [formControl]="password">
</label>
<p>{{password.value}}</p>
更多请参考官网文档!
本文来自博客园,作者:RHCHIK,转载请注明原文链接:https://www.cnblogs.com/suihung/p/16398745.html

 浙公网安备 33010602011771号