Vue-CLI 3.x 部署项目至生产服务器
本文已同步到专业技术网站 www.sufaith.com, 该网站专注于前后端开发技术与经验分享, 包含Web开发、Nodejs、Python、Linux、IT资讯等板块.
本教程主要讲解的是 Vue-CLI 3.x 脚手架搭建的vue项目, 先构建生成dist文件(纯静态应用), 然后自动化部署到静态文件服务器 Nginx。
一、Nginx服务器文件的配置
server {
        listen 80;
        server_name www.xxxxxx.com;#生产环境
        location / {
            root /usr/local/www/xxx_program/;
            index index.html;
            try_files $uri $uri/ /index.html;
        }
    }
    server {
        listen 80;
        server_name test.xxxxxx.com; #测试环境
        location / {
            root /usr/local/www/xxx_program_test/;
            index index.html;
            try_files $uri $uri/ /index.html;
        }
    }
二、配置生产/测试环境 服务器SSH远程登陆账号
1. 在项目根目录下, 创建 .env 文件 (当前环境变量)
VUE_APP_SERVER_ID变量指代 当前需部署的服务器ID为0
VUE_APP_SERVER_ID=0
2. 在项目根目录下, 创建 deploy/products.js 文件
该文件功能如下:
(1) 读取env环境变量
const fs = require('fs')
const path = require('path')
// env环境变量的路径
const envPath = path.resolve(__dirname, '../.env')
// env对象
const envObj = parse(fs.readFileSync(envPath, 'utf8'))
const SERVER_ID = parseInt(envObj['VUE_APP_SERVER_ID'])

function parse (src) {
  // 解析KEY=VAL的文件
  const res = {}
  src.split('\n').forEach(line => {
    // matching "KEY' and 'VAL' in 'KEY=VAL'
    const keyValueArr = line.match(/^\s*([\w\.\-]+)\s*=\s*(.*)?\s*$/)
    // matched?
    if (keyValueArr != null) {
      const key = keyValueArr[1]
      let value = keyValueArr[2] || ''

      // expand newlines in quoted values
      const len = value ? value.length : 0
      if (len > 0 && value.charAt(0) === '"' && value.charAt(len - 1) === '"') {
        value = value.replace(/\\n/gm, '\n')
      }

      // remove any surrounding quotes and extra spaces
      value = value.replace(/(^['"]|['"]$)/g, '').trim()

      res[key] = value
    }
  })
  return res
}
(2) 定义多个服务器账号 及 根据 SERVER_ID 导出当前环境服务器账号
const SERVER_LIST = [
  {
    id: 0,
    name: 'A-生产环境',
    domain: 'www.xxx.com',
    host: 'XX.XX.XX.XX',
    port: 22,
    username: 'root',
    password: 'xxxxxxx',
    path: '/usr/local/www/xxx_program/'
  },
  {
    id: 1,
    name: 'B-测试环境',
    domain: 'test.xxx.com',
    host: 'XX.XX.XX.XX',
    port: 22,
    username: 'root',
    password: 'xxxxxxx',
    path: '/usr/local/www/xxx_program_test/'
  },
]

module.exports = SERVER_LIST[SERVER_ID]
三、创建自动化部署脚本 (使用scp2库)
在项目根目录下, 创建 deploy/index.js 文件
const scpClient = require('scp2')
const ora = require('ora')
const chalk = require('chalk')
const server = require('./products')
const spinner = ora('正在发布到生产服务器...')
spinner.start()
scpClient.scp('dist/', {
  host: server.host,
  port: server.port,
  username: server.username,
  password: server.password,
  path: server.path
}, function(err) {
  spinner.stop()
  if (err) {
    console.log(chalk.red('  发布失败.\n'))
    throw err
  } else {
    console.log(chalk.green('  Success! 成功发布到生产服务器! \n'))
  }
})
四、添加 package.json 中的 scripts 命令, 自定义名称为 "deploy"
"scripts": {
    "serve": "vue-cli-service serve",
    "build": "vue-cli-service build",
    "lint": "vue-cli-service lint",
    "deploy": "npm run build && node ./deploy"
  }
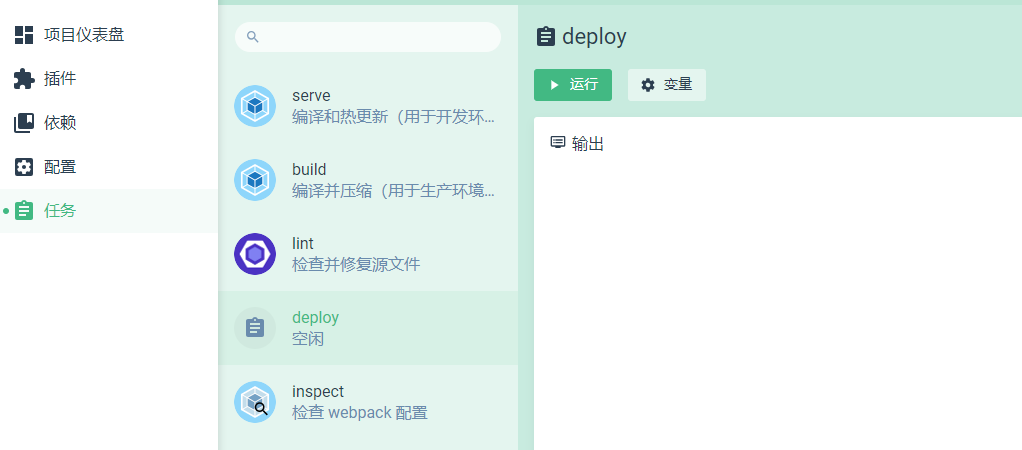
五、执行部署任务
在项目根目录下 执行 npm run deploy命令, 或 使用 vue ui控制面板执行deploy任务, 即可自动打包并部署至线上服务器
备注:
要切换部署的服务器, 只需修改 .env文件中的服务器ID, 然后再执行deploy任务即可.
福利:
本文已同步到我的个人技术网站 IT干货-sufaith 该网站包括Python, Linux, Nodejs, 前端开发等模块, 专注于程序开发中的技术、经验总结与分享, 欢迎访问.

 浙公网安备 33010602011771号