springMVC整理03--处理数据模型 & 试图解析器 & @ResponseBody & HttpEntity
1.处理模型数据
SpringMVC 中的模型数据是非常重要的,因为 MVC 中的控制(C)请求处理业务逻辑来生成数据模型(M),而视图(V)就是为了渲染数据模型的数据。当有一个查询的请求,控制器(C)会把请求拦截下来,然后把根据请求的内容对它进行分配适合的处理方法,在处理方法上进行处理查询的业务逻辑,得到了数据,再把数据封装成数据模型对象,最后把数据模型(M)对象传给了视图(V),让视图去渲染数据模型。SpringMVC 提供了以下几种途径输出模型数据:
- ModelAndView:处理方法返回值类型为 ModelAndView 时,方法体即可通过该对象添加模型数据。
- @ModelAttribute:方法入参标注该注解后,入参的对象就会放到数据模型中。
- Map 及 Model:入参为 org.springframework.ui.Model、org.springframework.uiModelMap 或 java.util.Map 时,处理方法返回时,Map 中的数据会自动添加到模型中。
- @SessionAttributes:将模型中的某个属性暂存到 HttpSession 中,以便多个请求之间可以共享这个属性。
1.1 Map 和 和 Model 入参
 1 /**
 2 * 当参数为 Map 时
 3 * SpirngMVC 会传入 一个 BindingAwareModelMap
 4 * 往 BindingAwareModelMap 里面存入的值 会在后面存入 request 域中
 5 * 相当于在方法返回前执行了一个 request.setAttribute 的操作
 6 */
 7 @RequestMapping("/map.html")
 8 public String map(Map<String, Object> map) {
 9 System. out .println(map.getClass().getName());
10 map.put("name", "aaa");
11 map.put("id", 123);
12 return "/model.jsp";
13 }
14 /**
15 * 参数为 Model 类型的,作用和 Map 一样
16 */
17 @RequestMapping("/model.html")
18 public String model(Model model) {
19 model.addAttribute("id",123);
20 model.addAttribute("name","aaa");
21 return "/model.jsp";
22 }
测试页面:
1 name=${name}<br/>
2 id=${id}<br/>
运行结果:访问 map.html 或 model.html 的时候,页面上显示: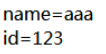 name=aaa id=123
1.2ModelAndView
ModelAndView 既包含数据模型,又包含视图信息
1 @RequestMapping("/modelandview.html")
2 public ModelAndView testModeAndView(){
3 ModelAndView modelAndView = new ModelAndView();
4 //将 Model 数据作为 request.attribute Foward 到下一个页面。
5 modelAndView.addObject("id",123);
6 modelAndView.addObject("name","abc");
7 modelAndView.setViewName("/model.jsp");//设置要返回的页面
8 return modelAndView;
9 }
1.3 @SessionAttributes
若希望在多个请求之间共用某个模型属性数据,则可以在控制器类上标注一个 @SessionAttributes,SpringMVC 将在模型中对应的属性暂存到 HttpSession 中。
@SessionAttributes 只能标注在类上。
@SessionAttributes 除了可以通过属性名指定需要放到会话中的属性外,还可以通过模型属性的对象类型指定哪些模型属性需要放到会话中.
– @SessionAttributes(types=Dept.class) 会将隐含模型中所有类型为 Dept.class 的属性添加到session 中。
– @SessionAttributes(value={“user”,”admin”})会将模型中名为 user 和 admin 的属性添加到session 中
– @SessionAttributes(types={Dept.class, Employee.class})会将模型中所有类型为 Dept 和Employee 的属性添加到 session 中
– @SessionAttributes(value={“user”,”admin”}, types={Dept.class})会将模型中名为 user和 admin和类型为 Dept 的对象放到 session 中。
在类上添加 @SessionAttributes 注解
1 @SessionAttributes(types = Dept.class, value = {"user", "admin"})
2 @Controller
3 public class ModelController {
测试方法:
 1 @RequestMapping("/session.html")
 2 public ModelAndView testSettion(Map<String, Object> map) {
 3 map.put("admin", "I am admin");
 4 map.put("user", "I am user");
 5 Dept dept = new Dept();
 6 dept.setName("session name");
 7 map.put("dept", dept);
 8 //@SessionAttributes 注解里没有声明 other 这个属性,所以不会在 session 中
 9 map.put("other", "I'm other");
10 return new ModelAndView("/model.jsp", "result", map);
11 }
测试页面:
 1 request 中的属性:<br/>
 2 admin:${requestScope.admin}<br/>
 3 user:${requestScope.user}<br/>
 4 dept.name:${requestScope.dept.name}<br/>
 5 other:${requestScope.other}<br/>
 6 session 中的属性:<br/>
 7 admin:${sessionScope.admin}<br/>
 8 user:${sessionScope.user}<br/>
 9 dept.name:${sessionScope.dept.name}<br/>
10 other:${sessionScope.other}<br/>
运行效果:
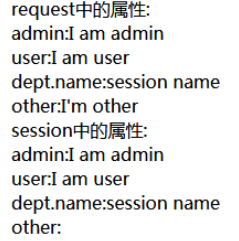
可以看到模型中的属性都放到了request的域中。@SessionAttributes中没有声明other,所以 session 中的 other 是空的。
1.4 @ModelAttribute
1.4.1 方法参数上使用@ ModelAttribute
在参数前使用@ModelAttribute,在进去方法时可以通过参数给对象赋值,如下面的代码,当请求/model1.html?id=1 的时候,会给 dept 的 id 属性赋值。在方法中可以对 dept 做进一步的处理。@ModelAttribute 可以自动将被注解的对象作为数据模型返回给页面。
1 @RequestMapping("/model1.html")
2 public String testModelAttribute(@ModelAttribute Dept dept) {
3 dept.setId(123);
4 dept.setName("test");
5 //使用@ModelAttribute 注解 dept
6 //相当于执行了 request.setAttribute("dept",dept);
7 //页面上可以直接取数据
8 return "/model.jsp";
9 }
测试页面 model.jsp,使用 EL 表达式取值 :
1 <body>
2 dept.id=${dept.id}<br/>
3 dept.name=${dept.name}
4 </body
运行结果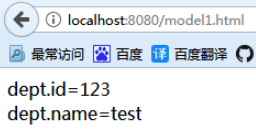
1.4.2 定义方法时使用@ ModelAttribute
在方法上使用@ModelAttribute 后,执行这个 Controller 的任意一个方法之前,都会调用这个方法给对象赋值。
 1 /**
 2 * 在方法上使用@ModelAttribute,调用这个 Controller 任意一个方法之前
 3 * 都会执行这个方法给模型赋值
 4 */
 5 @ModelAttribute("dept")
 6 public Dept getDept() {
 7 Dept dept = new Dept();
 8 dept.setId(456);
 9 dept.setName("name");
10 return dept;
11 }
12 /**
13 * 在调用这个方法前,会执行 getDept()
14 * 如果请求中有参数,会覆盖掉 getDept()的值
15 * dept 会作为数据模型返回到页面上
16 */
17 @RequestMapping("/model2.html")
18 public String testModelAttribute2(@ModelAttribute Dept dept) {
19 System. out .println(dept.getId());
20 System. out .println(dept.getName());
21 return "/model.jsp";
22 }
2. 视图和视图解析器
对于Controller的目标方法,无论其返回值是String、View、ModelMap或是ModelAndView,SpringMVC 都会在内部将它们封装为一个 ModelAndView 对象进行返回。
Spring MVC 借助视图解析器(ViewResolver)得到最终的视图对象(View),最终的视图可以是 JSP 也可是 Excell、 JFreeChart 等各种表现形式的视图。
View ---View 接口表示一个响应给用户的视图,例如 jsp 文件,pdf 文件,html 文件等。
视图的作用是渲染模型数据,将模型里的数据以某种形式呈现给客户。
为了实现视图模型和具体实现技术的解耦,Spring 在 org.springframework.web.servlet 包中定义了一个高度抽象的 View 接口。
视图对象由视图解析器负责实例化。由于视图是无状态的,所以他们不会有线程安全的问题。所谓视图是无状态的,是指对于每一个请求,都会创建一个 View 对象。
JSP 是最常见的视图技术。
2.1 ViewResolver
ViewResolver 的主要作用是把一个逻辑上的视图名称解析为一个真正的视图,SpringMVC
中用于把 View 对象呈现给客户端的是 View 对象本身,而 ViewResolver 只是把逻辑视图名称
解析为对象的 View 对象。
2.1.1 InternalResourceViewResolver
InternalResourceViewResolver 可以在视图名称前自动加前缀或后缀:
1 <!-- 配置视图解析器-->
2 <bean class="org.springframework.web.servlet.view.InternalResourceViewResolver">
3 <property name="prefix" value="/"></property><!--前缀-->
4 <property name="suffix" value=".jsp"></property><!--后缀-->
5 </bean>
如果配置了上面的解析器,Controller中返回字符串就不需要写/index.jsp了,直接返回“index”,就会按照/index.jsp 去解析
2.1.2 MappingJackson2JsonView
2.1.3 FreeMarkViewResolver
FreeMaker 后面会进行介绍,
FreeMarker 与 spring 整合需要导入 jar:
 1 <dependency>
 2 <groupId>org.freemarker</groupId>
 3 <artifactId>freemarker</artifactId>
 4 <version>2.3.23</version>
 5 </dependency>
 6 <dependency>
 7 <groupId>org.springframework</groupId>
 8 <artifactId>spring-context-support</artifactId>
 9 <version>4.3.11.RELEASE</version>
10 </dependency>
使用 FreeMarker 模板生成静态网页,需要在 springMVC-servlet.xml 中配置:
1 <bean id="freemarkerConfig"
2 class="org.springframework.web.servlet.view.freemarker.FreeMarkerConfigurer">
3 <!--模板存放路径-->
4 <property name="templateLoaderPath" value="/WEB-INF/ftl/" />
5 <property name="defaultEncoding" value="UTF-8" />
6 </bean>
在 WEB-INF/ftl 下创建模板文件 hello.ftl:
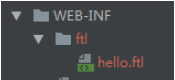
1 <html>
2 <head>
3 <title>Title</title>
4 </head>
5 <body>
6 <h1>${hello}</h1>
7 </body>
通过模板生成静态网页:
 1 @Controller
 2 public class  FreeMarkerController { {
 3 @Autowired
 4 private  FreeMarkerConfigurer  freeMarkerConfigurer;
 5 @RequestMapping( "/freemarker.html")
 6 @ResponseBody
 7 public  String genHtml() throws  Exception { {
 8 // 1 、从 g spring  容器中获得 r FreeMarkerConfigurer  对象。
 9 // 2 、从 r FreeMarkerConfigurer  对象中获得 n Configuration  对象。
10 Configuration  configuration  =  freeMarkerConfigurer.getConfiguration();
11 // 3 、使用 n Configuration  对象获得 e Template  对象。
12 Template  template  =  configuration.getTemplate( "hello.ftl");
13 // 4 、创建数据集
14 Map  dataModel  =  new HashMap <>();
15 dataModel. put( "hello",  "1000");
16 // 5 、创建输出文件的 r Writer  对象。
17 Writer  out  =  new FileWriter( new File( "F:/spring- - freemarker.html"));
18 // 6 、调用模板对象的 s process  方法,生成文件。
19 template.process( dataModel,  out);
20 // 7 、关闭流。
21 out. close();
22 return  "OK";
23 } }
24 } }
在 F 盘下就能看到 spring-freemark.html 文件了

以上是生成静态网页的配置。
如果想像读取 jsp 一样动态展示 freeMarker 的页面,可以配置视图解析器:
1 <bean id="viewResolverFtl"
2 class="org.springframework.web.servlet.view.freemarker.FreeMarkerViewResolver">
3 <property name="viewClass"
4 value="org.springframework.web.servlet.view.freemarker.FreeMarkerView"/>
5 <property name="contentType" value="text/html; charset=utf-8"/>
6 <property name="cache" value="true" />
7 <property name="suffix" value=".ftl" />
8 <property name="order" value="0"/>
9 </bean>
order 越小,视图解析器的优先级就越高。
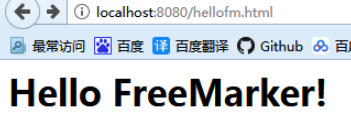
1 @RequestMapping( "/hellofm.html")
2 public  String sayHello( ModelMap  map) { {
3 // 传递属性到页面
4 map.addAttribute( "hello",  " Hello FreeMarker!");
5 return  "/hello"; // 去找  hello.ftl
6 } }
运行结果:
2.1.4 BeanNameViewResolver
引入 servlet 的 jar
1 <!--servlet 依赖 jar 包-->
2 <dependency>
3 <groupId>javax.servlet</groupId>
4 <artifactId>javax.servlet-api</artifactId>
5 <version>3.1.0</version>
6 </dependency>
自定义一个视图,然后声明成 bean,Controller 中返回这个 bean 的名字,就可以显示当前的视图:
 1 public class  HelloView  implements View { {
 2 public  String getContentType() { {
 3 return  "text/html";
 4 } }
 5 public void render(Map< < String,  ?>  model, HttpServletRequest  request,
 6 HttpServletResponse  response)  throws  Exception { {
 7 // 向相应中写入数据
 8 response. getWriter().print( "Welcome to  View:Hello");
 9 } }
10 } }
springMVC-servlet.xml 中配置:
1 <bean class="org.springframework.web.servlet.view.BeanNameViewResolver">
2 <property name="order" value="10" /><!--优先级靠后-->
3 </bean>
4 <bean id="helloView" class="view.HelloView"/>
Controller
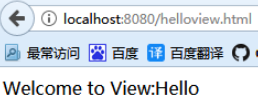
1 @RequestMapping( "helloview.html")
2 public  String hello() { {
3 // 因为当前没有  helloView.jsp
4 // 所以视图解析器依次执行,找到 w id=helloView  的视图并显示
5 return  "helloView";
6 }
运行结果:
2.2 自定义 View
处理 json 数据需要 json 的 jar 包
1 <!-- Jackson Json 处理工具包 -->
2 <dependency>
3 <groupId>com.fasterxml.jackson.core</groupId>
4 <artifactId>jackson-databind</artifactId>
5 <version>2.7.4</version>
6 </dependency>
 1 public class  JsonView  extends AbstractView { {
 2 /**
 3 *  该 w View  对应的输出类型
 4 */
 5 @Override
 6 public  String getContentType() { {
 7 return  "application/json; charset=UTF- - 8";
 8 } }
 9 // 向响应中写入数据
10 @Override
11 protected void renderMergedOutputModel(Map< < String,  Object >  model,
12 HttpServletRequest  request,HttpServletResponse  response)
13 throws  Exception { {
14 ObjectMapper  mapper  =  new ObjectMapper();
15 // 设置 e Date  类型的格式,默认是显示毫秒数
16 mapper.setDateFormat( new SimpleDateFormat( "yyyy- - MM- - dd HH:mm:ss"));
17 // 需要注意的是放入 l model  的对象一定要实现 e Serializable  接口才能转化成  json
18 String  jsonStr  =  mapper.writeValueAsString( model);
19 response. setContentType(getContentType());
20 response. setHeader( "Cache- - Control",  "no- - cache");
21 response. setCharacterEncoding( "UTF- - 8");
22 PrintWriter  out  =  null;
23 try { {
24 out  =  response. getWriter();
25 out.print( jsonStr);
26 out.flush();
27 }  catch ( IOException e e) { {
28 }  finally { {
29 if ( out  !=  null) { {
30 out.close();
31 out  =  null;
32 } }
33 } }
34 } }
35 } }
测试代码:
1 @RequestMapping( "myview.html")
2 public  ModelAndView myView() { {
3 Map< < String,  Object >  result  =  new HashMap <>();
4 result. put( "key1",  "123");
5 result. put( "key2",  new String[]{ { "a",  "b"} });
6 result. put( "key3",  new Date());
7 return new ModelAndView( new JsonView(),  result);
8 } }
如果是 map 中的值是其它对象类型的,传给 ModelAndView 的数据必须有一个 modelName
2.3 转发和重定向
1 public String showView2() {
2 //转发前面加 forward:
3 return "index.html";
4 }
5 @RequestMapping("/redirect.html")
6 public String showView3() {
7 //重定向前面加 redirect:
8 return "redirect:index.html";
9 }
3. @ReponseBody
该注解用于将 Controller 的方法返回的对象,通过适当的 HttpMessageConverter 转换为指定格式后,写入到 Response 对象的 body 数据区。使用时机:返回的数据不是 html 标签的页面,而是其他某种格式的数据时(如 json、xml 等)使用。
3.1 返回 json 数据
处理 json 数据需要 json 的 jar 包
1 <!-- Jackson Json 处理工具包 -->
2 <dependency>
3 <groupId>com.fasterxml.jackson.core</groupId>
4 <artifactId>jackson-databind</artifactId>
5 <version>2.7.4</version>
6 </dependency
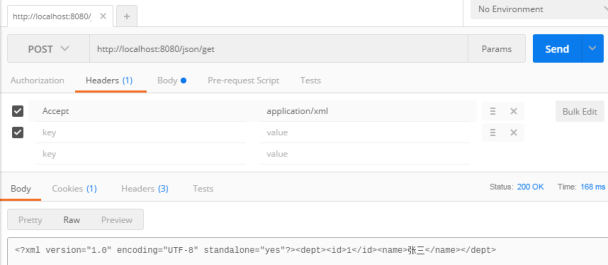
返回 json 类型的数据,需要在 spring 配置文件中加入如下配置:
 1 <!--配置返回值转换器-->
 2 <bean id="contentNegotiationManagerFactoryBean"
 3 class="org.springframework.web.accept.ContentNegotiationManagerFactoryBean">
 4 <!--是否支持后缀匹配-->
 5 <property name="favorPathExtension" value="true"/>
 6 <!--是否支持参数匹配-->
 7 <property name="favorParameter" value="true"/>
 8 <!--是否 accept-header 匹配-->
 9 <property name="ignoreAcceptHeader" value="false"/>
10 <property name="mediaTypes">
11 <map>
12 <!--表示.json 结尾的请求返回 json-->
13 <entry key="json" value="application/json"/>
14 <!--表示.xml 结尾的返回 xml-->
15 <entry key="xml" value="application/xml"/>
16 </map>
17 </property>
18 </bean>
测试 favorPathExtension 请求后缀分别是.xml 和.json
测试 favorParameter 请求中参数 format=json 和 format=xml
测试 ignoreAcceptHeader,请求的 Header 中 Accept=application/json 或 Accept=application/xml
如果要返回 Xml,需要将要转换为 xml 的实体类上添加注解,如:
1 @XmlRootElement
2 public class Dept {
在<mvc:annotation-driven/>标签中指定 content-negotation-manager
1 <mvc:annotation-driven
2 content-negotiation-manager="contentNegotiationManagerFactoryBean"/>
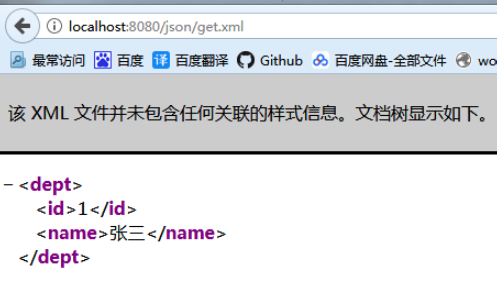
测试类:
 1 @Controller
 2 @RequestMapping("/json")
 3 public class JsonController {
 4 @RequestMapping("/get ")
 5 @ResponseBody//会自动将返回值转换成 json
 6 public Dept getJson() {
 7 Dept dept = new Dept();
 8 dept.setId(1);
 9 dept.setName("张三");
10 return dept;
11 }
12 }
测试结果:

3.2 实现 RESTFUL
 1 @RestController//相当于本类中所有的方法都加了@ResponseBody
 2 @RequestMapping("/rest")
 3 public class RestTestController {
 4 //通过 method 限制请求的方式
 5 @RequestMapping(value = "/{id}", method = RequestMethod. GET )
 6 public Dept getDept(@PathVariable Integer id) {
 7 //模拟从数据库中查出一条数据
 8 Dept dept = new Dept();
 9 dept.setId(id);
10 dept.setName("张三");
11 return dept;
12 }
13 @RequestMapping(method = RequestMethod. POST )
14 public Dept addDept(Dept dept) {
15 //模拟插入数据后生成主键
16 dept.setId(1);
17 System. out .println(dept.getName());
18 return dept;
19 }
20 @RequestMapping(method = RequestMethod. PUT , consumes = "application/json")
21 public Dept updateDept(@RequestBody Dept dept) {
22 System. out .println(dept.getName());
23 //执行修改的业务略
24 dept.setName("修改");//模拟修改名字
25 return dept;
26 }
27 @RequestMapping(value = "/{id}", method = RequestMethod. DELETE )
28 public String deleteDept(@PathVariable Integer id) {
29 //执行删除的业务略
30 System. out .println(id);
31 return "删除成功";
32 }
33 }
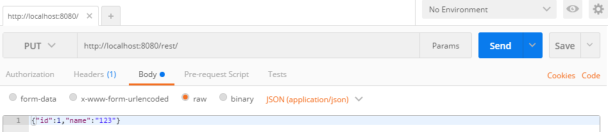
通过 postman 可以测试请求(ajax 方式无法测试 PUT 和 DELETE)。测试 put 的时候,请求的 body 设置为 raw,Headers 的 ContentType=application/json,否则会报 415:
注意类名上方的@RestController,相当于在类中每个方法上都添加了@ReponseBody。deleteDept 方法返回了一句 String 类型的提示信息,默认的 String 类型的返回值,编码是ISO-8859-1,中文会乱码,解决方案是在配置文件中修改编码:
修改<mvc:annotation-driven>节点,添加<mvc:message-converters>
1 <mvc:annotation-driven
2 content-negotiation-manager="contentNegotiationManagerFactoryBean">
3 <!--String 返回值默认编码是 ISO-8859-1,需要-->
4 <mvc:message-converters>
5 <bean class="org.springframework.http.converter.StringHttpMessageConverter">
6 <constructor-arg value="UTF-8" />
7 </bean>
8 </mvc:message-converters>
9 </mvc:annotation-driven>
4 HttpEntity
HttpEntity 和@RequestBody 和@ResponseBody 类似,除了可以得到 request 和 response的 body 以外,还可以操作 header。
 1 @RequestMapping("/entity.html")
 2 public ResponseEntity<Dept> getEntity(RequestEntity<Dept> requestEntity) {
 3 //获取请求头
 4 String requestHeader = requestEntity.getHeaders().getFirst("MyRequestHeader");
 5 System. out .println(requestHeader);
 6 Dept dept = new Dept();
 7 dept.setId(1);
 8 dept.setName("张三");
 9 HttpHeaders responseHeaders = new HttpHeaders();//创建响应头
10 responseHeaders.set("MyResponseHeader", "MyValue");//自定义响应头
11 //响应对象
12 ResponseEntity<Dept> responseEntity =
13 new ResponseEntity<>(dept, responseHeaders, HttpStatus. OK );
14 return responseEntity;
15 }
测试的页面:
 1 <input type="button" onclick=" testEntity ()" value="测试 HttpEntity"/>
 2 <script type="text/javascript">
 3 function  testEntity (){
 4 $.ajax({
 5 type: "POST",
 6 url: "/json/entity.html",
 7 headers:{"MyRequestHeader":"abc"},
 8 success: function(data, status, xhr){//xhr 可以看到响应的头
 9 alert(data.id);
10 alert(status);
11 alert("Header="+xhr.getResponseHeader("MyResponseHeader"));
12 },
13 error: function(data, status, xhr){
14 alert(data.id);
15 alert(status);
16 alert("Header="+xhr.getResponseHeader("MyResponseHeader"));
17 }
18 });
19 }
20 </script>
本博客文章均已测试验证,欢迎评论、交流、点赞。
部分文章来源于网络,如有侵权请联系删除。
转载请注明原文链接:https://www.cnblogs.com/sueyyyy/p/9623586.html

 浙公网安备 33010602011771号