Spring03-AOP
一. AOP介绍
1. Aop介绍
AOP(Aspect Oriented Programming),即面向切面编程,可以说是OOP(Object Oriented Programming,面向对象编程)的补充和完善。OOP引入封装、继承、多态等概念来建立一种对象层次结构,用于模拟公共行为的一个集合。不过OOP允许开发者定义纵向的关系,但并不适合定义横向的关系,例如日志功能。日志代码往往横向地散布在所有对象层次中,而与它对应的对象的核心功能毫无关系对于其他类型的代码,如安全性、异常处理和透明的持续性也都是如此,这种散布在各处的无关的代码被称为横切(cross cutting),在OOP设计中,它导致了大量代码的重复,而不利于各个模块的重用。
AOP技术恰恰相反,它利用一种称为"横切"的技术,剖解开封装的对象内部,并将那些影响了多个类的公共行为封装到一个可重用模块,并将其命名为"Aspect",即切面。所谓"切面",简单说就是那些与业务无关,却为业务模块所共同调用的逻辑或责任封装起来,便于减少系统的重复代码,降低模块之间的耦合度,并有利于未来的可操作性和可维护性。
使用"横切"技术,AOP把软件系统分为两个部分:核心关注点和横切关注点。业务处理的主要流程是核心关注点,与之关系不大的部分是横切关注点。横切关注点的一个特点是,他们经常发生在核心关注点的多处,而各处基本相似,比如权限认证、日志、事物。AOP的作用在于分离系统中的各种关注点,将核心关注点和横切关注点分离开来。
-
连接点(Joinpoint):
特定点是程序执行的某一个特定位置,如类开始初始化前,类初始化后,类某一个方法调用前/调用后,方法抛出异常后,一个类或一段程序代码拥有一些具有边界性质的特定点,这写代码中的特定点就称为"连接点",Spring仅支持方法连接点,即仅能在方法调用前,方法调用后,方法抛出异常时,以及方法调用前后这些程序执行点织入增强.
-
切点(Pointcut)
每个程序类都拥有对个连接点,如一个拥有两个方法的类,这两个方法都是连接点,即连接点是程序类中客观存在的事物,但在众多连接点中,如何定位某些感兴趣的连接点呢?AOP通过"切点"定位特定的连接点.
-
增强(Advice)
增强是织入目标类连接点上的一段程序代码,在Spring中,增强不仅可以描述程序代码,还拥有另一个和连接点相关的信息,这便是执行点的方位,结合执行点的方位信息和切点信息,就可以找到特定的连接,正因为增强既包含了用于添加到目标连接点上的一段执行逻辑,又包含用于定位连接点的方位信息,所以Spring所提供的增强接口都是带方位名的.如BeforeAdvice,AfterReturningAdvice,ThrowsAdvice等.BeforeAdvice表示方法调用前的位置.而AfterReturningAdivce表示访问返回后的位置,所以只有结合切点和增强,才能确定特定的连接点并实施增强逻辑.
-
目标对象(Target)
增强逻辑的织入目标类.如果没有AOP,那么目标业务类需要自己实现所有逻辑,如果使用AOP可以把一些非逻辑性代码通过AOP织入到主程序代码上.
-
引介(Introduction)
引介是一种特殊的增强,它为类添加一些属性和方法.这样,即使一个业务类原本没有实现某一个接口,通过AOP的引介功能,也可以动态地为该业务类添加接口的实现逻辑.让业务类成为这个接口的实现类.
-
织入(Weaving)
织入是将增强添加到目标类具体链接点上的过程,AOP就像一台织布机,将目标类,增强,或者引介天衣无缝的编织到一起,我们不能不说"织入"这个词太精辟了,根据不同的实现技术,AOP有3种织入方式:
-
编译期织入,这要求使用特殊的Java编译器.
-
类装载期织入,这要求使用特殊的类装载器.
-
动态代理织入,在运行期为目标类添加增强生成子类的方式.
Spring采用动态代理织入,而AspectJ采用编译期织入和类装载器织入.
-
-
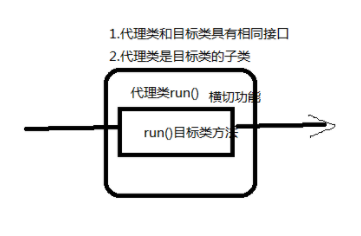
代理(Proxy)
一个类被AOP织入增强后,就产生了一个结果类.它是融合了原类和增强逻辑的代理类,根据不同的代理方式,代理类既可能是和原类具有相同接口的类(JDK动态代理),也可能就是原类的子类(CGLIB动态代理),所以可以采用与调用原类相同的方法调用代理类.
-
切面(Aspect)
切面由切点和增强(介入)组成,它既包括横切逻辑的定义,也包括链接点的定义,也包括链接点的定义,Spring AOP就是负责实施切面的框架,它将切面所定义的横切所定义的横切逻辑织入切面所指定的链接点中.
AOP的工作重心在于如何将增强应用于目标对象的连接点中上,这里包含两项工作:
第一,如何通过切点和增强定位到链接点上;
第二,如何在增强中编写切面代码;
1 Spring的 AOP底层用到两种代理机制:
2 - JDK 的动态代理:针对实现了接口的类产生代理。
3 - CGlib 的动态代理:针对没有实现接口的类产生代理,应用的是底层的字节码增强的技术 生成当前类的子类对象
3.1 JDK动态代理实现
-
创建接口和对应实现类
1 public interface UserService {
2    void login();
3   void loginOut();
4 }
1 //实现类
2 public class UserServiceImpl implements  UserService {
3   public void login() {
4      System.out.println("login方法触发");
5   }
6   public void loginOut() {
7     System.out.println("loginOut方法触发");
8   }
9 }
2.创建动态代理类
 1 public class PerformHandler implements InvocationHandler {
 2     private  Object target; //目标对象
 3     public  PerformHandler(Object target){
 4         this.target = target;
 5     }
 6     public Object invoke(Object proxy, Method method, Object[] args) throws Throwable {
 7         //本方法中的其他输出输入增强
 8         System.out.println("方法触发了");
 9         //执行被代理类 原方法
10         Object invoke = method.invoke(target, args);
11         System.out.println("执行完毕了");
12         return invoke;
13     }
14 }
测试
 1  @Test
 2  public  void  test1(){
 3      //测试JDK动态代理技术
 4       UserService userService = new UserServiceImpl();
 5       PerformHandler performHandler = new PerformHandler(userService);
 6       userService = (UserService) Proxy.newProxyInstance(userService.getClass().getClassLoader(),
 7                 userService.getClass().getInterfaces(),
 8                 performHandler
 9         );
10       userService.login();
11
12     }
测试结果: 在调用接口方法的前后都会添加代理类的方法!
3.2 CGlib实现代理
第二个入参 interfaces就是需要代理实例实现的接口列表.
对于没有通过接口定义业务方法的类,如何动态创建代理实例呢? JDK动态代理技术显然已经黔驴技穷,CGLib作为一个替代者,填补了这一空缺.
GCLib采用底层的字节码技术,可以为一个类创建子类,在子类中采用方法拦截的技术拦截所有父类方法的调用并顺势织入横切逻辑.
1.创建创建CGLib代理器
 1 public class CglibProxy  implements MethodInterceptor{
 2     private Enhancer enhancer = new Enhancer();
 3     //设置被代理对象
 4     public  Object getProxy(Class clazz){
 5         enhancer.setSuperclass(clazz);
 6         enhancer.setCallback(this);
 7         return  enhancer.create();
 8     }
 9     public Object intercept(Object obj, Method method,
10                             Object[] objects,
11                             MethodProxy methodProxy) throws Throwable {
12         System.out.println("CGLig代理之前之前");
13         Object invoke = methodProxy.invokeSuper(obj,objects);
14         System.out.println("CGLig代理之前之后");
15         return invoke;
16     }
17 }
测试
1  @Test
2  public  void test2(){
3     //TODO CGlib实现
4     CglibProxy cglibProxy = new CglibProxy();
5     UserServiceImpl userService= (UserServiceImpl) cglibProxy.getProxy(UserServiceImpl.class);
6     userService.login();
7  }
二. Spring中AOP开发
1. Spring 中 AOP 基于xml开发
1.1 项目准备
导入jar包:
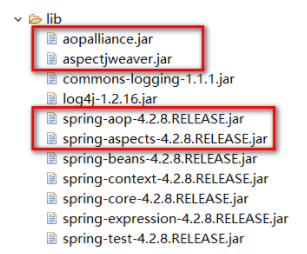
pom文件添加
 1 <dependency>
 2     <groupId>junit</groupId>
 3     <artifactId>junit</artifactId>
 4     <version>3.8.1</version>
 5     <scope>test</scope>
 6   </dependency>
 7   <dependency>
 8     <groupId>aopalliance</groupId>
 9     <artifactId>aopalliance</artifactId>
10     <version>1.0</version>
11   </dependency>
12   <!-- https://mvnrepository.com/artifact/org.aspectj/aspectjweaver -->
13   <dependency>
14     <groupId>org.aspectj</groupId>
15     <artifactId>aspectjweaver</artifactId>
16     <version>1.8.10</version>
17   </dependency>
18   <!-- https://mvnrepository.com/artifact/org.springframework/spring-aspects -->
19   <dependency>
20     <groupId>org.springframework</groupId>
21     <artifactId>spring-aspects</artifactId>
22     <version>4.3.7.RELEASE</version>
23   </dependency>
24   <dependency>
25     <groupId>org.springframework</groupId>
26     <artifactId>spring-aop</artifactId>
27     <version>4.3.10.RELEASE</version>
28   </dependency>
29   <dependency>
30     <groupId>org.springframework</groupId>
31     <artifactId>spring-context-support</artifactId>
32     <version>4.3.11.RELEASE</version>
33   </dependency>
34   <dependency>
35     <groupId>org.springframework</groupId>
36     <artifactId>spring-context</artifactId>
37     <version>4.3.10.RELEASE</version>
38   </dependency>
39   <dependency>
40     <groupId>org.springframework</groupId>
41     <artifactId>spring-core</artifactId>
42     <version>4.3.10.RELEASE</version>
43   </dependency>
44   <dependency>
45     <groupId>org.springframework</groupId>
46     <artifactId>spring-beans</artifactId>
47     <version>4.3.10.RELEASE</version>
48   </dependency>
49   <dependency>
50     <groupId>org.springframework</groupId>
51     <artifactId>spring-expression</artifactId>
52     <version>4.3.10.RELEASE</version>
53   </dependency>
54   <dependency>
55     <groupId>commons-logging</groupId>
56     <artifactId>commons-logging</artifactId>
57     <version>1.1.2</version>
58   </dependency>
59   <dependency>
60     <groupId>log4j</groupId>
61     <artifactId>log4j</artifactId>
62     <version>1.2.14</version>
63   </dependency>
64   <dependency>
65     <groupId>mysql</groupId>
66     <artifactId>mysql-connector-java</artifactId>
67     <version>5.1.38</version>
68   </dependency>
69   <!-- https://mvnrepository.com/artifact/commons-dbcp/commons-dbcp -->
70   <dependency>
71     <groupId>commons-dbcp</groupId>
72     <artifactId>commons-dbcp</artifactId>
73     <version>1.4</version>
74   </dependency>
75   <dependency>
76     <groupId>org.springframework.boot</groupId>
77     <artifactId>spring-boot</artifactId>
78     <version>1.5.7.RELEASE</version>
79   </dependency>
-
-
创建配置文件:
applicationContext-aop.xml -
创建测试代码:
AopTest.java
1.2 准备操作对象
先创建UserService接口:
1 public interface UserService {
2     void save();
3     void delete();
4     void update();
5     void select();
6 }
实现类
 1 public class UserServiceImpl implements  UserService {
 2     public void save() {
 3         System.out.println("保存用户");
 4     }
 5     public void delete() {
 6         System.out.println("删除用户");
 7     }
 8     public void update() {
 9         System.out.println("更新用户");
10     }
11     public void select() {
12         System.out.println("查找用户");
13     }
14 }
1.3 增强类
 1 public class MyAdivce {
 2     /**
 3      //前置通知:目标方法运行之前调用
 4      //后置通知(如果出现异常不会调用):在目标方法运行之后调用
 5      //环绕通知:在目标方法之前和之后都调用
 6      //异常拦截通知:如果出现异常,就会调用
 7      //后置通知(无论是否出现 异常都会调用):在目标方法运行之后调用
 8      */
 9      //前置通知
10      public  void before(){
11          System.out.println("这是前置通知");
12      }
13      //后置通知
14      public  void afterReturning(){
15          System.out.println("这是后置通知(方法不出现异常)");
16      }
17      public  Object around(ProceedingJoinPoint point) throws Throwable {
18          System.out.println("这是环绕通知之前部分!!");
19          Object object = point.proceed(); //调用目标方法
20          System.out.println("这是环绕通知之后的部分!!");
21          return  object;
22      }
23      public  void afterException(){
24          System.out.println("异常通知!");
25      }
26      public  void after(){
27          System.out.println("这也是后置通知,就算方法发生异常也会调用!");
28      }
29
30 }
1.4 将增强织入目标对象(xml)
在applicationContext-aop.xml 中配置
 1 <?xml version="1.0" encoding="UTF-8"?>
 2 <beans xmlns:xsi="http://www.w3.org/2001/XMLSchema-instance"       xmlns="http://www.springframework.org/schema/beans"       xmlns:context="http://www.springframework.org/schema/context"       xmlns:aop="http://www.springframework.org/schema/aop"       xsi:schemaLocation="http://www.springframework.org/schema/beans      http://www.springframework.org/schema/beans/spring-beans-4.2.xsd
 3        http://www.springframework.org/schema/context     http://www.springframework.org/schema/context/spring-context-4.2.xsd
 4        http://www.springframework.org/schema/aop
 5        http://www.springframework.org/schema/aop/spring-aop-4.2.xsd ">
 6     <bean name="userService" class="spring.service.UserServiceImpl" />
 7     <!--配置通知对象-->
 8     <bean name="myAdvice" class="spring.aop.MyAdivce" />
 9     <!-- 配置将增强织入目标对象-->
10     <aop:config>
11             <!--
12              spring.service.UserServiceImpl
13              1 2 3 4
14              1: 修饰符  public/private/*  可忽略
15              2: 返回值  String/../*
16              3: 全限定类名  类名  ..代表不限层数  *ServiceImpl
17              4: (..)
18             -->
19         <aop:pointcut id="pc" expression="execution(*
20         spring.service.*ServiceImpl.*
21         (..))"/>
22         <aop:aspect ref="myAdvice">
23                  <aop:before method="before" pointcut-ref="pc" />
24                  <aop:after-returning method="afterReturning" pointcut-ref="pc" />
25                  <aop:around method="around" pointcut-ref="pc" />
26                  <aop:after-throwing method="afterException" pointcut-ref="pc" />
27                  <aop:after method="after" pointcut-ref="pc" />
28         </aop:aspect>
29     </aop:config>
30 </beans>
测试:
1 @Test
2 public  void test1(){
3    //TODO 测试切面引入
4    ApplicationContext context = new ClassPathXmlApplicationContext("applicationContext-aop.xml");
5    UserService userServiceImpl = context.getBean("userService", UserService.class);
6    userServiceImpl.delete();
7 }
2. Spring中的AOP基于注解开发
Spring 在处理@Aspect注解表达式时,需要将Spring的asm模块添加到类路径中,asm是轻量级的字节码处理框架,因为Java的反射机制无法获取入参名,Spring利用asm处理@Aspect中所描述的方法入参名.
此外,Spring采用AspectJ提供的@Aspect注解类库及相应的解析类库,需要在pom.xml文件中添加aspectj.weaver和aspectj.tools类包的依赖.
2.1 创建配置文件
class-path路径下创建applicationContext-aop-annotation.xml
配置目标对象,配置通知对象,开启注解
 1 <?xml version="1.0" encoding="UTF-8"?>
 2 <beans xmlns:xsi="http://www.w3.org/2001/XMLSchema-instance"      xmlns="http://www.springframework.org/schema/beans"       xmlns:context="http://www.springframework.org/schema/context"      xmlns:aop="http://www.springframework.org/schema/aop"       xsi:schemaLocation="http://www.springframework.org/schema/beans       http://www.springframework.org/schema/beans/spring-beans-4.2.xsd
 3        http://www.springframework.org/schema/context      http://www.springframework.org/schema/context/spring-context-4.2.xsd
 4        http://www.springframework.org/schema/aop
 5        http://www.springframework.org/schema/aop/spring-aop-4.2.xsd ">
 6     <bean name="userService" class="spring.service.UserServiceImpl" />
 7     <!--配置通知对象-->
 8     <bean name="myAdvice" class="spring.aop.MyAdivce" />
 9     <!-- 配置将增强织入目标对象  使用注解的方式-->
10      <aop:aspectj-autoproxy></aop:aspectj-autoproxy>
11
12 </beans>
2.2 修改增强类MyAdvice
-
在类上添加
@Aspect注解 -
可以将
execution1 //后置通知 2 @AfterReturning("execution(* com..service.*ServiceImpl.*(..))") 3 public void afterReturning(){ 4 System.out.println("这是后置通知(如果出现异常不会调用)!!"); 5 }
1   @Pointcut("execution(* com..service.*ServiceImpl.*(..))")
2     public void pc(){}
3     //前置通知
4     //指定该方法是前置通知,并制定切入点
5     @Before("MyAdvice.pc()")
6     public void before(){
7         System.out.println("这是前置通知!!");
8     }
完整定义增强类
 1 @Aspect
 2 public class MyAdivce {
 3     /**
 4      //前置通知:目标方法运行之前调用
 5      //后置通知(如果出现异常不会调用):在目标方法运行之后调用
 6      //环绕通知:在目标方法之前和之后都调用
 7      //异常拦截通知:如果出现异常,就会调用
 8      //后置通知(无论是否出现 异常都会调用):在目标方法运行之后调用
 9      */
10     @Pointcut("execution(* spring.service.*ServiceImpl.*(..))")
11     public  void pc(){
12     }
13      //前置通知
14     @Before("MyAdivce.pc()")
15      public  void before(){
16          System.out.println("这是前置通知");
17      }
18      //后置通知
19      @AfterReturning("execution(* com..*ServiceImpl.*(..))")
20      public  void afterReturning(){
21          System.out.println("这是后置通知(方法不出现异常)");
22      }
23
24      public  Object around(ProceedingJoinPoint point) throws Throwable {
25          System.out.println("这是环绕通知之前部分!!");
26          Object object = point.proceed(); //调用目标方法
27          System.out.println("这是环绕通知之后的部分!!");
28          return  object;
29      }
30      public  void afterException(){
31          System.out.println("异常通知!");
32      }
33      public  void after(){
34          System.out.println("这也是后置通知,就算方法发生异常也会调用!");
35      }
36
37 }
本博客文章均已测试验证,欢迎评论、交流、点赞。
部分文章来源于网络,如有侵权请联系删除。
转载请注明原文链接:https://www.cnblogs.com/sueyyyy/p/9581896.html

 浙公网安备 33010602011771号