使用Docker+nginx部署Vue项目
准备前端文件目录
使用 npm run build 命令将vue项目打包,生成dist目录。

将文件夹放到服务器上,我们这里是放到了服务器的 /usr/local 目录下

编写构建脚本
1.在当前目录新建Dockfile文件
Dockerfile
# 指定基础镜像,必须为第一个命令
# 可以使用镜像ID或者镜像名称 例如 nginx:1.14
FROM bb52fc3d3709
# 维护者信息
MAINTAINER su
# 将本地文件添加到容器中
# 将dist文件中的内容复制到 /usr/local/nginx/html/ 这个目录下面,该路径是nginx容器生成的一个虚拟路径,你的项目会存在这里。
COPY dist/  /usr/local/nginx/html/
COPY nginx.conf /etc/nginx/nginx.conf
# 构建镜像时执行的命令
RUN echo 'echo init ok!!'
注:如果指定的基础镜像没有找到的话,会自动从仓库中pull对应的镜像。这里还有一种情况,如果是内网情况并且镜像仓库中没有所需要的镜像。可以在有这个镜像的服务器上先导出镜像,然后再复制到当前服务器进行导入即可。
# nginx.tar是导出tar包的文件名,
# nginx:1.14是仓库中的镜像名称,这里也可以直接使用镜像ID
# 导出镜像
docker save -o nginx.tar nginx:1.14

# 导入镜像,nginx.tar就是刚才导出的包
docker load -i nginx.tar
2.在当前目录新建nginx配置文件 nginx.conf (注:nginx代理目录就是刚才在Dockerfile文件中配置的虚拟目录 /usr/local/nginx/html/ )
nginx.conf
worker_processes auto;
#error_log  logs/error.log;
#error_log  logs/error.log  notice;
#error_log  logs/error.log  info;

#pid        logs/nginx.pid;

events {
    worker_connections  1024;
}

http {
    include       mime.types;
    default_type  application/octet-stream;

    #log_format  main  '$remote_addr - $remote_user [$time_local] "$request" '
    #                  '$status $body_bytes_sent "$http_referer" '
    #                  '"$http_user_agent" "$http_x_forwarded_for"';

    #access_log  logs/access.log  main;

    sendfile        on;
    #tcp_nopush     on;

    #keepalive_timeout  0;
    keepalive_timeout  65;

    #gzip  on;

    client_max_body_size   20m;
    server {
        listen       80;
        server_name  localhost;

        #charset koi8-r;

        #access_log  logs/host.access.log  main;
     location / {
        root   /usr/local/nginx/html;
        index  index.html index.htm;
        try_files $uri $uri/ /index.html;
        }
        #error_page  404              /404.html;

        # redirect server error pages to the static page /50x.html
        #
        error_page   500 502 503 504  /50x.html;
        location = /50x.html {
            root   html;
        }

        # proxy the PHP scripts to Apache listening on 127.0.0.1:80
        #
        #location ~ \.php$ {
        #    proxy_pass   http://127.0.0.1;
        #}

        # pass the PHP scripts to FastCGI server listening on 127.0.0.1:9000
        #
        #location ~ \.php$ {
        #    root           html;
        #    fastcgi_pass   127.0.0.1:9000;
        #    fastcgi_index  index.php;
        #    fastcgi_param  SCRIPT_FILENAME  /scripts$fastcgi_script_name;
        #    include        fastcgi_params;
        #}

        # deny access to .htaccess files, if Apache's document root
        # concurs with nginx's one
        #
        #location ~ /\.ht {
        #    deny  all;
        #}
    }

    # another virtual host using mix of IP-, name-, and port-based configuration
    #
    #server {
    #    listen       8000;
    #    listen       somename:8080;
    #    server_name  somename  alias  another.alias;

    #    location / {
    #        root   html;
    #        index  index.html index.htm;
    #    }
    #}

}
构建镜像
命令(注意最后的 . 不可省略)
docker build -t test-vue:V1.0.0 .
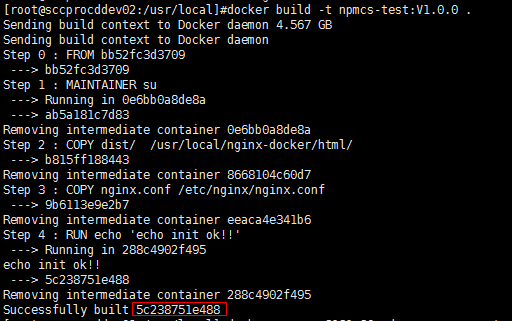
5c238751e488就是构建完成后生成的镜像ID
启动镜像
# run: 创建一个新的容器并运行一个命令
# -d: 后台运行容器,并返回容器ID
# -p: 端口映射,格式为:主机(宿主)端口:容器端口
# --name="npmcs-test": 为容器指定一个名称
docker run -p 8181:80 -d --name npmcs-test 5c238751e488
使用docker ps查看运行状态,可以发现已经成功启动该镜像。

测试
访问http://ip:8181进行测试
部署完毕后可以删除 /usr/local/dist 目录,不会影响镜像的运行。
EOF
本博客文章均已测试验证,欢迎评论、交流、点赞。
部分文章来源于网络,如有侵权请联系删除。
转载请注明原文链接:https://www.cnblogs.com/sueyyyy/p/13206798.html

 浙公网安备 33010602011771号